Table of Contents
- Beyond the Treat: Why Candy Crafts Are a Sweet Deal for Development
- Essential Ingredients for Sweet Success: Your Candy Crafting Toolkit
- A Treasury of Sweet Ideas: Our Top Candy Crafts for Kids
- Making Learning Delicious: Deeper Dive into STEM & Art with I'm the Chef Too!
- Tips for Sweet Success: Parental Guidance for Joyful Crafting
- Beyond the Home Kitchen: Candy Crafts for Groups & Classrooms
- The Sweet Conclusion
- FAQ: Your Sweetest Questions Answered
Do you ever find yourself searching for that magical activity – one that captures your child's imagination, keeps their hands busy, and offers a much-needed break from screens, all while being genuinely educational? It's a quest many parents and educators know well in our fast-paced world. While countless options exist, there’s one delightful realm that consistently delivers smiles, sparks creativity, and even offers a delicious reward: candy crafts for kids!
At I'm the Chef Too!, we wholeheartedly believe that learning should be an adventure, a joyous exploration that blends food, STEM, and the arts into unforgettable "edutainment" experiences. Candy crafts are a perfect embodiment of this philosophy. They're not just about assembling sugary treats; they're about igniting curiosity, fostering fine motor skills, introducing basic scientific principles, and encouraging artistic expression, all wrapped up in a package of hands-on fun.
In this comprehensive guide, we're going to dive deep into the wonderful world of candy crafting. We'll explore why these activities are so beneficial for your child's development, what tools you'll need to get started, and a treasure trove of creative, edible art projects to try at home or in a group setting. Our mission is to provide you with practical, valuable advice to make these moments of creation truly special, fostering a love for learning, building confidence, and creating joyful family memories. Get ready to transform ordinary sweets into extraordinary learning experiences, where every twist, stick, and sprinkle is a step towards discovery!
Beyond the Treat: Why Candy Crafts Are a Sweet Deal for Development
Candy crafts are far more than just a way to enjoy a sugary snack; they are a rich, multisensory platform for learning and development. We know that children learn best when they are actively engaged, and few activities offer the irresistible appeal and tangible results that crafting with candy does. Here’s why these sweet projects are a win for your child’s growth, echoing the core values we uphold at I'm the Chef Too!:
A Multisensory Learning Experience
Imagine the vibrant colors of jelly beans, the soft texture of marshmallows, the distinct smell of chocolate, and the exciting taste of a finished creation. Candy crafts engage sight, touch, smell, and taste simultaneously. This multisensory input stimulates different parts of the brain, enhancing cognitive development and making learning more memorable and enjoyable. Children aren't just seeing; they're experiencing, and that experiential learning is incredibly powerful.
Fostering Creativity and Imagination
With a pile of candies, the possibilities are truly endless! Children are encouraged to think outside the box, transforming simple ingredients into edible masterpieces. Whether they're designing a fantastical candy house, sculpting an alien creature from taffy, or inventing a new candy necklace pattern, their imagination takes center stage. This process of ideation and creation boosts self-expression and helps children develop their unique artistic voice. It’s about giving them the freedom to explore and invent, much like the open-ended discovery we encourage in all our kits.
Boosting Fine Motor Skills
The intricate work involved in candy crafts—picking up small candies, carefully placing sprinkles, threading gummy rings onto a string, or molding soft taffy—is a fantastic workout for tiny hands. These precise movements develop fine motor skills, hand-eye coordination, and dexterity. These are crucial skills for everything from writing and drawing to buttoning clothes and tying shoelaces. The focused attention required also helps build concentration and patience.
Introducing Core STEM Concepts
At I'm the Chef Too!, our unique blend of food and STEM is at the heart of what we do, and candy crafts are a perfect microcosm of this approach.
- Math in the Mix: Children naturally engage in mathematical thinking as they count candies, sort them by color or shape, create repeating patterns, and even estimate quantities. They might divide a larger candy into smaller pieces, introducing fractions in a tangible way.
- Sweet Science: Melting chocolate, dissolving hard candies in water, or observing how different types of sugar react to heat or moisture are all informal science experiments. Kids learn about states of matter, solubility, and simple chemical reactions through direct observation. For instance, creating an edible slime from taffy introduces them to changing material properties.
- Engineering Edible Structures: Building a candy house or a towering candy sculpture involves fundamental engineering principles. Children learn about stability, balance, structural integrity, and design as they figure out how to make their creations stand tall without toppling over. They problem-solve how to make walls stay up or how to support a roof, testing and refining their designs.
- Artful Creations: Beyond the technical aspects, candy crafts are inherently artistic. Children explore color theory as they choose harmonious or contrasting hues, experiment with texture (smooth chocolate next to bumpy sprinkles), and learn about composition and form as they arrange their edible components. Sculpting with taffy is a fantastic introduction to 3D art.
Problem-Solving and Critical Thinking
What happens if the icing isn't sticky enough? How can I make this gummy bear stand up? These are the kinds of questions children encounter during candy crafting. They learn to troubleshoot, adapt, and think critically to overcome challenges. This resilience and ability to find solutions are invaluable life skills that extend far beyond the kitchen.
Encouraging Patience and Focus
Many candy crafts require a sequence of steps, from preparing ingredients to assembling delicate pieces. This step-by-step process encourages patience and sustained focus, teaching children to see a project through to completion and appreciate the effort involved in creating something from scratch.
The Joy of Shared Experiences
One of the most beautiful aspects of candy crafts, and indeed all our activities at I'm the Chef Too!, is the opportunity for family bonding. Working together on a sweet project creates shared laughter, collaboration, and lasting memories. These moments of connection strengthen family ties and provide a positive environment for learning. It's about being present and enjoying the journey together.
A Screen-Free Alternative
In an increasingly digital world, finding engaging, hands-on, screen-free alternatives is a priority for many parents. Candy crafts offer a fantastic solution, pulling children away from devices and into a world of tangible creation. This aligns perfectly with our commitment at I'm the Chef Too! to provide enriching experiences that encourage direct engagement with the world around them.
Essential Ingredients for Sweet Success: Your Candy Crafting Toolkit
Before you embark on your delicious crafting journey, it’s helpful to gather your supplies. Think of this as preparing your creative culinary lab! Having everything ready not only makes the process smoother but also allows your little chefs to dive straight into the fun.
The Candies: A Rainbow of Possibilities
The star of the show! The key here is variety. Different candies offer different textures, shapes, and colors, opening up a world of creative possibilities.
- Soft & Chewy: Gummy bears, gummy worms, marshmallows (mini and regular), fruit snacks, licorice (ropes, wheels), soft taffy, caramels. These are great for sculpting, sticking, and threading.
- Hard & Crunchy: Jelly beans, M&Ms, Skittles, Lifesavers, candy beads, sprinkles (all shapes and sizes), small hard candies. Excellent for mosaics, decorating, and adding texture.
- Chocolatey Delights: Chocolate chips, chocolate melts (wafers), small chocolate candies. Perfect for melting, dipping, and adding a rich flavor.
- Structural Sweets: Pretzels (sticks and twists), wafer cookies, graham crackers, large flat cookies. These can form the base or framework for many projects.
When selecting candies, consider their role in the craft. Will they be threaded, melted, glued, or stacked?
Edible Adhesives: The Glue that Holds it All Together
You'll need something to bind your sweet creations!
- Royal Icing: The gold standard for candy construction, especially for candy houses. It dries hard and provides strong adhesion. You can easily make it with powdered sugar, egg whites (or meringue powder), and a touch of water.
- Melted Chocolate/Candy Melts: Excellent for "gluing" heavier candies, dipping, or creating edible "paint." White chocolate can be easily colored with food coloring for vibrant effects.
- Peanut Butter: A good option if allergies aren't a concern, especially for younger children, as it’s safe to eat and easy to spread.
- Corn Syrup/Honey: Use very sparingly as a sticky "glue." It can be quite messy but effective for light adhesion.
Basic Crafting Tools: Kitchen Essentials & More
- Work Surface Protection: Lay down parchment paper, wax paper, or silicone baking mats. These make cleanup a breeze and prevent candies from sticking to your table.
- Child-Safe Cutting Tools: Plastic knives, butter knives, or even clean blunt scissors can be used (with supervision) for cutting softer candies or licorice.
- Building & Manipulating Tools: Wooden skewers (for kabobs or internal supports – always with adult supervision), toothpicks (for smaller details), small rolling pins, clean hands!
- Mixing & Spreading: Small bowls for separating candies or melting chocolate, small spoons, spreading spatulas.
- Cookie Cutters: For shaping taffy or dough bases.
- Aprons: Essential for protecting clothes from sticky situations and adding to the "chef" experience!
Non-Edible Craft Supplies (Optional but helpful):
- Sturdy Base: Cardboard or thick cardstock for candy mosaics or as a base for houses.
- Threading Material: Stretchy string or elastic for candy necklaces (ensure it's safe and strong enough).
- Food-Safe Markers: For drawing designs on cookies before decorating.
Safety First: Our Top Priority
At I'm the Chef Too!, safety is paramount, especially when little hands are involved in the kitchen.
- Adult Supervision: Always supervise children during candy crafts, especially when using skewers, knives, or anything involving heat (like melting chocolate).
- Allergen Awareness: Be mindful of food allergies. Check candy labels carefully for common allergens like nuts, dairy, soy, and gluten. If crafting with a group, inquire about all allergies beforehand.
- Choking Hazards: For very young children (toddlers and preschoolers), avoid small, hard candies that can be choking hazards. Stick to larger, softer, and easily dissolvable options.
- Cleanliness: Always start with clean hands and a clean work surface.
- Moderation: While candy crafts are fun, remember they involve sugary treats. Encourage tasting in moderation during and after the crafting process.
By having these ingredients and tools ready, you’re setting the stage for a delightful and safe candy crafting adventure!
A Treasury of Sweet Ideas: Our Top Candy Crafts for Kids
Now that we've covered the "why" and "what you need," let's get to the truly delicious part: the ideas! These candy crafts are designed to be engaging, educational, and undeniably fun, perfectly illustrating how we blend culinary creativity with STEM learning at I'm the Chef Too!.
1. Edible Masterpieces: Candy Mosaics and Paintings
- Concept: This craft allows children to unleash their inner artist by using small candies to create colorful pictures or designs on a flat, edible surface. It's a fantastic introduction to color, pattern, and composition.
-
How-To:
- Choose Your Canvas: A large, plain cookie (like a sugar cookie or shortbread), a graham cracker, or even a sturdy piece of cardstock (if you don't plan to eat it) makes an excellent base.
- Design Your Outline: Lightly draw a simple shape or picture onto your canvas with a food-safe marker, or just let creativity flow!
- Apply Edible Glue: Spread a thin layer of royal icing, melted chocolate, or even a bit of peanut butter (if no allergies) onto the area you plan to decorate.
- Arrange Your Candies: Use small candies like jelly beans, M&Ms, Skittles, sprinkles, and mini gumdrops. Encourage your child to experiment with colors and create patterns. A red border, a green center, yellow dots – the possibilities are endless!
- Learning Connections: This activity is rich in learning! Children practice color recognition, develop fine motor skills by carefully picking up and placing small candies, and explore basic design principles. They also learn about patience as they build their mosaic piece by piece.
- Advanced Twist: Melted Candy "Paintings": For a truly artistic endeavor, melt white chocolate or candy melts in various colors. Provide small brushes (new, clean ones dedicated to food) and let kids "paint" designs directly onto cookies or rice crispy treats. They can swirl colors, create abstract art, or paint themed pictures.
- Seamless Integration: This is where kids can unleash their inner artist, much like the creative freedom found in our diverse collection of one-time kits that encourages individual expression. Every child's unique vision shines!
2. Sweet Structures: Building Candy Houses, Towers, and More
- Concept: Who says building with blocks is just for toys? This activity takes architectural design to a delicious new level, teaching kids about stability and structure with edible materials.
-
How-To:
- The Foundation: Graham crackers are the go-to for candy houses, but you could also use gingerbread cookies or large flat wafers.
- The Mortar: Royal icing is your best friend here. It dries hard and strong, providing excellent adhesion. Melted chocolate can also work, but takes longer to set.
- Assemble the Structure: Help your child "glue" the graham cracker walls together with royal icing, allowing a few minutes for each section to set before adding the roof.
- Decorate! This is where the fun explodes! Use gummy strips as roof tiles, mini marshmallows for "snow," pretzel sticks for fences, candy canes for columns, and sprinkles for general sparkle. Rolled-out taffy can be shaped into doors and windows.
- Learning Connections: This craft is a fantastic introduction to engineering principles. Children learn about balance, stability, geometry (how shapes fit together), and spatial reasoning. They have to plan their design, understand how weight distribution works, and troubleshoot when parts don't hold—all essential STEM skills.
- Beyond Houses: Encourage kids to think bigger! Can they build a tall candy tower? A simple candy bridge? A log cabin using pretzel sticks and melted chocolate? The possibilities are as vast as their imagination.
- Seamless Integration: This activity perfectly embodies how we blend STEM and the arts at I'm the Chef Too!, transforming a fun build into a tangible lesson in structural integrity. Our kits aim to provide similar hands-on learning that feels like play!
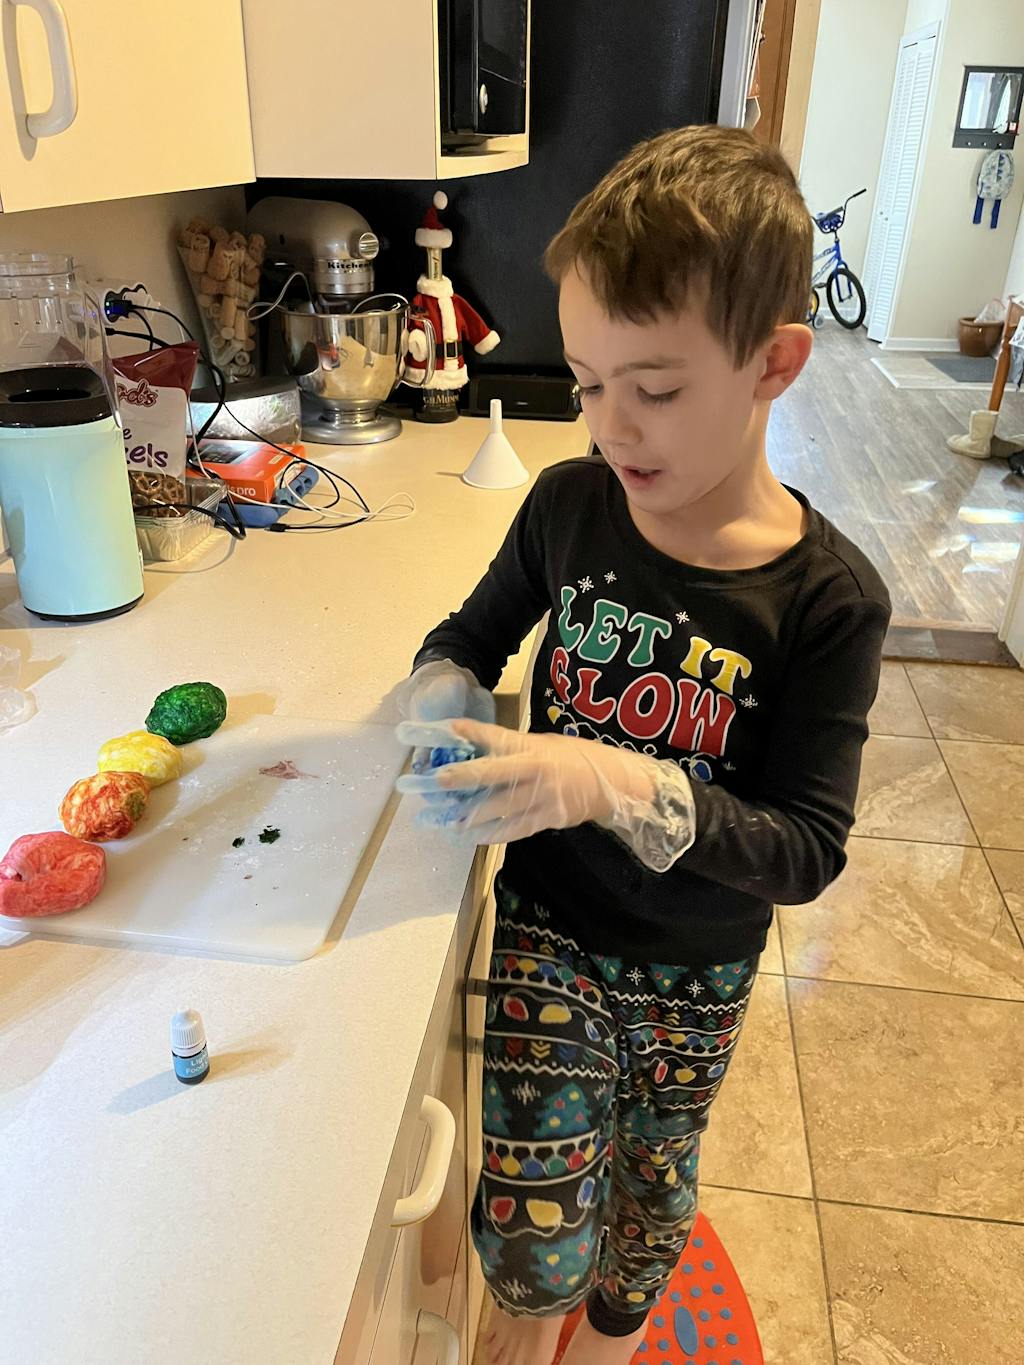
3. Wiggly Wonders: Taffy Twists, Sculptures, and Edible Playdough
- Concept: Taffy is a truly magical candy for crafting due to its incredible malleability. This section focuses on using its soft, pliable texture for sensory play, sculpting, and fine motor development.
-
How-To:
- Warm the Taffy: Unwrap various colorful taffy pieces. Have kids warm them slightly in their hands for a minute or two to make them easier to mold.
- Twist & Sculpt: Encourage them to twist, roll, flatten, and shape the taffy into anything they can imagine – animals, flowers, abstract shapes, letters, or even small bowls. They can combine different colors for marbled effects.
- Edible Playdough: For a fun sensory experience, slightly melt taffy in a microwave-safe bowl (10-15 seconds). Then, slowly mix in cornstarch or powdered sugar until it reaches a dough-like, non-sticky consistency. Add a few drops of food coloring for vibrant hues. This edible playdough can be stretched, squished, and molded just like traditional playdough, offering a safe, delicious alternative for sensory play.
- Learning Connections: This tactile activity is excellent for developing fine motor control, strengthening hand muscles, and fostering 3D visualization. Children also learn about the properties of materials – how taffy changes consistency with warmth and how adding dry ingredients alters its texture. It’s pure sensory delight combined with creative expression.
- Seamless Integration: This hands-on, tactile exploration is exactly what we champion at I'm the Chef Too!, where even beloved characters can make learning fun, like when kids make Peppa Pig Muddy Puddle Cookie Pies and engage in edible sculpting and creative design.
4. Wearable Delights: Candy Necklaces, Bracelets, and Rings
- Concept: A timeless classic, creating edible jewelry is a simple yet engaging activity that appeals to children of all ages. It combines fashion with fun and a tasty reward!
-
How-To:
- Gather Materials: You'll need stretchy elastic string (ensure it's strong enough not to break easily) and a variety of candies with holes. Think Lifesavers, gummy rings, candy beads, or even O-shaped cereals.
- Thread Away: Cut the string to the desired length. Let your child thread the candies onto the string, encouraging them to create patterns (e.g., red, blue, green, red, blue, green) or sort by color.
- Tie Securely: An adult should tie the ends of the string securely to form a necklace or bracelet.
- Learning Connections: This seemingly simple craft is a powerhouse for developing fine motor skills and hand-eye coordination. It also introduces basic math concepts like counting, sorting, and pattern recognition. Children learn sequencing and develop patience as they complete their wearable art.
- Seamless Integration: This classic activity perfectly exemplifies the kind of fun, skill-building activities we aim to deliver, making every moment an opportunity for growth and joy. Imagine the excitement of creating and wearing your own sweet accessories!
5. Skewered Sweetness: Candy Kabobs
- Concept: Easy to make and visually stunning, candy kabobs are fantastic for parties, gifts, or just a colorful afternoon snack. They’re all about aesthetic arrangement and delicious variety.
-
How-To:
- Choose Your Candies: Select an assortment of soft candies that can be easily pierced by a skewer. Gummies (worms, bears, rings), marshmallows, fruit snacks, and soft taffy cubes work wonderfully.
- Skewer Safety: An adult should supervise the use of wooden skewers. For younger children, consider using plastic skewers or even sturdy lollipop sticks.
- Assemble: Encourage your child to carefully slide the candies onto the skewer, alternating colors, shapes, and textures for visual appeal. They can create rainbow patterns, themed arrangements, or simply a delicious mix!
- Learning Connections: This craft enhances fine motor skills and hand-eye coordination. It also encourages creative expression through visual design and patterning. Children learn sequencing and the satisfaction of building something appealing.
6. Sweet Science Experiments: Candy Edition
- Concept: Candy isn't just for eating or crafting; it's also a fantastic medium for exploring basic scientific principles right in your kitchen!
-
How-To:
- Dissolving Candies: Place various hard candies (like M&Ms, Skittles, or Lifesavers) in different liquids (water, oil, vinegar) and observe which dissolve fastest or produce interesting color effects. Discuss solubility and chemical reactions.
- Candy Chromatography: Place an M&M or Skittle on a damp coffee filter and watch as the colors separate and spread, demonstrating how different dyes travel at different rates.
- Erupting Candies: While not a candy per se, the principles of chemical reactions are thrilling! Combine baking soda with vinegar for a fizzy reaction. You can even create an edible volcano around a small cup and watch it bubble over, much like the exciting eruptions in our kits.
- Learning Connections: These experiments introduce children to the scientific method – observation, hypothesis, experimentation, and drawing conclusions. They learn about chemical reactions (acids and bases), solubility, and the properties of different substances in a fun, tangible way.
- Seamless Integration: Witnessing a fizzing chemical reaction that makes our Erupting Volcano Cakes bubble over with deliciousness teaches young scientists about acids and bases, making abstract concepts concrete and exciting! At I'm the Chef Too!, we turn everyday ingredients into exciting scientific discoveries.
7. Themed Edible Art: Connecting Candy to Interests
- Concept: What better way to engage a child than by connecting crafts to their favorite interests? Themed candy crafts make learning relevant and incredibly exciting.
-
How-To:
- Dinosaur Digs: Create "fossil digs" by layering crushed chocolate cookies (dirt) with chocolate pudding and embedding white chocolate candy bones (available in novelty candy stores or molded from melted white chocolate). Kids can excavate their edible fossils with spoons!
-
Galaxy Creations: Using round cookies or donut holes as planets, decorate them with blue and purple icing, then add edible glitter and small candy stars to create an entire edible solar system.
- Example: Explore astronomy by creating your own edible solar system with our Galaxy Donut Kit, where candies become glittering stars and planets, making learning about the cosmos a truly sweet experience.
- Under the Sea: Make blue jello cups (the ocean) and add gummy fish, candy "coral" (licorice pieces), and graham cracker "sand" at the bottom.
- Holiday & Seasonal Fun: The possibilities are endless! Candy corn mosaics for Halloween, candy cane decorations for Christmas, heart-shaped candy boxes for Valentine's Day, or edible leprechaun traps for St. Patrick's Day.
- Learning Connections: This approach integrates existing knowledge and passions, making learning feel more natural and exciting. Children might research dinosaur facts or planet names before beginning their craft, expanding their vocabulary and general knowledge.
- Seamless Integration: This approach mirrors our dedication at I'm the Chef Too! to sparking curiosity by connecting learning to themes children already love, making education feel like an adventure. Ready for a new adventure every month that delivers these rich learning experiences right to your door? Join The Chef's Club and enjoy free shipping on every box, bringing a world of "edutainment" to your family!
Making Learning Delicious: Deeper Dive into STEM & Art with I'm the Chef Too!
At I'm the Chef Too!, our mission is simple: to make learning so fun, children don't even realize they're doing it! Candy crafts are a fantastic example of our "edutainment" philosophy in action, seamlessly blending cooking, STEM, and the arts into one-of-a-kind experiences. Every activity, whether it's building a candy house or experimenting with dissolving colors, offers a wealth of developmental benefits that align with our core values.
Our Unique "Edutainment" Blend
We believe that the most effective learning happens when children are fully immersed and excited. Candy crafts embody this principle perfectly. From the moment they choose their candies, they're engaging their artistic eye. As they plan their design, they're thinking like engineers. When they observe changes in texture or appearance, they're acting as scientists. And all of this happens while they're having a blast in the kitchen, a space we champion as a dynamic learning environment.
From Concept to Creation: A Holistic Learning Journey
Consider the journey of creating a candy mosaic. It starts with an idea (art). Then, they plan which colors and shapes to use (math and art). They carefully place each candy, developing fine motor skills. They might discover that some candies stick better than others, leading to a small experiment in adhesion (science). This holistic approach to learning, where different disciplines naturally intertwine, is fundamental to how we design our kits at I'm the Chef Too!. It’s about more than just a single lesson; it’s about a comprehensive experience.
Real-World Connections: Chemistry in the Kitchen
The kitchen is a natural laboratory. When children melt chocolate, they’re observing a change in the state of matter. When they make royal icing, they're seeing how different ingredients combine to create a new substance with unique properties. These tangible experiences provide a foundational understanding of chemistry and physics that goes beyond textbooks, making abstract concepts concrete and relatable. They're not just recipes; they're experiments waiting to happen.
The Power of Tangible Learning
In an age dominated by digital screens, the value of hands-on, tangible learning cannot be overstated. When children can touch, feel, smell, and taste what they're learning, it creates deeper neural pathways, leading to better understanding and retention. Candy crafts provide that essential tactile interaction, transforming passive consumption into active creation. It's about getting messy, exploring textures, and truly understanding materials.
Developed by Experts for Your Child
Our entire approach, from the philosophy behind encouraging candy crafts to the carefully curated activities in our kits, is developed by mothers and educators. We understand child development, the nuances of engaging different age groups, and the importance of fostering a love for learning in a supportive and fun environment. This expertise ensures that our "edutainment" experiences are not only fun but also genuinely enriching and developmentally appropriate.
A New Adventure, Every Month!
Imagine bringing this consistent blend of discovery, creativity, and deliciousness right to your doorstep, month after month. If you're looking for an effortless way to bring these incredible experiences into your home without all the planning, our monthly "Chef's Club" subscription is perfect! Each box is a complete experience, containing pre-measured dry ingredients and specialty supplies. It's the ultimate convenience for busy families and a fantastic way to ensure a steady stream of screen-free, educational fun. Join The Chef's Club today and let the continuous adventure begin!
Tips for Sweet Success: Parental Guidance for Joyful Crafting
Embarking on candy crafts with children promises a bounty of fun, but a little preparation and a relaxed mindset can turn a good activity into a truly joyful and memorable experience. Here are some tips from our I'm the Chef Too! playbook to ensure your sweet crafting adventures are successful for everyone involved.
Embrace the Mess (and Prepare for It!)
Let’s be honest: crafting with candy can get sticky! Acknowledge this upfront and embrace it. Lay down newspaper, old tablecloths, or use silicone mats. Have wet wipes, paper towels, and a damp cloth ready for quick cleanups. Focus on the joy of creation, not on pristine cleanliness. A little mess is a sign of great fun and deep engagement!
Focus on the Process, Not Perfection
The goal of candy crafts is not to produce a professional-grade confectionery masterpiece. It's about the journey: the experimentation, the laughter, the learning, and the shared experience. Encourage effort and creativity over a flawless final product. Celebrate their unique designs, even if they don't look exactly like the picture in a book or online. This fosters confidence and a positive attitude towards creative exploration.
Let Them Lead (with Guidance)
Offer choices and ask open-ended questions: "Which colors do you want to use?" "How do you think we can make this part stand up?" Allow children to make decisions about their creations, even if it means their candy house has a gummy bear chimney and a licorice door. Provide gentle guidance and assistance when needed, but empower them to be the chief architects of their edible art.
Age-Appropriate Adaptations
Tailor the complexity of the craft to your child's developmental stage.
- Toddlers/Preschoolers: Focus on large, easy-to-handle candies. Simple threading onto thick string, sensory play with edible playdough, and basic sticking/pasting are perfect. Emphasize verbal instruction and close supervision.
- Elementary Age (5-10): They can handle more complex patterns, basic structures, and simple science experiments. Introduce child-safe scissors for cutting soft candies and encourage more independent problem-solving.
- Tweens (11+): Challenge them with more intricate designs, multi-step projects, and advanced scientific concepts. They might enjoy researching new techniques or designing a themed candy creation from scratch.
Mindful Consumption
While the immediate reward of eating their creation is part of the fun, it's also an opportunity to teach mindful consumption. Emphasize that the craft itself is the primary activity. You can decide together to enjoy a small portion now and save the rest for later, or share it with family and friends. This also reinforces the idea of sharing and gratitude.
Documentation and Display
Celebrate your child's efforts! Take photos of their finished (or in-progress!) creations. If the craft isn't immediately eaten, find a safe spot to display it for a little while. This validates their hard work and boosts their self-esteem.
Continuous Learning, Delivered to Your Door
If you're looking for an effortless way to bring these incredible experiences into your home without all the planning, our monthly "Chef's Club" subscription is perfect! Each box is a complete experience, containing pre-measured dry ingredients and specialty supplies. Our flexible 3, 6, and 12-month pre-paid plans are perfect for gifting or long-term enrichment, ensuring a steady stream of exciting, screen-free learning. Join The Chef's Club and start your delicious journey today!
Beyond the Home Kitchen: Candy Crafts for Groups & Classrooms
The magic of candy crafts isn't limited to just your kitchen table. These activities are incredibly versatile and can be scaled up to engage larger groups of children, making them ideal for a variety of educational and social settings. At I'm the Chef Too!, we recognize the power of shared learning, and candy crafts are a brilliant way to bring hands-on "edutainment" to many!
Perfect for Parties
Looking for a unique birthday party activity that doubles as a party favor? Candy crafting is your answer! Set up a candy mosaic station, a kabob assembly line, or a mini candy house building competition. Children get to be creative, have fun, and then take home their delicious creation. It's engaging, memorable, and interactive, ensuring everyone has a sweet time.
Educational Settings: Bringing STEM to Life
Candy crafts are a fantastic tool for educators and group leaders to reinforce learning in a fun, tangible way.
- Classrooms: Teachers can use candy crafts to illustrate scientific concepts (like chemical reactions with edible slime or dissolving candies), mathematical principles (patterns, counting, geometry in structures), or artistic design. Group projects foster teamwork and communication skills.
- Homeschool Co-ops: For homeschooling families, these activities offer a wonderful way to add a hands-on, multidisciplinary element to the curriculum. A "candy science day" or an "edible art studio" can make learning about various subjects truly exciting.
- Camps: Whether it's a summer camp, a holiday camp, or an after-school program, candy crafts provide a fantastic activity that keeps kids active, engaged, and learning during breaks from traditional lessons. They can be themed to align with the camp's overall focus, like a "space camp" creating galaxy donuts.
Benefits of Group Activities
When children engage in candy crafts together, they naturally develop a host of social and emotional skills:
- Teamwork and Collaboration: Sharing supplies, discussing designs, and helping each other out.
- Communication: Expressing ideas, asking for help, and explaining their creations.
- Sharing and Taking Turns: Essential for group harmony, especially when limited resources (like a specific color of candy) are involved.
- Patience and Empathy: Learning to wait their turn and understanding that others might have different ideas.
Logistics for Groups: Planning for Success
To make group candy crafting smooth and enjoyable:
- Pre-portion Ingredients: To avoid arguments and make setup easy, pre-portion candies and edible glue into individual cups or small bags for each child or small group.
- Clear Instructions: Have step-by-step visual aids or a clear demonstration. For older children, written instructions can also be provided.
- Multiple Adult Helpers: More hands make light work, especially with younger children or more complex crafts.
- Dedicated Workstations: Set up individual or small-group workstations with protective coverings to minimize mess.
Seamless Integration: Bring our hands-on STEM adventures to your classroom, camp, or homeschool co-op. Learn more about our versatile programs for schools and groups, available with or without food components, to make learning truly unforgettable for a whole group of children. We pride ourselves on offering flexible, educational solutions that spark curiosity in every child, no matter the setting. For a taste of the fun, or to supplement a larger group activity, you can also browse our complete collection of one-time kits and find the perfect theme for your little learners, ensuring every child can experience the joy of "edutainment."
The Sweet Conclusion
As we've explored, candy crafts for kids are far more than just a momentary sugary diversion. They are a vibrant, multisensory avenue for children to express creativity, develop essential fine motor skills, engage with fundamental STEM concepts, and enjoy precious, screen-free bonding time with family and friends. From constructing edible buildings that teach engineering principles to crafting colorful mosaics that spark artistic vision, every candy-coated project is an opportunity for discovery and delight.
At I'm the Chef Too!, we are passionately committed to our mission of blending food, STEM, and the arts into one-of-a-kind "edutainment" experiences. We believe in sparking curiosity and creativity in children, facilitating joyful family bonding, and providing tangible, hands-on alternatives to digital entertainment. Our unique approach, developed by mothers and educators, ensures that learning complex subjects is always fun, engaging, and utterly delicious. Candy crafts perfectly embody this philosophy, turning everyday ingredients into extraordinary learning adventures.
Don't let the planning stop the fun! Make these incredible learning experiences a regular part of your family's routine. Imagine the anticipation of a new themed adventure arriving at your door each month, complete with pre-measured dry ingredients and specialty supplies, ready to transform your kitchen into a learning lab. Give the gift of learning that lasts all year with a 3, 6, or 12-month subscription to our STEM cooking adventures. Join The Chef's Club and start your delicious journey of discovery and creativity today! Let's get cooking, crafting, and learning!
FAQ: Your Sweetest Questions Answered
Q: Are candy crafts really educational?
A: Absolutely! Beyond the fun, candy crafts are packed with educational value. They engage children in STEM principles (math through counting and patterning, science through observing melting and dissolving, engineering through building structures), artistic expression (color, design, sculpting), and crucial fine motor skill development (picking up, placing, molding). They also foster problem-solving, patience, and creativity.
Q: How do I manage the sugar intake during candy crafts?
A: This is a common and valid concern. The key is to emphasize the crafting process over the eating.
- Moderation: Set clear expectations beforehand about how much candy can be eaten during or after the activity.
- Small Portions: Use smaller quantities of candy for the craft itself.
- Alternative Rewards: Focus on the joy of creation as the primary reward, not just the consumption.
- Save for Later/Share: Encourage kids to save their creations to admire, or share them with family/friends, spreading the treat (and the sugar) out.
- Balance: Balance candy craft days with other healthy activities and meals.
Q: What if my child has allergies?
A: Always be vigilant about allergies.
- Read Labels: Carefully check all candy packaging for allergen information (nuts, dairy, gluten, soy, etc.).
- Substitutions: Be prepared to substitute candies or ingredients. For example, use allergy-friendly chocolate melts or use edible glue alternatives like sunbutter (if no nut allergies) or royal icing.
- Cross-Contamination: If crafting with multiple children, be mindful of cross-contamination by using separate bowls and tools.
- "Without Food" Options: For group settings with severe allergies, consider our School & Group Programs which offer "without food" components, focusing on the STEM and art elements with non-edible materials.
Q: How do I prevent a huge mess?
A: While some mess is inevitable (and part of the fun!), you can minimize it with a few strategies:
- Protect Your Surface: Lay down newspaper, a disposable tablecloth, parchment paper, or silicone baking mats.
- Aprons: Have children wear aprons or old clothes.
- Easy Access Clean-Up: Keep wet wipes, paper towels, and a damp cloth handy for sticky fingers and spills.
- Small Bowls: Portion candies into small, individual bowls to prevent large spills of mixed ingredients.
- Designated Area: Designate a specific "crafting zone" in your kitchen or play area.
Q: Are there age-appropriate candy crafts for toddlers?
A: Yes! For toddlers (1-3 years old), focus on very simple, supervised activities:
- Large, Soft Candies: Use big marshmallows, large gummy worms, or soft taffy.
- Simple Sticking: Spread a thin layer of peanut butter (if no allergies) or cream cheese on a graham cracker and let them stick large candies onto it.
- Edible Playdough: Supervised play with homemade edible taffy playdough.
- Thick Stringing: Use very thick string or pipe cleaners and large candies with big holes. Always supervise closely to prevent choking hazards.
Q: Can these crafts be stored or do we have to eat them right away?
A: It depends on the craft and the ingredients.
- Royal Icing Creations: Candy houses or mosaics made with royal icing can often be stored in a cool, dry place for a few days to a week. They may get stale, but the structure should hold.
- Melted Chocolate/Candy Melts: These generally hold up well and can be stored in an airtight container at room temperature (or fridge if it's warm) for a few days.
- Fresh/Soft Candies: Crafts primarily made with fresh fruit or very soft, moist candies might not last as long and are best consumed within a day or two.
- Airtight is Key: For any craft you plan to store, an airtight container will help maintain freshness and prevent candies from getting sticky or hard.
Q: What if my child just wants to eat the candy instead of craft with it?
A: This is a common challenge!
- Set Expectations: Before starting, clearly state that the candy is for crafting first, and eating is the reward afterward (in moderation).
- Separate Bowls: Give a small, designated "snack" portion of candy separate from the crafting candy.
- Engage Immediately: Start the crafting quickly so they get into the flow of building and creating.
- Verbal Reinforcement: Continuously encourage their crafting efforts and praise their designs. Remind them of the "big picture" of what they are trying to create.
- Distraction: If they're fixated on eating, try to redirect their attention to a specific part of the craft, or introduce a new color or shape.
- Choose Wisely: Sometimes choosing candies that are less appealing for direct eating (e.g., small hard candies for mosaics) can help!


")