Table of Contents
- Introduction
- What is a Volcano STEM Activity?
- The Science Behind the Eruption: A Deep Dive into Chemistry
- Building Your Own Volcano: More Than Just a Cone
- Making it Erupt: The Core Experience
- Beyond the Eruption: Advanced STEM Exploration
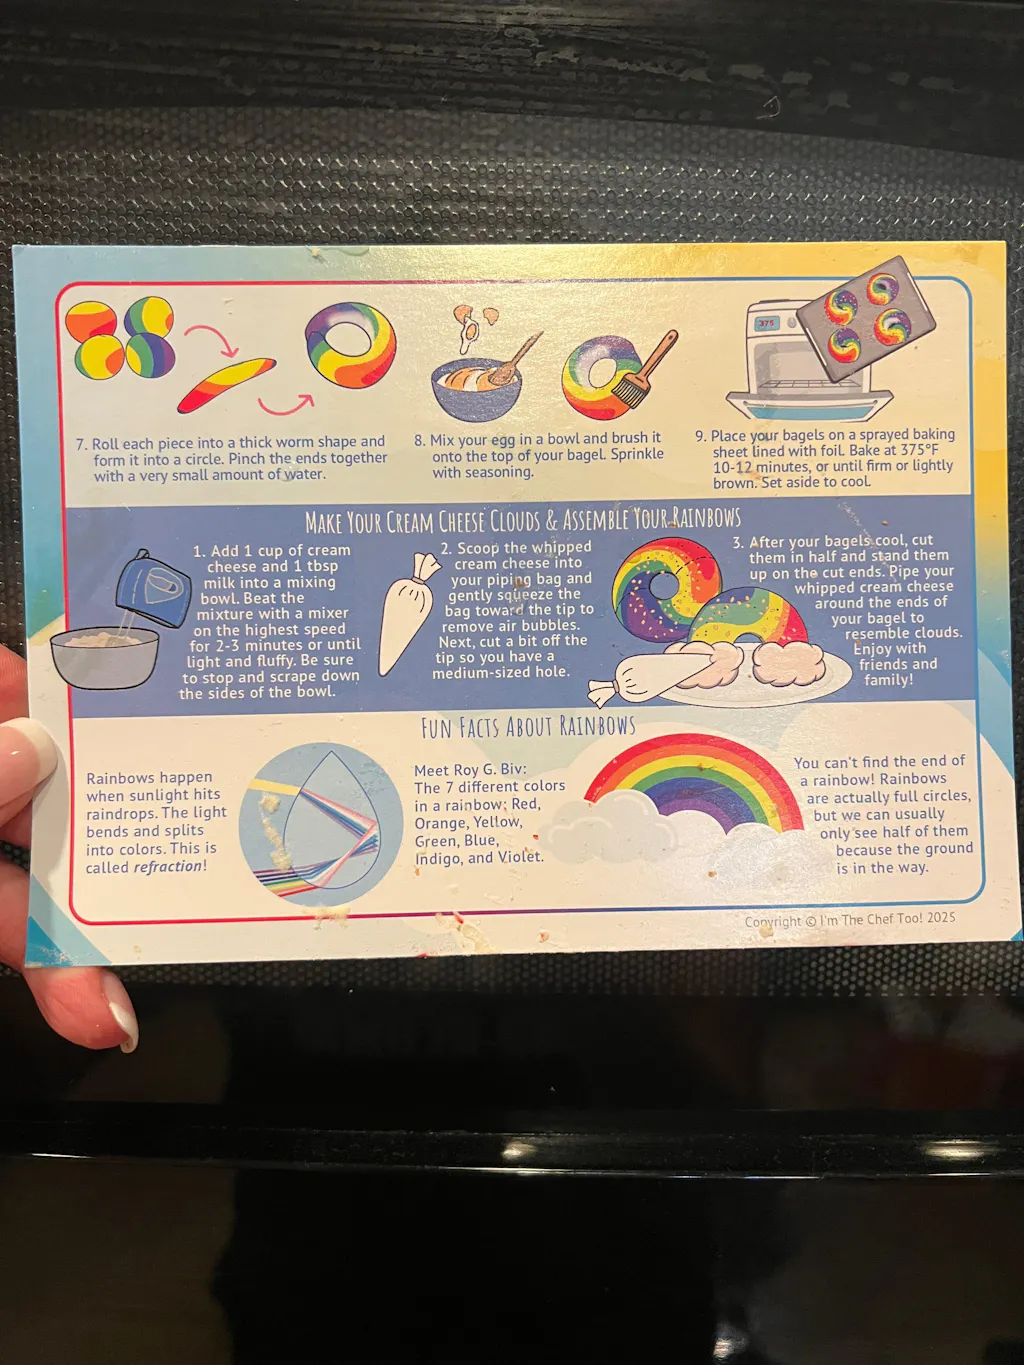
- Why Volcano STEM Activities Are So Powerful for Learning
- Integrating STEM with Culinary Fun
- Tips for a Successful Volcano STEM Activity
- Expanding the STEM Horizon with I'm the Chef Too!
- Conclusion
Picture this: your child's eyes widen with pure awe as a vibrant, foamy "lava" dramatically overflows from a homemade mountain, bubbling and hissing just like a real volcano. The air buzzes with excitement, not from a screen, but from a genuine, hands-on scientific spectacle they've brought to life themselves. This isn't just a messy play session; it's a dynamic, educational journey into the heart of geology, chemistry, and engineering, all wrapped up in one thrilling volcano STEM activity.
At I'm the Chef Too!, our core mission is to transform learning into an unforgettable adventure. We believe that the most profound lessons often happen when children are actively engaged, creating, and even tasting their way through complex concepts. That's why we blend food, STEM, and the arts into one-of-a-kind "edutainment" experiences designed to spark curiosity and creativity in children. This blog post will guide you through the exciting world of volcano STEM activities, explaining the science behind the eruption, offering various ways to build your own geological masterpiece, and highlighting how these engaging projects foster critical thinking, problem-solving, and a lifelong love for discovery. Get ready to ignite your child's inner scientist and make some incredible, screen-free memories together!
Introduction
Have you ever wondered what makes a volcano erupt? Or perhaps, how scientists study these powerful natural phenomena without getting too close? The answer often lies in understanding the core principles of science, technology, engineering, and mathematics – what we collectively call STEM. Far from being intimidating academic subjects, STEM concepts are all around us, waiting to be explored, especially through fun, interactive projects. A classic baking soda volcano isn't just a delightful kitchen experiment; it's a gateway to understanding real-world geological processes, chemical reactions, and even the art of scientific observation and mapping.
In this comprehensive guide, we're going to dive deep into the world of volcano STEM activities. We'll explore the fascinating chemistry that makes the "lava" flow, discuss various creative ways to construct your volcano, and look at how you can extend this simple activity into a rich, multidisciplinary learning experience. You’ll discover how building and erupting a homemade volcano can dramatically boost your child's scientific literacy, problem-solving skills, and creative expression. By the end, you'll be equipped with everything you need to host your own spectacular volcanic eruption at home, turning a simple afternoon into an exciting educational adventure that truly sparks a child's imagination.
What is a Volcano STEM Activity?
At its heart, a volcano STEM activity is a hands-on project that simulates a volcanic eruption using readily available materials, typically baking soda and vinegar. But it's so much more than just mixing two ingredients. It’s an immersive experience that touches upon all four pillars of STEM:
- Science (S): Children learn about chemical reactions (acid-base reactions, specifically), the production of gases (carbon dioxide), pressure, and the geological processes of volcanic eruptions. They observe cause and effect, forming hypotheses and drawing conclusions based on their experiments.
- Technology (T): While not high-tech, aspects like using tools for construction, measuring ingredients, and potentially using digital resources to research real volcanoes or even map out their "lava flows" introduce technological thinking. Understanding how instruments might be used to monitor real volcanoes can also be discussed.
- Engineering (E): Designing and building the volcano's structure, deciding on its size and shape, ensuring stability, and creating a "crater" that effectively channels the eruption all involve engineering principles. It's about problem-solving to achieve a desired outcome.
- Mathematics (M): Measuring ingredients precisely, understanding ratios (e.g., how much baking soda to vinegar), calculating volumes, and potentially mapping lava flows on a grid introduce mathematical concepts in a tangible way.
The beauty of a volcano STEM activity lies in its accessibility and versatility. It can be scaled for different age groups, from a simple, awe-inspiring eruption for preschoolers to a multi-layered geological study for older elementary students. It’s a fantastic way to introduce complex scientific ideas in a fun, non-intimidating manner, fostering a genuine love for learning through direct experience. It transforms abstract concepts into concrete, observable phenomena, making education engaging and memorable.
The Science Behind the Eruption: A Deep Dive into Chemistry
The spectacular eruption of a baking soda volcano is a fantastic demonstration of a chemical reaction. It's a classic for a reason – it’s visually dramatic and conceptually simple enough for kids to grasp the basics, yet deep enough to explore more complex chemical principles.
Let's break down the magic:
- Baking Soda (Sodium Bicarbonate): This common household ingredient is a chemical compound with the formula NaHCO₃. In chemistry terms, it’s a base.
- Vinegar (Acetic Acid): Vinegar is a dilute solution of acetic acid, with the chemical formula CH₃COOH. As its name suggests, it’s an acid.
When baking soda (a base) and vinegar (an acid) mix, they undergo a neutralization reaction. This isn't just a simple mix; it's a complete transformation of substances. The sodium bicarbonate and acetic acid react to form three new substances:
- Water (H₂O): A liquid, familiar to everyone.
- Sodium Acetate (CH₃COONa): This is a salt that remains dissolved in the water.
- Carbon Dioxide Gas (CO₂): This is the star of our show! It's the same gas that we breathe out, that plants use for photosynthesis, and that makes sodas fizzy.
The Role of Carbon Dioxide (CO₂):
As soon as the baking soda and vinegar combine, carbon dioxide gas is rapidly produced. This gas tries to escape, and because it's trapped within the confines of your volcano's "crater" (the cup or bottle inside), pressure starts to build up. Imagine blowing air into a balloon – as more air goes in, the pressure inside increases until the balloon expands or the air escapes. In our volcano, the gas needs an exit!
Why the Foam and "Lava" Flow?
- Pressure Release: When the pressure of the accumulating carbon dioxide gas becomes too great for the small opening of the volcano, it forces its way out, pushing the liquid mixture (water, sodium acetate, and any remaining unreacted baking soda/vinegar) upwards and outwards.
- Dish Soap's Role: Many volcano experiments suggest adding a few drops of dish soap. Why? Dish soap acts as a surfactant. Surfactants lower the surface tension of water, allowing the carbon dioxide bubbles to become trapped within the liquid, creating a thick, foamy "lava" instead of just tiny, quickly dissipating bubbles. This makes the eruption much more dramatic and visually appealing, mimicking the viscous flow of real lava.
- Food Coloring: Adding red or orange food coloring to the vinegar before the reaction simply gives the "lava" its iconic, fiery hue, making the visual experience even more exciting and realistic for children.
This seemingly simple reaction is a powerful introduction to fundamental chemical principles. Children observe a tangible example of a gas being produced from two liquids/solids, understand how pressure builds, and see the immediate results of a chemical change. It's an unforgettable lesson in cause and effect that transforms abstract concepts into concrete, bubbling reality. To experience this science firsthand with perfectly portioned ingredients and a complete, delicious adventure, consider joining The Chef's Club where new scientific and culinary discoveries arrive at your doorstep every month!
Building Your Own Volcano: More Than Just a Cone
The structure of your volcano is where the engineering and artistic elements truly shine. While the core chemical reaction remains the same, how you build the volcano's exterior can vary wildly, offering different learning opportunities and levels of complexity. Remember, adult supervision is always key, especially when dealing with cutting or hot water.
Simple Cup Volcano: Quick and Easy
This is the simplest and quickest way to set up your eruption, perfect for younger children or impromptu scientific exploration.
Materials:
- Paper cup or an old plastic party cup (like a Solo cup)
- A baking sheet or shallow tray (for containment and easy cleanup!)
- Baking soda
- Vinegar
- Red food coloring (optional)
- Liquid dish soap (optional, but highly recommended for foamy "lava")
- Spoon
Steps:
- Prepare the Crater: Place your paper or plastic cup in the center of a baking sheet or tray. This tray is crucial to catch all the "lava" and make cleanup a breeze.
- Add Ingredients: Spoon 1-2 tablespoons of baking soda into the cup.
- Pour in the Vinegar: In a separate small container, mix about ½ to 1 cup of vinegar with a few drops of red food coloring and a squirt of dish soap.
- Erupt! Slowly pour the vinegar mixture into the cup containing the baking soda. Stand back and watch the magnificent eruption!
This method is fantastic for demonstrating the immediate chemical reaction and for repeat eruptions. You can simply rinse the cup and repeat the process.
Dough-Based Volcano: Sculpting and Stability
This method allows for more creative sculpting and a more realistic volcano shape. You can use homemade play dough, store-bought modeling clay, or even a simple flour and salt dough.
Materials:
- Plastic bottle (e.g., small soda bottle, water bottle) or a small paper cup
- Large baking dish or a sturdy piece of cardboard as a base
- Dough (homemade flour/salt dough is great, or play dough)
- Flour/Salt Dough Recipe: 6 cups flour, 2 cups salt, 4 tablespoons cooking oil, ~2 cups warm water. Mix until smooth and firm. Add more water if needed.
- Baking soda, vinegar, red food coloring, dish soap (as above)
Steps:
- Secure the Core: Place the plastic bottle or small cup in the center of your baking dish or cardboard base. This will be the "vent" of your volcano.
- Sculpt the Mountain: Mold the dough around the bottle/cup to form a conical volcano shape. Ensure the opening of the bottle/cup remains clear and accessible at the top, forming the crater. Make sure the dough is firmly attached to the base for stability.
- Decorate (Optional): Once the basic shape is formed, children can add details like trees (twigs), rocks (small stones), or even tiny toy animals to create a mini-diorama around their volcano. This encourages artistic expression and imaginative play.
- Erupt! Add baking soda to the bottle/cup, then pour in your colored vinegar and dish soap mixture. The dough structure adds to the visual effect as the lava flows down its sides.
This method offers a deeper engagement with engineering principles as kids design and construct a stable structure around the eruption chamber. It also allows for more detailed landscape building, blending science with art.
Integrating a Cardboard Tube or Paper Mache: A Sturdier Structure
For a more robust and reusable volcano, incorporating a cardboard paper towel roll or even using paper mache can be excellent options.
Materials:
- Cardboard paper towel roll or a plastic bottle
- Paper plate or sturdy cardboard for the base
- Cardboard or heavy paper for the cone structure
- Tape, scissors, glue
- Optional: Paper mache materials (strips of newspaper, flour and water paste)
- Baking soda, vinegar, food coloring, dish soap
Steps (Cardboard Tube Method):
- Base and Core: Cut a hole in the center of a paper plate or cardboard base, just big enough for your paper towel roll or plastic bottle to fit snugly. Secure it with tape.
- Create the Cone: Cut a large circle from heavy paper or thin cardboard. Cut a slit from the edge to the center of the circle, then overlap the edges to form a cone. Adjust the cone's size so it fits over your base and covers the tube/bottle, leaving the top open for the crater. Tape or glue the cone together.
- Assemble: Place the cone over the tube/bottle and secure it to the base. Decorate as desired.
- Erupt! Proceed with the baking soda and vinegar as usual.
The paper mache method involves more drying time but results in a very durable, paintable volcano that can be used repeatedly.
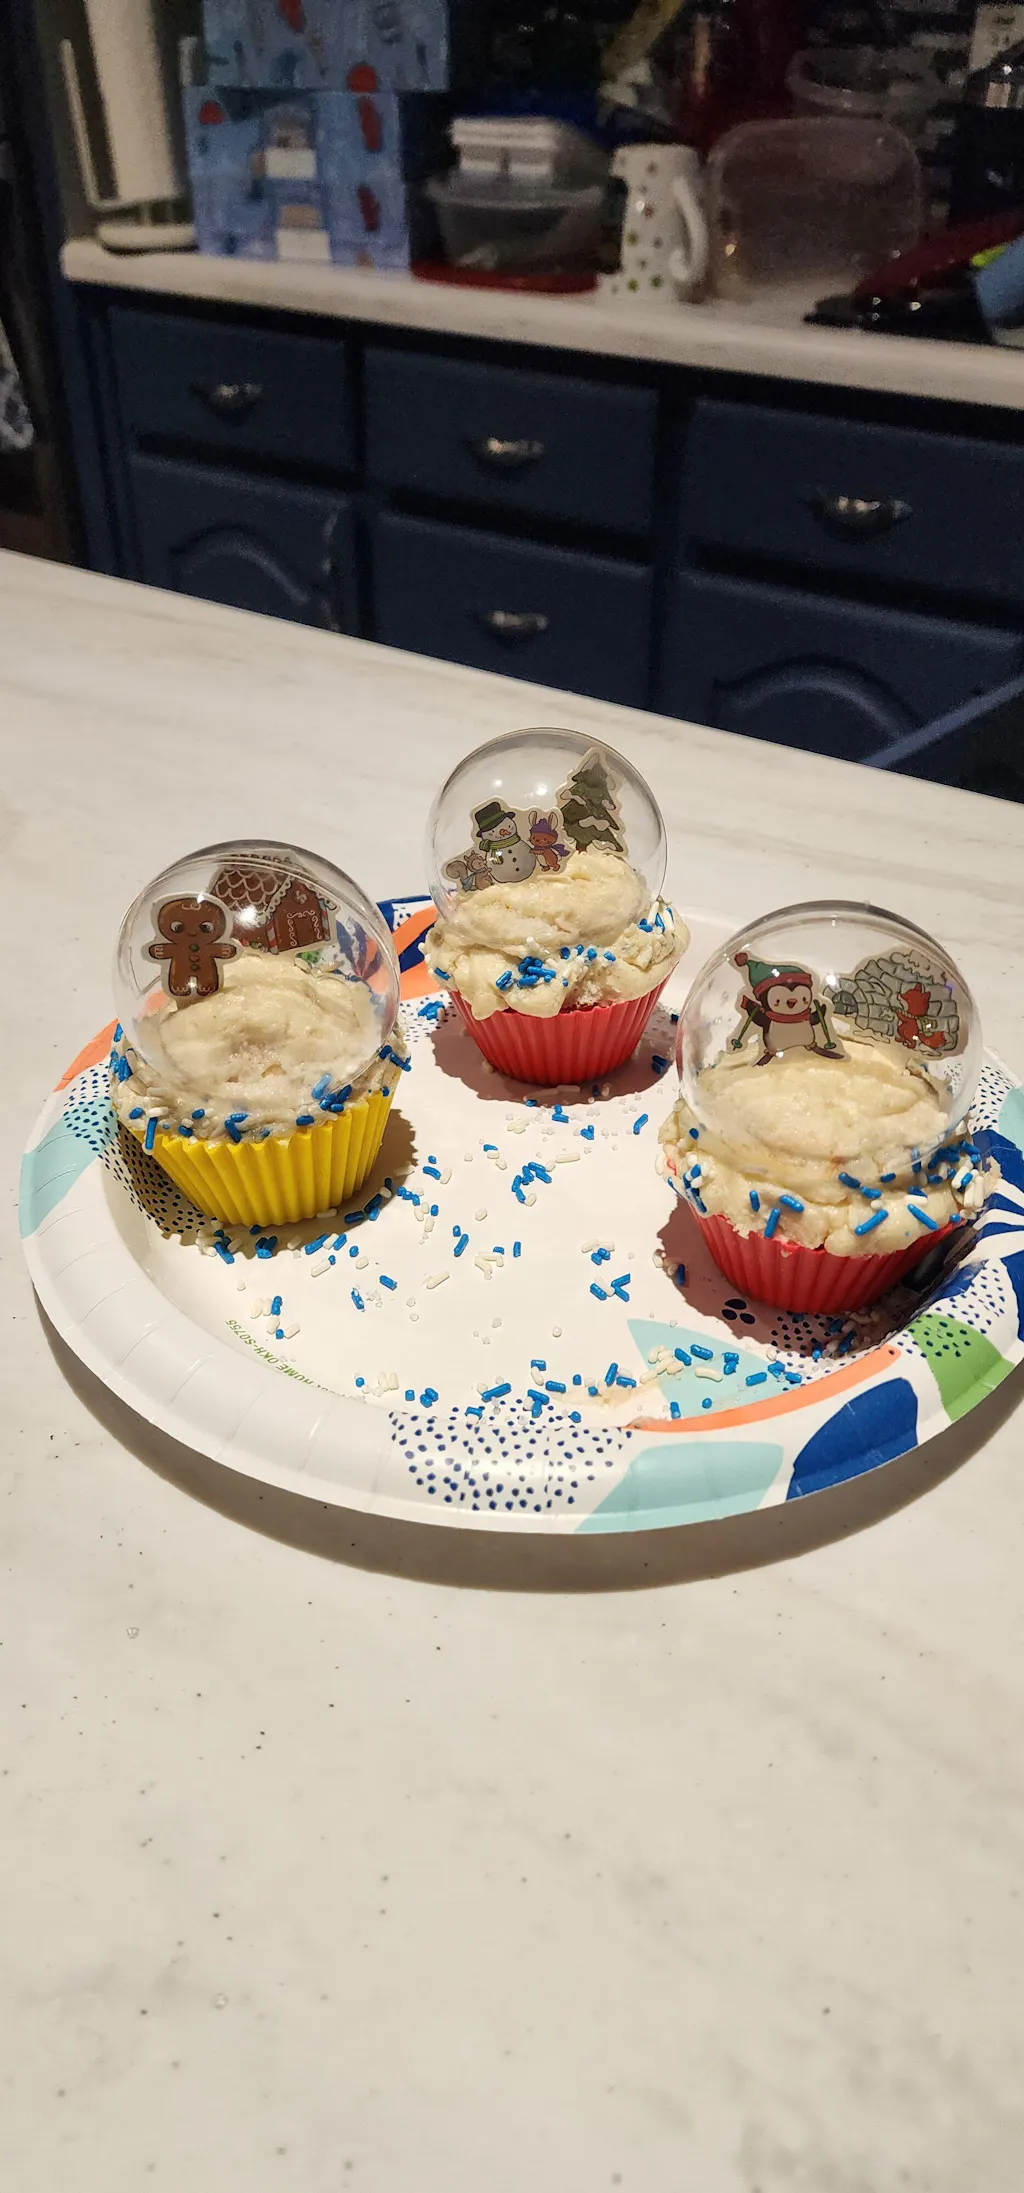
No matter which construction method you choose, the process of building is as valuable as the eruption itself. It's where children plan, problem-solve, and bring their ideas to life. For families looking for a complete, mess-free (mostly!) and curated experience, our Erupting Volcano Cakes Kit provides all the pre-measured dry ingredients and specialty supplies to make delicious, erupting cupcake volcanoes – combining science and baking in one incredibly fun adventure!
Making it Erupt: The Core Experience
The moment of eruption is the grand finale, the payoff for all the planning and building. It's a moment of pure wonder that can captivate children of all ages.
Basic Eruption Steps Refined:
Once your volcano structure is ready:
- Add the Baking Soda: Carefully spoon 1-2 tablespoons (or more, depending on the size of your volcano's internal chamber) of baking soda into the "crater" (the bottle or cup inside your volcano). For a bigger eruption, you can use more baking soda, but remember you’ll need more vinegar too!
-
Prepare the "Lava" Mixture: In a separate container (a measuring cup with a spout works well), mix your vinegar. For a standard tabletop volcano, half a cup to a full cup of vinegar is usually a good starting point. This is the time to add:
- Red Food Coloring: A generous squeeze of red or orange food coloring will give your lava that vibrant, fiery look.
- Liquid Dish Soap: A good squirt (about a tablespoon) of dish soap will create fantastic, long-lasting foam, making the eruption more dramatic and mimicking the viscous flow of real lava more closely.
- Optional Enhancements: For a multi-sensory experience, you could add a few drops of an essential oil like peppermint for a surprising scent, or even a bit of glitter for sparkling lava (though beware, glitter can be tricky to clean!).
- Initiate Eruption! With anticipation building, slowly but steadily pour the vinegar mixture into the volcano's crater. As the liquid reaches the baking soda, the reaction will begin almost immediately. Watch as the carbon dioxide gas builds pressure, pushing the foamy, colored "lava" up and over the rim of your volcano, cascading down its sides.
- Observe and Enjoy: Encourage children to observe what's happening. What do they see? What do they hear? (A gentle fizzing sound as the gas escapes). How does the lava flow? Is it fast or slow? Thick or thin?
- Repeat (Often)! The beauty of the baking soda volcano is its reusability. Once the eruption subsides, you can often add more baking soda and vinegar for another spectacular show. This allows for repeated experimentation and observation, reinforcing the learning without much setup time.
Enhancing the Sensory Experience:
- Sound: Point out the fizzing sound the gas makes as it escapes.
- Sight: Discuss the color and texture of the "lava." Does it remind them of anything?
- Touch (Carefully): You can talk about the coolness of the liquid, but always emphasize that real lava is incredibly hot and dangerous.
- Smell: While vinegar has a strong smell, you can discuss the lack of smell from the carbon dioxide gas itself.
Making the volcano erupt is the exciting peak of the activity, solidifying the scientific concepts in a memorable way. It’s a moment of pure joy and wonder that leaves a lasting impression, often sparking a desire to explore more about science and the world around us. And if you're looking for ongoing, convenient ways to bring these kinds of "aha!" moments to your home, consider joining The Chef's Club. Each month, we deliver a complete STEM cooking adventure right to your door, filled with pre-measured ingredients and all the specialty supplies needed for a new, engaging project.
Beyond the Eruption: Advanced STEM Exploration
While the initial eruption is thrilling, the true depth of a volcano STEM activity lies in expanding it beyond a one-off event. By incorporating additional steps, you can transform a simple experiment into a comprehensive geological study, introducing concepts like stratification, mapping, and scientific sampling. This is where you really outrank basic volcano experiments and delve into the complexities.
Geology and Layers: Creating a Stratified Volcano
Real volcanoes are formed by layers of lava, ash, and rock building up over many eruptions. You can simulate this process in your model volcano.
Materials (in addition to basic volcano supplies):
- Three or more different colors of play dough or soft clay
- Clear plastic drinking straws (standard straws cut into thirds or fourths)
- Graph paper or plain paper
- Colored pencils or crayons (ideally matching your play dough colors)
Steps for Layered Eruptions:
- First Eruption & Lava Flow: Conduct your first volcano eruption using baking soda, vinegar, and one color of play dough for the "lava."
- Trace the Flow: After the eruption, once the liquid has been dabbed up with a paper towel, use a colored pencil to trace the outer edge of where the "lava" flowed on your base.
- First Layer of Play Dough: Cover the area inside the traced line with a thin, even layer of the first color of play dough. This represents the first lava flow that solidified.
- Map It: On a separate piece of graph paper, draw a circle representing your volcano's base. Use the matching colored pencil to draw the shape of this first lava layer. Mark cardinal directions (North, South, East, West) on both your physical volcano base and your map to ensure consistent orientation.
- Subsequent Eruptions: Repeat steps 1-4. For each subsequent eruption, use a different color of play dough to represent the new lava flow, tracing its unique path and adding it to your physical model and your map. You can vary the amount of baking soda or vinegar to try and make the lava flow in different directions or distances, simulating geological variability.
Mapping the Flow: Integrating Geography and Math
Mapping the lava flows adds a significant geographical and mathematical dimension to your activity.
Key Learning:
- Spatial Reasoning: Understanding how things are arranged in space.
- Mapping Skills: Learning about scale, direction, and representing a 3D environment on a 2D surface.
- Data Recording: Documenting observations systematically.
Steps:
- Orient Your Volcano: As mentioned above, clearly mark North, South, East, and West on your volcano's base. Do the same on your graph paper map.
- Draw Layers Accurately: After each eruption and subsequent play dough layer, carefully draw the outline of that layer on your map using the corresponding color. Emphasize matching the orientation with the cardinal directions.
- Analyze Flow Patterns: Discuss with your child: Did the lava flow in the same direction each time? What might cause it to flow differently (e.g., uneven base, different amounts of liquid, slight tilt)?
- Predictive Mapping: Before an eruption, have your child predict where they think the lava might flow based on the volcano's shape and previous eruptions. Then compare their prediction to the actual outcome.
Engineering Challenges: Optimizing Your Volcano
Turn your volcano activity into an engineering design challenge.
Ideas for Experimentation:
- Crater Size: How does the size of the crater opening affect the eruption? A wider opening vs. a narrower one?
- Volcano Height: Does a taller or shorter volcano produce a more dramatic flow?
- Ingredient Ratios: Experiment with different ratios of baking soda to vinegar. Does more baking soda make a bigger eruption? What about less vinegar?
- Detergent Amount: How does more or less dish soap change the foaminess of the lava?
- Lava Viscosity: What happens if you make the vinegar thicker (e.g., by dissolving some sugar in it, though this might slightly alter the chemical reaction speed)? How does that compare to real lava's viscosity?
- Reinforcing the Structure: If your volcano's structure isn't stable, how can you improve its engineering to make it stronger or better contain the eruption?
Taking Core Samples: A Scientist's Perspective
This is a fantastic step to simulate how geologists and planetary scientists study the internal structure of layered geological formations.
Materials:
- Your multi-layered play dough volcano
- Clear plastic drinking straws (cut into thirds or fourths)
Steps:
- Blind Sampling (Optional but Fun!): If possible, have someone who didn't build the volcano (another family member or a friend) try to "sample" it. This simulates a real scientific expedition where the internal structure is initially unknown.
- Take a Core Sample: Choose a spot on the volcano. Gently push an open end of a straw straight down through the play dough layers until you reach the base. Twist the straw a little as you push to help cut through the layers.
- Extract and Observe: Carefully pull the straw straight out. Look through the clear straw – you should be able to see the different colored layers of play dough, just like a core sample reveals layers of rock or ice.
- Record Findings: On a new piece of graph paper, draw a circle and cardinal directions. Based only on the core samples taken (and you might take 3-4 from different spots on the volcano), try to predict and draw where each layer of "lava" began and ended on this new map. Use your colored pencils to match the observed layers.
- Compare and Learn: Once your prediction map is complete, compare it to the "known" map you created during the layering process (steps 2-6 above). Discuss: How accurate were your predictions? Why might they be different? What does this tell us about the importance of multiple samples or more advanced geological tools? This step truly brings the scientific method to life – observation, hypothesis, testing, and analysis.
These advanced explorations transform a simple volcano into a robust, multi-faceted STEM lesson. They encourage critical thinking, data analysis, and an appreciation for the scientific process, all while having an absolute blast. For families eager to explore these types of hands-on, educational activities regularly, we highly recommend our monthly Chef's Club subscription. It's the perfect way to receive new, exciting STEM cooking adventures delivered right to your door with free shipping in the US!
Why Volcano STEM Activities Are So Powerful for Learning
Beyond the captivating visual of a foamy eruption, engaging in a volcano STEM activity offers a wealth of developmental and educational benefits for children. At I'm the Chef Too!, we see these hands-on experiences as fundamental to fostering a love for learning and building essential life skills.
Fostering Curiosity and Critical Thinking
The "why" behind the eruption is often what sparks the most profound learning. When children see the lava flow, their immediate questions are "Why did that happen?" or "What made it do that?". This natural curiosity is the foundation of scientific inquiry. A volcano STEM activity provides a direct, observable answer, encouraging children to:
- Ask questions: "What if we add more vinegar?" "What if the hole was bigger?"
- Formulate hypotheses: "I think it will erupt bigger if we put more baking soda."
- Test ideas: Actually try their "what if" scenarios.
- Observe and analyze results: "It was bigger!" or "It wasn't as big as I thought."
This process is the core of critical thinking and scientific reasoning, building a mindset that values exploration and understanding.
Developing Problem-Solving Skills
Building the volcano itself presents numerous mini-challenges. How do you make the cone stand up? How do you ensure the bottle doesn't tip over? How do you get the lava to flow where you want it to?
- Design challenges: Deciding on the best materials and structure.
- Execution issues: Figuring out how to mold the dough or cut the paper correctly.
- Troubleshooting: If the first eruption isn't as expected, what can be adjusted for the next attempt?
Each of these steps requires children to identify a problem, brainstorm solutions, implement them, and evaluate their effectiveness. These are invaluable skills applicable across all areas of life, from academics to daily challenges.
Encouraging Creativity and Innovation
A volcano doesn't just have to be a brown cone! Children can express their creativity by:
- Decorating: Painting, adding toy dinosaurs, creating a surrounding landscape with trees and miniature figures.
- Varying materials: Using different types of dough, recycled containers, or even natural elements from the yard.
- Inventing scenarios: Imagining their volcano is on a distant planet (like with our Galaxy Donut Kit where kids explore astronomy by creating an edible solar system!), or part of an ancient civilization.
This artistic freedom intertwined with scientific principles demonstrates that STEM is not just about rigid rules but also about imaginative problem-solving and innovative thinking.
Promoting Family Bonding
In a world increasingly driven by individual screen time, hands-on activities like a volcano eruption offer a fantastic opportunity for meaningful family interaction.
- Collaborative effort: Parents and children work together, sharing tasks and responsibilities.
- Shared excitement: The thrill of the eruption is a shared joyful experience.
- Conversation starters: The activity naturally leads to discussions about science, the Earth, and creative ideas.
These shared experiences create lasting memories and strengthen family connections, fulfilling a core value of I'm the Chef Too! – facilitating family bonding through engaging activities.
Providing a Screen-Free Educational Alternative
One of the biggest challenges for parents today is finding engaging, educational activities that pull children away from digital devices. A volcano STEM activity is the perfect antidote. It’s inherently tactile, visual, and auditory, providing rich sensory input that screens simply cannot replicate. It encourages active participation, physical manipulation, and real-world observation, which are crucial for holistic child development.
By choosing activities like these, you're not just doing an experiment; you're nurturing a child's natural curiosity, building their confidence in their ability to understand complex concepts, and providing them with invaluable skills that extend far beyond the kitchen table. These are the transformative "edutainment" experiences that I'm the Chef Too! is dedicated to providing, helping children learn through tangible, hands-on, and often delicious cooking adventures. Ready to bring more of these engaging, screen-free moments into your home? Discover our wide array of adventure kits and find the perfect theme for your little learner by browsing our complete collection of one-time kits.
Integrating STEM with Culinary Fun
At I'm the Chef Too!, we believe learning should be as delightful as it is educational. That’s why we’ve taken the magic of STEM activities and blended it seamlessly with the joy of cooking. Imagine learning about chemical reactions not just by watching a fizz, but by creating an edible masterpiece that fizzes and erupts right before your eyes – and then you get to eat it!
Edible STEM: Learning You Can Taste
Our unique approach turns the kitchen into a vibrant laboratory where scientific principles come to life in delicious ways. For instance, while a traditional baking soda volcano is a fantastic demonstration, our Erupting Volcano Cakes Kit elevates this classic experiment. Kids learn about acid-base reactions and gas production as they mix and bake cupcakes that actually "erupt" with a delicious, edible lava!
This method offers several unique advantages:
- Increased Engagement: When food is involved, children's excitement levels soar. The promise of a tasty treat at the end provides a powerful incentive for engagement and completion.
- Multi-Sensory Learning: Cooking engages all five senses – sight, smell, touch, sound (mixing, bubbling), and of course, taste. This multi-sensory input can reinforce learning more effectively than single-sense activities.
- Practical Life Skills: Beyond STEM, cooking activities teach valuable life skills like measuring, following instructions, kitchen safety, and patience.
- Reduced Mess (for you!): Our kits come with pre-measured dry ingredients, minimizing kitchen chaos and making the experience more enjoyable for parents too.
It’s our unique approach to teaching complex subjects through tangible, hands-on, and delicious cooking adventures. Developed by mothers and educators, our kits are designed to be intuitive and fun, making learning feel like play.
The Chef's Club: Your Monthly STEM Adventure
If the idea of edible STEM explorations excites you, then we have the perfect solution for consistent, convenient learning fun. The Chef's Club is our monthly subscription box designed to bring new "edutainment" experiences right to your home.
Here's why so many families love being part of The Chef's Club:
- Convenience Delivered: A new, exciting adventure is delivered directly to your door every month with free shipping in the US. No more scrambling for obscure ingredients or lesson plans.
- Flexibility for Every Family: We offer flexible 3, 6, and 12-month pre-paid plans, perfect for gifting or for ensuring long-term enrichment and discovery for your child.
- Complete Experience in Every Box: Each Chef's Club box is a complete adventure. It contains pre-measured dry ingredients, specialty supplies, and easy-to-follow instructions, allowing you to dive right into the fun without extra trips to the grocery store.
- Diverse STEM Themes: While our Erupting Volcano Cakes Kit is a fantastic example, our monthly themes span a wide range of STEM topics – from chemistry to biology, engineering to astronomy – all integrated with delicious culinary creations. Imagine exploring astronomy by creating your own edible solar system with our Galaxy Donut Kit or diving into structural engineering with edible building blocks.
Joining The Chef's Club isn't just subscribing to a box; it's subscribing to a world of curiosity, creativity, and connection. It’s about making learning an anticipated, joyful part of your family's routine, proving that education can indeed be deliciously fun!
Tips for a Successful Volcano STEM Activity
To ensure your volcano STEM adventure is a roaring success, here are some practical tips that will help make the experience smooth, safe, and truly educational.
Safety First
Even with simple household ingredients, safety should always be the top priority, especially when working with children.
- Adult Supervision is Key: Never leave children unsupervised during the activity. An adult should always be present to guide, assist, and ensure safety.
- Eye Protection: While not strictly necessary for a standard baking soda and vinegar volcano, wearing safety goggles is a good habit to instill for any science experiment. It teaches children the importance of protecting their eyes in a lab-like setting.
- Ingestion Caution: While baking soda and vinegar are food-safe, the "lava" mixture is not intended for consumption, especially once mixed with dish soap or food coloring. Make sure children understand this clearly. For truly edible volcano fun, our Erupting Volcano Cakes Kit is designed specifically for safe and delicious consumption!
- Ventilation: The reaction produces carbon dioxide gas. While typically harmless in small, open environments, ensure good ventilation, especially if doing multiple eruptions indoors.
- Handling Chemicals: Teach children to handle ingredients carefully, avoiding direct contact with eyes or mouth, and to wash hands thoroughly after the activity.
Setting Up for Easy Cleanup
Volcano eruptions are fun, but they can be messy! Planning for cleanup beforehand makes the experience much more enjoyable for everyone.
- Choose the Right Location: Outdoors is ideal – a patio, driveway, or even a grassy area. If indoors, choose a tiled floor or a room where spills are easy to wipe up.
- Use a Large Tray or Pan: As mentioned earlier, placing your volcano in a large baking sheet, a plastic bin, or even a designated "science tray" with raised edges will contain most of the overflow.
- Newspaper or Plastic Sheeting: Lay down old newspapers, a plastic tablecloth, or a trash bag cut open to protect your table or floor.
- Have Paper Towels Ready: Keep a roll of paper towels or a few old rags nearby for quick clean-ups during and after the eruption.
- Easy-to-Wash Ingredients: Stick to food coloring that washes out of clothes easily, or have children wear old clothes or aprons.
Encouraging Open-Ended Exploration
The most impactful learning often happens when children are given the freedom to explore and experiment beyond the initial instructions.
- Ask Open-Ended Questions: Instead of "What happened?", try "What did you observe?" or "What do you think would happen if...?" This encourages deeper thought.
- Allow for Variations: Let children try different amounts of ingredients, different shapes of volcanoes, or even different "lava" colors. Embrace their ideas, even if they seem unconventional.
- Document the Process: Suggest drawing observations, taking photos, or even making short videos. This helps reinforce learning and provides a record of their scientific journey.
- Connect to the Real World: Discuss real volcanoes, plate tectonics, or the different types of lava. Look up videos or images of real eruptions to build on their understanding.
Documenting the Learning
Making a record of the activity enhances the educational value significantly.
- Science Journals: Encourage children to keep a simple science journal. They can draw their volcano before and after, record the ingredients they used, note observations, and describe what they learned.
- Photo/Video Diaries: Capture the eruptions! These visual records are not only fun to look back on but also allow for later discussion about the process.
- Discussion and Reflection: After the activity, take time to talk about what they enjoyed, what surprised them, and what new things they learned. This helps solidify the concepts.
By following these tips, you can turn a simple volcano STEM activity into a truly enriching and memorable experience for your child, fostering a love for science and discovery in a safe and engaging environment. And if you're looking for more inspiration and convenience in your STEM adventures, remember that our one-time kits offer a fantastic starting point. You can browse our complete collection of one-time kits to find the perfect hands-on learning experience for your family.
Expanding the STEM Horizon with I'm the Chef Too!
A volcano STEM activity is an incredible starting point, but the world of STEM is vast and wonderfully interconnected! At I'm the Chef Too!, we are passionate about showing children just how exciting and accessible these subjects can be, especially when combined with the universal appeal of food and creativity.
Beyond Volcanoes: A World of Edible Adventures
Our unique "edutainment" approach means that every kit is a gateway to a new STEM concept. While the Erupting Volcano Cakes Kit is a fan favorite for its dramatic chemical reactions, imagine delving into other fascinating areas:
- Astronomy: Explore the wonders of space by creating an edible solar system with our Galaxy Donut Kit, learning about planets, orbits, and celestial bodies.
- Paleontology: Become a junior archaeologist with a Fudgy Fossil Dig kit, uncovering edible dinosaur bones while learning about ancient life.
- Marine Biology: Dive into the ocean's depths by creating delicious aquatic treats and understanding marine ecosystems.
- Engineering: Build edible structures, learning about stability, balance, and design principles.
- Biology: Discover the magic of DNA by building edible models or understanding plant parts through delicious recipes.
Each kit is thoughtfully designed by mothers and educators to be a complete, screen-free learning experience, providing pre-measured dry ingredients and all the specialty supplies. It's about sparking a lifelong love for learning through tangible, hands-on, and delicious culinary adventures. Ready to discover your child's next passion? You can browse our complete collection of one-time kits and pick an adventure that perfectly suits their interests!
For Schools and Groups
The benefits of hands-on, engaging STEM activities extend far beyond the home kitchen. For educators, homeschool groups, and youth organizations, I'm the Chef Too! offers versatile programs designed to bring our unique learning experiences to a larger scale. We understand the diverse needs of different learning environments, which is why we offer flexible options.
Whether you're looking for a fun and educational activity for a classroom, a summer camp, a scout troop, or a homeschool co-op, our programs are adaptable. We offer options both with and without food components, allowing you to choose what best suits your facility's guidelines and your group's preferences. Our kits provide a structured yet creative way to introduce STEM concepts, encourage teamwork, and foster an environment of discovery. To learn more about how to bring our hands-on STEM adventures to your classroom, camp, or homeschool co-op, explore our versatile programs for schools and groups.
Conclusion
The power of a simple volcano STEM activity to ignite a child's curiosity is truly remarkable. From the basic fizzing eruption to detailed geological mapping and scientific sampling, this hands-on project offers an unparalleled opportunity to explore core concepts in science, technology, engineering, and mathematics. It's a testament to how accessible and exciting learning can be when it moves beyond textbooks and into the realm of active creation and discovery.
By engaging in activities like building and erupting a volcano, children aren't just memorizing facts; they're experiencing them. They're developing critical thinking, honing problem-solving skills, expressing their creativity, and most importantly, creating joyful, screen-free memories with their families. This is the heart of what we do at I'm the Chef Too! – fostering a lifelong love for learning through unique "edutainment" experiences that blend food, STEM, and the arts.
We believe every child deserves the chance to explore, experiment, and discover the magic of STEM in a way that truly resonates with them. Ready to spark even more curiosity and creativity in your child? We invite you to join The Chef's Club and receive a new, exciting STEM cooking adventure delivered directly to your door every month with free shipping. Give the gift of learning that lasts all year, one delicious, educational eruption at a time!
FAQ
Q1: What are the main STEM concepts children learn from a baking soda volcano? A1: Children learn about chemical reactions (acid-base neutralization), gas production (carbon dioxide), pressure, and basic geological principles (volcano formation, lava flow). They also engage in engineering (building the volcano structure), mathematics (measuring ingredients, mapping), and observation (scientific method).
Q2: What is the best type of vinegar to use for a volcano experiment? A2: White vinegar (acetic acid) is typically used because it's readily available, inexpensive, and reacts well with baking soda. Its clear color also allows food coloring to show up vibrantly. While other vinegars work, they might be more expensive or have a stronger scent.
Q3: How can I make the "lava" more foamy and realistic? A3: Adding a few drops of liquid dish soap to your vinegar mixture before pouring it into the volcano will create a much thicker, longer-lasting foam. The dish soap traps the carbon dioxide bubbles, mimicking the viscosity of real lava. Red or orange food coloring also helps achieve a realistic look.
Q4: Is the baking soda volcano safe for children? A4: Yes, a baking soda and vinegar volcano is generally safe for children with adult supervision. Both ingredients are common household items. However, always ensure children do not ingest the mixture, especially if dish soap or artificial food coloring is added. It's also a good practice to wear safety glasses and conduct the experiment in an area easy to clean, like outdoors or on a large tray.
Q5: What age group is a volcano STEM activity suitable for? A5: This activity is highly adaptable. Preschoolers can enjoy the simple awe of the eruption and sensory play. Elementary school children can delve deeper into the chemical reactions, experiment with variables, and engage in more complex engineering and mapping aspects. Middle schoolers can even explore concepts like reaction rates and gas laws.
Q6: How can I make the volcano reusable for multiple eruptions? A6: If you build your volcano around a plastic bottle or sturdy cup, you can easily rinse out the container and repeat the experiment. For the exterior, using durable materials like a flour/salt dough that dries hard, or a paper mache structure, allows you to reuse the volcano shape for many eruptions. Our Erupting Volcano Cakes Kit even lets you bake edible volcanoes, providing multiple delicious eruptions!
Q7: Can I use different ingredients to make a volcano erupt? A7: The baking soda and vinegar reaction is the classic and most accessible. Other acid-base reactions can also produce gas, but they might not be as safe or readily available for a children's activity. For example, citric acid (found in lemons) can react with baking soda, but vinegar is typically stronger and more consistent for this specific experiment.
Q8: What if my volcano doesn't erupt well? A8:
- Check Ratios: Ensure you have enough baking soda and vinegar. A good starting ratio is 1-2 tablespoons of baking soda to ½ to 1 cup of vinegar.
- Fresh Ingredients: Ensure your baking soda hasn't expired, as its reactivity can decrease over time.
- Add Dish Soap: If you want more foam, make sure you add a squirt of liquid dish soap.
- Pour Speed: Slowly pouring the vinegar can allow for a more sustained, rather than explosive, reaction. Experiment with pouring speed.
Q9: How can I extend the learning beyond the eruption? A9: You can extend the activity by:
- Adding Layers: Use different colored play dough to simulate successive lava flows and build a stratified volcano.
- Mapping: Have children draw maps of their lava flows, incorporating cardinal directions.
- Core Samples: Use clear straws to take "core samples" of their layered volcano to study its internal structure.
- Research: Encourage children to research real volcanoes, different types of eruptions, and how scientists study them.
- Experimentation: Let them change variables (ingredient amounts, crater size) and observe the effects.
Q10: Where can I find more ready-to-go STEM activities for kids? A10: I'm the Chef Too! specializes in blending food, STEM, and the arts into unique "edutainment" experiences. You can browse our complete collection of one-time kits for a wide variety of themed adventures, or join The Chef's Club for a new, exciting STEM cooking adventure delivered to your door every month. We also offer programs for schools and groups.