Table of Contents
- The Magic and Benefits of Candle Crafts for Young Minds
- Crafting with Cardboard & Paper: Illuminated Creations (No Real Flame!)
- Jar & Luminary Crafts: Guiding Lights of Imagination
- Safe "Candle" Making: The Allure of Granulated Wax & Sand
- Edible "Candle" Creations: A Delicious Twist on Crafting (I'm the Chef Too! Special!)
- Integrating Learning: More Than Just a Craft
- Safety First: Essential Guidelines for Candle Crafts
- Conclusion
- FAQ Section
Remember that quiet moment of awe when a flickering flame catches your eye, or the joy of creating something beautiful with your own hands? For children, these simple experiences can ignite a world of wonder and learning. In a world increasingly dominated by screens, we're always searching for activities that truly engage young minds, stimulate their senses, and foster meaningful connections. That’s where the enchanting world of candle crafts for kids comes in!
This isn't just about making pretty decorations; it's about a rich tapestry of creativity, skill development, and cherished family bonding. From simple paper creations that teach basic geometry to edible masterpieces that introduce culinary science, we'll journey through a variety of safe and engaging "candle" themed projects. Our purpose here is to provide you, parents and educators, with a comprehensive guide to fun, hands-on activities that blend art, ingenuity, and a touch of magic. Get ready to transform everyday materials into extraordinary creations, fostering curiosity and lasting memories, perfectly aligning with our mission at I'm the Chef Too! to bring "edutainment" into every home.
The Magic and Benefits of Candle Crafts for Young Minds
At I'm the Chef Too!, we believe that learning should be an adventure – a delicious, hands-on, and often surprising journey of discovery. Candle crafts, even those that don't involve a real flame, are a fantastic embodiment of this philosophy. They offer a unique blend of experiences that nurture a child's holistic development, extending far beyond the finished product. Let's explore some of the profound benefits these seemingly simple activities provide:
1. Igniting Creativity and Imagination: When a child is presented with materials and an idea, their imagination takes flight. Candle crafts encourage children to think outside the box, to choose colors, textures, and designs that reflect their inner world. There's no single "right" way to decorate a jar or wrap a cardboard tube, empowering them to express themselves freely. This open-ended creativity is a cornerstone of our approach at I'm the Chef Too!, where every kit encourages unique interpretations and personal touches.
2. Boosting Fine Motor Skills and Dexterity: From cutting paper flames and wrapping yarn around a cardboard tube to carefully pouring colored sand or precisely piping frosting, candle crafts are a workout for little hands. These activities enhance hand-eye coordination, strengthen small muscles, and refine dexterity – crucial skills for writing, drawing, and countless everyday tasks. The tangible nature of these projects offers a vital alternative to screen-based interactions, promoting physical engagement and active learning.
3. Engaging Sensory Exploration: Many candle crafts are a feast for the senses. Children get to feel the smooth surface of glass, the rough texture of yarn, the stickiness of glue, or the grit of sand. They see vibrant colors come to life and, when making edible versions, even get to experience delightful aromas and tastes. This multi-sensory engagement deepens learning and makes the experience more memorable and enjoyable.
4. Cultivating Problem-Solving and Critical Thinking: What happens if the yarn isn't wrapped tightly? How do we make the flame stand up? Which colors will look best together? These are all mini-challenges that children encounter and solve during the crafting process. They learn to follow instructions, adapt when things don't go as planned, and make decisions that influence the final outcome. This builds resilience and a foundational understanding of cause and effect, much like the scientific principles woven into our I'm the Chef Too! kits.
5. Fostering Patience and Focus: In our fast-paced world, teaching patience is more important than ever. Crafting a candle requires sustained attention, from preparing materials to carefully executing each step. Waiting for glue to dry or for layers to set teaches children the value of perseverance and the satisfaction of a project completed with care.
6. Strengthening Family Bonding: These crafts are more than just individual activities; they are invitations for connection. Working together on a project, sharing laughs, offering encouragement, and celebrating achievements creates precious family memories. At I'm the Chef Too!, fostering family bonding is central to our mission, providing opportunities for parents and children to learn and create side-by-side.
7. Providing a Screen-Free Educational Alternative: In an age where digital distractions are abundant, offering engaging, hands-on activities is paramount. Candle crafts provide a welcome break from screens, stimulating different parts of the brain and encouraging tangible interaction with the world. This aligns perfectly with our dedication at I'm the Chef Too! to offering enriching, screen-free educational experiences that spark genuine curiosity.
Are you ready to regularly infuse your home with these kinds of enriching, screen-free educational adventures? We handcraft each of our kits to blend food, STEM, and the arts into one-of-a-kind "edutainment" experiences, developed by mothers and educators just like you! Join The Chef's Club today and enjoy the convenience of a new, exciting adventure delivered to your door every month with free shipping in the US! Our flexible 3, 6, and 12-month pre-paid plans are perfect for gifting or long-term enrichment.
Crafting with Cardboard & Paper: Illuminated Creations (No Real Flame!)
One of the most accessible and imaginative ways to dive into "candle" crafts is by using everyday materials like cardboard tubes and paper. These crafts are fantastic for all ages, promoting creativity without the need for real flames, making them perfectly safe for little hands.
Materials You'll Need:
- Cardboard tubes (empty toilet paper rolls, paper towel rolls, wrapping paper tubes, or craft store cardboard cylinders)
- Construction paper or colorful cardstock
- Yarn in various colors
- Scissors (child-safe scissors for younger children)
- Craft glue or glue sticks
- Tape
- Paints (acrylic or tempera), paintbrushes
- Optional: glitter, sequins, stickers, natural elements (small leaves, dried flowers), hole punch
Step-by-Step: Vibrant Yarn-Wrapped "Candles"
This craft is a wonderful way to introduce color theory and fine motor control.
- Prepare Your Tubes: Gather your cardboard tubes. You can use them as-is or cut them to varying heights to create a more dynamic display. For example, cut one paper towel roll into one tall and one shorter "candle."
- Base Layer (Optional but Recommended): For a cleaner finish, especially if your tubes have print on them, wrap each tube in a layer of plain white paper and secure with glue or tape. Trim any excess paper and tuck the edges inside the tube openings.
- Start Wrapping the Yarn: Choose your first yarn color. Secure one end of the yarn inside the top edge of the cardboard tube with a small piece of tape. Now, encourage your child to start wrapping the yarn tightly around the tube, moving downwards. They can wrap in neat rows or crisscross for a more textured look.
- Color Changes & Patterns: As they wrap, discuss color choices. Should they make stripes? A rainbow effect? Or a solid color? When changing colors, simply tape the end of the previous yarn color inside the tube, and tape the new color's start point.
- Finishing the Wrap: Continue wrapping until the entire tube is covered, or leave a small gap at the top for the "flame" insertion. Secure the final end of the yarn inside the bottom of the tube with tape.
-
Crafting the "Flame":
- Paper Flame: Cut teardrop or wavy flame shapes from yellow, orange, and even a tiny piece of red or gold cardstock. Layer these shapes, gluing the smaller ones onto the larger ones for a multi-dimensional look. Cut two small slits at the top of the yarn-wrapped tube, opposite each other. Gently push the bottom of the paper flame into these slits so it stands upright.
- Tissue Paper Flame (Puffy Effect): Cut a rectangle of orange or yellow tissue paper (e.g., 3x11 inches). Fold it in half lengthwise. Cut two small slits at the top of the cardboard tube. Push a bit of the folded tissue paper through one slit and out the other, letting it puff out from the top. You can secure it with a tiny bit of glue or tape from the inside.
- Display: Arrange your colorful yarn-wrapped "candles" together as a festive centerpiece or individual decorative pieces.
Step-by-Step: Painted & Decorated Cardboard Candles
This offers a canvas for endless artistic expression.
- Prepare Tubes: As above, cut tubes to desired heights. A white paper base is helpful for vibrant paint colors.
- Painting: Provide various colors of tempera or acrylic paints. Children can paint solid colors, create stripes, polka dots, ombre effects, or abstract designs. Encourage them to experiment with different brush strokes. Let the paint dry completely.
-
Adding Details: Once dry, the fun truly begins!
- Glitter & Sequins: Apply a thin layer of glue to areas, then sprinkle glitter or press on sequins.
- Stickers & Cut-outs: Use themed stickers (stars, hearts, animals) or cut shapes from construction paper to glue onto the painted surface.
- Natural Elements: For a rustic look, use thinned glue to attach small, dried leaves, pressed flowers, or thin twigs.
- Flame Creation: Use the same methods as described for yarn-wrapped candles (paper or tissue paper flames).
- Creating Luminaries: For a beautiful glowing effect, consider painting scenes or patterns on the cardboard tube. Once dry, use a hole punch to create small holes along the patterns. Place a small, battery-operated tea light inside the bottom of the tube (ensure the tube is wide enough and stable) for a soft, diffused glow.
STEM & Art Connections:
These simple crafts are brimming with learning opportunities. Children engage with geometry by manipulating cylindrical shapes and understanding how different lengths create a varied display. They explore color theory through mixing paints and choosing yarn colors, observing how colors interact. Design thinking comes into play as they plan their patterns and decide how to make their "flame" stand out. The act of carefully wrapping yarn or precisely applying glue also introduces basic engineering principles – how to secure materials and create stable structures. Plus, the sheer joy of transforming a humble cardboard roll into something beautiful is a powerful lesson in resourcefulness and creativity.
Ready to explore even more creative adventures that blend learning and fun? Browse our complete collection of one-time kits in our shop and discover the perfect theme for your little learner! From science experiments to artistic endeavors, we have a world of discovery waiting.
Jar & Luminary Crafts: Guiding Lights of Imagination
Upcycling is a wonderful way to teach children about sustainability, and transforming ordinary glass jars into beautiful "candle" luminaries is a fantastic example. These crafts create stunning decorative pieces that can glow softly with the help of battery-operated tea lights, making them safe and enchanting.
Materials You'll Need:
- Clean, empty glass jars (mason jars, jam jars, pizza sauce jars, baby food jars – various sizes add visual interest)
- White school glue (PVA glue) or Mod Podge
- Water (for thinning glue)
- Paintbrushes or sponge brushes
- Tissue paper in assorted colors
- Glitter, sequins, small beads
- Natural elements: small pressed leaves, dried flowers, thin twigs, small pebbles
- Acrylic paints designed for glass (optional)
- Battery-operated tea lights (essential for safety!)
- Newspaper or a tablecloth to protect your workspace
Step-by-Step: Decoupage Jars with Tissue Paper
This technique is simple, forgiving, and yields beautiful stained-glass-like effects.
- Prepare Your Jars: Ensure jars are sparkling clean and dry. Remove any labels.
- Prepare Workspace & Materials: Lay down newspaper. Tear tissue paper into small, irregular pieces (this is great for fine motor skills!). You can choose a color theme or a rainbow of colors. Mix white glue with a little water (about 2 parts glue to 1 part water) in a small bowl to create a thin, brushable decoupage medium.
-
Applying Tissue Paper:
- Have your child brush a thin layer of the thinned glue onto a small section of the jar.
- Place a piece of tissue paper onto the wet glue.
- Gently brush another thin layer of glue over the tissue paper, smoothing out any major wrinkles. The tissue paper will become translucent.
- Repeat this process, overlapping pieces of tissue paper until the entire jar is covered. Experiment with different color combinations and layers to create depth.
- Adding Embellishments (Optional): While the glue is still wet, sprinkle glitter or press sequins onto the surface. You can also carefully attach small pressed leaves or dried flowers.
- Drying Time: Allow the jars to dry completely, which may take several hours or overnight. The glue will dry clear.
- The Magical Reveal: Once dry, place a battery-operated tea light inside each jar. Turn off the room lights and watch your child's creations glow!
Step-by-Step: Painted Glass Luminaries
This method offers a more direct painting experience, allowing for intricate designs or broad color washes.
- Prepare Jars: Clean and dry.
- Paint Choice: For painting directly on glass, you can use acrylic paints mixed with a glass painting medium (found at craft stores) to help them adhere, or special glass paints. Tempera paints can also work, but they may scratch off more easily.
-
Painting Designs:
- Children can paint freehand designs: swirls, dots, stripes, or even simple scenes.
- They can use stencils (tape them to the inside of the jar for an outline) for specific shapes.
- For younger children, finger painting on the outside of the jar can be a wonderfully tactile experience.
- Consider painting the inside of the jar for a smoother exterior and a diffused glow.
- Drying and Curing: Allow paints to dry thoroughly according to product instructions. Some glass paints require baking to cure and become permanent. Always ensure this is done by an adult.
- Illumination: Insert battery-operated tea lights.
STEM & Art Connections:
These luminary crafts provide an excellent opportunity to explore basic light diffusion – how light passes through translucent materials and creates different effects. Children observe how colors overlap and blend, engaging with color theory. The process of upcycling teaches important lessons in environmental awareness and resourcefulness. When designing their jars, they engage in symmetry and pattern recognition. The transformation of a plain jar into a glowing work of art fosters a sense of accomplishment and reinforces the idea that creativity can turn everyday objects into something extraordinary.
Want to keep sparking your child's passion for discovery with engaging, hands-on projects delivered right to your door? Our kits are designed by mothers and educators to make learning fun and accessible. Join The Chef's Club for a continuous stream of creative exploration, complete with pre-measured dry ingredients and specialty supplies!
Safe "Candle" Making: The Allure of Granulated Wax & Sand
When we talk about "candle crafts," many people immediately think of melting wax. However, for children, handling hot wax is simply not safe. But don't worry! There's a fantastic, kid-friendly alternative that offers all the visual appeal of traditional candles without the danger: using granulated wax or colorful craft sand. These layered creations are captivating to make and display.
Materials You'll Need:
- Clear glass containers (mason jars, clear vases, old jam jars, even glass drinking glasses work well)
- Assorted bags of colorful granulated wax (available at craft stores) OR Assorted bags of colorful craft sand + small votive candles
- Pre-waxed wicks with bases (if using granulated wax)
- Dixie cups or small scoops for easy pouring
- Optional: Wooden skewer for pattern making, funnel for precise pouring
Step-by-Step: Layered Sand/Wax Candles (The Safe Way!)
This activity is incredibly satisfying and highlights the beauty of layering and color.
- Set Up Your Workspace: Cover your table with newspaper or a washable tablecloth. Pour each color of granulated wax or craft sand into separate Dixie cups or small bowls for easy access and pouring. This helps prevent color contamination and makes the process smoother for little hands.
-
Prepare Your Vessel:
- If Using Granulated Wax: Take a pre-waxed wick (which usually has a metal base) and center it at the bottom of your clear glass container. You can use a dab of hot glue (applied by an adult) to secure it, or simply hold it upright as your child starts pouring the wax.
- If Using Craft Sand: Place a small votive candle (a finished, store-bought one) in the center of the bottom of your clear glass container. This provides the "burning" element, and the sand will be poured around it.
-
Start Pouring Layers: This is the most exciting part!
- Demonstrate for your child if they haven't done sand art before. Have them choose a color and gently pour a layer into the bottom of the container. They can pour directly, use a spoon, or a funnel. Encourage them to pour evenly around the wick or votive.
- Choose another color and pour the next layer. Discuss color combinations and how they look stacked.
- Create Patterns: Tilt the container slightly as you pour to create angled layers. After pouring a layer, use a wooden skewer to gently push down from the top edge of the sand/wax to create decorative peaks and valleys around the perimeter before adding the next layer. This creates beautiful, intricate patterns!
- Continue layering until the container is filled to about an inch from the rim, leaving enough wick exposed (for granulated wax) or the top of the votive candle visible (for craft sand).
- Final Touches: Gently tap the container on the table a few times to settle the sand or wax and ensure the layers are compact. If using granulated wax, make sure the wick is straight and trimmed to about 1/4 inch above the top layer.
- Easy Cleanup: Simply pour any unused sand or granulated wax back into their original bags or containers. This craft is wonderfully mess-free compared to many others!
How to Safely Display and "Burn" Your New Creations:
- Granulated Wax Candles: When it's time to light the candle, always ensure an adult is present and supervising. Place the candle on a heatproof surface. Trim the wick before lighting and again before subsequent uses for a clean, even burn. Be sure to blow out the candle after each use and never leave it unattended.
- Craft Sand with Votive: Light the votive candle as you would any other, always with adult supervision. Ensure the sand layers are below the votive's flame. The sand itself will not burn.
STEM & Art Connections:
This activity is rich in STEM principles. Children learn about density (albeit an implied, visual one, as the layers stay separate due to gravity and careful pouring). They engage deeply with color theory as they choose and combine hues, observing how different colors impact the overall aesthetic. The process of precise pouring and pattern creation fosters careful measurement and spatial reasoning. The anticipation of seeing colors transform or "erupt" into a beautiful design is a thrill, much like the chemical reaction that makes our Erupting Volcano Cakes bubble over with deliciousness. Just as we meticulously design our kits to teach complex subjects through tangible, hands-on activities, these layered candles offer a similar tactile learning experience.
Edible "Candle" Creations: A Delicious Twist on Crafting (I'm the Chef Too! Special!)
At I'm the Chef Too!, our unique approach blends food, STEM, and the arts into unforgettable experiences. So, what better way to expand on candle crafts for kids than by making them edible? This takes the fun to a whole new level, adding the sensory delight of taste and smell while teaching valuable kitchen skills. These edible "candles" are perfect for parties, holiday celebrations, or just a delightful afternoon snack!
Benefits of Edible "Candle" Crafts:
- Combines Crafting with Cooking/Baking: Merges artistic expression with practical life skills.
- Ultimate Sensory Experience: Engages sight, touch, smell, and taste!
- Following Instructions: Teaches children to follow a recipe, a fundamental skill in both cooking and science.
- Measurement & Precision: Critical for successful baking and a key STEM skill.
- Food Science in Action: Understanding how ingredients combine and transform.
Idea 1: Pretzel Rod "Candles"
These are incredibly simple and versatile, perfect for any occasion.
- Materials: Large pretzel rods, white chocolate chips or candy melts, various sprinkles, yellow/orange M&Ms or small candy corn for the "flame."
-
Instructions:
- Melt white chocolate chips or candy melts in a microwave-safe bowl in 30-second intervals, stirring until smooth.
- Have your child dip about two-thirds of a pretzel rod into the melted chocolate, coating it evenly.
- Immediately roll the chocolate-covered pretzel in sprinkles, ensuring good coverage.
- Place the pretzel rods on parchment paper to set. Before the chocolate fully hardens, carefully press a yellow or orange M&M (or a small piece of candy corn) onto the top end of the pretzel rod to resemble a flame.
- Allow to set completely (you can pop them in the fridge for faster hardening).
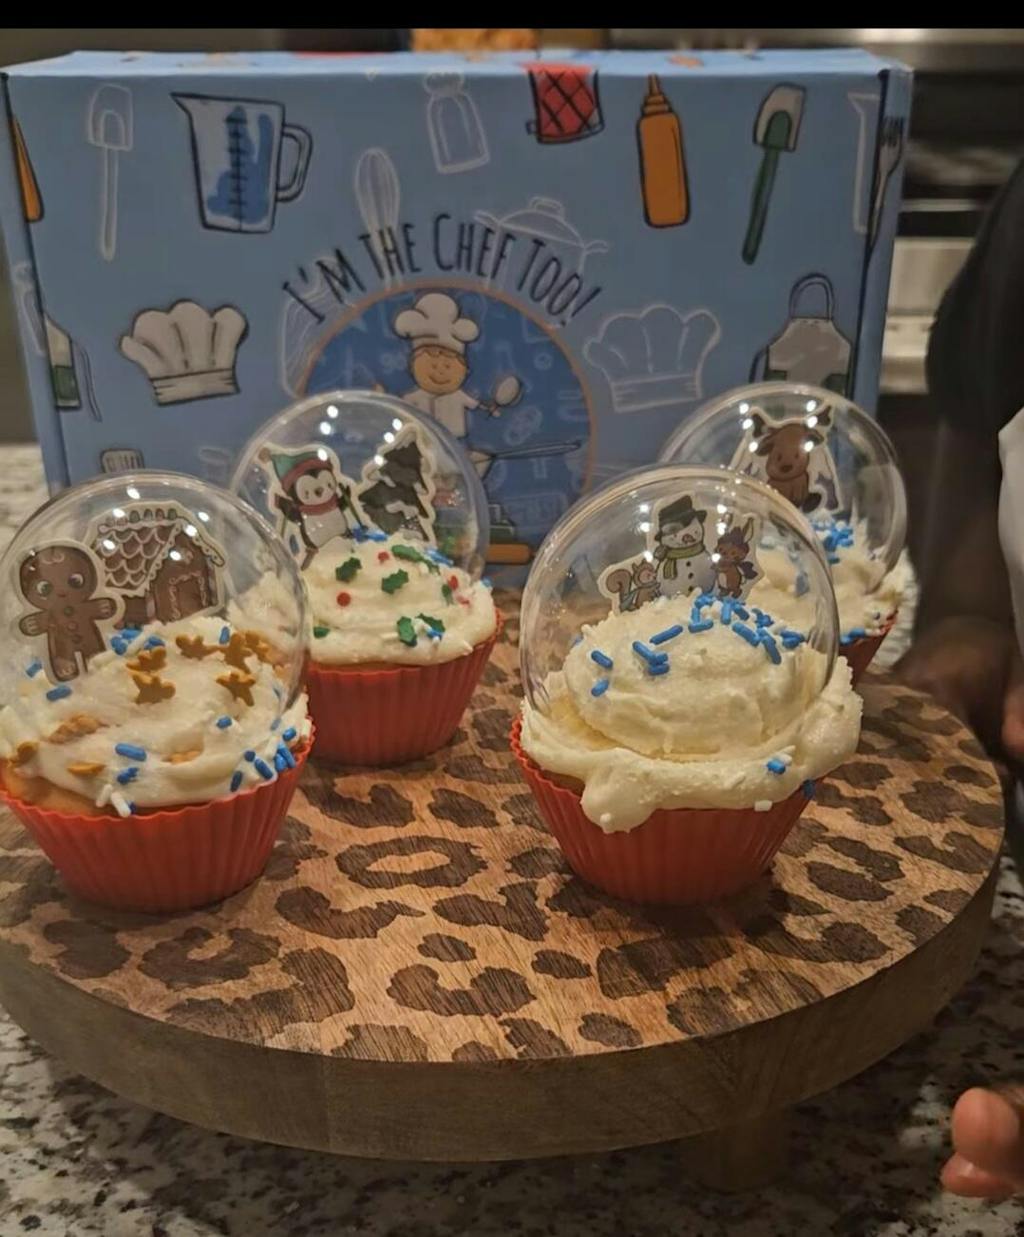
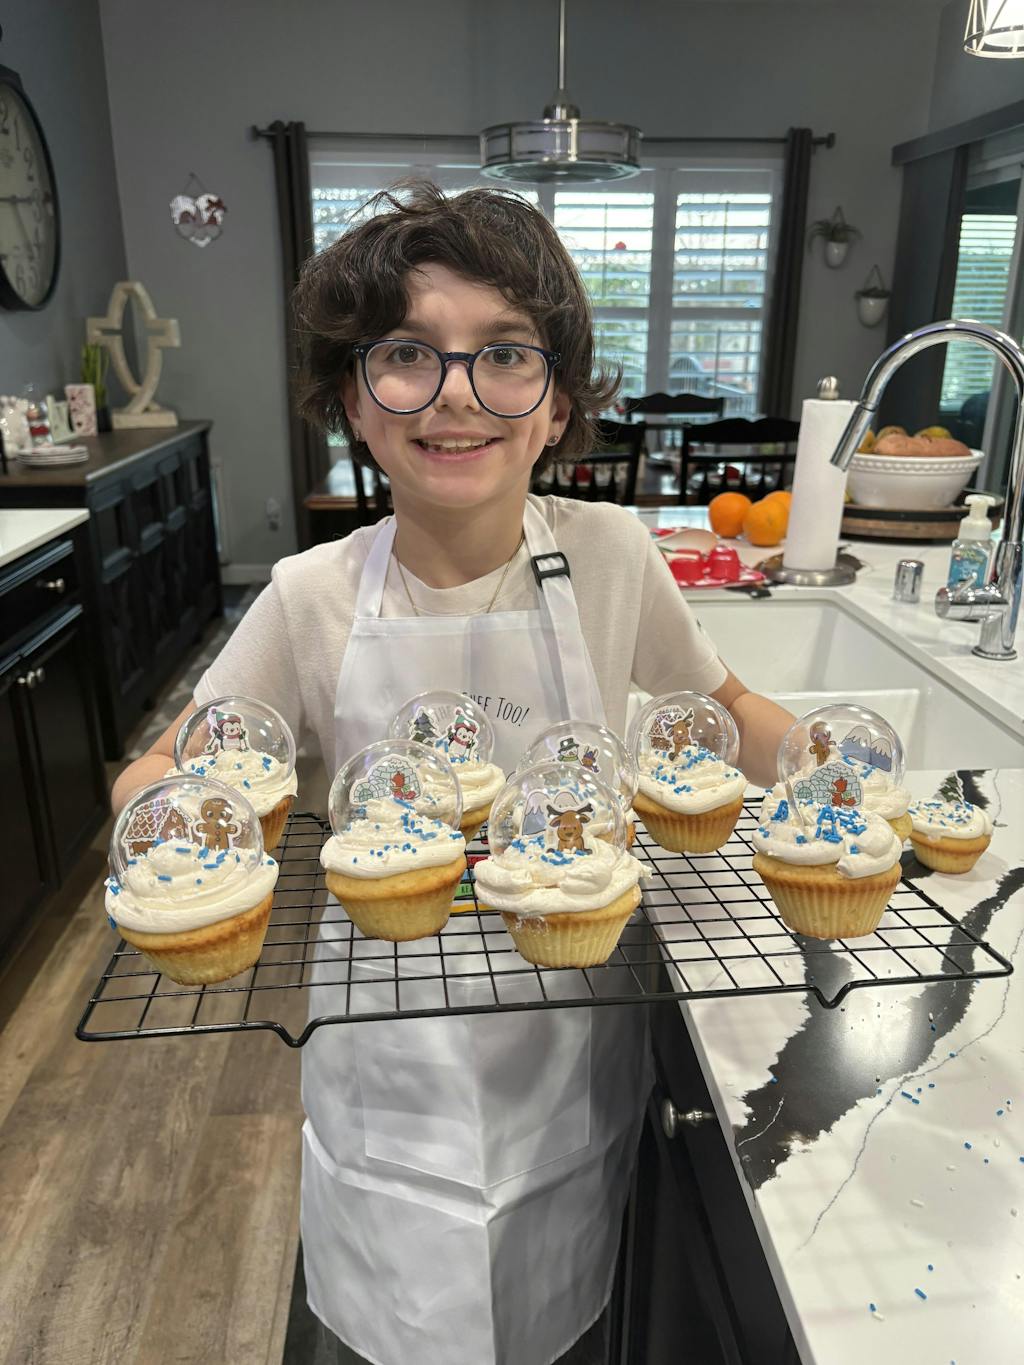
Idea 2: Cookie "Pillar Candles" or Cupcake "Votives"
These offer a delicious canvas for decorating.
- Materials: Store-bought or homemade rectangular sugar cookies (for pillar candles) or cupcakes (for votives), frosting (white or colored), edible glitter, small yellow/orange candies or piped frosting flames.
-
Instructions (Cookies):
- Provide rectangular sugar cookies. Have your child spread a layer of frosting on top, acting as the "wax."
- They can then decorate with edible glitter, small candies, or sprinkles.
- For the "flame," use a small, pointed yellow or orange candy, or pipe a small flame shape using a contrasting frosting color.
-
Instructions (Cupcakes):
- Frost cupcakes with a smooth, even layer.
- Children can use edible glitter, sprinkles, or small candies to decorate the "candle base."
- For the flame, pipe a small, upright flame shape with yellow or orange frosting, or place a small piece of yellow/orange fruit (like a mango bit) on top.
Idea 3: Fruit Skewer "Candles" (A Healthy Option!)
This is a refreshing and fun way to make healthy eating exciting.
- Materials: Various colorful fruits cut into uniform shapes (banana slices, melon cubes, grape halves, strawberry pieces), wooden skewers, a small marshmallow or a piece of yellow fruit (like a pineapple cube or mango piece) for the "flame."
-
Instructions:
- Have your child thread different fruit pieces onto a wooden skewer, creating a colorful "pillar."
- At the very top, add a small marshmallow or a yellow fruit piece to represent the flame.
- Arrange them upright in a glass for a delightful and healthy centerpiece.
STEM & Art Connections:
These edible crafts are a feast of learning. Children get hands-on experience with measurement as they follow recipe instructions (even for simple melting chocolate amounts). They observe basic chemistry in action when chocolate melts and re-hardens, or when ingredients combine in a baked good. Sequential instructions are key to success, teaching them the importance of order. Geometry appears in cutting shapes and arranging elements. And, of course, food science principles are subtly introduced. The artistic expression comes in selecting colors, patterns, and creating the "flame" design. At I'm the Chef Too!, we believe the best way to learn is by doing – and tasting! Our kits exemplify this, turning complex STEM principles into delicious, hands-on adventures.
Just as you'll explore new flavors and artistic expression with edible candles, you can also explore astronomy by creating your own edible solar system with our Galaxy Donut Kit. It's another fantastic example of how we blend learning and delicious fun! Ready to blend more food, STEM, and art into your family's routine? Join The Chef's Club today and get exciting new adventures delivered to your doorstep every month!
Integrating Learning: More Than Just a Craft
It’s easy to look at candle crafts as just a fun way to pass the time, but as we’ve explored, they are so much more. Each snip of the scissors, every brushstroke, and every carefully placed sprinkle is an opportunity for profound learning and development. At I'm the Chef Too!, our kits are developed by mothers and educators who understand that truly effective learning happens when it’s integrated into engaging, hands-on experiences. Candle crafts embody this beautifully.
When children are involved in activities like these, they aren't just making something; they're actively honing critical thinking skills. They're making choices about color, texture, and design, which fosters aesthetic judgment and problem-solving. If a paper flame doesn't stand up, they're encouraged to think about why and how to fix it, developing resilience and adaptability. This process-over-product mentality is vital – the learning happens in the doing, not just in the finished item.
These activities also open doors for rich dialogue. As parents and educators, we can ask open-ended questions: "What colors do you think would look nice together?" "Why do you think the glue makes the tissue paper stick?" "What part of this process was the most challenging for you?" These conversations deepen understanding, encourage reflection, and strengthen the bond between adult and child. By engaging children in these kinds of thoughtful, creative endeavors, we're not just creating memories; we're building a foundation for lifelong learning.
For families seeking consistent, enriching activities that go beyond the ordinary, we offer a vast library of themed kits. You can find the perfect theme for your little learner by browsing our complete collection of one-time kits. Each kit is a curated blend of STEM and culinary fun, designed to spark curiosity and creativity with every delicious experiment.
Safety First: Essential Guidelines for Candle Crafts
While the majority of the "candle crafts" we've discussed are designed to be safe for children, especially those avoiding real flames, it’s always important to reiterate and prioritize safety. Our goal at I'm the Chef Too! is to provide enriching experiences within a secure environment.
Here are our essential safety guidelines for enjoying candle crafts with kids:
- Constant Adult Supervision: No matter the craft, adult supervision is paramount. Children should never be left alone with craft materials, especially scissors, glue, or any tools that could pose a risk.
- Embrace Battery-Operated Lights: For all non-edible paper, cardboard, or jar crafts, always use battery-operated tea lights or LED candles. These provide the enchanting glow without any fire hazard. Never place real flame candles inside or near flammable craft materials.
- Fire Safety with Real Candles (Adult-Only Lighting): If you create a layered granulated wax candle with a real wick, or use craft sand around a votive candle, the actual lighting and burning should always be done by an adult. Ensure the craft is placed on a stable, heat-proof surface, away from anything flammable (curtains, paper, etc.), and never leave a burning candle unattended. Teach children about fire safety, but keep them at a safe distance from open flames.
-
Safe Material Choices:
- Non-Toxic Paints and Glues: Always ensure paints, glues, and other art supplies are labeled "non-toxic" and are suitable for children's use.
- Edible Decorations: For edible "candle" crafts, use only food-grade ingredients and decorations. Double-check labels for allergens if applicable.
- Child-Safe Tools: Provide age-appropriate scissors (blunt-tipped for preschoolers) and ensure children understand how to use any tools safely.
- Clean Workspace: Keep the crafting area tidy to prevent tripping hazards or spills. Clean up thoroughly after each activity, and safely store away any sharp objects or small parts.
- Choking Hazards: Be mindful of small parts like sequins, beads, or small candy pieces, especially with very young children who might put things in their mouths.
By following these simple yet crucial safety guidelines, you can ensure that your candle crafting sessions are not only incredibly fun and educational but also completely safe for everyone involved.
Conclusion
From the simplest paper rolls transformed into vibrant "candles" to delicious edible treats that mimic their glowing counterparts, candle crafts for kids offer a dazzling array of opportunities for creativity, learning, and connection. We've explored how these activities naturally foster fine motor skills, encourage imaginative play, stimulate sensory exploration, and build problem-solving abilities – all while providing a much-needed screen-free alternative for growing minds.
At I'm the Chef Too!, we're dedicated to sparking that curiosity and fostering those precious family moments. Our mission is to blend food, STEM, and the arts into one-of-a-kind "edutainment" experiences, designed by mothers and educators to be both fun and educational. Just as a simple candle brightens a room, these crafts illuminate young minds and create lasting memories that warm the heart.
Imagine the joy of your child unwrapping a new adventure every month, ready to embark on a culinary STEM journey that promises both delicious creations and exciting discoveries. It's more than just a box; it's an invitation to explore, learn, and bond as a family.
Don't let the opportunity to ignite your child's passion for discovery pass you by! Join The Chef's Club today and receive a new, engaging, and delicious "edutainment" experience delivered directly to your door with free shipping in the US. Choose from our flexible 3, 6, or 12-month pre-paid plans – the perfect way to ensure a year full of learning, laughter, and culinary creativity!
FAQ Section
Q: What age is appropriate for candle crafts? A: Many candle crafts, especially those using paper, cardboard tubes, or safe, non-toxic art supplies for jar decoration, are suitable for children as young as 3 or 4 with adult supervision. Crafts involving small parts, intricate cutting, or adult-supervised pouring (like granulated wax) are better for children aged 5 and up. "Candle" making with hot wax is generally not recommended for children due to safety concerns; stick to granulated wax or edible options for kids.
Q: What kind of containers are best for jar crafts? A: Clear glass containers work best to allow light to shine through. Mason jars, old jam jars, pizza sauce jars, baby food jars, or even clean glass drinking glasses are excellent choices. Ensure they are thoroughly cleaned and dry before starting the craft.
Q: Can we use real sand for sand candles? A: Yes, you can! If using real play sand or natural sand, the process is similar to using granulated wax, but you'll need to place a small, pre-made votive candle in the center of the vessel and pour the sand around it. The sand itself will not burn. Always ensure an adult lights and supervises the votive candle.
Q: How can I make candle crafts educational? A: Candle crafts are inherently educational! You can enhance the learning by: * Discussing colors, patterns, and shapes (geometry, color theory). * Talking about light and transparency (basic physics). * Practicing fine motor skills and hand-eye coordination. * Following step-by-step instructions (sequencing, critical thinking). * Engaging in conversations about the materials and process, asking open-ended questions to encourage problem-solving and creative thinking.
Q: What are some easy edible "candle" ideas? A: Some super fun and easy edible "candle" ideas include: * Pretzel Rod "Candles": Dip pretzel rods in melted white chocolate, decorate with sprinkles, and top with a yellow/orange candy for a flame. * Cookie "Pillar Candles": Use rectangular sugar cookies as the base, frost, decorate, and add a small candy or piped frosting flame. * Cupcake "Votives": Frost cupcakes, decorate, and top with a candy or frosting flame. * Fruit Skewer "Candles": Stack colorful fruit pieces on a skewer, and place a small piece of yellow fruit or a mini marshmallow on top as the flame. These are a delicious way to combine crafting with healthy eating!


")