Table of Contents
- Why Homemade Christmas Crafts Matter: Beyond the Glitter and Glue
- Getting Started: Your Essential Christmas Crafting Toolkit
- Enchanting Ornaments: Decking the Halls with Handmade Charm
- Festive Decorations: Bringing Holiday Cheer Home
- Thoughtful Gifts from Little Hands: Spreading Holiday Joy
- Integrating STEM & Art into Holiday Crafting (I'm the Chef Too! Focus)
- Tips for a Smooth and Joyful Crafting Experience
- Beyond Christmas: Continuing the Creative Learning Journey
- Conclusion
- FAQ Section
The holiday season often feels like a whirlwind of activities, from bustling shopping trips to endless to-do lists. Amidst the cheerful chaos, a quiet desire often emerges: to slow down, connect, and create lasting memories with our children. We yearn for moments of genuine connection, away from screens and distractions, where little hands can be busy and imaginations can soar. This isn't just a nostalgic wish; it's an opportunity to enrich our children's development while basking in the festive spirit.
This blog post is your comprehensive guide to unlocking the magic of homemade Christmas crafts for kids. We'll explore why these activities are more than just pretty decorations – they're powerful tools for learning, bonding, and building confidence. We'll dive into an extensive collection of easy, engaging, and educational craft ideas, ranging from nature-inspired ornaments to delightful edible creations. Our goal is to equip you with the inspiration and practical tips to transform everyday materials into cherished holiday keepsakes, making this Christmas season truly unforgettable for your entire family. Get ready to gather your supplies, ignite your creativity, and embark on a crafting journey that promises joy, discovery, and plenty of festive fun!
Why Homemade Christmas Crafts Matter: Beyond the Glitter and Glue
Engaging in homemade Christmas crafts offers a treasure trove of benefits that extend far beyond simply decorating a tree or making a gift. These hands-on activities are a cornerstone of childhood development, providing rich opportunities for growth in multiple areas. At I'm the Chef Too!, we wholeheartedly believe in the power of hands-on "edutainment" experiences, blending food, STEM, and the arts to spark curiosity and creativity. Crafting, especially during the holidays, perfectly embodies this philosophy.
Fostering Creativity and Imagination
When children craft, they step into a world of endless possibilities. A plain pine cone transforms into a reindeer, a simple piece of cardboard becomes a magnificent Christmas tree, and a handful of beads forms a shimmering icicle. This process encourages divergent thinking, problem-solving, and the ability to visualize an end product from raw materials. They learn to make choices about colors, textures, and designs, all while expressing their unique artistic voice. It's a fantastic way to let their imaginations run wild in a tangible, screen-free environment.
Developing Fine Motor Skills and Coordination
From carefully cutting shapes with scissors to delicately gluing small embellishments, and from threading beads onto a pipe cleaner to molding dough, crafting activities are a workout for tiny hands and fingers. These tasks enhance dexterity, hand-eye coordination, and precision – all fundamental skills that impact everything from writing to self-care. The repetitive motions involved in many crafts also build muscle memory and strengthen grip.
Nurturing STEM Concepts Through Play
While often seen as purely artistic, crafting is brimming with STEM (Science, Technology, Engineering, and Mathematics) principles. Consider the engineering involved in building a candy sled that can actually stand, or the geometry in arranging twigs to form a snowflake. When drying orange slices for ornaments, children observe the science of dehydration. Even mixing colors to paint a pine cone introduces basic chemistry. Our mission at I'm the Chef Too! is to teach complex subjects through tangible, hands-on, and delicious cooking adventures. Similarly, crafting allows children to explore scientific concepts and mathematical relationships in a fun, accessible way without even realizing they're learning. It’s a wonderful entry point for sparking early interest in STEM fields.
Encouraging Family Bonding and Screen-Free Engagement
The holiday season is synonymous with family time, and crafting provides a perfect opportunity for shared experiences. Sitting together at a table, discussing ideas, sharing supplies, and working towards a common goal creates precious moments of connection. These are the screen-free interactions that build strong family bonds and create cherished memories that will be recounted for years to come. Parents and children can learn from each other, laugh together, and enjoy the simple pleasure of creating side-by-side.
Building Confidence and a Sense of Accomplishment
There's an incredible boost to a child's self-esteem that comes from completing a craft project. Holding up their finished ornament or gift, knowing they made it themselves, instills a powerful sense of accomplishment. This confidence is crucial for their overall development, encouraging them to take on new challenges and believe in their own capabilities. Even if a craft doesn't turn out "perfectly," the effort and the process are what truly matter, and celebrating those efforts is key.
Creating Cherished Keepsakes and Thoughtful Gifts
Homemade crafts hold a special place in our hearts. Unlike store-bought items, a handmade ornament carries a story, a memory of the child who made it and the time spent together. These items become treasured keepsakes that evoke nostalgia year after year. Furthermore, crafting gifts for loved ones teaches children about generosity, thoughtfulness, and the joy of giving. A homemade gift, however simple, often means the most because it comes from the heart and hands of a child.
If you're looking to consistently provide these types of enriching, screen-free experiences, consider joining The Chef's Club. A new adventure is delivered to your door every month with free shipping in the US, ensuring continuous fun and learning!
Getting Started: Your Essential Christmas Crafting Toolkit
Before diving into the flurry of glitter and glue, a little preparation goes a long way. Having a well-stocked craft cupboard can make spur-of-the-moment crafting sessions much smoother and more enjoyable. Think of it as preparing your kitchen for a delicious new recipe – the right ingredients make all the difference!
Basic Supplies: The Foundation of Fun
These are the absolute staples that every crafting station should have:
- Glue: School glue (like Elmer's) for paper and lighter items, tacky glue for stronger bonds, and a low-temperature hot glue gun (with adult supervision) for quick-setting and sturdier projects.
- Scissors: Kid-safe scissors for little hands and a sharper pair for adult-only cuts.
- Paper: Construction paper in various colors, plain white paper, cardstock, and even patterned scrapbook paper.
- Drawing & Coloring Tools: Crayons, washable markers, colored pencils, and tempera paints.
- Embellishments: Googly eyes, pom-poms (various sizes and colors), pipe cleaners, glitter (biodegradable options are great!), buttons, beads (pony beads are excellent for small hands), sequins, and ribbons.
Recycled Riches: Turning Trash into Treasure
One of the most satisfying aspects of crafting is transforming everyday items into something new and beautiful. These "found" materials are often free and encourage resourcefulness:
- Toilet Paper and Paper Towel Tubes: Perfect for making reindeer, angels, snowmen, or even small gift boxes. They offer a great cylindrical base for many characters.
- Cardboard: Cereal boxes, shipping boxes, or even paper plates can be cut, painted, and shaped into wreaths, ornaments, or structural components for larger projects.
- Old Socks: White socks can be stuffed with rice to create adorable snowmen, while colorful socks can be repurposed into puppets or festive characters.
- Plastic Ornaments: Clear plastic ornaments can be filled with small candies or decorated from the inside.
Nature's Bounty: Bringing the Outdoors In
The natural world offers an incredible array of free and beautiful crafting materials, perfect for adding an organic touch to your holiday decor. Encourage a family nature walk to gather these treasures:
- Pine Cones: Excellent for painting, turning into mini Christmas trees, or transforming into adorable animals like reindeer.
- Twigs and Small Sticks: Ideal for constructing stars, snowflakes, or mini Christmas trees for garlands. Look for slightly flexible ones.
- Leaves: Fall leaves, if preserved, can be used for "confetti" or pressed into clay. Evergreen clippings (cedar, spruce) are wonderful for mini wreaths and garlands.
- Cinnamon Sticks: Not only do they look festive, but they also add a delightful scent. Great for bundling into ornaments or wreaths.
- Dried Orange Slices: A simple process creates beautiful, translucent ornaments or garland components with a lovely citrus aroma.
Edible Elements: Crafting You Can Taste!
At I'm the Chef Too!, we know that combining food with fun is a recipe for success! Edible crafts are especially engaging because they stimulate multiple senses and have a delicious reward at the end.
- Candies: Miniature candy bars, candy canes, peppermints, M&Ms, Skittles – these can be structural elements (candy sleds) or decorative fillers for clear ornaments.
- Applesauce & Spices: A classic mixture of applesauce and ground cinnamon creates fragrant, bake-free ornaments that smell wonderfully festive.
- Cookie Cutters: Not just for cookies! Metal cookie cutters can be used to melt peppermint candies into stained-glass ornaments, or to shape applesauce dough.
Speaking of edible fun, remember that "crafting" can also mean cooking! Explore astronomy by creating your own edible solar system with our Galaxy Donut Kit, or delve into geology with our Erupting Volcano Cakes Kit!
Specialty Items: Adding That Extra Sparkle
These items might not be in every home but are worth picking up for specific projects:
- Cookie Cutters (metal): Beyond edible crafts, these can be templates for cutting shapes from felt or paper.
- Sandpaper: Useful for smoothing edges on wood crafts or providing texture.
- Paint Pens/Sharpies: For fine details on ornaments or personalized messages.
- Battery-Operated Tea Lights: The base for adorable snowman crafts.
- Wood Slices: Small wooden rounds perfect for stamping, painting, or attaching other embellishments to create rustic ornaments.
Safety First: Adult Supervision and Age-Appropriate Choices
Always remember that crafting should be fun and safe. Ensure adult supervision, especially when using hot glue guns, sharp scissors, or small items that could be choking hazards for younger children. Choose crafts that are appropriate for your child's age and skill level to ensure they feel successful and engaged, rather than frustrated. Prioritize washable paints and glues to make cleanup a breeze!
Enchanting Ornaments: Decking the Halls with Handmade Charm
Ornaments are often the heart of holiday crafting. They’re small, manageable projects that yield beautiful, display-ready results. Each year, as you decorate your tree, these handmade treasures will spark memories of the time spent creating them.
Nature-Inspired Ornaments: Bringing the Outdoors In
Nature provides a stunning palette of materials for unique and rustic ornaments.
-
Pine Cone Trees:
- Materials: Small pine cones, mini felt balls, star jewels, Elmer's glue, hot glue gun (adult use), small wood slices (optional base).
- Process: Hot glue pine cones to wood slices for stability if desired. Kids can then dab Elmer's glue onto the "branches" of the pine cone and adorn them with colorful felt balls like tiny ornaments. A star jewel hot-glued to the top completes the mini tree look. These teach children about scale and simple decoration.
-
Twig Snowflakes:
- Materials: 5-6 straight, thin twigs of similar length, twine, hot glue (adult use).
- Process: Children can collect the twigs. Adults can then arrange them into a snowflake pattern, perhaps a simple 'X' shape with a vertical twig, and secure them with hot glue or by tightly wrapping twine at the intersections. Kids can then decorate with small pom-poms or glitter. This introduces basic geometry and construction.
-
Dried Orange Slices:
- Materials: Oranges (blood oranges or grapefruits for variety), a sharp knife (adult use), baking sheet, parchment paper, ribbon or twine.
- Process: Adult slices oranges thinly. Bake them on a parchment-lined sheet at a low temperature (200°F / 95°C) for 6-8 hours, flipping occasionally, until dried and translucent. This is a fascinating science experiment in dehydration! Once cool, children can thread ribbon through the center to hang them. The natural scent and warm glow are simply beautiful.
-
Evergreen Needle and Clay Ornaments:
- Materials: Air-dry clay, evergreen sprigs, rolling pin, cookie cutters, a straw for making a hole, twine.
- Process: Roll out the clay (kids love this part!). Press evergreen sprigs into the clay to create an impression, then use cookie cutters to cut out festive shapes (stars, circles, trees). Poke a hole for hanging before letting them air dry completely. Once dry, children can paint them or leave them natural. These make wonderful keepsakes, capturing the texture and scent of the holidays.
Edible Ornaments: A Delicious Way to Decorate
These ornaments are fun to make, beautiful to look at, and sometimes, even tasty to eat (if they last that long!).
-
Applesauce Cinnamon Ornaments:
- Materials: 1 cup applesauce, 1 cup ground cinnamon, optional: craft glue, glitter, puffy paints, cookie cutters, sandpaper, ribbon.
- Process: Mix applesauce and cinnamon thoroughly to form a stiff dough. Roll it out and use cookie cutters to make shapes. Poke a hole for hanging. Let them air dry for several days, flipping them periodically, or bake on a low heat until hardened. Kids can decorate them with glitter, puffy paint, or ribbon once dry. These fill the house with a wonderful aroma and teach about simple ingredient mixing and drying processes.
-
Peppermint Candy Ornaments:
- Materials: Metal cookie cutters, peppermint candies, parchment paper, baking sheet, toothpick, ribbon.
- Process: Adult preheats oven to 300°F (150°C). Place metal cookie cutters on a parchment-lined baking sheet. Fill the bottom of each cutter with a single layer of peppermint candies. Bake for 3-7 minutes, watching closely, until candies are melted and spread evenly. Remove from oven, and while still warm, use a toothpick to create a hole for hanging. Let cool completely before removing from cutters. These demonstrate the science of melting and cooling and create beautiful "stained glass" effects.
-
M&M/Skittles Ornaments:
- Materials: Clear plastic ornaments, M&Ms, Skittles, or other small candies, ribbon.
- Process: Children carefully pour colorful candies into the clear ornaments. Tie a festive ribbon around the top. This is a simple yet effective way to add a burst of color to the tree, practicing fine motor skills and sorting if different colors are used.
When crafting involves edible elements, it's a perfect blend of learning and fun! If your children love creating tasty masterpieces, don't miss out on what we offer. Not ready to subscribe? Explore our full library of adventure kits available for a single purchase in our shop and find the perfect theme for your little learner.
Upcycled Ornaments: Giving New Life to Old Things
These crafts are not only creative but also teach valuable lessons about sustainability and resourcefulness.
-
Toilet Paper Roll Angels/Snowmen:
- Materials: Toilet paper or paper towel tubes, paint, glitter, fabric scraps, pipe cleaners, cotton balls, googly eyes, glue.
- Process: Paint the tubes white for snowmen or a flesh tone for angels. Once dry, add details: for snowmen, glue on cotton ball heads, googly eyes, orange pom-pom noses, and pipe cleaner earmuffs; for angels, add fabric wings, yarn hair, and pipe cleaner halos. This is fantastic for character design and using recycled materials creatively.
-
Clothespin Angels or Reindeer:
- Materials: Large and medium wooden clothespins, white acrylic paint, glitter paint, small white pom-poms, snowflake confetti, blue or silver rhinestones, tacky glue, twine, red pipe cleaners, red pom-poms, black felt.
- Process: For angels, paint clothespins white, add glitter paint for sparkle, then glue on pom-pom heads, snowflake wings, and rhinestone accents. For reindeer, paint brown, add pipe cleaner antlers, googly eyes, and a red pom-pom nose. These help develop fine motor skills and creativity in transforming simple objects.
Personalized Ornaments: Making it Uniquely Yours
These crafts are wonderful for capturing a moment in time and making truly individual decorations.
-
Stamped Wood Slices:
- Materials: Small or medium wood slices, ink pads (various colors), rubber stamps (holiday themes like snowflakes, evergreen sprigs, letters), twine.
- Process: Children can press stamps onto the wood slices to create designs. Older children can stamp their initials or the year. Drill a small hole (adult) and thread with twine for hanging. Simple yet elegant, these offer an introduction to printmaking and personalization.
-
Handprint/Footprint Ornaments:
- Materials: Air-dry clay or salt dough, acrylic paint, glitter, ribbon.
- Process: Roll out clay/dough. Have your child press their hand or foot into it to make an impression. Cut around the impression, poke a hole, and let dry/bake. Once dry, children can paint the impression (e.g., a handprint becomes a reindeer with painted antlers). These are truly priceless keepsakes, marking a child's growth each year.
Festive Decorations: Bringing Holiday Cheer Home
Beyond the tree, homemade decorations infuse your entire home with a warm, personal holiday spirit. These projects can transform your space into a festive wonderland, all crafted with love by little hands.
Wreaths: Welcoming Holiday Guests
Wreaths are a classic symbol of the holidays, and making them with natural elements can be incredibly rewarding.
-
Cardboard and Nature Wreaths:
- Materials: Cardboard (cut into a ring), rubber bands, evergreen clippings, small pine cones, berries, ribbons, hot glue (adult use).
- Process: Children can collect the natural elements. Adults cut a ring from cardboard. Kids can then layer evergreen clippings and other items onto the cardboard ring, securing them with rubber bands. Adults can add a final touch with hot glue for extra security or to attach ribbons and small pine cones. This teaches composition and the beauty of natural materials.
-
Cinnamon Stick Bundles:
- Materials: Cinnamon sticks (various lengths), twine, ribbon, glue gun (adult use), scissors.
- Process: Children can arrange cinnamon sticks into small bundles. Adults can secure them tightly with twine or hot glue. Tie a festive ribbon bow at the top. These can be hung as mini wreaths, used as package toppers, or simply placed in bowls to release their inviting fragrance. This is a lovely sensory craft that also develops tying skills.
Garlands: Stringing Together the Season's Joy
Garlands add a continuous festive touch, perfect for mantels, doorways, or windows.
-
Mini Christmas Tree Garland:
- Materials: Cardboard, evergreen clippings, small twigs, felt balls, leaf "confetti" or sequins, Elmer's glue, jeweled stars, twine, hot glue (adult use).
- Process: Adults cut various sizes of Christmas tree shapes from cardboard. Kids cover the cardboard trees with Elmer's glue and layer on evergreen clippings, then glue on trimmed twigs for stumps. They can then decorate with felt balls, stars, and leaf confetti. Once dry, adults hot glue the finished trees to a long strand of twine. This is a multi-step project that combines several different crafting techniques and promotes patience.
-
Dried Orange Slice Garland:
- Materials: Dried orange slices (as made for ornaments), sturdy thread or twine, a large needle (adult use).
- Process: Once the orange slices are completely dry, children (with adult supervision for the needle) can thread them onto a long piece of twine, alternating with cinnamon sticks or wooden beads for added texture and fragrance. This teaches patterning and fine motor skills.
Tabletop Decor: Creating Mini Holiday Scenes
These crafts are perfect for adding festive touches to shelves, tables, or windowsills.
-
Pine Cone Reindeer:
- Materials: Pine cones, googly eyes, small twigs for antlers, red felt balls for noses, brown felt trimmed into ear shapes, hot glue gun (adult use).
- Process: Kids pick out pine cones. Adults use hot glue to attach googly eyes, felt ears, twig antlers, and a red pom-pom nose to transform the pine cone into an adorable reindeer. These are fantastic for imaginative play once completed and make charming little characters.
-
Popsicle Stick Sleds:
- Materials: Regular and small popsicle sticks, wood glue or hot glue (adult use), wood stain or paint, embellishments (jingle bells, faux greenery).
- Process: Children can paint or stain the popsicle sticks. Adults then assemble the sleds by gluing several regular sticks side-by-side for the base, and two candy canes or small popsicle sticks for the runners. Children can then add embellishments. This activity introduces basic architectural principles and design.
-
Tea Light Snowmen:
- Materials: Battery-operated tea lights, black sharpie, red ribbon, red pipe cleaners, red pom-poms, black felt, orange sharpie, glue gun (adult use).
- Process: The tea light acts as the snowman's head and body. Kids draw snowman faces with black and orange sharpies. Adults hot glue a red pipe cleaner "scarf" around the base of the "flame" (which becomes the nose/hat) and a red pom-pom on top for a hat. This is a wonderfully simple craft that brings a cozy glow to any room.
Bringing our culinary adventures to your home also brings science to life. Creating an edible, bubbling concoction in our Erupting Volcano Cakes Kit is another fantastic way to engage kids in hands-on, festive, and delicious STEM fun!
Thoughtful Gifts from Little Hands: Spreading Holiday Joy
Gifts made by children carry a special magic. They are infused with effort, love, and a personal touch that store-bought items simply cannot replicate. Encouraging children to create gifts for family and friends fosters empathy and the joy of giving.
Edible Gifts: Sweet Treats from the Heart
When children craft edible gifts, they not only learn basic cooking skills but also experience the delight of sharing their creations.
-
Candy Sleds:
- Materials: 10 miniature candy bars, 2 candy canes, 1 full-size Kit Kat bar (or similar flat chocolate bar), glue dots or double-sided tape, wrapping ribbon, small bows.
- Process: Adults can help secure the candy canes to the bottom of the Kit Kat bar to form the runners of the sled. Children then stack the miniature candy bars on top of the Kit Kat, securing them with glue dots or tape. Finish by tying a pretty ribbon and attaching a small bow. These are charming, edible gifts that teach basic construction and presentation.
-
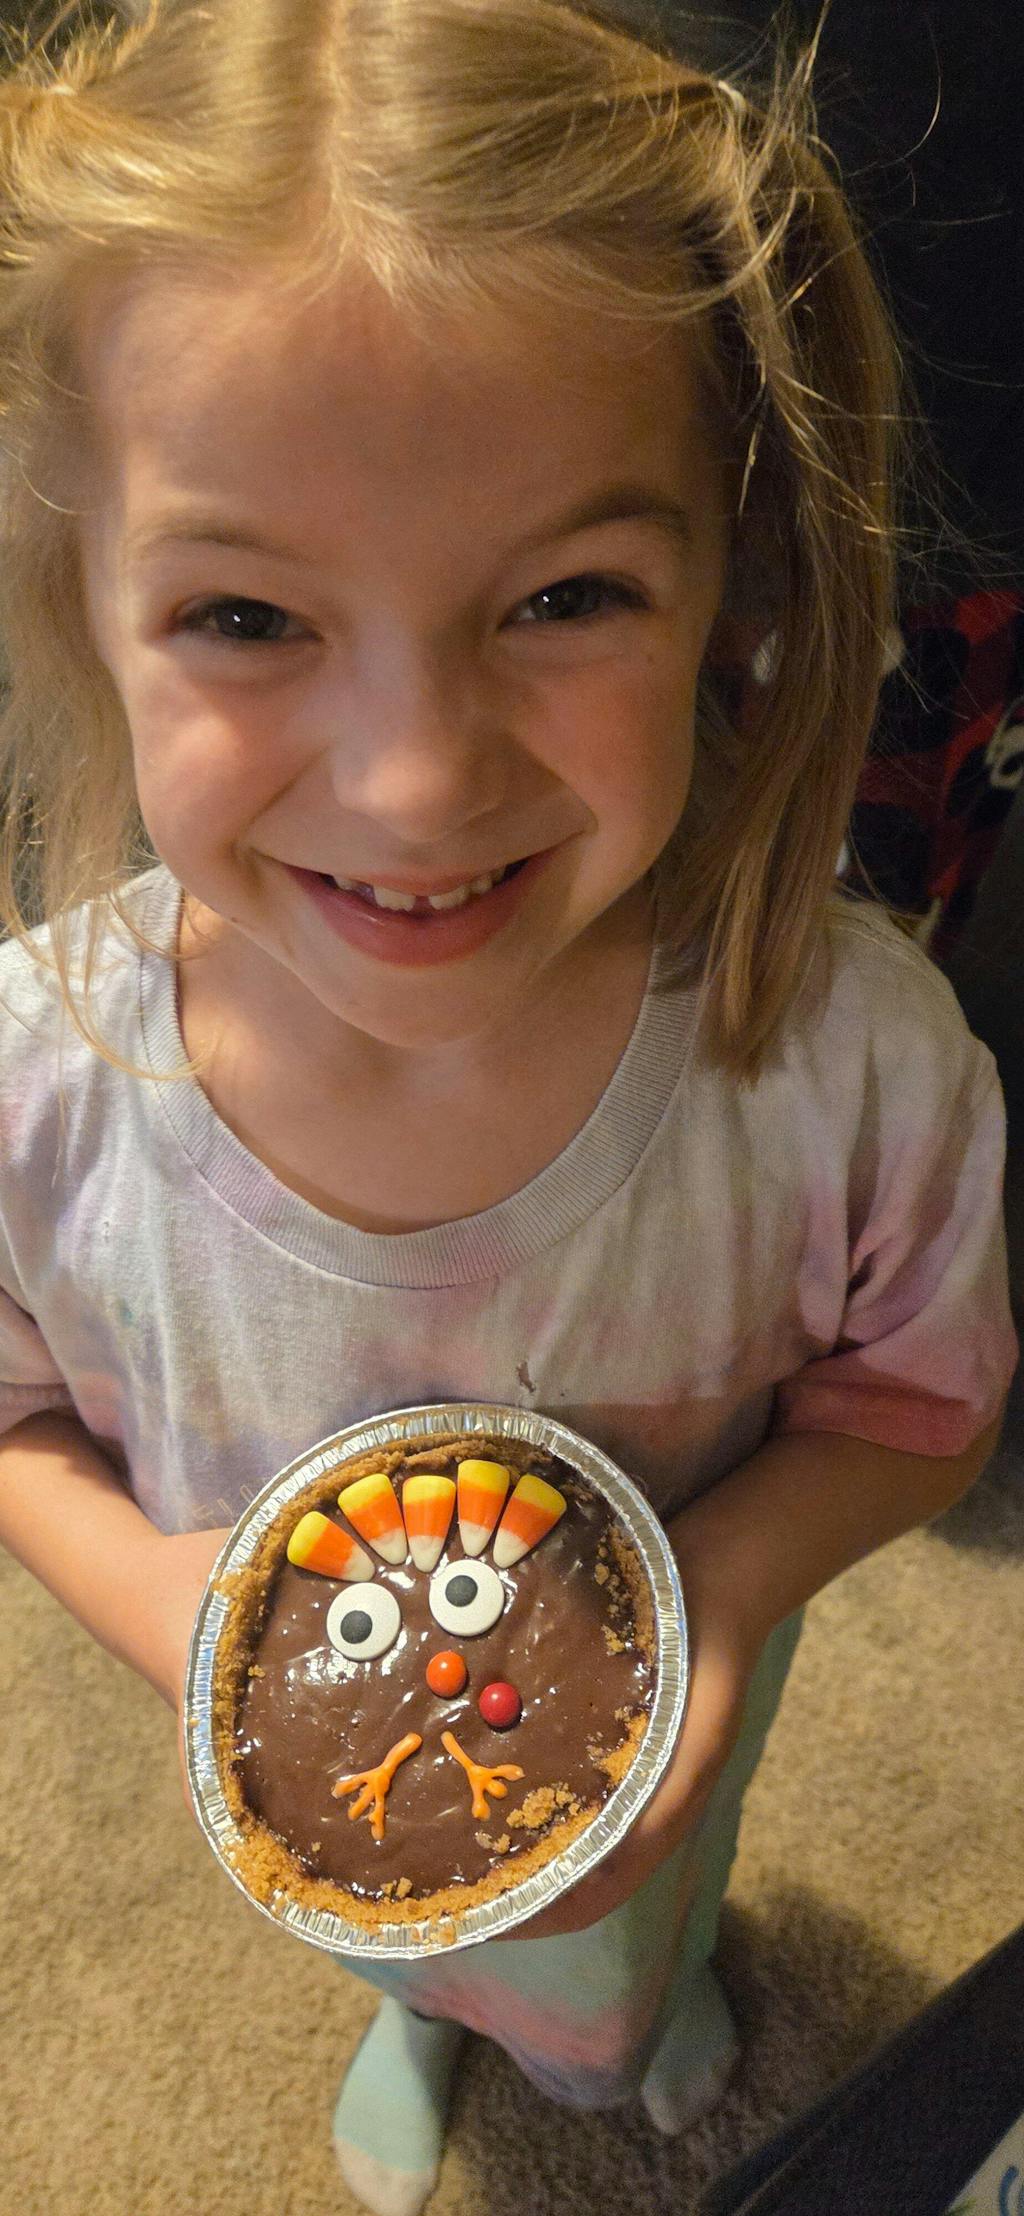
Decorated Cookies or Cupcakes:
- Materials: Pre-baked cookies or cupcakes, various frostings, sprinkles, edible glitter, small candies.
- Process: This is where creativity truly shines! Children can decorate cookies or cupcakes with different colors of frosting, sprinkles, and small candies to create festive designs. Package them in clear bags with a handmade tag for a delightful, personalized gift. This activity refines fine motor skills and encourages artistic expression through edible mediums. If your child loves both crafting and cooking, then our monthly Chef's Club is the perfect solution for continuous screen-free fun!
Keepsake Gifts: Memories to Treasure
These gifts are designed to last, becoming cherished mementos for the recipients.
- Pine Cone Reindeer (as previously described): These charming little figures are perfect for grandparents or teachers. They can be placed on a desk or shelf as a constant reminder of the child who made them.
- Personalized Ornaments (as previously described): A handprint ornament, a stamped wood slice with a special message, or a painted acorn – these unique pieces will be proudly displayed year after year.
-
Salt Dough Handprint Plaques:
- Materials: Salt dough (flour, salt, water), rolling pin, child's hand, sharp knife (adult use), straw, acrylic paints, sealant.
- Process: Prepare salt dough. Roll it out and have your child press their hand into it. Carefully cut around the handprint, make a hole for hanging, and bake at a low temperature until hard. Once cooled, children can paint their handprint and the plaque. An adult can apply a clear sealant to protect it. This creates a durable, personal keepsake.
Handmade Cards and Gift Tags: Adding a Personal Touch
Even the wrapping can be a work of art!
- Materials: Cardstock, construction paper, crayons, markers, stickers, glitter, small nature elements (pressed leaves, tiny pine cones), glue.
- Process: Encourage children to design their own holiday cards or gift tags. They can draw festive scenes, write personal messages (or dictate them to an adult), and decorate with various craft supplies. This promotes literacy, artistic design, and personal expression.
DIY Snow Globes: A Mini Winter Wonderland
- Materials: Small glass jars with tight-fitting lids, distilled water, glitter, waterproof glue (e.g., E6000), small plastic figurines or ornaments (e.g., miniature trees, reindeer), glycerin (optional, to make glitter fall slower).
- Process: Children choose their figurines and arrange them on the inside of the jar lid. Adults glue the figurines securely to the lid using waterproof glue and let dry completely. Fill the jar almost to the top with distilled water, add a pinch of glitter, and a few drops of glycerin if desired. Screw the lid on tightly (adult can add glue to the rim for a permanent seal). Shake and enjoy! This craft introduces concepts of density and buoyancy in a magical way.
Integrating STEM & Art into Holiday Crafting (I'm the Chef Too! Focus)
At I'm the Chef Too!, our core philosophy is to blend food, STEM, and the arts into unique "edutainment" experiences. We believe that learning is most profound when it's hands-on, engaging, and sparks genuine curiosity. Holiday crafting provides a perfect, natural extension of this approach, allowing children to explore scientific principles, engineering challenges, and artistic expression all within the festive context of creation.
The Science of Crafting: Unseen Lessons in Every Project
Many seemingly simple crafts are miniature science experiments in disguise.
- Chemistry in Edible Crafts: When children make applesauce cinnamon ornaments, they're observing how ingredients combine and how moisture loss (dehydration) changes texture and preserves an item. Melting peppermint candies demonstrates states of matter and the effects of heat. Decorating cookies with frosting involves understanding how different ingredients (sugar, butter, food coloring) create various consistencies and colors.
- Physics of Structure and Stability: Building a candy sled or a popsicle stick house involves basic engineering principles. What makes it stable? How can it bear weight? Children instinctively experiment with balance, support, and material strength. They learn about gravity and friction when testing if their candy sled can slide.
- Biology with Nature Crafts: Collecting pine cones, leaves, and twigs isn't just about finding materials; it's an opportunity to discuss botany, local ecosystems, and the life cycle of plants. Drying orange slices delves into the science of preservation.
The Art of Crafting: Cultivating Aesthetic Appreciation
Crafting is inherently artistic, offering a canvas for children to develop their aesthetic sense and creative skills.
- Color Theory: Choosing colors for painting ornaments, selecting ribbons, or arranging felt balls on a pine cone tree allows children to experiment with color combinations, understand contrast, and appreciate how different hues evoke feelings.
- Design and Composition: Arranging natural elements on a wreath or designing a unique snow globe teaches principles of composition, balance, and focal points. They learn what looks visually appealing and how to translate an idea into a tangible design.
- Texture and Form: Working with diverse materials like rough pine cones, smooth clay, fluffy pom-poms, and shiny glitter introduces children to various textures and forms, enhancing their sensory development and understanding of three-dimensional space.
I'm the Chef Too!'s Approach: Blending Food, STEM, and Art
Our kits are designed to bring this multi-disciplinary learning directly to your kitchen. We take complex scientific or artistic concepts and make them accessible and exciting through the medium of food.
- Tangible, Hands-On Learning: Just as children learn best by doing when crafting, they learn best by doing when cooking. Our kits provide all the pre-measured dry ingredients and specialty supplies needed for a complete hands-on experience, removing the stress for parents and maximizing the fun for kids.
- Sparking Curiosity: Our adventures are crafted by mothers and educators who understand how to ignite a child's natural curiosity. Whether it's the wonder of a chemical reaction making a cake erupt or the artistry of creating an edible galaxy, we design experiences that inspire questions and exploration.
- Screen-Free Educational Alternative: In an increasingly digital world, we are committed to providing meaningful, screen-free alternatives that encourage creativity, problem-solving, and family interaction. Homemade Christmas crafts perfectly align with this value, offering a beautiful respite from digital distractions.
Consider how "crafting" isn't limited to paper and glue. Imagine crafting edible experiments! Our Erupting Volcano Cakes Kit lets kids witness a spectacular chemical reaction, just like a scientific craft. Or, delve into the artistry of the cosmos by creating an edible solar system with our Galaxy Donut Kit. These kits epitomize our unique blend of deliciousness, discovery, and creative expression.
Tips for a Smooth and Joyful Crafting Experience
Crafting with kids, especially during the festive season, is about the journey, not just the destination. A few simple strategies can transform potential chaos into cherished memories.
Preparation is Key
- Gather All Supplies: Before you invite your little crafters to the table, ensure all materials are out and easily accessible. Pre-cut shapes for younger children, or have tools like hot glue guns warmed up and ready for adult use.
- Protect Your Workspace: Lay down old newspapers, a disposable tablecloth, or a craft mat to catch spills and glitter. This makes cleanup significantly easier and reduces stress.
- Dress for Success (or Mess!): Have kids wear old clothes or aprons that you don't mind getting paint or glue on. Embrace the fact that crafting can be a bit messy!
Embrace the Mess (and How to Manage It)
- Set Realistic Expectations: Don't aim for Pinterest-perfect outcomes. The joy is in the process, the exploration, and the unique expression of each child.
- Have Cleaning Supplies Ready: Keep a damp cloth, paper towels, and a small broom/dustpan close by for quick cleanups. A designated "glitter zone" can help contain the sparkle.
- Involve Kids in Cleanup: Teach children to put away supplies and help wipe down surfaces. This fosters responsibility and good habits.
Process Over Product
- Focus on the Experience: Emphasize the fun of creating, experimenting, and spending time together. If an ornament doesn't look exactly as planned, praise the effort and the creativity.
- Ask Open-Ended Questions: Instead of just saying "That's nice," ask, "What colors did you choose and why?" or "What was your favorite part of making this?" This encourages reflection and builds language skills.
- Allow for Independent Choices: Let children make their own decisions about colors, placement, and decorations, even if they're not what you would choose. This nurtures their individuality and confidence.
Encourage Independence
- Provide Guidance, Not Dictation: Show them how to use a tool, but then step back and let them try it. Offer suggestions if they get stuck, but allow them to problem-solve.
- Break Down Complex Tasks: For multi-step crafts, break them into smaller, manageable chunks. "First, we'll paint the pine cones. Then, after they dry, we'll add the decorations."
- Celebrate Small Victories: Acknowledge their efforts at each stage, not just the finished product. "You did a great job cutting that circle!"
Celebrate Efforts, Not Perfection
- Display Their Work Proudly: Hang every ornament, tape up every card. Seeing their creations displayed gives children immense pride and encourages future creativity.
- Share Their Creations: If they make gifts, talk about who they're for and why that person will love them. This fosters generosity and thoughtfulness.
Beyond Christmas: Continuing the Creative Learning Journey
As the last glitter speck is swept away and the final homemade ornament finds its place, the magic of Christmas crafting leaves behind more than just festive decorations. It leaves a legacy of shared laughter, newfound skills, and vibrant memories. The joy of creating, the pride of accomplishment, and the invaluable family bonding experienced during these holiday projects don't have to end with the season.
At I'm the Chef Too!, we believe that the spirit of hands-on "edutainment" should be a year-round endeavor. Our mission is to continue sparking curiosity and creativity in children, facilitating family bonding, and providing screen-free educational alternatives long after the holiday lights are packed away. We’re passionate about teaching complex subjects through tangible, hands-on, and delicious cooking adventures, developed by mothers and educators who understand what truly engages young minds.
Think about how much your child learned: the science of ingredients, the art of design, the engineering of construction, and the pure joy of making something with their own hands. Imagine if these enriching experiences could arrive at your doorstep every single month!
Conclusion
The magic of homemade Christmas crafts for kids lies in their ability to transform simple materials into cherished memories, fostering creativity, developing essential skills, and strengthening family bonds. From humble pine cones to intricate edible delights, each project is an opportunity for learning, laughter, and connection. We've explored a vast array of ideas, from nature-inspired ornaments to thoughtful handmade gifts, all designed to make this holiday season truly special and screen-free.
Remember, the goal isn't perfection, but participation – the joy found in the process, the confidence built in creation, and the invaluable time spent together. At I'm the Chef Too!, we champion this hands-on approach to learning, blending STEM, food, and art into every adventure.
Ready to extend the joy of discovery and delicious learning beyond the holidays? Give the gift of learning that lasts all year with a 3, 6, or 12-month prepaid subscription to our STEM cooking adventures! Join The Chef's Club today and enjoy a new, exciting, and educational adventure delivered to your door every month with free shipping in the US. Let's keep the curiosity cooking!
FAQ Section
Q1: What age group are these homemade Christmas crafts suitable for?
A1: Many of these crafts are adaptable for a wide range of ages! Younger children (toddlers and preschoolers) can focus on painting, gluing large items, and sensory play with adult supervision. Elementary-aged children can handle more complex cutting, detailed decorating, and multi-step projects. Older kids can take on more intricate designs, fine motor tasks like threading, and independent creation. Always choose activities appropriate for your child's skill level and ensure adult supervision for sharp tools or small parts.
Q2: How can I make these crafts more educational?
A2: You're already doing it just by crafting! To enhance the educational aspect, talk about the materials (e.g., "Where do pine cones come from?"), discuss shapes and patterns (geometry in snowflakes), explain simple science (how glue dries, how heat melts candy), and encourage storytelling about their creations. At I'm the Chef Too!, we integrate STEM and art seamlessly into our cooking kits, and you can apply similar principles to crafting by discussing the "why" and "how" behind each step.
Q3: What are some good ways to store finished crafts or display them?
A3: For ornaments, a sturdy ornament box or even an egg carton can protect them year after year. Larger decorations can be stored in plastic bins. Displaying crafts prominently is key to boosting a child's confidence! Hang them on the tree, tape cards to the refrigerator, create a special "craft gallery" wall, or use them as unique gift toppers.
Q4: My child gets easily frustrated if a craft doesn't turn out "perfectly." How can I help?
A4: Focus on the process, not the product! Emphasize the fun of creating, the effort they put in, and the unique choices they made. Say things like, "I love how you experimented with those colors!" or "You worked so hard on that!" instead of commenting on the outcome. Remind them that art is about expressing themselves, and there's no "right" or "wrong" way. Sometimes, having a less structured "free craft" session where they can just explore materials without a specific goal can also help.
Q5: Where can I find affordable craft supplies for these homemade Christmas crafts?
A5: Many supplies can be found right in your home (recycled materials!) or in nature (pine cones, twigs). Dollar stores, discount retailers, and craft store sales are excellent places to stock up on basics like glue, paints, paper, and embellishments like googly eyes and pom-poms. Buying in bulk (e.g., a large bottle of school glue) can also be cost-effective.
Q6: How can I incorporate baking or cooking into our holiday crafting time?
A6: Absolutely! Edible crafts like decorating cookies, making candy sleds, or creating applesauce-cinnamon ornaments are wonderful ways to blend crafting with culinary fun. These activities engage multiple senses and have a delicious reward. If your child enjoys mixing, measuring, and creating edible masterpieces, then exploring our full library of adventure kits available for a single purchase in our shop is a fantastic next step to continue the culinary crafting journey!
Q7: What are the benefits of a subscription box like The Chef's Club for year-round crafting and learning?
A7: A subscription to The Chef's Club offers incredible convenience, delivering new, exciting, and educational STEM cooking adventures directly to your door every month with free shipping. It takes the stress out of planning and shopping for activities, ensuring a consistent stream of screen-free, hands-on learning experiences. Our kits are developed by mothers and educators to spark curiosity, foster family bonding, and teach complex subjects through delicious, tangible projects, much like the best homemade crafts do.