Table of Contents
- Introduction
- What Exactly Is a Chemical Change? Unpacking the Science of Transformation
- Why Chemical Changes Matter for Kids: Sparking Curiosity and Cultivating Future Innovators
- Safety First: Essential Guidelines for Junior Scientists
- Our Top Edible Chemical Change Experiments for Kids: Delicious Discoveries!
- Exploring Beyond the Kitchen: More Chemical Wonders
- Beyond the Experiment: Maximizing the Learning Experience
- Bringing STEM Home with I'm the Chef Too!
- Conclusion
- FAQ Section
Introduction
Have you ever seen something seemingly magical happen right before your eyes? Perhaps a fluffy cake rising in the oven, sparkling bubbles erupting from a simple mixture, or a penny slowly changing color over time? These aren't magic tricks; they're the wonders of chemistry in action, specifically, chemical change experiments for kids! Far from being a dry, complex subject confined to labs, chemistry is all around us, happening constantly in our kitchens, backyards, and even inside our bodies. It’s the science of how things transform, creating entirely new substances with brand new properties.
At I'm the Chef Too!, we believe that learning should be an adventure—a delicious, hands-on, and utterly captivating one. Our mission is to blend food, STEM, and the arts into one-of-a-kind "edutainment" experiences that ignite curiosity and creativity in children. We know that introducing foundational scientific concepts like chemical changes early on, in an engaging and tangible way, can spark a lifelong love for learning. This post isn't just a list of activities; it's your comprehensive guide to understanding, exploring, and truly experiencing chemical changes with your children, making science fun, accessible, and unforgettable. Get ready to turn your home into a vibrant laboratory where every experiment fosters confidence, hones critical thinking, and creates joyful family memories, all while keeping screens off and imaginations on!
What Exactly Is a Chemical Change? Unpacking the Science of Transformation
Before we dive into the exciting world of experiments, let's take a moment to understand the fundamental concept we're exploring. What truly defines a "chemical change" and how does it differ from other types of changes we observe every day? It all boils down to the tiny building blocks of matter: atoms and molecules.
Every material around us, whether it's the water we drink, the air we breathe, or the sugar we bake with, is made up of chemical substances. A chemical substance has a defined chemical composition – its makeup is always the same. For instance, a molecule of water (H₂O) always consists of two hydrogen atoms and one oxygen atom. This composition doesn't change if you freeze water into ice or boil it into steam; it's still H₂O. That’s a physical change – the substance is still the same, just in a different state.
A chemical change, or chemical reaction, is different. It occurs when two or more chemical substances interact with each other and, in the process, create one or more new chemical substances. On a molecular level, this means the atoms are rearranged, breaking old bonds and forming new ones. The original substances (called reactants) are consumed, and new substances (called products) emerge. It's like taking LEGO bricks from one structure and building an entirely new one – the bricks are the same, but their arrangement makes something completely new.
Telling the Tale: Signs of a Chemical Change
How can we tell if a chemical change has taken place? Our senses are our best scientific tools! When you mix two substances, keep an eye (or nose, or ear!) out for these common indicators:
- Temperature Change: The mixture might become noticeably warmer (exothermic reaction, releasing heat) or cooler (endothermic reaction, absorbing heat). Think about those hand warmers that heat up when you shake them!
- Light (or a Spark/Flame): Some chemical reactions release energy in the form of light, from a faint glow to a bright flame. This is often seen in combustion reactions.
- Color Change: A dramatic shift in color is a strong indicator that new substances have formed. For example, a raw egg white is clear, but when cooked, it turns opaque white.
- Odor: The production of a new smell, distinct from the original ingredients, often signals a chemical transformation.
- Bubbling or Fizzing: This usually indicates the creation of a new gas. Think of mixing baking soda and vinegar – the fizz is carbon dioxide gas escaping!
- Cloudiness or Formation of a Solid (Precipitate): Sometimes, when two clear liquids mix, a cloudy or solid substance appears, settles to the bottom, or floats. This solid is a new compound that isn't soluble in the liquid.
- Volume Change: While less common for simple visual observation, the creation or consumption of gas can lead to a noticeable change in the overall volume or pressure of a confined system, like inflating a balloon.
By learning to identify these signs, children can become keen observers, truly understanding the dynamic world of chemistry happening all around them. It transforms everyday occurrences into scientific observations, making learning an engaging, interactive process.
Why Chemical Changes Matter for Kids: Sparking Curiosity and Cultivating Future Innovators
You might wonder why it’s so important to introduce complex concepts like chemical changes to young children. The answer is simple: it’s about more than just science facts. It's about developing critical thinking, problem-solving skills, and a profound sense of curiosity that will benefit them throughout their lives.
Laying the Foundation for STEM Success
By engaging in chemical change experiments for kids, children naturally begin to grasp core STEM (Science, Technology, Engineering, and Mathematics) principles. They learn to:
- Observe: Noticing subtle details and changes.
- Question: Asking "why" and "how" things happen.
- Predict: Forming hypotheses about what might occur.
- Experiment: Testing their ideas in a hands-on way.
- Analyze: Interpreting results and connecting them to explanations.
These skills are invaluable, not just for aspiring scientists but for anyone navigating an increasingly complex world. They are the building blocks of scientific literacy and critical thinking, empowering children to understand the world around them and to confidently approach new challenges.
Connecting Science to the Real World
Chemistry isn't just for textbooks; it's integral to daily life. Cooking, cleaning, digesting food, growing plants, even the processes happening inside their own bodies – all involve chemical changes. When kids see a chemical reaction transform ingredients into a delicious treat, they make a tangible connection between abstract science and their everyday experiences. This connection makes learning relevant, memorable, and incredibly exciting.
Our I'm the Chef Too! Approach: Edutainment Beyond the Screen
At I'm the Chef Too!, we firmly believe in the power of hands-on discovery. Our unique approach seamlessly blends food, STEM, and the arts, creating "edutainment" experiences that captivate children and keep them engaged. We want to provide a screen-free educational alternative that promotes family bonding and sparks genuine creativity. Our kits, developed by mothers and educators, teach complex subjects through tangible, delicious cooking adventures. We don't promise your child will become a top scientist overnight, but we guarantee they will foster a love for learning, build confidence in their abilities, develop key skills, and create joyful, lasting memories with you.
Imagine the excitement when your child discovers that the amazing transformation they just witnessed in their kitchen is the same science behind why bread rises or why a raw egg becomes solid when cooked. These revelations build confidence and foster a positive attitude towards learning.
Ready to bring a world of discovery, creativity, and delicious science right to your doorstep? There's nothing quite like the anticipation of a new adventure arriving every month. Join The Chef's Club today and enjoy free shipping on every box, packed with pre-measured dry ingredients and specialty supplies for a complete, delightful experience!
Safety First: Essential Guidelines for Junior Scientists
Before embarking on any scientific exploration, safety must always be our top priority. While the chemical change experiments for kids we'll discuss are designed to be fun and accessible, they still require responsible adult supervision and adherence to a few key guidelines. Modeling good lab hygiene and safety practices from a young age instills valuable habits for future scientists.
Non-Negotiable Safety Rules:
- Adult Supervision: All experiments, especially those involving heat, sharp objects, or chemicals, must be conducted with direct adult supervision. Never leave children unattended during an experiment.
- Protective Gear: We highly recommend wearing safety goggles to protect eyes from splashes, and smocks or old clothes to protect skin and clothing. Even common household ingredients can be irritants.
- Proper Ventilation: If an experiment produces fumes or gas, ensure it's conducted in a well-ventilated area, preferably outdoors or near an open window.
- Safe Handling of Ingredients: Treat all ingredients, even common kitchen items, with respect. Avoid direct contact with skin or eyes, especially with acids (like vinegar) or bases (like baking soda). Use spoons or pipettes for transfer.
- No Tasting (Unless Explicitly Edible): Unless an experiment is specifically designed as an edible cooking project and you are following a trusted recipe, never allow children to taste or ingest any experimental mixture. Even seemingly harmless ingredients can become unsafe when combined.
- Clean-Up: After each experiment, clean up thoroughly. Wash hands immediately with soap and water, and properly dispose of all materials as instructed or according to local guidelines.
By establishing these safety protocols, we teach children respect for scientific inquiry and ensure that their adventures in chemistry are not only educational but also secure and enjoyable.
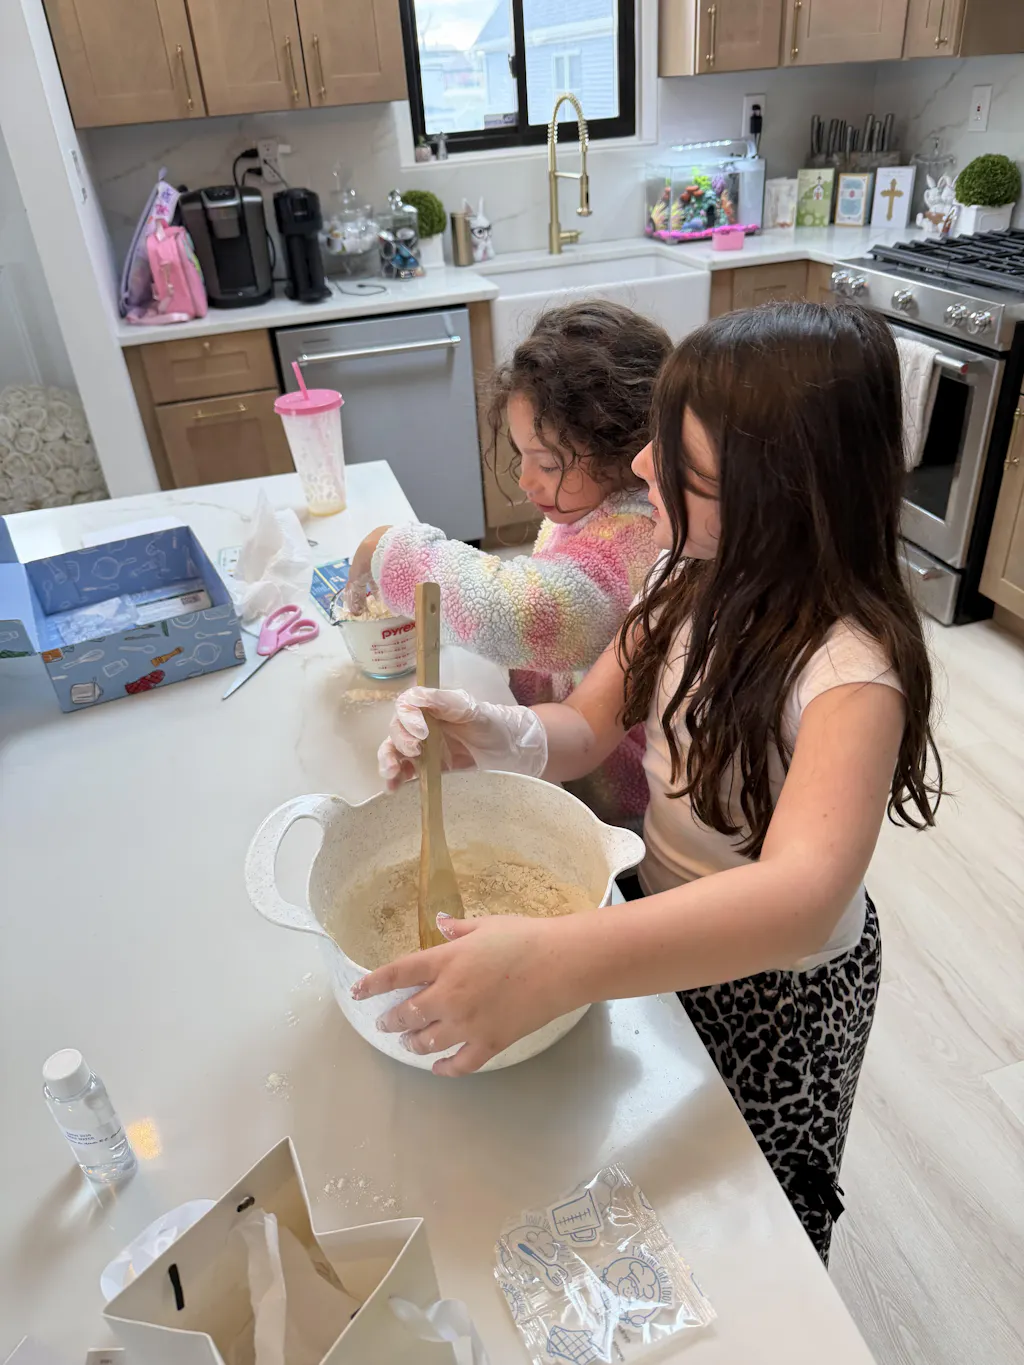
Our Top Edible Chemical Change Experiments for Kids: Delicious Discoveries!
One of the best ways to explore chemical changes is through the magic of cooking and baking. The kitchen is a natural laboratory, full of delicious transformations! Here are some of our favorite edible chemical change experiments for kids, designed to engage their senses and spark their scientific curiosity.
1. The Classic Volcano Eruption: Fizzing Fun with Baking Soda and Vinegar
This iconic experiment is a staple for a reason: it's visually dramatic, incredibly fun, and a perfect introduction to acid-base chemical reactions.
- The Science: When baking soda (sodium bicarbonate, a base) mixes with vinegar (acetic acid), a chemical reaction occurs, producing carbon dioxide gas, water, and sodium acetate. The rapidly expanding carbon dioxide gas creates the bubbling, fizzing "eruption."
-
What You'll Need:
- Baking soda
- White vinegar
- Liquid dish soap (optional, but enhances the foam)
- Red food coloring (optional, for lava effect)
- A container (cup, small bottle, or even a molded clay volcano)
- A tray or large bowl to catch the overflow
-
Experiment:
- Place your container on a tray. Add 1-2 tablespoons of baking soda to the bottom.
- If using, add a few drops of red food coloring and a squirt of dish soap to the baking soda.
- Slowly pour about half a cup of vinegar into the container.
- Watch the immediate, fizzy eruption! For a longer reaction, add more baking soda or vinegar.
-
Discussion Questions:
- What happened when the vinegar touched the baking soda?
- What did you see, hear, or feel? (Bubbles, fizzing sound, sometimes a slight cooling sensation).
- What do you think those bubbles are? (Carbon dioxide gas).
- How is this different from simply mixing water and sugar? (A new gas was formed, not just a mixture).
At I'm the Chef Too!, we love bringing this kind of excitement into delicious forms. Imagine making your very own volcano that you can actually eat! Our Erupting Volcano Cakes Kit lets kids experience this amazing chemical reaction in a safe, guided, and tasty way, transforming learning into a delightful culinary adventure.
2. Fizzy Lemon/Orange/Cranberry Delights: Edible Acid-Base Reactions
Extend the acid-base fun with fruits! The natural acids in citrus fruits or cranberries can create a similar fizz.
- The Science: Similar to the volcano, the citric acid in lemons/oranges or the acid in cranberries reacts with baking soda to produce carbon dioxide gas.
-
What You'll Need:
- Lemon, orange, or cranberry juice (freshly squeezed is best)
- Baking soda
- Small spoons or straws
- Small cups or a tray
-
Experiment:
- Pour a small amount of juice into a cup.
- Add a spoonful of baking soda to the juice.
- Stir gently and observe the fizzing.
- For a twist, cut an orange into slices, sprinkle baking soda on a slice, and carefully taste the fizzy sensation! (Ensure hands are clean and fruit is washed).
-
Discussion Questions:
- Does this react like the vinegar and baking soda? What's similar? What's different?
- How does it feel on your tongue if you tasted the orange fizz? (Tingling sensation from the gas).
3. Balloon Inflation: Trapping the Invisible Gas
This experiment elegantly demonstrates that new gas is indeed formed and can take up space.
- The Science: The chemical reaction between baking soda and vinegar (or an antacid tablet and water) produces carbon dioxide gas. When the reaction occurs in a sealed environment, the gas has nowhere to go but into the balloon, inflating it.
-
What You'll Need:
- Empty plastic bottle (e.g., water bottle)
- Balloon
- Baking soda
- Vinegar OR Antacid tablet (like Alka-Seltzer) and water
- Funnel (optional, but helpful)
-
Experiment (Baking Soda & Vinegar Version):
- Pour about 1/2 cup of vinegar into the plastic bottle.
- Using a funnel, carefully add 2-3 tablespoons of baking soda into the balloon, trying to keep it from falling into the bottle yet.
- Carefully stretch the mouth of the balloon over the opening of the bottle, ensuring a tight seal.
- Once secured, lift the balloon so the baking soda falls from the balloon into the vinegar in the bottle.
- Watch as the balloon inflates!
-
Experiment (Antacid Tablet Version):
- Fill the bottle halfway with water.
- Break an antacid tablet into small pieces that will fit into the balloon. Place the pieces inside the balloon.
- Attach the balloon securely to the bottle opening.
- Lift the balloon to drop the tablet pieces into the water.
- Observe the balloon inflating as the tablet fizzes!
-
Discussion Questions:
- Where did the air come from to inflate the balloon?
- What would happen if you used more baking soda or more antacid tablets?
- How is this similar to the fizzing volcano?
For more imaginative projects that bring science to life, take a peek at our full collection of single-purchase adventure kits. You're sure to find the perfect theme to ignite your little learner's curiosity, from ancient history to outer space! Browse our complete collection of one-time kits here.
4. Making "Plastic" from Milk: A Casein Polymer Adventure
This fascinating experiment transforms liquid milk into a moldable, plastic-like substance, demonstrating a fundamental chemical change related to proteins.
- The Science: Milk contains a protein called casein. When you add an acid (like vinegar), the casein molecules unfold and regroup, or "curdle," forming a polymer – a large chain-like molecule. This solid, plastic-like substance is a new material with entirely different properties from liquid milk.
-
What You'll Need:
- 1 cup milk (whole milk works best)
- 4 tablespoons white vinegar
- Saucepan
- Stove (adult use only)
- Strainer
- Coffee filter or paper towel
- Spoon
- Cookie cutters or food coloring (optional, for shaping/decorating)
-
Experiment:
- Have an adult gently heat the milk in a saucepan over medium heat until it's steamy but not boiling (around 120°F / 50°C).
- Remove the milk from the heat.
- Stir in the vinegar slowly. You'll immediately notice the milk curdling and separating into curds (solids) and whey (liquid).
- Continue stirring for about a minute.
- Carefully pour the mixture through a strainer lined with a coffee filter or paper towel into a bowl to separate the curds from the whey.
- Gently press out any excess liquid from the curds with the back of a spoon.
- Once cooled and mostly dry, you'll have a dough-like substance. Knead it a bit, and you can mold it into shapes, add food coloring, or press it into cookie cutters. Let it dry for 24-48 hours to harden into "milk plastic."
-
Discussion Questions:
- How did the milk change when you added the vinegar?
- What's different about the new substance you made compared to liquid milk?
- Can you think of other times you've seen milk curdle (like sour milk)? Is that a chemical change too?
5. Naked Egg: Shell-less Science
Watch an eggshell disappear right before your eyes in this incredible chemical change experiment.
- The Science: Eggshells are primarily made of calcium carbonate. Vinegar is acetic acid. When the acid in the vinegar comes into contact with the calcium carbonate, a chemical reaction occurs, dissolving the calcium carbonate and producing carbon dioxide gas (which you'll see as tiny bubbles on the shell). What's left is the semi-permeable membrane that holds the egg together, making it appear "naked" and bouncy!
-
What You'll Need:
- Raw egg (uncooked, in its shell)
- White vinegar
- Clear glass or jar
- Patience (this one takes a few days!)
-
Experiment:
- Carefully place the raw egg into the glass.
- Pour enough vinegar into the glass to completely submerge the egg.
- Observe the egg immediately – you should see tiny bubbles forming on the shell's surface. This is the carbon dioxide gas being released!
- Cover the glass (loosely, if you want to allow some gas to escape) and let it sit for 24-48 hours.
- After 24-48 hours, carefully remove the egg from the old vinegar (it might be cloudy or dirty) and gently rinse it under cool water. You'll notice the shell feels softer and may even rub off.
- Place the egg in fresh vinegar for another 24-48 hours.
- After a total of 2-3 days, gently take the egg out and rinse it. The shell should be completely gone, leaving you with a translucent, bouncy "naked" egg!
-
Discussion Questions:
- What did you observe happening to the eggshell?
- What do you think those bubbles were?
- How did the egg change from when you first put it in the vinegar?
- Can you gently bounce the egg? (Do this over a sink or soft surface, as it can still break!).
6. Elephant Toothpaste: A Foaming Spectacle (Requires Adult Handling of Hydrogen Peroxide)
This classic demonstration is an exciting exothermic (heat-releasing) decomposition reaction that produces a massive amount of foamy "toothpaste." Adult supervision for handling hydrogen peroxide is crucial.
- The Science: Hydrogen peroxide (H₂O₂) naturally decomposes into water (H₂O) and oxygen gas (O₂), but this usually happens very slowly. Yeast acts as a catalyst, speeding up this decomposition reaction dramatically. When dish soap is added, the rapidly released oxygen gas gets trapped by the soap, creating a massive amount of foam that resembles elephant-sized toothpaste. The reaction also releases heat, making it an exothermic chemical change.
-
What You'll Need:
- Empty plastic bottle (e.g., water bottle)
- 1/2 cup 3% hydrogen peroxide (available at pharmacies)
- 1 tablespoon active dry yeast
- 3 tablespoons warm water
- Liquid dish soap
- Food coloring (optional)
- Funnel (optional)
- A tray or baking pan (essential for catching foam)
- Safety goggles and gloves for the adult and children
-
Experiment:
- Place the empty bottle in the center of a large tray.
- In a small cup, dissolve the yeast in the warm water and stir until it's thoroughly mixed. Let it sit for about 5 minutes.
- Using a funnel, carefully pour the hydrogen peroxide into the bottle.
- Add a good squirt of dish soap into the bottle (about 1-2 tablespoons).
- If using food coloring, add a few drops down the side of the bottle for stripes of color in the foam.
- Now for the exciting part! Quickly pour the yeast mixture into the bottle.
- Step back and watch as a huge column of foam erupts from the bottle! You can even feel the bottle; it will be warm to the touch (exothermic reaction).
-
Discussion Questions:
- What signs of a chemical change did you observe? (Lots of foam, warmth, new substance formed).
- What do you think is in all that foam? (Oxygen gas trapped by soap).
- What was the role of the yeast in this experiment? (It helped the hydrogen peroxide break down faster).
Remember, while this foam is fun to look at, it's not edible. Always clean up thoroughly after the experiment.
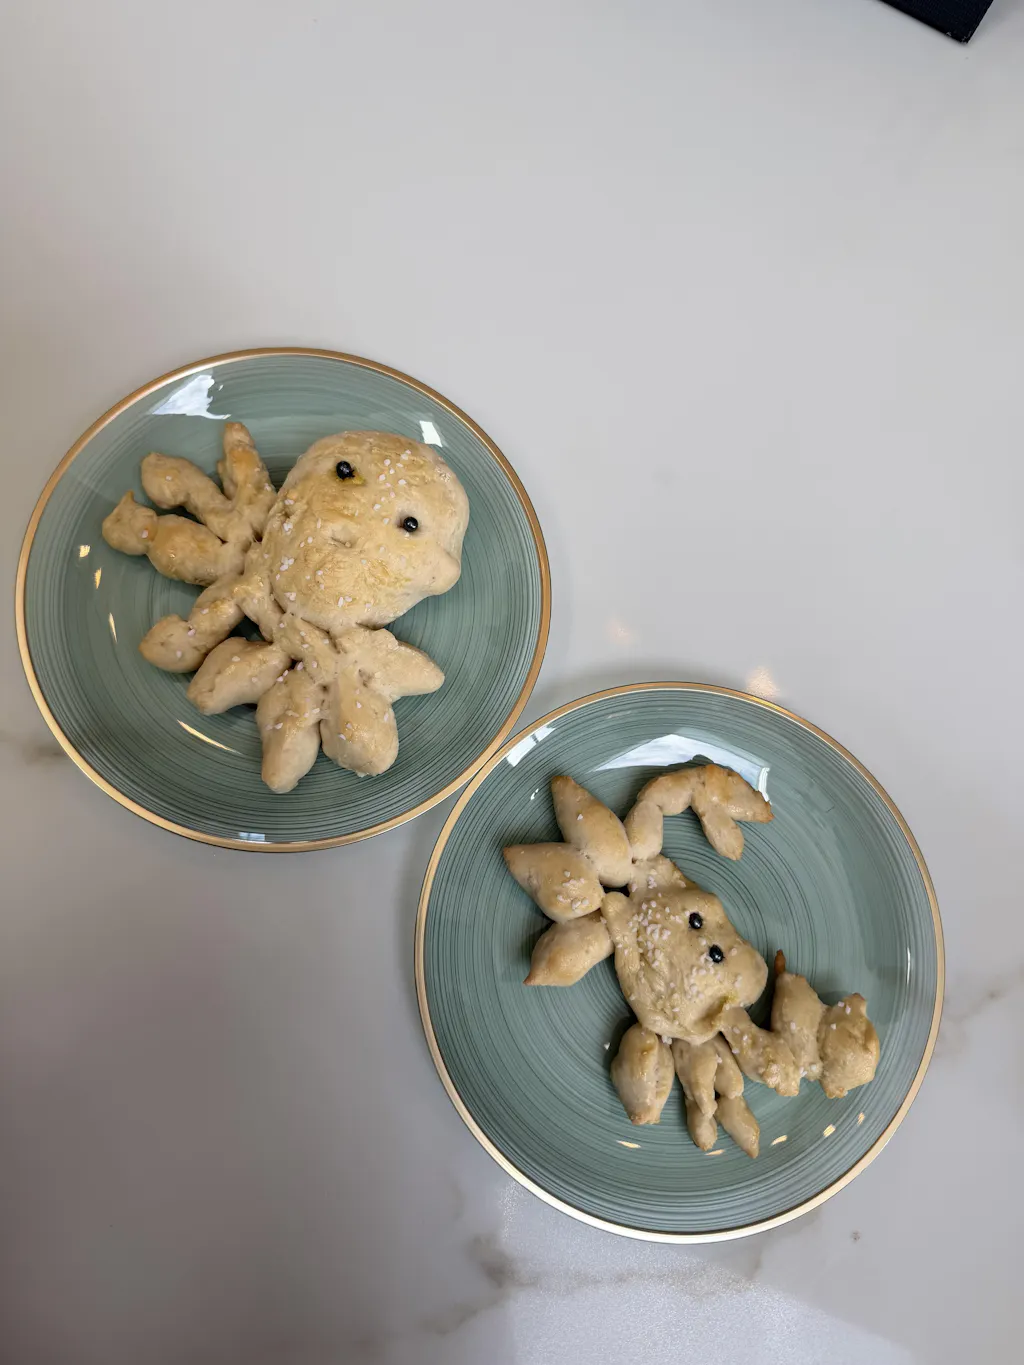
7. Baking Wonders: Everyday Kitchen Chemistry
Every time you bake, you're observing an array of fascinating chemical changes!
- The Science: Baking soda and baking powder are key players in many recipes. Baking soda needs an acid (like buttermilk, lemon juice, or yogurt) to react and produce carbon dioxide gas, which helps doughs and batters rise. Baking powder is a combination of baking soda, an acid (like cream of tartar), and a starch, designed to react and produce gas when wet and/or when heated. Beyond leavening, heating ingredients causes other chemical changes: proteins coagulate, sugars caramelize, and fats melt, all contributing to new textures, flavors, and aromas.
-
Examples:
- Cake Rising: The bubbles formed by baking soda/powder create air pockets, making the cake light and fluffy.
- Bread Baking: Yeast ferments sugars, producing carbon dioxide and alcohol, causing the bread to rise. Heat then kills the yeast and sets the bread's structure.
- Browning/Caramelization: Heat causes sugars to break down and recombine in complex ways, creating delicious brown crusts and rich flavors.
- Activity: Next time you bake, point out these changes to your child! Let them see the dough rise, smell the browning crust, and feel the transformation from liquid batter to solid cake.
-
Discussion Questions:
- What changes do you see when we mix the wet and dry ingredients?
- How does the dough look and feel different after it rests for a while? (If using yeast).
- What happens to the cake when it's in the oven? How does it look, smell, and feel after it's baked?
Our unique I'm the Chef Too! kits turn these everyday kitchen transformations into structured learning adventures. For example, our Galaxy Donut Kit provides all the ingredients for delicious donuts, but also incorporates lessons on astronomy, letting kids explore chemical changes in baking while creating their own edible solar system! It's a fantastic way to blend deliciousness with discovery.
Exploring Beyond the Kitchen: More Chemical Wonders
While edible experiments are a fantastic way to engage kids, many other safe and exciting chemical change experiments for kids can be done with common household items, revealing the wonders of chemistry in different contexts.
8. Red Cabbage pH Indicator: Unveiling Acids and Bases
Discover the hidden acidity or alkalinity of everyday substances using a vibrant natural indicator.
- The Science: Red cabbage contains a pigment called anthocyanin, which changes color depending on the pH (acidity or alkalinity) of its environment. It turns red/pink in acids, blue/purple in neutral solutions, and green/yellow in bases. This is a classic example of a chemical change indicated by a dramatic color shift.
-
What You'll Need:
- Half a head of red cabbage
- Hot water
- Strainer
- Clear glasses or small bowls
- Various household substances: lemon juice, vinegar, baking soda solution (baking soda dissolved in water), dish soap solution, tap water, milk.
-
Experiment:
- Have an adult chop the red cabbage into small pieces.
- Place the cabbage in a heatproof bowl or pot and pour hot water over it, just enough to cover the cabbage. Let it steep for at least 15-30 minutes (or simmer gently for 10 minutes, then cool). The water will turn deep purple.
- Strain out the cabbage pieces, reserving the purple liquid – this is your pH indicator!
- Pour a small amount of each household substance into separate clear glasses.
- Add a few drops of the red cabbage indicator liquid to each glass and observe the color change.
-
Discussion Questions:
- What colors did you see?
- Which substances turned red/pink? (Acids like lemon juice, vinegar).
- Which turned green/yellow? (Bases like baking soda, dish soap).
- What color did tap water become? (Usually purple/blue, indicating neutral or slightly acidic/basic).
9. Dancing Raisins: A Carbon Dioxide Performance
This fun experiment shows how gas production can affect buoyancy.
- The Science: Carbonated sodas contain dissolved carbon dioxide gas. When you drop raisins into the soda, the gas bubbles adhere to the rough surface of the raisins, increasing their buoyancy. The raisins float to the surface. When the bubbles pop at the surface, the raisins lose their buoyancy and sink, only for new bubbles to attach, repeating the "dance." This interaction of gas with the solid is a physical manifestation of a chemical process (the carbonation of the drink).
-
What You'll Need:
- Clear carbonated soda (like club soda or lemon-lime soda)
- Tall, clear glass
- Raisins
-
Experiment:
- Pour the carbonated soda into the tall glass.
- Drop a few raisins into the soda.
- Observe them "dancing" as they float up and down.
-
Discussion Questions:
- What makes the raisins float?
- What happens when they reach the top?
- Why do they sink again?
10. Lava Lamp: Colorful Chemical Reactions in Motion
Create your own mesmerizing, bubbling lava lamp using a simple chemical reaction.
- The Science: Oil and water don't mix (they are immiscible), and oil is less dense than water, so it floats on top. When an Alka-Seltzer tablet (containing citric acid and baking soda) is added to the water layer, it reacts to produce carbon dioxide gas. These gas bubbles rise through the oil, carrying small blobs of colored water with them. When the bubbles pop at the surface, the water blobs sink back down, creating a continuous "lava" effect.
-
What You'll Need:
- Tall, clear glass or plastic bottle
- Vegetable oil
- Water
- Food coloring
- Alka-Seltzer tablet (or similar effervescent antacid)
-
Experiment:
- Fill the glass about one-quarter full with water.
- Slowly pour vegetable oil on top until the glass is almost full. You'll see two distinct layers.
- Add about 10-15 drops of food coloring. Watch as the drops fall through the oil and mix with the water layer.
- Break an Alka-Seltzer tablet into a few pieces. Drop one piece into the glass.
- Observe the bubbles and colorful "lava" blobs moving up and down. Add more tablet pieces for continued action.
-
Discussion Questions:
- Why did the oil and water stay separate?
- What caused the bubbles?
- Why do the colored blobs go up and then come back down?
11. Green Pennies: The Patina of Time
Observe a real-life chemical change that occurs over days, transforming the appearance of copper.
- The Science: Pennies are primarily made of copper. When copper is exposed to oxygen in the air, especially in the presence of an acid (like vinegar or lemon juice) and salt, it undergoes a slow oxidation chemical reaction. This reaction forms copper carbonate (or a similar copper salt), which is greenish-blue and known as patina. This is similar to how the Statue of Liberty got its green color!
-
What You'll Need:
- Several shiny copper pennies (pre-1982 pennies have more copper)
- Small, non-metal dish or bowl
- White vinegar or lemon juice
- Salt
- Paper towel
-
Experiment:
- Pour a small amount of vinegar (or lemon juice) into the dish.
- Sprinkle a pinch of salt into the vinegar and stir to dissolve.
- Place the pennies in the liquid, ensuring they are partially submerged or resting on a vinegar-soaked paper towel. You can also rub them with the solution.
- Leave the dish uncovered in a well-ventilated area for several hours or even overnight.
- Observe the pennies over time. You should start to see a greenish-blue film forming on their surface.
-
Discussion Questions:
- What did the pennies look like before the experiment?
- How have they changed?
- Where else have you seen this kind of green color on metal?
- Do you think you could change the pennies back to their original shiny color easily? (This is often an irreversible change).
Beyond the Experiment: Maximizing the Learning Experience
Engaging in chemical change experiments for kids is just the beginning. To truly unlock their potential and foster a deep understanding, we need to guide children through a process that encourages scientific thinking and curiosity.
The Power of Prediction, Observation, and Explanation (POE)
Encourage your junior scientists to think like real scientists using the POE method:
- Predict: Before starting, ask "What do you think will happen?" This activates prior knowledge and sets a purpose for the experiment.
- Observe: During the experiment, encourage focused observation. "What do you see, hear, smell, feel?" Prompt them to notice details, like bubbles, color changes, or temperature shifts.
- Explain: After the experiment, ask "What did happen, and why do you think it happened?" This helps them connect their observations to scientific concepts.
Documenting Discoveries: The Scientist's Journal
Provide a simple notebook or paper for children to record their observations. They can:
- Draw pictures: Illustrate what they see before, during, and after the experiment.
- Write notes: Even simple words or phrases about colors, smells, or reactions.
- List materials: Practice organization and following instructions.
- Formulate questions: Encourage them to ask "what if we tried...?" for future experiments.
This practice reinforces literacy skills while solidifying scientific understanding. It also helps them track their progress and reflect on their learning journey.
Connecting to Real Life: The "Aha!" Moments
After each experiment, take time to discuss how the scientific principles relate to the real world.
- Cooking: "Remember our volcano? That's the same gas that makes cakes light and fluffy!"
- Everyday Life: "Rusting metal, spoiled food, even our own digestion – these are all chemical changes happening constantly."
- Body Science: "When we eat, our bodies perform amazing chemical changes to turn food into energy."
These discussions transform abstract concepts into tangible, relatable experiences, making science relevant and exciting.
Fostering a Growth Mindset: Celebrating Effort and Discovery
Not every experiment will go perfectly, and that's okay! Emphasize that in science, there are no "failures," only opportunities to learn. Focus on the effort, the questions asked, and the discoveries made, rather than just the "right" outcome. This builds resilience, confidence, and a genuine love for the process of learning.
At I'm the Chef Too!, we craft every kit with this philosophy in mind. We believe in fostering a love for learning, building confidence in every child's innate curiosity, developing key skills like critical thinking and fine motor coordination, and, most importantly, creating joyful, screen-free family memories around the kitchen table. Our educational experiences are designed by mothers and educators to be both enriching and fun, bringing complex subjects to life through delicious, hands-on cooking adventures.
Bringing STEM Home with I'm the Chef Too!
The world of chemical change experiments for kids is vast, exciting, and incredibly accessible. By transforming your kitchen into a home laboratory, you’re not just conducting experiments; you’re nurturing curiosity, building confidence, and creating invaluable family bonding moments.
We understand that planning and executing these activities can sometimes feel overwhelming. That’s why at I'm the Chef Too!, our mission is to make it easy and enjoyable for families to explore STEM and the arts together. Our unique "edutainment" kits deliver a complete, screen-free educational adventure right to your door, meticulously designed to blend food, science, and creativity into one unforgettable experience. Each box is packed with pre-measured dry ingredients, specialty supplies, and engaging instructions developed by mothers and educators, ensuring a seamless and enriching learning journey for your child.
Whether you're looking for a one-time thematic adventure or a consistent stream of scientific discovery, we have something for every budding chef and scientist. From erupting volcanoes you can eat to galaxy donuts that teach astronomy, our kits bring complex subjects to life in a tangible, delicious way.
Ready to embark on an exciting journey of discovery, creativity, and delicious science? The easiest way to ensure a steady stream of engaging, educational fun is through our monthly subscription. Join The Chef's Club today to receive a new adventure delivered to your door every month with free shipping in the US. You can choose from flexible 3, 6, or 12-month pre-paid plans, perfect for gifting or long-term enrichment.
Not ready for a subscription just yet? No problem! You can still dive into our world of culinary STEM adventures. Explore our full library of adventure kits available for a single purchase in our shop and find the perfect theme to ignite your child's passion for learning.
Conclusion
The world of chemical changes is a thrilling landscape of transformation, happening all around us, from the rising of a cake to the subtle greening of an old penny. Engaging in chemical change experiments for kids is far more than just a fun activity; it's a powerful way to foster scientific literacy, critical thinking, and an insatiable curiosity about how the world works. By making science tangible, accessible, and exciting, we empower children to become confident explorers, keen observers, and joyful learners.
These hands-on experiences, whether edible or visually spectacular, teach fundamental STEM concepts, encourage observation and prediction, and most importantly, create precious memories as families learn and discover together. At I'm the Chef Too!, we are dedicated to providing these unique "edutainment" opportunities, blending food, STEM, and the arts into one-of-a-kind adventures that spark creativity and facilitate family bonding, all in a screen-free environment.
Don't let the wonders of chemistry remain a mystery. Embrace the fizz, the pop, and the incredible transformations that await in your own home. Ignite your child’s passion for discovery and make learning an unforgettable experience.
Ready to bring the magic of science and cooking into your home every month? Take the first step towards endless educational fun and family bonding. Join The Chef's Club now and let us deliver delightful, expertly crafted STEM cooking adventures directly to your doorstep. Your next great discovery awaits!
FAQ Section
Q1: What is the main difference between a physical change and a chemical change for kids?
A1: The simplest way to explain it is:
- Physical Change: The substance changes form or appearance, but it's still the same substance. Think of cutting paper (it's still paper) or melting ice (it's still water, just liquid). You can often reverse it easily.
- Chemical Change: The substance changes into an entirely new substance with different properties. Think of baking a cake (flour, eggs, sugar become a cake – you can't easily get the flour back) or burning wood (it becomes ash and smoke). These changes are usually harder, if not impossible, to reverse.
Q2: Are all the chemical change experiments mentioned here safe for children?
A2: Most of the edible and visual experiments are safe with proper adult supervision. However, experiments involving heat sources (like invisible ink with an iron, or heating milk for "milk plastic"), or specific chemicals like hydrogen peroxide (for elephant toothpaste) or ammonia (mentioned in some advanced contexts in general chemistry), absolutely require direct adult handling and extreme caution. Always prioritize safety, wear protective gear, and never let children ingest non-edible experimental mixtures.
Q3: What age group are these chemical change experiments best suited for?
A3: Many of these experiments can be adapted for a wide range of ages, from preschoolers to elementary and even middle schoolers.
- Preschool/Kindergarten: Focus on sensory observation (fizzing, color changes), simple predictions, and hands-on manipulation (e.g., baking soda volcanoes, fizzy fruit).
- Elementary School (Grades 1-5): Introduce basic scientific explanations (e.g., "gas is formed"), encourage asking "why," and begin using a science journal to record observations.
- Middle School (Grades 6-8): Dive deeper into molecular explanations, introduce terms like "reactants," "products," "exothermic," and encourage designing variations of experiments.
Q4: How can I make these experiments more educational beyond just doing them?
A4: To maximize the educational value:
- Ask "What if?" questions: Encourage predictions and hypothesizing.
- Use a science journal: Have kids draw or write what they see.
- Discuss the "why": Explain the basic science in simple terms.
- Connect to real life: Point out where they see similar changes daily (e.g., cooking, rusting).
- Encourage independent thought: Let them lead parts of the experiment or suggest variations.
- Emphasize observation: Ask them to describe what they see, hear, or smell in detail.
Q5: Can I substitute ingredients if I don't have exactly what's listed?
A5: For many experiments, simple substitutions are possible (e.g., lemon juice instead of vinegar as an acid). However, for chemical reactions, the specific ingredients are crucial to achieve the desired outcome. Always consult a reliable source or do a quick search before making substitutions, especially with chemicals, to ensure safety and effectiveness. If you're unsure, it's best to stick to the original ingredient list. Our I'm the Chef Too! kits take the guesswork out by providing pre-measured ingredients and specialty supplies, ensuring successful and safe outcomes every time.
Q6: How do I store leftover chemicals or dispose of experimental waste safely?
A6: For common household ingredients like baking soda, vinegar, and food coloring, storage is simple (e.g., in airtight containers in a cool, dry place). For waste from most of these experiments (like volcano eruptions or naked egg liquid), it can usually be poured down the drain with plenty of water. However, for experiments involving stronger chemicals like hydrogen peroxide or if you're ever unsure, it's best to check local waste disposal guidelines or contact your municipal waste authority. Always ensure bottles are clearly labeled if you store any unused chemicals.
Q7: What are the benefits of using a STEM cooking kit like those from I'm the Chef Too! for chemical change experiments?
A7: Using a specialized kit offers several advantages:
- Convenience: All necessary dry ingredients and specialty supplies are included and pre-measured, saving you time and trips to the store.
- Curated Learning: Kits are designed by educators to teach specific STEM concepts, like chemical changes, through engaging, age-appropriate activities.
- Safety: Instructions are clear and tested, guiding you through safe experimentation.
- Engagement: Themes (like galaxy donuts or volcano cakes) make learning fun and relatable, sparking creativity.
- Screen-Free: Provides a hands-on, tangible alternative to digital entertainment, promoting active learning and family bonding.
- Reduced Mess/Waste: Pre-measured ingredients minimize excess and simplify cleanup.