Table of Contents
- Why Easter Crafts Are More Than Just Fun
- Edible Easter Crafts: A Delicious Twist on Learning
- Classic Easter Egg Decorating with a STEM Spin
- Hoppy Bunny & Chirpy Chick Crafts: Developing Fine Motor Skills
- Spring Blooms & Baskets: Creativity with Nature & Recyclables
- Making Learning a Family Adventure with I'm the Chef Too!
- Conclusion
- FAQ
The crisp air of spring, the gentle budding of new leaves, and the anticipation of vibrant colors all signal one joyful occasion: Easter! For many families, Easter isn't just about baskets and chocolate bunnies; it's a cherished time for connection, creativity, and making lasting memories. But if you’ve ever found yourself staring at a pile of craft supplies or searching online for "what to do with the kids this Easter," you’re certainly not alone. The desire to engage children in meaningful, screen-free activities that are both fun and enriching is a common quest for parents and educators alike.
This comprehensive guide is designed to transform your Easter preparations into an exciting journey of discovery and imagination. We'll explore a delightful array of Easter craft ideas for kids, ranging from delicious edible creations that engage all the senses to classic egg decorating with a clever STEM twist, and charming bunny and chick crafts that nurture fine motor skills. We'll also dive into spring-inspired projects using nature and recycled materials, all while highlighting the incredible developmental benefits woven into each activity. Our aim is to provide practical, inspiring ideas that foster creativity, build confidence, and strengthen family bonds, ensuring your Easter celebration is filled with joyful learning and wonderful shared moments.
Why Easter Crafts Are More Than Just Fun
At first glance, crafting might seem like just another way to pass the time, especially during a holiday break. However, the true value of engaging children in Easter craft ideas extends far beyond simple amusement. These hands-on activities are powerful tools for holistic development, subtly nurturing a wide range of skills while creating a rich tapestry of family memories.
Consider the intricate dance of small fingers as they glue a cotton ball onto a bunny or carefully paint a stripe on an egg. These seemingly simple actions are critical for developing fine motor skills, which are essential for everything from writing and drawing to tying shoelaces and manipulating small objects. Crafts also significantly boost cognitive development. Children learn to follow instructions, sequence steps, and problem-solve when a project doesn't go exactly as planned. "What if the glue won't stick?" or "How can I make this egg stand up?" become mini-engineering challenges that build resilience and critical thinking.
Creativity and self-expression blossom in a crafting environment. There's no single "right" way to decorate an Easter egg or design a bunny, encouraging children to experiment with colors, textures, and forms. This freedom fosters a sense of agency and allows their unique personalities to shine through. The joy of creating something tangible from scratch, something they can proudly display or share, is a profound confidence builder. It reinforces the idea that their efforts lead to wonderful outcomes, nurturing a positive self-image and a "can-do" attitude.
Beyond individual growth, Easter crafts are magnificent catalysts for family bonding. When parents and children sit side-by-side, sharing materials, offering encouragement, and collaborating on a project, powerful connections are forged. These shared experiences create rich conversational opportunities, allowing for laughter, storytelling, and quiet moments of focused togetherness. In an increasingly digital world, these screen-free engagements offer a much-needed respite, providing a healthy alternative that stimulates the brain in different ways and encourages real-world interaction.
What's more, many Easter craft ideas naturally lend themselves to an introduction to STEM principles. From understanding color mixing (chemistry) and observing patterns (math) to designing a stable structure for an Easter basket (engineering) or experimenting with different materials (science), crafts are an organic gateway to scientific inquiry and mathematical thinking.
At I'm the Chef Too!, our mission is deeply rooted in this understanding. We believe in blending food, STEM, and the arts into one-of-a-kind "edutainment" experiences. We are committed to sparking curiosity and creativity in children, facilitating family bonding, and providing a compelling screen-free educational alternative. Our unique approach teaches complex subjects through tangible, hands-on, and delicious cooking adventures, all developed by mothers and educators who understand the importance of making learning joyful and accessible. Every activity, whether it's a culinary creation or a simple craft, is an opportunity for growth, discovery, and shared happiness.
Edible Easter Crafts: A Delicious Twist on Learning
What's better than creating a beautiful Easter craft? Creating one you can actually eat! Edible Easter craft ideas bring an extra layer of sensory engagement to the crafting experience, allowing children to not only see and feel their creations but also smell, taste, and even hear the crunch of their delicious masterpieces. The kitchen, often seen as a place for adults, transforms into a vibrant laboratory where STEM principles come alive through tangible, delicious results.
In the kitchen, children engage in practical math skills as they measure ingredients, count out sprinkles, and understand fractions (half a cup, a quarter teaspoon). They observe fascinating chemistry in action – from the magic of yeast making dough rise to the way eggs bind ingredients or how heat transforms raw batter into a fluffy cake. Understanding states of matter becomes an intuitive lesson when chocolate melts from solid to liquid, or water turns to steam. These are not just abstract concepts from a textbook; they are real-world phenomena happening right before their eyes and under their eager hands.
Let's explore some delicious Easter craft ideas that blend culinary fun with fundamental learning.
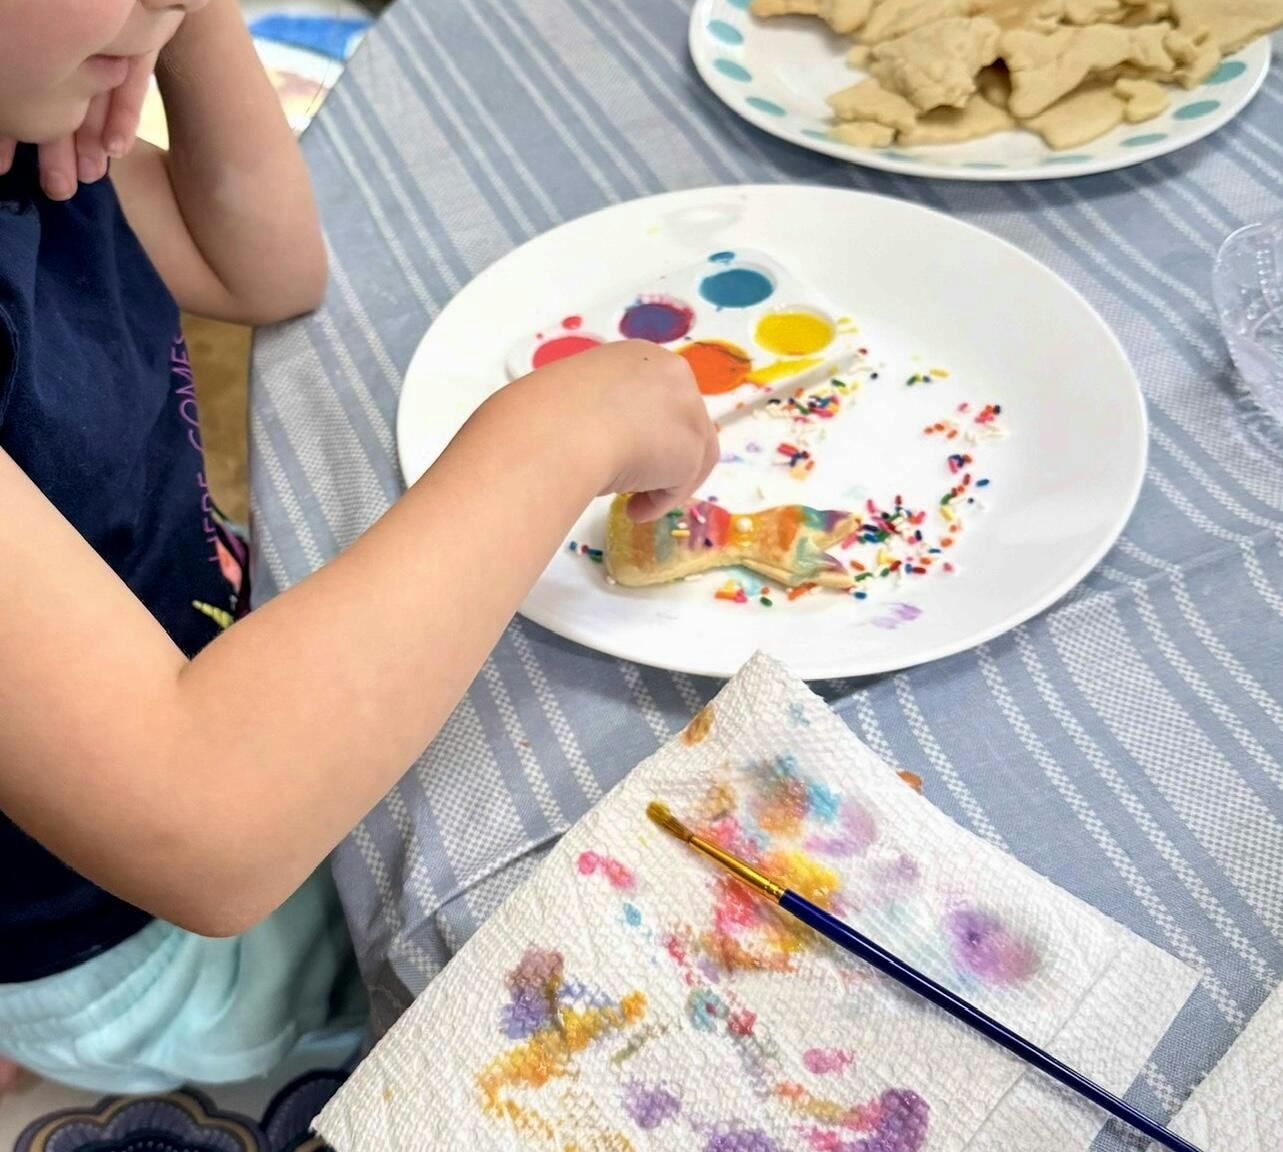
Craft Idea 1: Decorate Your Own Easter Cookies or Cupcakes
This is a classic for a reason, offering endless possibilities for creativity and skill development.
- Ingredients & Process: Start with pre-baked sugar cookies in Easter shapes (bunnies, eggs, chicks) or plain cupcakes. Provide various colors of royal icing or buttercream, sprinkles, edible glitter, small candies, and even edible markers.
- Creative Variations: Encourage children to experiment with different frosting techniques: spreading with a knife, piping simple outlines, or creating polka dots. They can mix colors to create new shades, learning about primary and secondary colors in a hands-on way.
-
Learning Points:
- Fine Motor Skills: Squeezing piping bags, picking up small sprinkles, and carefully drawing lines.
- Color Theory: Experimenting with mixing icing colors.
- Patience & Precision: Taking time to decorate carefully.
- Design & Aesthetics: Thinking about how colors and toppings look together.
- I'm the Chef Too! Connection: This aligns perfectly with our philosophy of blending food, STEM, and arts. Imagine a kit that provides all the pre-measured dry ingredients and specialty supplies needed for such an activity, delivered right to your door! We know that convenience makes it easier for families to dive into these enriching experiences. If you're looking for more ready-to-bake edible adventures like this one, we encourage you to Browse our complete collection of one-time kits and discover a world of culinary creativity.
Craft Idea 2: Edible Nests with Chocolate & Candy Eggs
A simple, no-bake activity that's big on visual appeal and deliciousness.
- Ingredients & Process: Melt chocolate chips gently (in a microwave or double boiler). Stir in chow mein noodles or shredded wheat cereal until fully coated. Spoon spoonfuls onto parchment paper, shaping them into small "nests" with a spoon. Let them set in the fridge, then fill with candy-coated chocolate eggs.
-
Learning Points:
- Physical Change: Observing chocolate transition from solid to liquid and back again.
- Measurement & Estimation: Judging the right amount of cereal for the chocolate.
- Structure & Form: Shaping the nests and understanding how they hold their candy cargo.
- Sensory Exploration: The varying textures of the melted chocolate, crunchy noodles, and smooth candy.
Craft Idea 3: "Bunny Dirt Cups" (Pudding Parfaits)
These layered desserts are as fun to make as they are to eat.
- Ingredients & Process: Gather clear cups, chocolate pudding, crushed chocolate cookies (for "dirt"), gummy worms, and bunny-shaped marshmallows or cookies. Kids can layer the ingredients, creating their own edible garden scene.
-
Learning Points:
- Layering & Sequencing: Following a specific order to build the parfait.
- Texture & Consistency: Exploring how different food items feel and taste together.
- Presentation: Arranging ingredients to make an appealing dessert.
- Imagination: Creating a story around their "bunny garden."
- I'm the Chef Too! Connection: This perfectly exemplifies the tangible, hands-on, and delicious adventures we champion. We believe that learning should be an exciting journey, and what better way to explore concepts than by creating something you can truly enjoy? These kinds of activities foster curiosity and build confidence, allowing children to experiment and succeed in a fun, low-pressure environment. Ready for a new adventure delivered to your door every month? Join The Chef's Club and enjoy free shipping on every box. You can even give the gift of learning that lasts all year with a 12-month subscription to our STEM cooking adventures, perfect for continuously sparking that love for learning.
- Specific Kit Mention: Even beloved characters can make learning fun, like when kids make Peppa Pig Muddy Puddle Cookie Pies. These character-themed edible kits bring joy and a sense of familiarity to the learning process, demonstrating how cooking and crafting can be a gateway to imaginative play and skill development.
Classic Easter Egg Decorating with a STEM Spin
Decorating Easter eggs is a time-honored tradition, but we can elevate this classic activity by infusing it with exciting STEM concepts. It’s an opportunity to turn simple dyes into scientific experiments, exploring chemical reactions, color theory, and physical properties in a tangible, memorable way.
Craft Idea 4: Baking Soda & Vinegar "Volcano" Eggs
Transform your egg dyeing into an effervescent eruption!
- Materials: Hard-boiled eggs, baking soda, vinegar, liquid food coloring, small bowls or cups, spoons.
-
Process:
- Place a hard-boiled egg in a small bowl.
- Sprinkle a generous amount of baking soda over the egg.
- Add several drops of different food colorings directly onto the baking soda.
- Slowly pour vinegar over the egg. Watch the fizzing reaction! The baking soda and vinegar create carbon dioxide gas, which bubbles up and spreads the colors in a unique marbled pattern onto the eggshell.
- Once the fizzing stops, remove the egg, rinse gently, and marvel at the colorful designs.
-
Learning Points:
- Chemical Reactions: Observing the acid-base reaction between baking soda (base) and vinegar (acid) and the gas (carbon dioxide) produced.
- Color Mixing: Seeing how different colors blend and spread during the reaction.
- Observation & Prediction: Hypothesizing what will happen when the vinegar is added.
- Scientific Inquiry: Encouraging questions like "Why does it fizz?" and "What happens if I add more vinegar?"
- I'm the Chef Too! Connection: This kind of exciting chemical reaction that makes things bubble over with deliciousness is exactly what we love to explore! It's the same scientific wonder that makes our Erupting Volcano Cakes Kit such a blast. Through hands-on experiences like these, children learn that STEM is anything but boring – it’s dynamic, delicious, and deeply engaging. We strive to make learning about science, technology, engineering, and math as fun and accessible as possible, demonstrating that real-world science can be found everywhere, even in your kitchen!
Craft Idea 5: Natural Dye Experiments
Go back to nature to create beautiful, earthy tones for your Easter eggs.
- Materials: Hard-boiled eggs, various natural ingredients like red cabbage (blue/purple), onion skins (orange/brown), turmeric (yellow), beet juice (pink/red), spinach (green), coffee (brown), vinegar.
-
Process:
- In separate pots, combine water with your chosen natural ingredient (e.g., chopped red cabbage, onion skins). Add a splash of vinegar (which helps set the color).
- Bring to a boil, then reduce heat and simmer for 15-30 minutes until the water is colored.
- Strain out the solids to get your natural dye.
- Submerge hard-boiled eggs in the cooled dyes. Let them soak for several hours or overnight in the refrigerator for deeper colors.
-
Learning Points:
- Pigment Extraction: Understanding that plants contain natural colors that can be extracted.
- Observation & Comparison: Noticing how different ingredients produce different hues and how the color develops over time.
- Hypothesis Testing: "Which ingredient do you think will make the brightest color?"
- Patience: Waiting for the dyes to work their magic.
Craft Idea 6: Melted Crayon Eggs
A vibrant, mess-friendly way to decorate warm eggs.
- Materials: Warm, hard-boiled eggs (still hot from boiling), crayons (peeled).
-
Process:
- While the eggs are still warm, kids can gently draw on them with peeled crayons. The heat from the egg will melt the crayon wax, creating beautiful, abstract designs that dry instantly.
- Encourage different drawing techniques: dots, lines, swirls, or even scribbles for a cool effect.
-
Learning Points:
- Heat Transfer: Observing how the warmth of the egg melts the crayon wax.
- States of Matter: Wax changing from solid to liquid and back.
- Abstract Art: Creating unique patterns without needing to draw specific objects.
- Cause and Effect: Understanding that the warm egg directly impacts the crayon's texture and application.
- Safety: Always supervise children when handling warm eggs to ensure they don't burn their fingers.
Craft Idea 7: Marbled Shaving Cream Eggs
This technique creates stunning, unique marbled patterns.
- Materials: Hard-boiled eggs, shaving cream (not gel), liquid food coloring, shallow pan or tray, spoon, paper towels, gloves (optional).
-
Process:
- Spray a layer of shaving cream into a shallow pan.
- Drip various colors of food coloring randomly over the shaving cream.
- Use a toothpick or skewer to swirl the colors, creating marbled patterns.
- Gently roll a hard-boiled egg through the marbled shaving cream, ensuring it's fully coated.
- Let the egg sit for 10-15 minutes, then wipe off the shaving cream with a paper towel to reveal the stunning marbled design.
-
Learning Points:
- Density & Surface Tension: Observing how the colors sit on top of the shaving cream before being swirled.
- Pattern Creation: Understanding how swirling motions create unique, non-repeating designs.
- Color Blending: Seeing how colors interact and mix on the surface.
- Fine Motor Control: Carefully rolling the egg and wiping away the cream.
- I'm the Chef Too! Connection: These kinds of hands-on activities, which blend art with fascinating science principles, are at the heart of what we do. They transform everyday items into tools for discovery, fostering a love for learning that extends far beyond the activity itself. Imagine having exciting, education-packed kits delivered to your doorstep every month, complete with all the specialty supplies needed for a new adventure. This convenience allows you to spend less time planning and more time creating precious memories with your children. Our monthly "Chef's Club" subscription is designed to bring continuous learning and fun right to your home. Discover the ease and excitement of our thoughtfully curated boxes by exploring our options, including flexible 3, 6, and 12-month pre-paid plans perfect for gifting or long-term enrichment. Don't miss out on the joy – Join The Chef's Club today!
Hoppy Bunny & Chirpy Chick Crafts: Developing Fine Motor Skills
Easter wouldn't be complete without adorable bunnies and cheerful chicks! These iconic symbols provide fantastic inspiration for crafts that are not only charming but also incredibly effective at honing crucial fine motor skills, hand-eye coordination, and spatial awareness. Cutting, pasting, shaping, and assembling are all vital for children's development, and doing so with a fun, festive theme makes the learning process enjoyable and engaging.
Craft Idea 8: Paper Plate Bunny Masks or Bags
Simple materials yield big creative results with this versatile craft.
- Materials: Paper plates, pink construction paper, pipe cleaners, cotton balls, googly eyes, glue, scissors, elastic string (for masks) or stapler (for bags).
-
Process (Mask):
- Cut out the center of the paper plate for the face opening.
- Cut two bunny ear shapes from the remaining plate or from white construction paper, and smaller pink inner ear shapes. Glue them together and attach to the top of the plate.
- Glue on googly eyes, a pink construction paper nose, and pipe cleaner whiskers.
- Attach cotton balls to the chin area for a fluffy beard.
- Punch holes on either side and tie elastic string to create a mask.
-
Process (Bag):
- Fold a paper plate in half and staple the edges together, leaving the top open.
- Decorate one side with bunny features as above.
- Attach a strip of construction paper or ribbon for a handle.
-
Learning Points:
- Geometry: Working with circles and understanding how to transform them.
- Cutting Skills: Practicing scissor control to cut out shapes.
- Gluing & Assembly: Learning how to attach different materials securely.
- Symmetry & Facial Features: Arranging features to create a recognizable face.
Craft Idea 9: Cotton Ball Bunny Craft
A tactile and visually appealing craft that's great for younger children.
- Materials: Bunny-shaped template (drawn or printed), cotton balls, glue, googly eyes, small pink pom-pom for the nose, construction paper for ears/feet.
-
Process:
- Provide a bunny outline on paper.
- Children glue cotton balls all over the bunny body to create a fluffy texture.
- Add googly eyes and a pom-pom nose.
- Cut out and glue on construction paper ears and feet.
-
Learning Points:
- Sensory Input: Exploring the soft texture of cotton balls.
- Fine Motor Control: Picking up and gluing individual cotton balls.
- Patience: Filling the entire outline carefully.
- Following Instructions: Completing steps in a sequence.
Craft Idea 10: Handprint or Footprint Chicks/Bunnies
These make wonderful, personalized keepsakes for parents and grandparents.
- Materials: Washable paint (yellow for chicks, white/pink for bunnies), construction paper, markers, googly eyes, small orange paper scraps for beaks/carrot noses.
-
Process (Chicks):
- Paint a child's palm yellow and press it onto paper, fingers pointing down to form the chick's body and feathers.
- Once dry, add googly eyes, draw a beak and legs with markers.
-
Process (Bunnies):
- Paint a child's foot white or pink and press it onto paper, heel up to form the bunny's head.
- Once dry, draw on bunny ears, eyes, a nose, and whiskers. Add a cotton ball for a tail at the opposite end of the footprint.
-
Learning Points:
- Body Awareness: Understanding their own hand/foot as a tool for creation.
- Tracing & Outlining: If drawing features afterward.
- Creative Embellishment: Adding details to bring their creature to life.
- Memory Making: Creating a tangible record of their size at a specific age.
Craft Idea 11: Pom-Pom Chicks (Simple)
A delightful and easy craft perfect for little hands.
- Materials: Yellow yarn, cardboard, scissors, googly eyes, orange construction paper (for beaks and feet), glue.
-
Process:
- Cut two matching donut shapes from cardboard.
- Place the cardboard rings together and start wrapping yellow yarn tightly around both rings, through the center hole, until the hole is almost completely filled.
- Carefully cut the yarn along the outer edge of the cardboard rings, slipping scissors between the two rings.
- Tie a separate piece of yarn tightly between the two cardboard rings, pulling it through the center to secure the pom-pom. Remove the cardboard. Fluff the pom-pom.
- Glue on googly eyes and small orange paper beaks and feet.
-
Learning Points:
- Wrapping & Winding: Developing repetitive fine motor skills.
- Cutting & Shaping: Practicing scissor skills and understanding how yarn transforms.
- Assembly: Putting together different components to create a final product.
- Patience & Perseverance: The process of making a pom-pom takes time and careful effort.
- I'm the Chef Too! Connection: These types of creative activities, which encourage hands-on exploration and build foundational skills, truly exemplify our mission to spark curiosity and creativity in children. We believe that every child has an innate desire to learn and create, and it's our joy to provide accessible, engaging avenues for that exploration. Whether it's crafting a fluffy pom-pom chick or baking a delicious treat, the process of bringing an idea to life is incredibly rewarding. For more exciting project ideas that combine fun and learning, we invite you to Browse our complete collection of one-time kits. Each kit is a complete adventure, thoughtfully designed by mothers and educators to deliver maximum engagement and educational value.
Spring Blooms & Baskets: Creativity with Nature & Recyclables
Easter is a celebration of new life and the vibrant return of spring. What better way to honor this than by creating crafts inspired by blooming flowers and by repurposing materials around the house? These crafts encourage children to connect with the natural world and think creatively about sustainability, transforming everyday items into beautiful works of art. It’s an excellent opportunity to introduce concepts of upcycling, design thinking, and even basic engineering.
Craft Idea 12: Egg Carton Flowers
Transform humble egg cartons into a beautiful bouquet that lasts.
- Materials: Cardboard egg cartons, scissors, paint (various colors), paintbrushes, pipe cleaners or straws (for stems), glue.
-
Process:
- Cut individual cups from the egg carton.
- Carefully trim the edges of each cup to form petals. You can make rounded petals, pointed petals, or fringed edges.
- Paint the flowers in vibrant spring colors. Let them dry.
- Poke a small hole in the center of each flower and thread a pipe cleaner or straw through for a stem, securing it with a dab of glue if needed.
- Arrange your egg carton flowers in a vase or use them to decorate other Easter crafts.
-
Learning Points:
- Upcycling & Sustainability: Understanding how to give new life to discarded materials.
- Cutting & Shaping: Refining scissor skills and manipulating materials to create desired forms.
- Color Theory: Choosing and mixing paint colors for artistic expression.
- 3D Construction: Building a three-dimensional object from flat pieces.
Craft Idea 13: Tissue Paper Spring Blossoms
Create delicate, colorful flowers that can brighten any room.
- Materials: Tissue paper (various spring colors), pipe cleaners or floral wire, scissors.
-
Process:
- Stack 6-8 sheets of tissue paper.
- Fold the stack accordion-style, making folds about 1-2 inches wide.
- Trim the ends of the folded stack into a rounded or pointed shape.
- Secure the middle of the folded tissue paper with a pipe cleaner or floral wire, twisting it tightly to form the stem.
- Gently pull apart each layer of tissue paper, one by one, from both sides of the pipe cleaner, fluffing it up to create a full blossom.
-
Learning Points:
- Layering & Folding: Understanding how multiple thin layers create volume.
- Fine Motor Skills: Carefully separating delicate tissue paper without tearing it.
- Aesthetics & Design: Arranging colors and shapes to create visually appealing flowers.
- Spatial Reasoning: Visualizing how the flat folded paper will transform into a 3D flower.
Craft Idea 14: DIY Easter Baskets from Recycled Materials
Encourage resourcefulness and design thinking by creating personalized Easter baskets.
- Materials: Cardboard boxes (cereal boxes, shoe boxes), milk jugs, construction paper, glue, tape, scissors, paint, decorative items (ribbons, glitter, stickers).
-
Process (Cardboard Box Basket):
- Cut the top flaps off a cardboard box to create an open container.
- Cut a strip of cardboard for a handle and attach it securely with tape or glue.
- Kids can then decorate the basket by painting it, gluing on construction paper, adding drawings, or sticking on embellishments.
-
Process (Milk Jug Basket):
- Thoroughly rinse and dry a plastic milk jug.
- Cut off the top section of the jug, leaving the handle intact. This handle will become the basket's handle.
- Trim the edges neatly.
- Decorate the outside of the jug with paint, markers, or by gluing on paper and fabric scraps.
-
Learning Points:
- Engineering & Stability: Thinking about how to make a basket sturdy enough to hold treats.
- Design Thinking: Planning the structure and decoration of their basket.
- Problem-Solving: Figuring out how to attach handles or make the base more secure.
- Resourcefulness: Seeing the potential for new creations in discarded items.
- I'm the Chef Too! Connection: Just like these imaginative uses of recycled materials, we believe in providing versatile learning opportunities that spark ingenuity. Our focus is on making learning exciting and accessible, whether through culinary adventures or creative crafting. We encourage hands-on exploration that builds critical thinking skills and fosters a love for discovery. For families, schools, or community groups looking to bring these enriching experiences to a larger audience, we offer flexible programs tailored to your needs. These programs can even be customized with or without food components, ensuring everyone can participate in the fun. Bring our hands-on STEM adventures to your classroom, camp, or homeschool co-op. Learn more about our versatile programs for schools and groups. We're dedicated to bringing engaging, educational activities to every child. Moreover, for continuous, captivating experiences right at home, remember that a new adventure is delivered to your door every month with free shipping in the US when you Join The Chef's Club. It’s the perfect way to keep the creativity flowing all year long!
Making Learning a Family Adventure with I'm the Chef Too!
Throughout this exploration of delightful Easter craft ideas for kids, a clear theme emerges: the profound power of hands-on, creative activities to enrich childhood and strengthen family bonds. At I'm the Chef Too!, this philosophy is not just a part of what we do; it's the very heart of our mission. We are passionately dedicated to blending food, STEM, and the arts into unique "edutainment" experiences that captivate young minds and create lasting memories.
Our thoughtfully designed kits are born from the insights of mothers and educators, ensuring they are not only engaging but also developmentally appropriate and academically valuable. We understand the challenges parents face in finding genuinely educational and entertaining screen-free alternatives. That's why we create comprehensive, convenient boxes that take the guesswork out of planning. Each I'm the Chef Too! kit is a complete adventure, arriving at your door with pre-measured dry ingredients and specialty supplies, ready for an immediate dive into discovery.
Imagine the joy of your child creating an edible masterpiece while simultaneously learning about chemical reactions, or meticulously decorating a craft that hones their fine motor skills. These tangible, hands-on, and delicious cooking adventures are crafted to spark curiosity, foster creativity, and build confidence in a fun, pressure-free environment. We focus on the benefits of the process: the laughter shared, the skills developed, the self-esteem boosted by a successful creation, and the joyful family memories forged. While we don't promise your child will become a top scientist overnight, we absolutely promise to ignite a love for learning that can last a lifetime.
Whether you're looking for an engaging one-time project or a continuous stream of educational fun, we have options to suit your family's needs. From individual kits that allow you to explore a specific theme to our popular Chef's Club subscription, we make it easy to bring the magic of STEM and culinary arts into your home. Each box is a complete journey, meticulously designed to be a screen-free oasis of learning and family connection.
Conclusion
As we wrap up our journey through a myriad of captivating Easter craft ideas for kids, it's clear that the holiday offers more than just sweet treats and colorful eggs. It presents a golden opportunity to engage children in hands-on activities that are rich with developmental benefits, foster creativity, and create cherished family memories. From the delicious explorations of edible crafts that introduce basic chemistry and math, to classic egg decorating with a scientific twist, and charming bunny and chick crafts that hone fine motor skills, each activity is a building block for learning and growth. Even simple endeavors like transforming recycled materials into beautiful spring blossoms and baskets teach valuable lessons in sustainability and ingenuity.
These are the moments that truly matter—the shared laughter, the concentrated effort, the proud display of a child’s creation. They represent a tangible break from screens, offering a refreshing return to real-world interaction and discovery. By embracing these Easter craft ideas, you're not just filling time; you're nurturing curiosity, building confidence, and weaving a stronger family fabric.
At I'm the Chef Too!, we are passionate about supporting families and educators in this joyful pursuit of learning. Our mission is to blend the worlds of food, STEM, and the arts into unforgettable "edutainment" experiences that arrive conveniently at your doorstep. We believe that every child deserves the chance to explore, create, and learn in a way that truly resonates with their innate sense of wonder.
Ready to spark endless curiosity and creativity in your kitchen? Transform your family time into an exciting adventure of discovery, learning, and delicious fun with I'm the Chef Too! Our monthly "Chef's Club" subscription delivers a new, unique culinary STEM experience right to your home with free shipping in the US. Each box is packed with pre-measured dry ingredients and specialty supplies, meticulously designed by mothers and educators to make learning engaging and effortless. Choose from our flexible 3, 6, or 12-month pre-paid plans, perfect for continuous enrichment or as a thoughtful gift that keeps on giving. Don't miss out on the magic of hands-on learning and family bonding. Join The Chef's Club today!
FAQ
Q: What age group are these Easter craft ideas suitable for? A: Most of these crafts are adaptable for a wide range of ages, generally from toddlers (with significant adult supervision) to pre-teens. Activities like painting, gluing cotton balls, and simple cookie decorating are great for younger children (3-6), while more intricate cutting, detailed decorating, and understanding STEM concepts like chemical reactions can engage older children (7-12) more deeply. Always adjust the complexity and level of supervision to your child's individual skills and interests.
Q: How can I make these crafts less messy? A: Mess is often part of the fun and learning! However, you can minimize it by:
- Preparation: Lay down newspaper, a washable mat, or an old tablecloth.
- Aprons: Have kids wear an old shirt or a craft apron.
- Designated Space: Use a specific "craft zone" that's easy to clean.
- Portion Control: Dispense small amounts of paint, glue, or sprinkles at a time.
- Containment: Use trays or shallow boxes to contain small items and liquids.
- Wipes Handy: Keep damp cloths or baby wipes nearby for quick clean-ups.
Q: What if my child isn't interested in crafting? A: Try to understand why they might be resistant. Is it too messy? Too structured? Do they prefer different types of activities?
- Incorporate their interests: If they love dinosaurs, can you make an "Easter egg fossil dig"? If they love space, can you decorate eggs like planets?
- Make it collaborative: Work with them on a project, rather than just telling them what to do.
- Focus on process, not product: Emphasize the fun of experimenting rather than creating a perfect final product.
- Edible crafts: The promise of a delicious reward often motivates hesitant crafters!
- Short bursts: Don't expect them to sit for hours. Short, focused sessions might be more effective.
- Offer choices: Let them pick from a few options to give them a sense of control.
Q: How can I incorporate more learning into these Easter crafts? A: Every craft offers a learning opportunity!
- Ask open-ended questions: "What do you think will happen if...?" "Why do you think the colors mixed like that?" "How can we make this stronger?"
- Introduce vocabulary: Use words like "symmetry," "texture," "dissolve," "hypothesis."
- Read related books: Find picture books about eggs, bunnies, spring, or even simple science experiments.
- Connect to real-world phenomena: Discuss how natural dyes work in nature or how engineers design structures.
- Document the process: Take photos, or have older kids write down their observations or steps.
Q: What makes I'm the Chef Too! kits different from other craft or cooking boxes? A: At I'm the Chef Too!, we uniquely blend food, STEM, and the arts into one-of-a-kind "edutainment" experiences. Unlike simple craft boxes, our kits provide complete cooking adventures that teach complex STEM concepts through tangible, hands-on, and delicious culinary projects. Developed by mothers and educators, our mission is to spark curiosity, creativity, and facilitate genuine family bonding, all while offering a screen-free educational alternative. We provide pre-measured dry ingredients and specialty supplies directly to your door, ensuring convenience without compromising on educational value or fun. It's about empowering children to learn by doing, tasting, and creating, fostering a love for discovery that goes beyond the kitchen.


")