Table of Contents
- The Enchanting World of Kaleidoscopes: More Than Just a Toy
- The STEM & Art Magic Behind Kaleidoscope Crafts
- Why Hands-On Learning Matters: The I'm the Chef Too! Philosophy
- Getting Started: Essential Materials for Your DIY Kaleidoscope
- Crafting Your Classic Kaleidoscope: Step-by-Step Guide
- Beyond the Basic: Exciting Kaleidoscope Variations for Enhanced Learning
- Nurturing Creativity and Cognitive Skills Through Kaleidoscope Making
- Setting Up for Success: Tips for Parents and Educators
- The I'm the Chef Too! Difference: Blending STEM, Food, and Art
- Conclusion
- Frequently Asked Questions (FAQ)
Have you ever looked at the world through a child's eyes? It's a place of wonder, where everyday objects hold untold magic and the simplest phenomena can spark endless fascination. Imagine transforming those ordinary moments into dazzling, ever-changing patterns of light and color, right in their hands. That's the enchantment of kaleidoscope crafts for kids, a journey into visual delight and hands-on discovery that goes far beyond a mere toy.
In this comprehensive guide, we'll dive deep into the captivating world of kaleidoscopes, exploring not only how to craft these magical devices but also the incredible educational value they hold. From the scientific principles of light and reflection to the artistic expression of design and color, we'll show you how to blend fun and learning seamlessly. At I'm the Chef Too!, our mission is to create one-of-a-kind "edutainment" experiences that combine food, STEM, and the arts, and kaleidoscope crafts perfectly embody this spirit of tangible, hands-on, and utterly engaging learning. Get ready to ignite curiosity, foster creativity, and build wonderful family memories with these captivating projects!
The Enchanting World of Kaleidoscopes: More Than Just a Toy
Before we roll up our sleeves and start crafting, let's take a moment to appreciate the humble kaleidoscope. More than two centuries ago, in 1816, a Scottish scientist named David Brewster stumbled upon this brilliant invention. Brewster, a true "jack-of-all-trades" in the scientific world, dedicated much of his career to studying optics, and the kaleidoscope became his most famous contribution. He designed it to illustrate a scientific principle – how mirrors could create intricate, repeating patterns through multiple reflections. Little did he know, he was also creating an enduring source of joy and fascination for generations to come.
At its core, a kaleidoscope is an optical instrument that uses mirrors to reflect objects, creating symmetrical and often kaleidoscopic patterns. The word itself comes from ancient Greek, meaning "observer of beautiful forms," which perfectly describes the experience. With each slight turn or shift, the internal elements—be it colorful bits of paper, beads, or even the world outside—rearrange into a breathtaking new display. For children, this isn't just a pretty picture; it's a dynamic, interactive exploration of how light behaves, how shapes combine, and how simple components can produce infinite variations of beauty. It's a perfect example of how complex subjects can be made accessible and exciting through tangible, hands-on experiences, a philosophy that resonates deeply with us at I'm the Chef Too!.
The STEM & Art Magic Behind Kaleidoscope Crafts
When we talk about kaleidoscope crafts for kids, we're not just discussing a simple art project. We're unlocking a powerful learning experience that integrates multiple disciplines, truly embodying the spirit of STEM (Science, Technology, Engineering, Mathematics) and STEAM (Science, Technology, Engineering, Art, Mathematics) education. This multidisciplinary approach is at the heart of what we do at I'm the Chef Too!, where we believe learning is most effective when it's engaging, hands-on, and connects different areas of knowledge.
Science: A Symphony of Light and Reflection
Making a kaleidoscope is a fantastic introduction to the science of optics, specifically light and reflection. Kids get to observe firsthand how mirrors work their magic:
- Reflection: The most obvious scientific principle at play is reflection. Children see how multiple mirrors, arranged at specific angles, bounce light and images back and forth, creating what appears to be an infinite tunnel of patterns. They can experiment with how changing the angle or number of mirrors alters the complexity of the reflections.
- Symmetry: Every pattern within a kaleidoscope is a testament to symmetry. Kids intuitively grasp this as they watch their own designs multiply and arrange themselves into perfectly balanced, repeating motifs. This visual understanding of symmetry lays foundational mathematical and artistic concepts.
- Light Interaction: How does light travel? How do colors appear? As children view their kaleidoscope, they're engaging with how light illuminates the objects, how it's reflected, and how their eyes perceive the resulting spectrum of color. This connects directly to elementary science standards, such as those within the Next Generation Science Standards (NGSS) for Grade 1: Light and Sound (PS 4-2 and PS 4-3), and for Grade 4: PS 4-2. It's a delightful way to explore abstract concepts through a very concrete, dazzling output.
Technology & Engineering: Designing for Dazzle
Building a kaleidoscope involves practical application of technology and engineering principles, even if it feels like just "crafting":
- Design Thinking: Kids engage in design thinking as they plan their kaleidoscope. What materials will work best? How should the mirrors be cut and arranged to fit snugly?
- Construction Skills: Cutting, measuring, folding, and taping all contribute to developing fine motor skills and spatial reasoning. Getting the internal reflective core to fit "just right" within the cardboard tube is a subtle engineering challenge that requires precision and problem-solving.
- Structural Integrity: Understanding how to secure the straw, mirrors, and viewing disc so they function correctly introduces basic concepts of structural design. When the parts work together seamlessly, the magic happens.
Art: Creativity in Every Turn
Art is undeniably at the forefront of the kaleidoscope experience. It’s where personal expression meets scientific principles:
- Color Theory: Kids experiment with vibrant hues on their viewing discs, observing how these colors interact and blend when reflected. They see the power of bold, distinct shapes and colors to create dramatic effects.
- Pattern and Design: Decorating the outer tube and the inner viewing discs encourages creative freedom. Whether it's a mosaic, abstract scribbles, or carefully drawn shapes, children are learning about composition and visual appeal.
- Artistic Inspiration: We can even introduce kids to artists who play with light and reflection, like the Icelandic-Danish artist Olafur Eliasson, who creates immersive installations using color and mirrors. Imagining being covered in a spectrum of color under one of his sculptures helps children connect their small craft to larger artistic concepts.
Mathematics: Geometry in Action
Hidden within the patterns and structures are fundamental mathematical concepts:
- Geometry: The most obvious is the triangular prism shape of the reflective core. Kids are introduced to polygons, angles, and three-dimensional shapes in a tangible way. They might even explore how different internal shapes—circular, triangular, or square—yield different reflective outcomes.
- Measurement: Cutting materials to precise lengths and widths, and calculating the diameter of a circle for the viewing disc, all reinforce practical measurement skills. This "doing" helps solidify abstract mathematical concepts.
At I'm the Chef Too!, we believe this blend of subjects makes learning stick. It's not about memorizing facts, but about engaging with concepts through active participation. This is why we craft kits that bring these kinds of experiences right to your kitchen table. Ready for a new adventure every month? Join The Chef's Club and enjoy free shipping on every box. It's a fantastic way to keep the learning and creativity flowing with convenient, engaging activities developed by mothers and educators.
Why Hands-On Learning Matters: The I'm the Chef Too! Philosophy
The act of building a kaleidoscope isn't just about the final dazzling product; it's about the entire process of creation, problem-solving, and discovery. This emphasis on tangible, experiential learning is a cornerstone of our philosophy at I'm the Chef Too!. We understand that children learn best when they are actively engaged, when their hands are busy, and when their minds are sparking with curiosity.
Our mission is to seamlessly blend food, STEM, and the arts into one-of-a-kind "edutainment" experiences. Just as mixing ingredients in a recipe teaches chemistry, measuring teaches math, and decorating teaches art, crafting a kaleidoscope teaches optics, geometry, and design. These aren't just abstract lessons; they are real-world applications that children can see, feel, and manipulate.
We are deeply committed to sparking curiosity and creativity in children. A kaleidoscope craft, for instance, encourages children to ask "how does this work?" and "what if I try this?". This inquisitive spirit is what drives innovation and a lifelong love of learning. We also prioritize facilitating family bonding. In an increasingly digital world, these hands-on projects offer a wonderful opportunity for parents and children to connect, collaborate, and create together, away from screens. Imagine the shared "oohs" and "aahs" as you both peer into your newly crafted kaleidoscope, marveling at the patterns you made together. These are the joyful, memorable moments that truly count.
Our unique approach, developed by mothers and educators, ensures that our activities are not only educational but also developmentally appropriate and incredibly fun. We know that while we can't guarantee your child will become the next Nobel laureate in physics, we can promise to foster a love for learning, build confidence through successful creation, develop key foundational skills, and, most importantly, create joyful family memories that will last a lifetime. Every time your child engages with a hands-on activity like making a kaleidoscope, they're not just learning a concept; they're learning that learning itself is an exciting adventure.
Getting Started: Essential Materials for Your DIY Kaleidoscope
The beauty of kaleidoscope crafts for kids lies in their accessibility. You likely have many of the core materials lying around your home already, making this an excellent budget-friendly project. Gathering your supplies is part of the fun, and it teaches children about resourcefulness!
Here's a comprehensive list of what you'll need:
-
Cardboard Tubes: These form the main body of your kaleidoscope.
- Empty toilet paper rolls are perfect for smaller hands.
- Paper towel rolls offer a slightly longer viewing experience.
- Even wrapping paper rolls, cut down to size, can work for larger projects.
-
Reflective Material: This is the most crucial component for creating those dazzling reflections.
- Mylar Sheets: Often found in craft stores, Mylar is highly reflective and flexible. It’s ideal for this project.
- Reflective Mirrored Sheets/Cardstock: These can be plastic mirror sheets or metallic scrapbook paper. Ensure they are highly reflective; regular aluminum foil, unfortunately, won't produce the desired sharp, clear reflections.
-
Cutting Tools:
- Scissors: Child-safe scissors for decorating paper; sharper scissors for adult use when cutting reflective sheets.
- Paper Cutter (optional): Handy for making precise, straight cuts on cardstock or Mylar, for adult use only.
- X-Acto Knife/Straightedge/Cutting Mat (for adults only): Essential for precise, clean cuts on mirrored plastic sheets, but adult supervision and handling are paramount due to sharpness.
-
Adhesive:
- Tape: Clear tape (for securing Mylar strips), double-sided tape (for decorative paper), or masking tape (for general use).
-
Cardstock:
- White Cardstock: For creating the rotating viewing discs.
- Decorative Paper (optional): For covering the outside of the cardboard tube to make it look even prettier.
- Bendy Straws: These are key for the spinning mechanism of your viewing disc.
-
Decorating Supplies: Let your child's imagination run wild!
- Markers, Crayons, Colored Pencils: For drawing patterns on the viewing discs and decorating the tube.
- Stickers: Great for quick, bold patterns.
- Paint: Tempera paints work well for decorating the cardboard tube.
-
Small, Colorful Objects for Viewing (optional): For more advanced kaleidoscope variations, especially if creating a "sandwich" end.
- Perler Beads: Excellent for creating patterned discs that can be held at the end.
- Flat Beads & Cellophane Pieces: Small, translucent items work wonderfully.
- Glitter: Can be sprinkled into a sealed end.
-
Optional for Advanced Variations:
- Clear Plastic Lids: For creating a rotating "sandwich" of viewing objects.
- Bamboo Skewer: For the rotational axis with plastic lids (again, adult supervision needed for sharp points).
Remember, part of the fun is being resourceful! You don't need fancy equipment to create something truly magical. And speaking of magical, why not explore our full library of adventure kits available for a single purchase? Browse our complete collection of one-time kits to find the perfect theme for your little learner, ensuring the hands-on learning never stops.
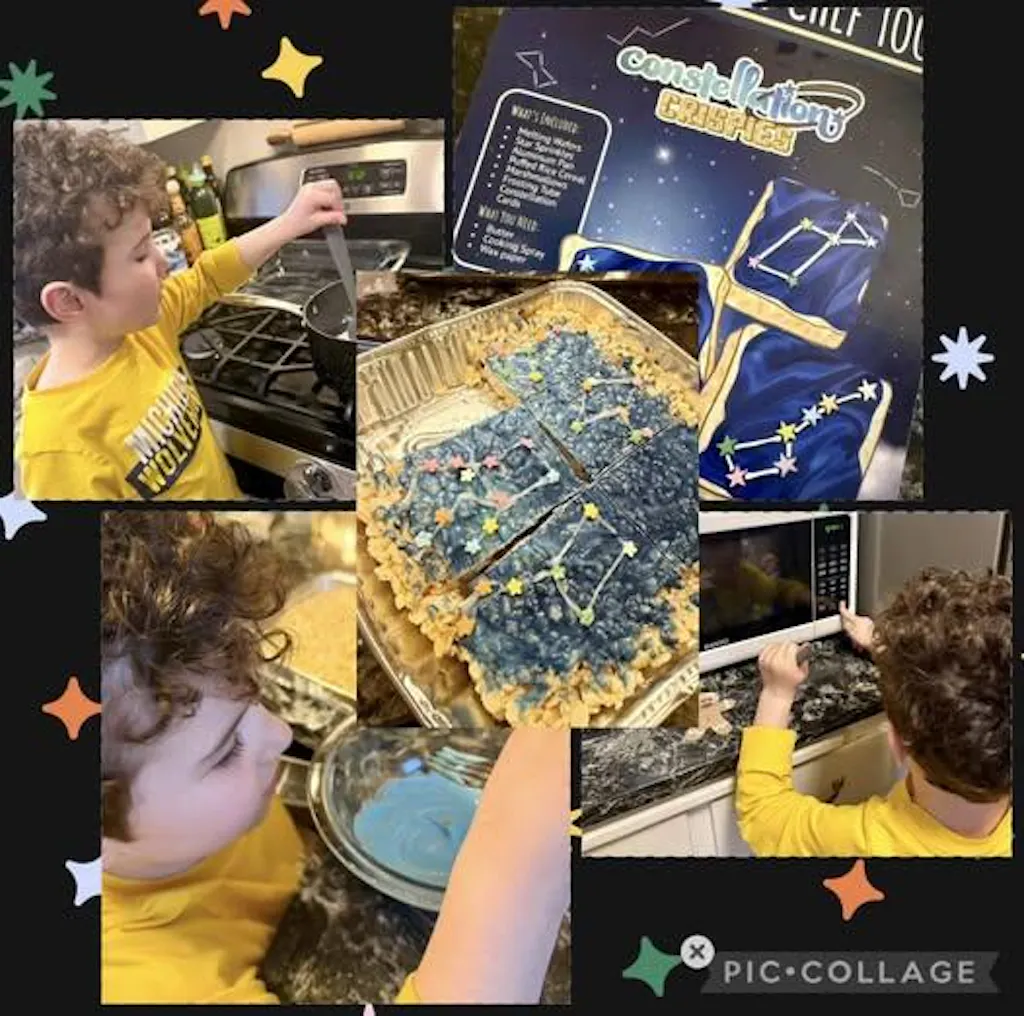
Crafting Your Classic Kaleidoscope: Step-by-Step Guide
Now for the exciting part! This step-by-step guide will walk you through creating a traditional kaleidoscope, emphasizing clarity and safety for our younger chefs and scientists.
Step 1: Prepare Your Tube (Optional Decoration)
This is the perfect starting point for kids to add their personal touch.
- Clean and Dry: Ensure your cardboard tube (toilet paper, paper towel, or cut-down wrapping paper) is clean and completely dry.
- Paint It: If your child loves to paint, this is their moment! Use tempera paint to cover the outside of the tube. Encourage them to pick their favorite colors or create a unique design. Set it aside to dry completely.
- Wrap It: Alternatively, you can use decorative paper. Measure and cut a piece of pretty paper to fit around the tube. Use double-sided tape or a glue stick to secure it firmly. This step can be done by an adult for a neater finish, or by older children with supervision.
Step 2: Create the Reflective Core
This is where the optical magic truly begins. Adult assistance will likely be needed for cutting the reflective material.
-
Measure and Cut Reflective Strips: This step requires precision for the best results. You'll need three equal strips of your Mylar or mirrored sheet.
- Length: The strips should be just shy of the length of your cardboard tube to fit inside without protruding. For example, if using a standard toilet paper roll, about 4 inches (10 cm) is a good length.
- Width: The width is crucial for a snug fit. A good starting point for a standard toilet paper roll is around 1.4 inches (3.5 cm) per strip.
- Pro Tip: Before cutting your valuable Mylar, practice with a piece of cardstock. Cut three cardstock strips to your chosen length and width, then tape them together to form a triangular prism. Test if it fits snugly inside your cardboard tube. Adjust the width as needed until you achieve a good fit. Remember, you want it snug enough not to fall out, but not so tight that it gets stuck.
-
Assemble the Prism:
- Lay your three Mylar strips side-by-side, reflective side down (if it has a distinct "best" side). Leave a tiny gap (about 1-2mm) between each strip.
- Carefully apply clear tape across the gaps, securing the strips together.
- Gently fold the taped strips into a triangular prism shape. The reflective sides should be facing inwards.
- Tape the last seam along the top to hold the triangular shape in place.
- Insert into Tube: Carefully slide the finished reflective prism into your decorated cardboard tube. It should fit snugly and not easily slide out. If it's a bit loose, a small piece of tape at the ends to secure it to the tube's interior can help.
Step 3: Secure the Viewing Mechanism
This simple addition allows your child to easily change the patterns.
- Prepare the Straw: Take a bendy straw and cut off the longer, non-bendy end. You only need the short, bendy part.
- Attach to Tube: Tape the bendy end of the straw along one end of your cardboard tube. Position it so the flexible part of the straw extends slightly over the edge of the tube's opening. This is where your viewing disc will attach.
Step 4: Design Your Dazzling Discs
This is a favorite part for kids, as they get to create the art that will be magnified and transformed.
-
Cut Cardstock Circles: You'll need several circles made from white cardstock.
- Size: The circles should be slightly larger than the opening of your cardboard tube (e.g., 3.75 inches or about 9.5 cm in diameter for a standard toilet paper roll). You can use a compass, a large cookie cutter, or even trace a cup to get a perfect circle.
- Make Multiple: Encourage your child to make several circles so they can experiment with different designs.
-
Decorate the Circles:
- Bold is Best: Explain that bold, distinct shapes and bright colors often create the most dramatic and interesting kaleidoscope patterns. Mosaics, geometric shapes, or even simple scribbles with strong colors work wonderfully.
- Get Creative: Use markers, crayons, stickers, or even small pieces of colored paper to decorate. One child might make a vibrant mosaic, another might draw a series of concentric circles, and a third might simply use a variety of stickers. The possibilities are endless!
- Poke a Hole: Once decorated, carefully poke a small hole in the very center of each cardstock circle. A sharp pencil or the tip of a bamboo skewer (with adult supervision!) works well. The hole needs to be just big enough for the bendy straw to pass through.
Step 5: Gaze and Marvel!
The moment of truth!
- Attach the Disc: Slide one of your decorated cardstock circles onto the bendy part of the straw, with the decorated side facing towards the kaleidoscope tube. The straw's bendy segment should hold the circle in place, allowing it to spin freely.
- Look Through: Hold the kaleidoscope up to a light source (but never directly at the sun!) and peer into the open end. Gently spin the cardstock circle with your free hand.
- Be Amazed: Watch as your designs transform into endless, symmetrical, and utterly beautiful patterns! This is where the effort pays off, and the "wow" factor truly kicks in. It's a moment of pure magic, a screen-free adventure that captivates and delights.
This hands-on creation of wonder is exactly what we aim for at I'm the Chef Too!. We love seeing kids light up with discovery, whether it's the chemistry of our Erupting Volcano Cakes kit bubbling over with deliciousness, or the optical magic of their homemade kaleidoscope.
Beyond the Basic: Exciting Kaleidoscope Variations for Enhanced Learning
Once your child has mastered the classic kaleidoscope, it's time to explore even more fascinating variations. These advanced kaleidoscope crafts for kids offer deeper dives into optical principles and encourage even more creative problem-solving, perfectly aligning with our commitment to continuous learning at I'm the Chef Too!.
The Teleidoscope: Exploring the World Anew
Did you know there's a type of kaleidoscope that doesn't use internal bits of colored paper? It's called a teleidoscope, and its magic lies in its open-ended design, allowing you to turn the world around you into a constantly changing, symmetrical spectacle.
-
How to Make a Teleidoscope:
- Follow Steps 1 and 2 from the classic kaleidoscope guide to create your decorated cardboard tube and reflective triangular prism, making sure the reflective core fits snugly inside the tube.
- Instead of attaching a straw and viewing disc, you simply leave one end of the tube completely open. The other end is where you look through.
- The magic happens when you point the open end at any object or scene – a patterned rug, a colorful plant, a window with trees outside, or even your own hand! The mirrors inside will reflect whatever is in front of the open end, transforming it into an intricate, symmetrical pattern.
- Educational Exploration: A teleidoscope encourages children to observe their environment in a new way. What patterns emerge from a brick wall? How does a pile of toys look when viewed through the teleidoscope? It’s a fantastic way to blend observation, art, and science, fostering a deeper connection with the world around them. This open-ended discovery is a hallmark of the kind of engaging, screen-free educational activities we champion.
Shape Shifters: Experimenting with Internal Geometries
The classic kaleidoscope uses a triangular reflective core, but what happens if you change the internal shape? Different geometries yield vastly different and equally mesmerizing patterns. This variation offers a wonderful opportunity to explore geometry and optics more deeply.
- Triangular Kaleidoscope (The Classic): As detailed in the main guide, three mirror strips taped into a prism. This typically creates a starburst effect with six-fold symmetry.
-
Circular Kaleidoscope:
- Cut a single piece of reflective material that matches the length of your tube and is wide enough to curl into a circle that fits snugly inside the tube's diameter.
- Carefully curl the reflective sheet into a circle and slide it into the cardboard tube. You may need to secure the overlapping ends with a small piece of tape.
- This shape creates a unique, often softer, and more flowing pattern, sometimes resembling a tunnel.
-
Square Kaleidoscope:
- Cut one piece of reflective material that matches the tube's length.
- Score (lightly cut, but not through, to create a fold line) your reflective sheet into four equal sections. For example, if your tube is 4 inches long, cut a 4-inch wide strip, then make three score marks approximately 1.18 inches (3 cm) apart.
- Fold along the scored lines to form a square prism, reflective side in. Tape the final seam.
- A square kaleidoscope often produces grid-like patterns, providing a different perspective on symmetry.
- Learning Outcomes: By creating and comparing these different shapes, children learn that the internal structure directly influences the visual output. They're engaging in hands-on geometry and seeing how mathematical principles translate into beautiful art. It’s about experimenting, making predictions, and observing the outcomes – true scientific inquiry!
Interactive Viewing Ends: The Kaleidoscope with a "Sandwich" End
For an even more dynamic kaleidoscope experience, you can create a rotating viewing end filled with loose objects. This combines the best of the classic kaleidoscope with the flexibility of a teleidoscope.
- Materials: Two clear plastic lids (e.g., from yogurt containers or takeout food), small flat beads, glitter, colorful cellophane pieces, masking tape, and a bamboo skewer (adult supervision required for skewer).
-
Instructions:
- Place a variety of small, colorful, flat objects (beads, glitter, cellophane) onto one clear plastic lid. Don't overfill; allow space for the objects to move.
- Place a second clear plastic lid directly on top, creating a "sandwich" with the objects inside.
- Use masking tape to seal the edges of the two lids together securely, ensuring the contents cannot escape.
- Carefully poke a small hole through the center of the taped lids using a bamboo skewer (adults handle this part!).
- Cut the bamboo skewer to be about 6 inches long.
- Feed the skewer through the hole in the lids. Tape the other end of the skewer to the side of your kaleidoscope tube, ensuring the "sandwich" of lids is positioned at one end of the tube and the skewer doesn't protrude into the viewing opening.
- Now, when you look through your kaleidoscope, you can rotate the "sandwich" of objects, creating constantly shifting patterns.
- Connecting to STEM: This variation highlights the principles of rotational motion and the interplay of loose elements within a confined space. It's a playful way to observe how random movement can still produce organized beauty. This is the kind of engaging, inquiry-based learning that makes our Galaxy Donut Kit so popular, where kids explore astronomy by creating their own edible solar system, combining scientific concepts with delicious outcomes.
Double the Fun: Creating Binocular Teleidoscopes
One clever young scientist at a Camp STEAM event decided to combine two teleidoscopes into a pair of "teleidoscopic binoculars." What a brilliant idea for collaborative exploration!
-
Instructions:
- Create two separate teleidoscopes (open-ended kaleidoscopes as described above).
- Find a small spacer, such as a large nut, a small cardboard ring, or another short piece of cardboard tubing.
- Glue or securely tape the two teleidoscopes together with the spacer in between.
- Encourage children to experiment with the orientation of the two teleidoscopes. What if one is triangular and one is square? What if both are triangular but the points face opposite directions?
- Enhanced Learning: This project fosters advanced design thinking and problem-solving. Children can investigate how combining different optical instruments changes their perception. It’s a fantastic collaborative project that encourages communication and shared discovery, much like the communal joy of baking and decorating together with one of our kits.
These variations demonstrate that the world of kaleidoscope crafts is vast and full of possibilities for continued learning and exploration. Each new design choice offers fresh insights into the fascinating interplay of light, mirrors, and imagination.
Nurturing Creativity and Cognitive Skills Through Kaleidoscope Making
The benefits of engaging children in kaleidoscope crafts for kids extend far beyond simply making a pretty toy. These activities are powerful tools for holistic child development, fostering a wide range of essential skills that will serve them well throughout their lives. At I'm the Chef Too!, we recognize that every hands-on activity, whether it's baking cookies or building a kaleidoscope, is an opportunity for profound growth.
- Communication Skills: Art is a universal language. When children draw patterns, choose colors, or decide on the aesthetic of their kaleidoscope, they are communicating visually. This form of expression allows them to convey ideas, feelings, and emotions that they might not yet have the words for, releasing creativity and building confidence.
- Social and Emotional Development: Crafting can be a solitary, meditative act, allowing for self-reflection and personal expression. When done in a group or with family, it also teaches valuable social skills like collaboration, sharing materials, and celebrating a friend's unique creation. Understanding their own artistic choices helps children develop self-awareness, which is a foundational step toward empathy for others.
- Problem-Solving and Critical Thinking: From figuring out how to cut the Mylar strips to fit perfectly, to troubleshooting why the patterns aren't forming correctly, children are constantly engaged in problem-solving. They learn to evaluate materials, adjust their approach, and think critically about cause and effect. "What happens if I use darker colors?" "How can I make this piece fit better?" These are critical thinking questions in action.
- Creativity and Innovation: This is where kaleidoscopes truly shine. The very nature of the craft encourages divergent thinking – coming up with multiple ways to decorate, different materials to view, or new variations of the basic design. It’s about making something novel and personally meaningful, fostering the innate creativity that we at I'm the Chef Too! strive to ignite in every child.
- Fine Motor Skills: The intricate actions involved in kaleidoscope crafting—holding scissors, cutting precisely, manipulating tape, poking holes, and decorating small circles—are all excellent exercises for developing fine motor skills. These skills are crucial for tasks like writing, drawing, and even tying shoelaces, contributing significantly to a child's overall dexterity and coordination.
- Academic Outcomes: By blending science, art, and math, kaleidoscope crafts naturally enhance academic outcomes. Children see the real-world application of geometry, the principles of physics, and the elements of artistic design, making these subjects more engaging and memorable. This experiential learning helps bridge the gap between abstract concepts and concrete understanding.
- Sensory Input: The vibrant colors, the reflective surfaces, the texture of the materials, and the act of turning and observing all provide rich sensory input. This multi-sensory engagement is vital for brain development and helps children process and understand their environment more deeply.
- Motivation and Self-Worth: Successfully completing a craft project, especially one that produces such a beautiful and engaging result, provides a significant boost to a child's self-confidence and self-worth. The pride in showing off their handmade kaleidoscope is invaluable.
- Family Connection: Working on a craft together creates precious bonding opportunities. It’s a chance for parents and children to share an experience, communicate, and create lasting memories. These shared activities are at the core of I'm the Chef Too!'s philosophy, as we believe learning and fun should always go hand-in-hand, fostering stronger family ties.
For parents and educators seeking diverse ways to engage young minds, remember that the journey of discovery can begin anywhere. If you're looking for more exciting adventures beyond kaleidoscope crafts, explore our full library of adventure kits available for a single purchase in our shop. Each kit is designed to provide comprehensive, fun-filled learning experiences that blend delicious food with fascinating STEM concepts and creative arts, delivering all the ingredients for memorable family moments right to your door.
Setting Up for Success: Tips for Parents and Educators
Creating kaleidoscope crafts for kids is a joyful experience, but a little preparation and guidance can make it even more rewarding and safe. As developers of educational kits, we understand the importance of setting realistic expectations and providing a supportive environment for learning and creativity.
-
Prioritize Safety First:
- Adult Supervision: Always emphasize that cutting reflective sheets, especially plastic mirror, and using tools like X-Acto knives or bamboo skewers, must be done by an adult or under very close adult supervision. Some reflective materials can have sharp edges.
- Child-Friendly Tools: Provide child-safe scissors for younger children to handle paper, stickers, and decorating tasks.
- Prepare Materials in Advance: For younger children, pre-cutting the Mylar strips or cardstock circles can help them jump straight into the more engaging assembly and decorating phases, reducing frustration. Older children can participate in the measuring and cutting with guidance.
- Encourage Experimentation, Not Perfection: The beauty of kaleidoscope crafts lies in their variability. Encourage children to try different colors, shapes, and patterns on their viewing discs. Remind them that there's no "right" or "wrong" way to decorate; every creation is unique and wonderful. Focus on the process of discovery and learning, rather than a flawless end product.
- Provide a Variety of Decorating Materials: Offer a diverse selection of markers, crayons, stickers, glitter glue, and even small bits of colored paper. The more options they have, the more creative they can be with their designs.
- Foster Unstructured Play: While we provide instructions, also allow for moments of unstructured exploration. Encourage children to look at different objects through their teleidoscope, or to try new designs on their viewing discs. Sometimes, the most profound learning happens during free play.
- Join in the Fun! Children learn by example. When you sit down and create a kaleidoscope alongside them, you're not only modeling engagement but also building a stronger connection. It shows them that you value creative pursuits and that learning can be a shared, joyful experience.
- Clean-Up Together: Integrate clean-up as part of the activity. This teaches responsibility and organization, making the whole crafting process a more complete learning experience.
Remember, the goal is to spark curiosity, build confidence, and create positive memories. By fostering a supportive and engaging environment, you're nurturing a lifelong love of learning, which is exactly what we strive to do with every kit we design at I'm the Chef Too!. Even beloved characters can make learning fun, like when kids make Peppa Pig Muddy Puddle Cookie Pies – combining a familiar friend with delicious STEM activities.
The I'm the Chef Too! Difference: Blending STEM, Food, and Art
At I'm the Chef Too!, our commitment goes beyond just providing ingredients; we deliver full-fledged, multi-sensory learning adventures right to your door. We've seen firsthand how a hands-on project like creating kaleidoscope crafts for kids can open up a world of scientific and artistic discovery. This is precisely the spirit that fuels every single "edutainment" experience we meticulously craft.
Our unique mission is to seamlessly blend food, STEM, and the arts into one unforgettable journey. We believe that when children are engaged through multiple senses – sight, touch, smell, and taste – learning becomes not just effective, but truly magical. Imagine the intricate patterns of a kaleidoscope, then imagine applying that same wonder to baking a cake that erupts like a volcano or crafting an edible solar system. That's the I'm the Chef Too! difference.
We're passionate about teaching complex subjects in an accessible, tangible, and, yes, delicious way. For instance, while a kaleidoscope teaches optics, our baking kits teach chemistry (how ingredients react), mathematics (measuring and ratios), and engineering (structuring a recipe) – all while encouraging artistic expression through decoration. We make the abstract concrete, turning the kitchen into a vibrant laboratory and art studio.
Developed by mothers and educators, our kits are designed with your child's developmental stage and curiosity in mind. We understand the challenges of finding screen-free, educational activities that genuinely captivate children and foster family bonding. That's why each I'm the Chef Too! box is a complete, convenient experience, containing pre-measured dry ingredients and specialty supplies, saving you time and hassle. We take pride in providing a reliable source of fun, engaging, and educational alternatives that spark creativity and build lasting memories.
We don't just send you a box; we send you an invitation to explore, create, and connect. A new adventure is delivered to your door every month with free shipping in the US when you join our community. Whether you're looking for ongoing enrichment or the perfect gift, our flexible 3, 6, and 12-month pre-paid plans make it easy to bring the joy of STEM cooking adventures into your home. Ready for delicious discoveries and endless learning? Join The Chef's Club and enjoy free shipping on every box. It's the simplest way to ensure a steady stream of engaging, educational fun that your whole family will love.
Conclusion
The journey into kaleidoscope crafts for kids is a testament to the boundless wonder that can be found in simple materials and a curious mind. We've explored how these captivating creations are much more than just pretty toys; they are powerful platforms for hands-on learning, blending the scientific principles of light and reflection with the artistic expression of design and color. From developing fine motor skills and problem-solving abilities to sparking creativity and fostering precious family moments, making a kaleidoscope offers a holistic educational experience that truly lights up young minds.
At I'm the Chef Too!, we believe that the most impactful learning happens when children are actively engaged, experimenting, and having fun. Kaleidoscope crafting perfectly embodies our mission to provide "edutainment" experiences that seamlessly weave together food, STEM, and the arts. By engaging with tangible projects like these, children not only grasp complex concepts but also build confidence, cultivate a love for discovery, and create memories that will last a lifetime.
Why let the adventure stop here? Continue to foster that curiosity and creativity with a steady stream of exciting, educational activities delivered right to your home. Each month, our carefully curated Chef's Club boxes bring a new, unique theme, complete with pre-measured dry ingredients, specialty supplies, and engaging STEM-based cooking projects developed by mothers and educators. It's the convenient, screen-free, and delicious way to keep the learning and family bonding alive all year long.
Don't miss out on the magic of making and learning together. Join The Chef's Club today and enjoy free shipping on every box! Give the gift of learning that lasts, and embark on countless new adventures with I'm the Chef Too!.
Frequently Asked Questions (FAQ)
Q: What's the best reflective material to use for a DIY kaleidoscope?
A: The best materials are Mylar sheets or specialized mirrored cardstock/plastic sheets designed for crafts. These offer the clearest and most vibrant reflections. Avoid using regular aluminum foil, as its crinkled surface doesn't provide sharp enough reflections for the classic kaleidoscope effect.
Q: My homemade kaleidoscope isn't working or the patterns are blurry – what went wrong?
A: There are a few common culprits:
- Reflective Material: Ensure your reflective material is smooth, highly reflective, and not scratched.
- Snug Fit: The triangular prism of mirrors needs to fit snugly inside the cardboard tube. If it's too loose, the mirrors might shift, causing distortions.
- Light Source: Make sure you're looking through the kaleidoscope towards a good, bright light source (but never directly at the sun!).
- Object Choice: For the classic kaleidoscope, ensure your viewing disc has bold, distinct shapes and colors. For a teleidoscope, point it at patterns with good contrast.
- Mirror Alignment: The mirrors in the prism must be taped tightly together with minimal gaps to create continuous reflections.
Q: How old should kids be for this kaleidoscope craft?
A: Younger children (ages 4-6) can actively participate in decorating the tube and viewing discs with supervision. Adults should handle all cutting of reflective materials and assembly of the prism and straw. Older children (7+) can take on more of the measuring, cutting (with appropriate safety scissors and supervision), and assembly steps, fostering greater independence and problem-solving. This craft is adaptable for a wide age range!
Q: Can I use different sized cardboard tubes for my kaleidoscope?
A: Absolutely! While toilet paper rolls are common, you can use paper towel rolls, cut-down wrapping paper rolls, or even wider craft tubes. Just remember that you'll need to adjust the measurements for your reflective strips accordingly. Always test the size of your reflective prism with plain paper first to ensure a snug fit before cutting your Mylar or mirrored sheets.
Q: What is the difference between a kaleidoscope and a teleidoscope?
A: A kaleidoscope typically has an enclosed end containing small, loose, colorful objects (like beads or colored glass) that tumble and rearrange to create patterns when you turn it. A teleidoscope, on the other hand, has an open end. Instead of internal objects, it uses its mirrors to reflect and refract images of the external world, transforming whatever you point it at into a kaleidoscopic pattern. It's like turning the world around you into a continuous, mesmerizing visual display!