Table of Contents
- Introduction: The Entrepreneurial Spark in Every Child
- Why Craft Fairs are Fantastic for Kids: Beyond Just the Booth
- Getting Started: Setting Up for Success
- Sweet & Savory STEM: Edible Craft Fair Ideas
- Personalized & Wearable Wonders
- Home Decor & Practical Creations
- Themed & Imaginative Play Items
- I'm the Chef Too! and Your Little Entrepreneur
- Tips for a Successful Craft Fair Experience
- Conclusion
- FAQ Section
Imagine the glint in your child's eye as a customer admires their handmade creation, the proud smile as they count their earnings, or the surge of confidence from explaining their craft to a stranger. These aren't just fleeting moments; they are powerful learning experiences that ignite a lifelong love for creativity, problem-solving, and independence. Craft fairs offer a unique stage for children to transform their imaginative play into real-world entrepreneurial adventures, far beyond the confines of a screen.
At I'm the Chef Too!, our mission is to blend food, STEM, and the arts into one-of-a-kind "edutainment" experiences, sparking curiosity and creativity in children. We believe in providing screen-free educational alternatives that facilitate family bonding and empower children through tangible, hands-on, and delicious cooking adventures developed by mothers and educators. Craft fairs perfectly embody this philosophy, offering a vibrant, real-world classroom where kids can apply their creative talents, develop crucial life skills, and experience the joy of making something truly their own – and then seeing others appreciate it enough to purchase! In this comprehensive guide, we'll dive deep into a treasure trove of easy, engaging, and profitable craft fair ideas for kids of all ages, offering practical advice to help you nurture your child's inner entrepreneur while creating cherished family memories.
Introduction: The Entrepreneurial Spark in Every Child
Have you ever watched your child meticulously draw a picture, carefully arrange their toys into a "shop," or proudly present you with a handmade gift? There's a natural inclination towards creation and sharing in every young heart. What if we could harness that innate drive and transform it into an exciting learning opportunity? Craft fairs provide the perfect platform for this transformation, turning playtime into a valuable educational experience.
Beyond just the fun of making things, participating in a craft fair teaches children invaluable lessons. They learn about design, production, pricing, marketing, and customer service – all fundamental entrepreneurial skills wrapped up in a joyful, hands-on package. It's about more than just making a little pocket money; it's about building confidence, fostering self-expression, and understanding the value of hard work. This blog post is dedicated to exploring a wide array of craft ideas that are not only fun and engaging for kids to create but also hold significant appeal for potential buyers. We'll provide detailed instructions, tips for presentation, and insights into the skills each project cultivates, ensuring your child's craft fair debut is both successful and incredibly rewarding.
Why Craft Fairs are Fantastic for Kids: Beyond Just the Booth
For us at I'm the Chef Too!, the essence of childhood learning lies in engaging all senses and making complex ideas accessible through playful exploration. Craft fairs perfectly align with this philosophy, offering a dynamic environment where children aren't just making things; they're mastering a range of skills that extend far beyond the craft table. It’s an immersive "edutainment" experience where the lessons are as sweet and satisfying as our most delicious STEM creations.
A Holistic Learning Experience: Think about it: from the moment a child decides what to make, they're engaging in a multi-faceted learning process.
- Creativity and Self-Expression: Choosing colors, designing patterns, adding unique touches – these acts allow children to explore their artistic side and communicate their individuality. It’s a powerful form of self-expression, fostering imagination and innovation.
-
Entrepreneurial Skills in Action: This is where the magic truly happens. Kids learn about:
- Budgeting and Cost Analysis: How much do the materials cost? Can we make a profit? This introduces basic math and financial literacy.
- Pricing Strategies: How much should we charge? What are similar items selling for? This teaches market awareness and value.
- Production Planning: How many items can we realistically make? What's our most efficient process?
- Marketing and Presentation: How can we make our booth look appealing? How do we talk about our crafts to customers? This develops communication and persuasion skills.
- Customer Service: Greeting buyers, answering questions, handling money with a smile. These interactions build social skills and confidence.
- Problem-Solving and Resilience: Sometimes a craft doesn't turn out as planned, or an item doesn't sell. These moments are opportunities to adapt, troubleshoot, and understand that not every attempt yields immediate success, which is a crucial life lesson.
- Confidence Building: The pride a child feels when someone chooses to buy their creation is immeasurable. It validates their efforts, boosts self-esteem, and encourages them to take on new challenges.
- Family Bonding: Many of these craft fair ideas are perfect for collaboration, creating wonderful opportunities for parents and children to spend quality time together. We believe strongly in facilitating family bonding through shared, screen-free activities, and preparing for a craft fair is a fantastic way to do just that. It's about working together towards a common goal, sharing ideas, and celebrating each other's contributions.
Just as our I'm the Chef Too! kits blend the excitement of a science experiment with the joy of baking, participating in a craft fair blends creative expression with practical business acumen. We're not just selling crafts; we're cultivating skills, fostering a love for learning, and creating joyful family memories that will last a lifetime.
Ready for a new adventure every month? Think of how many skills your child could develop with continuous hands-on projects! Join The Chef's Club and enjoy free shipping on every box, bringing new "edutainment" experiences right to your door.
Getting Started: Setting Up for Success
Embarking on a craft fair journey with your child requires a little planning, but the preparation itself is part of the fun and learning! At I'm the Chef Too!, we understand the importance of making complex processes manageable and enjoyable. Just like our kits provide pre-measured ingredients and step-by-step instructions, we'll help you break down the craft fair setup into easy-to-digest steps.
Brainstorming Ideas: What Will Spark Joy and Sales?
This is perhaps the most exciting part! Involve your child heavily in this process. What do they love to make? What are they genuinely interested in? Crafts that come from the heart often have the most appeal.
- Consider Interests: Does your child love animals? Art? Science? Themes that resonate with them will lead to more enthusiastic creation.
- Age Appropriateness: Choose crafts that match their skill level to prevent frustration. Simple, repetitive tasks are great for younger kids, while older children can tackle more intricate designs.
- Material Availability & Cost: Can you easily source the materials? Are they affordable? Think about bulk purchases for better value.
- Trend Spotting: While we don't encourage chasing every fad, understanding popular items (like slime or specific character themes) can give you ideas. However, encourage your child to add their unique spin.
- Testing Prototypes: Make a few samples. How long does each take? How do they look? Are they durable?
- Thinking Seasonally: Does the craft fair have a particular season or holiday theme? Ornaments around Christmas, flower-themed items in spring, etc.
Materials and Sourcing: Smart Shopping for Little Makers
Sourcing materials is a lesson in itself, teaching about budgeting and finding value.
- Shop Smart: Hit up craft stores, dollar stores, or even discount retailers for bulk supplies. Often, buying larger quantities of basic items like beads, yarn, or cardstock is more cost-effective.
- Upcycling and Recycling: Encourage your child to look for materials around the house. Old jars, cardboard, fabric scraps, or even natural elements like pebbles and pinecones can be transformed into treasures. This teaches environmental awareness and creative problem-solving.
- Safety First: Always ensure materials are non-toxic and age-appropriate. When using tools, adult supervision is paramount.
Pricing Strategies: The First Lesson in Economics
This can feel daunting, but it's a fantastic real-world math lesson.
- Cost of Materials: Add up the cost of all materials for one item. For example, if a pack of 10 beads costs $2, and you use 5 beads per bracelet, the cost per bracelet is $1.
- Time is Money (Optional for Kids, but good to discuss): For older kids, you can introduce the concept of how much their time is worth. For younger kids, focus on the sheer effort they put in.
- Competitor Analysis: What are similar items selling for? You want to be competitive but also value your child's unique work.
- Target Price: A common formula is (Materials Cost x 2) + a little extra for profit and effort.
- Round Numbers: For ease of making change, aim for prices like $1, $2.50, $5.
- Let the Child Decide: Guide them, but ultimately let them set the price. It gives them ownership and responsibility.
Displaying Wares: Creating an Eye-Catching Booth
Presentation is key! A well-organized and attractive display draws customers in.
- Theme and Cohesion: If your child has a few different crafts, try to group them thematically or by color.
- Eye Level for Kids: Remember that many customers might be other children! Place some items at kid-friendly eye level.
- Use Levels: Boxes, small risers, or even stacked books covered with a cloth can create visual interest and make your items stand out.
- Signage: Simple, clear signs are essential. Your child can help create these! Include prices and perhaps the name of their "business."
- Personal Touch: A photo of your child making the crafts, or a small bio about the "artist," can add a charming personal touch that customers love.
- Keep it Tidy: A clean, organized booth looks professional and inviting.
- The Power of a Smile: Encourage your child to stand by their booth, make eye contact, and smile. Their enthusiasm is their best selling tool!
Just as we believe in making complex subjects tangible and delicious through our kits, these craft fair ventures blend creativity with economics in a real, hands-on way. We provide the tools to spark curiosity, and your child brings the imagination to life.
Ready for a new adventure every month? Think of how many skills your child could develop with continuous hands-on projects! Join The Chef's Club and enjoy free shipping on every box, bringing new "edutainment" experiences right to your door.
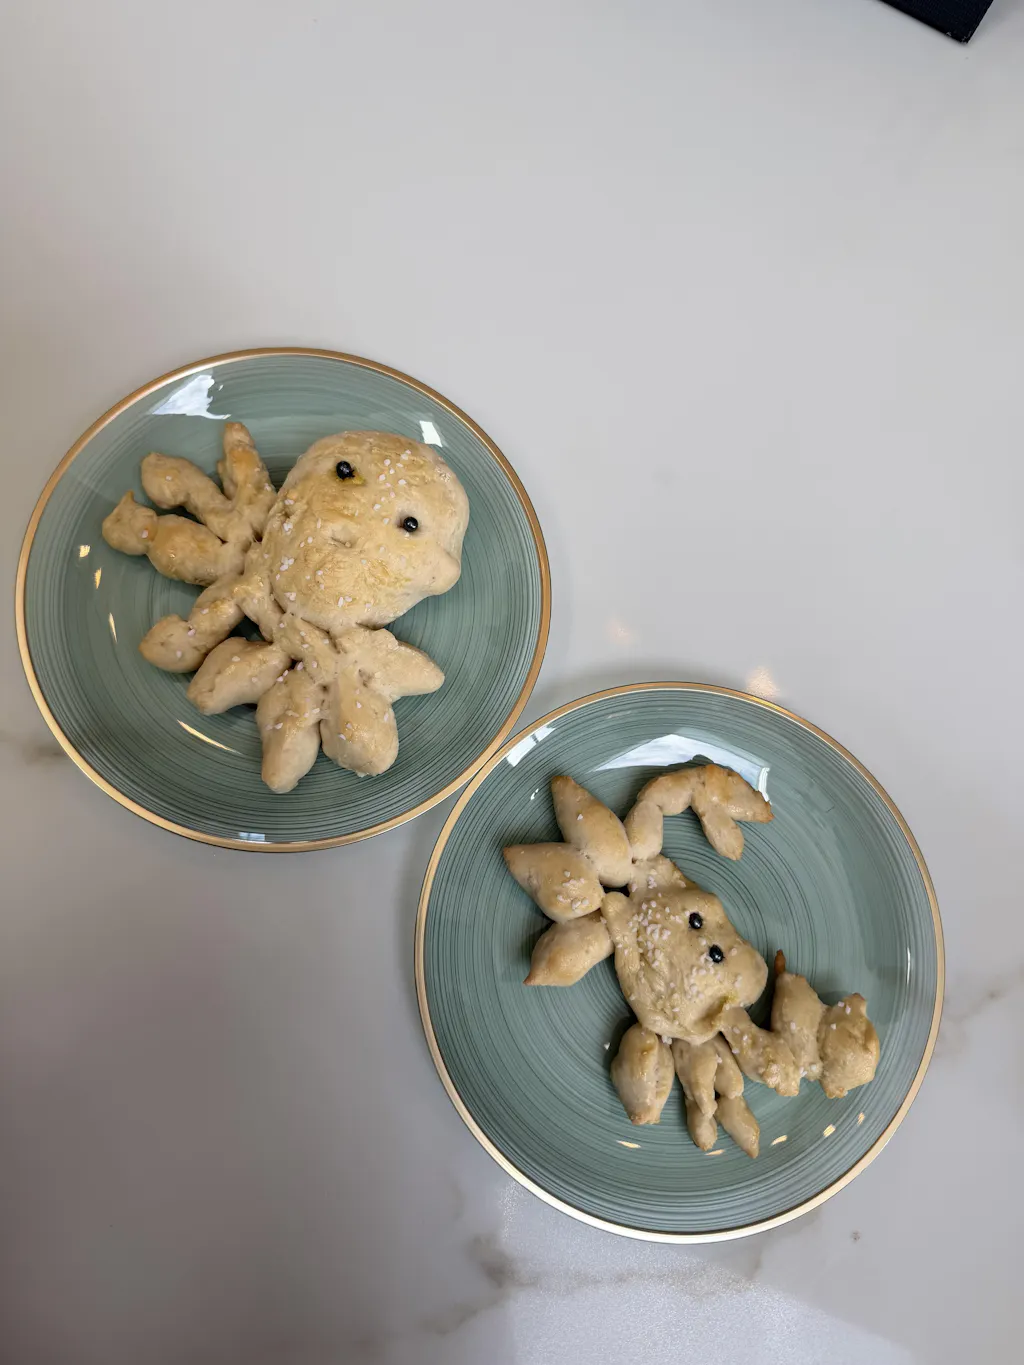
Sweet & Savory STEM: Edible Craft Fair Ideas
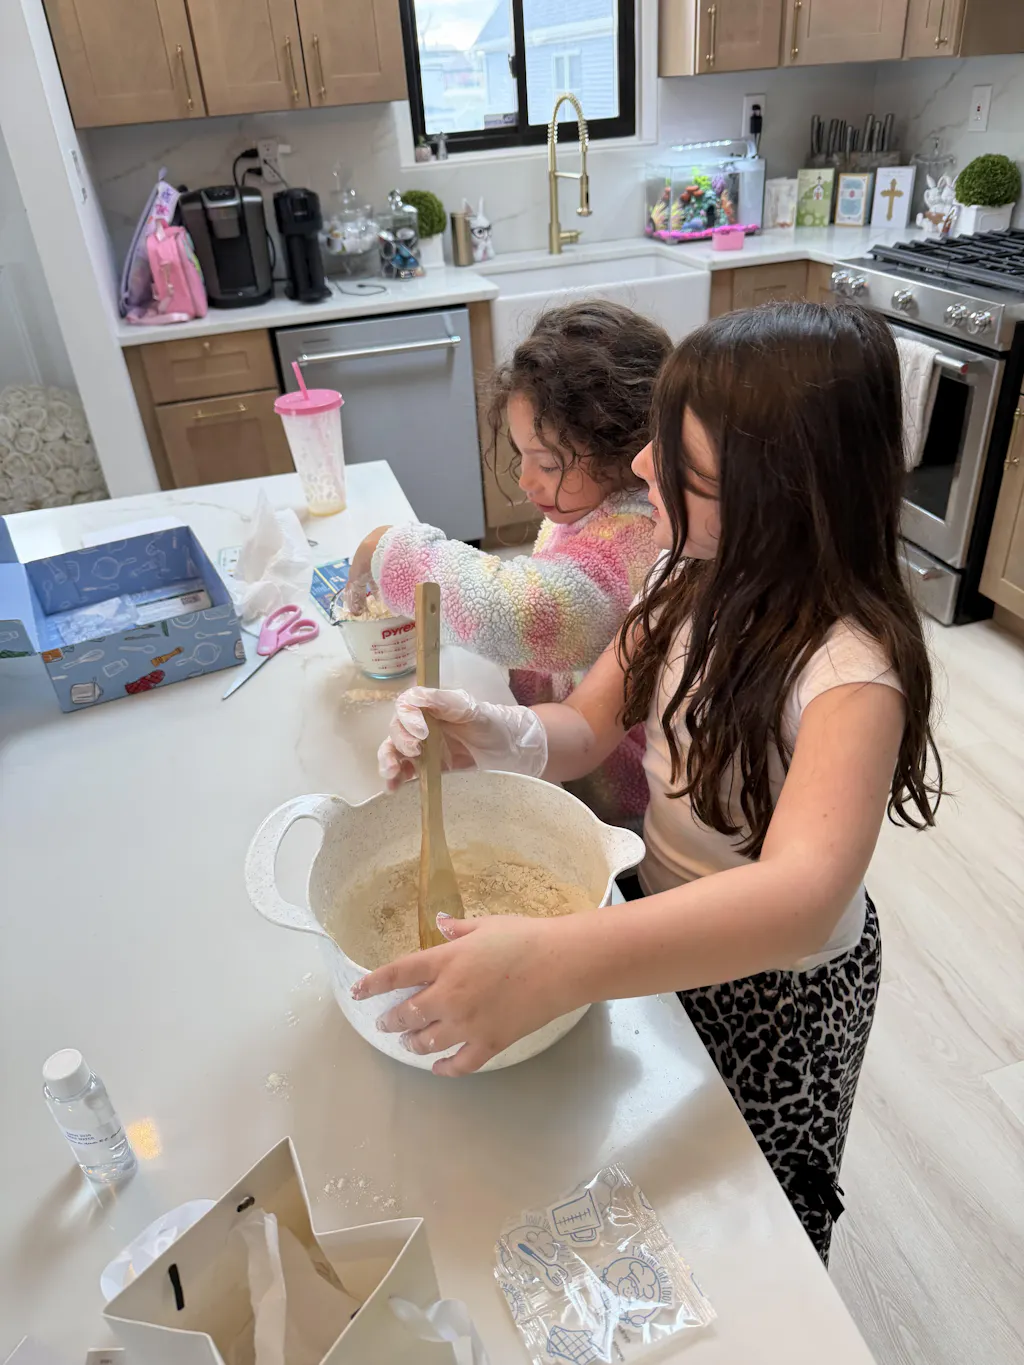
At I'm the Chef Too!, our heart lies in blending the joy of food with the wonder of STEM and the arts. What better way to captivate young entrepreneurs and their customers than with delicious, handmade treats that often involve a dash of kitchen science? Edible crafts are always a hit at craft fairs, appealing to almost everyone. Remember, for any food items, ensure you check local health regulations for food sales at craft fairs. Adult supervision is absolutely essential for all kitchen activities, especially when using ovens or hot liquids.
1. Mini Decorated Cookies or Cupcakes
These bite-sized delights are incredibly versatile and allow for endless creative expression. Kids can decorate them with simple icing designs, sprinkles, edible glitter, or even themed toppers.
Materials Needed:
- Baked cookies (sugar cookies work wonderfully) or cupcakes (from scratch or a mix)
- Pre-made or homemade icing/frosting (buttercream, royal icing)
- Food coloring
- Sprinkles, edible glitter, small candies
- Piping bags with various tips (or ziploc bags with a snipped corner)
- Small spatulas or butter knives
- Decorative packaging (cupcake boxes, clear bags, small gift boxes)
Process:
- Bake the Base: Prepare and bake your chosen cookies or cupcakes. Let them cool completely.
- Mix & Color Icing: Divide icing into small bowls and color with food coloring.
- Decorate! Let your child's creativity soar! Simple swirls, dots, zig-zags, or themed designs (e.g., flowers, animals, holidays). Sprinkles are always a favorite.
- Dry & Package: Allow decorated items to dry completely to prevent smudging. Package them carefully in individual bags or small boxes.
- Presentation Tips: A small sign describing the flavors or the theme ("Sunny Day Cookies," "Galaxy Swirl Cupcakes") adds appeal.
Skills Cultivated: Fine motor skills, color theory, design, patience, basic baking/food preparation, food safety.
2. Gourmet Hot Chocolate Mix Jars
These beautiful layered jars are not only visually appealing but also offer a cozy, comforting treat. They make fantastic gifts and are relatively simple to assemble.
Materials Needed:
- Small glass jars with lids (mason jars or decorative spice jars)
- Hot chocolate powder
- Mini chocolate chips (milk, dark, white)
- Mini marshmallows
- Crushed candy canes, cinnamon sticks, or other flavor mix-ins (optional)
- Small scoops or spoons for layering
- Ribbon, fabric scraps, or decorative tags for embellishment
Process:
- Gather Ingredients: Lay out all your dry ingredients.
- Layer with Care: This is where the artistry comes in. Help your child layer the ingredients carefully in the jars, creating distinct bands of color and texture. Start with the hot chocolate powder, then mini chips, then marshmallows, and so on.
- Seal & Decorate: Tightly secure the lid. Your child can then tie a ribbon around the neck, add a fabric cap, or create a handmade tag with instructions and a personal message.
- Presentation Tips: Offer a variety of "flavors" (e.g., Peppermint Swirl, S'mores Delight).
Skills Cultivated: Measuring, layering, fine motor skills, design, packaging, understanding ingredient combinations.
3. Edible Science Kits (DIY Version to Our Kits)
Imagine the delight of a craft that's also a mini science experiment you can eat! While preparing ingredients for these can be a bit more involved, the concept is incredibly engaging. You can create small bags or jars with specific dry ingredients and simple instructions, encouraging customers to "make their own" edible creation at home.
-
Example: DIY "Volcano" Candy Kit: Imagine small bags with ingredients for a fizzy candy experience. Perhaps baking soda, citric acid, and powdered sugar, with food coloring and flavor extracts to be added by the customer at home with a bit of water. This is a simple, tangible way to introduce the concept of chemical reactions. For those who love the magic of science experiments that you can eat, our Erupting Volcano Cakes Kit is always a bubbling hit, teaching chemical reactions in a delicious way with all the pre-measured ingredients and instructions ready to go!
-
Example: DIY "Galaxy" Candy Kit: Think edible glitter, blue and purple food coloring, and sugar crystals that can be mixed into a simple glaze for cookies or donuts. This hints at the vastness of space through vibrant, edible colors. If the cosmos call to your budding astronomer, exploring the wonders of the universe through taste is easy with our Galaxy Donut Kit, where learning about astronomy is as fun as it is delicious, and all the hard work of sourcing ingredients is done for you.
Skills Cultivated: Measurement, understanding chemical reactions (even simple ones), following instructions, creativity in design.
4. Homemade Dog Treats
For the animal lovers, making healthy, delicious treats for furry friends is a wonderful venture. These are often made with simple, wholesome ingredients and can be shaped creatively.
Materials Needed:
- Whole wheat flour, peanut butter (xylitol-free!), pumpkin puree, eggs (basic recipe)
- Cookie cutters (bone shapes, paw prints, or fun seasonal shapes)
- Baking sheets, parchment paper
- Clear bags, ribbon, handmade tags with ingredient lists
Process:
- Mix Ingredients: Combine all ingredients into a dough.
- Roll & Cut: Roll out the dough and let your child cut out shapes with cookie cutters.
- Bake: Bake according to a simple dog treat recipe.
- Cool & Package: Allow treats to cool completely. Package them in clear bags, tied with a ribbon, and be sure to include a clear list of all ingredients on the tag for pet owners.
- Presentation Tips: A cute photo of a dog enjoying the treats can be a great marketing tool!
Skills Cultivated: Measuring, following recipes, understanding basic nutrition (for pets!), food safety, marketing to a specific audience.
Edible crafts combine creativity with tangible results, offering immediate gratification for both the maker and the buyer. They embody our I'm the Chef Too! philosophy of learning through delicious, hands-on experiences.
Ready for a new adventure every month? Inspire your child with continuous "edutainment" experiences! Join The Chef's Club and enjoy free shipping on every box and watch their creativity blossom with every delicious experiment.
Personalized & Wearable Wonders
Crafts that people can wear or use to express their individuality are perennial favorites at fairs. These projects often involve fine motor skills, pattern recognition, and a keen eye for aesthetics, all while allowing children to create something truly unique.
1. Friendship Bracelets
A timeless classic, friendship bracelets are easy to make in bulk, highly customizable, and appeal to a wide age range.
Materials Needed:
- Embroidery floss or colorful crafting threads (various colors)
- Scissors
- Tape or a clipboard to secure the bracelet while working
Process:
- Choose Colors: Let your child select 3-6 colors.
- Cut Strands: Cut several strands of each color, about 24-30 inches long.
- Knotting: Tie a knot at one end, leaving a small loop or tail. Secure this end.
- Weaving: Teach your child a basic knotting pattern like the candy stripe (forward knot) or chevron. The beauty is in the repetition and the way colors blend.
- Finish: Once the desired length is reached, tie off the ends and trim excess.
- Presentation Tips: Display them on a small rack, a cushion, or draped over a rustic branch. Offer a variety of color combinations, or even take custom color requests!
Skills Cultivated: Fine motor skills, pattern recognition, patience, color theory, manual dexterity.
2. Beaded Keychains & Jewelry
Beads offer endless possibilities for personalization, allowing children to create unique accessories that are both decorative and functional.
Materials Needed:
- Assorted beads (plastic, glass, wooden, acrylic – varying shapes and sizes)
- Elastic string for bracelets, beading wire for keychains/necklaces
- Keychain rings or clasps for jewelry
- Crimp beads and jewelry pliers (for more secure finishes, especially for keychains)
- Letter beads (optional, for names or words)
- Charms (optional)
Process:
- Design First: Encourage your child to lay out their design before stringing.
- Stringing: For elastic bracelets, simply string beads onto the elastic. For keychains or necklaces, secure one end of the wire/cord with a crimp bead or knot, then string.
- Secure: For elastic bracelets, tie a surgeon's knot and add a dab of super glue (adult assistance needed). For keychains/necklaces, attach the ring/clasp using crimp beads (with pliers) or by tying secure knots.
- Presentation Tips: Display bracelets on a stand or small jewelry tree. Keychains can hang from a hook display. Group by color, theme, or bead type.
Skills Cultivated: Fine motor skills, pattern design, creativity, problem-solving (e.g., if a bead doesn't fit), dexterity.
3. Hair Accessories: Scrunchies, Headbands, & Clips
Stylish and practical, handmade hair accessories are popular items, and many can be made with minimal or no sewing.
Materials Needed:
- Fabric scraps (cotton, velvet, satin for scrunchies)
- Elastic (for scrunchies and headbands)
- Plain plastic or fabric headbands
- Alligator clips or barrettes
- Ribbon, fabric glue, small embellishments (buttons, beads, fabric flowers)
- Sewing machine or needle and thread (for scrunchies), hot glue gun (adult supervised)
Process (Scrunchies - No-Sew Option):
- Cut Fabric: Cut a rectangular strip of fabric (e.g., 20" x 4").
- Fold & Glue: Fold long edges inwards and glue. Then fold the strip in half lengthwise and glue the raw edges together, creating a tube.
- Insert Elastic: Thread elastic through the tube and tie securely. Glue the fabric ends together.
- Decorate Clips/Headbands: Hot glue bows made from ribbon, fabric flowers, or small felt shapes onto plain clips or headbands.
- Presentation Tips: Arrange on a small mannequin head, a decorative board, or in clear jars. Offer a wide variety of colors and patterns.
Skills Cultivated: Basic sewing (if applicable), measuring, cutting, design, color coordination, fine motor skills.
4. Decorated T-shirts & Tote Bags
These are fantastic for showing off artistic flair and creating functional, personalized items.
Materials Needed:
- Plain cotton T-shirts or canvas tote bags
- Fabric paints, fabric markers, or tie-dye kit
- Stencils (optional)
- Cardboard inserts (to prevent paint bleed)
- Iron (for setting fabric paint/markers - adult assistance)
- Rubber bands and plastic gloves (for tie-dye)
Process (Fabric Markers/Paint):
- Insert Cardboard: Place cardboard inside the shirt/bag.
- Design: Let your child draw, stencil, or paint their design.
- Set: Follow product instructions for setting the paint/markers (usually by ironing).
- Tie-Dye (Adult Supervised): Follow the instructions in the tie-dye kit carefully, ensuring proper ventilation and safety.
- Presentation Tips: Display on hangers or folded neatly. Show examples of kids wearing the shirts or using the bags.
Skills Cultivated: Artistic design, color theory, understanding materials, following instructions, patience, product care.
At I'm the Chef Too!, we appreciate that every creative endeavor, from concocting a delicious dessert to crafting a unique accessory, helps children build confidence and develop key skills. These wearable crafts are not just items; they are badges of your child's creativity and hard work.
Ready for a new adventure every month? Give the gift of learning that lasts all year with a 12-month subscription to our STEM cooking adventures! Each box is a complete experience, containing pre-measured dry ingredients and specialty supplies, making it easy to create more joyful family memories. Join The Chef's Club today!
Home Decor & Practical Creations
These crafts transform everyday items into objects of beauty or utility, offering a wide appeal to customers looking for unique gifts or personal touches for their homes. This category often involves an exciting blend of artistic expression and practical application, much like how our I'm the Chef Too! kits turn scientific principles into delicious, tangible results.
1. Handmade Greeting Cards
Always in demand, handmade cards offer a personal touch that store-bought alternatives simply can't match.
Materials Needed:
- Colored cardstock or blank card bases
- Decorative paper, glitter paper, stickers
- Scissors, glue sticks, various adhesives
- Markers, colored pencils, crayons
- Stamps and ink pads, stencils
- Embellishments (buttons, ribbons, small felt shapes)
- Envelopes
Process:
- Fold Card Base: Start with a folded piece of cardstock.
- Decorate Front: Encourage your child to create designs using layers of paper, drawings, stamps, or collages. The possibilities are endless!
- Add Message (Optional): They can write generic messages like "Thinking of You" or leave them blank.
- Presentation Tips: Display cards upright on a small stand, grouped by occasion (birthday, thank you, blank). Offer variety in style and color.
Skills Cultivated: Artistic design, composition, fine motor skills, understanding occasions, communication.
2. Painted Rocks & Coasters
Simple rocks or plain cork/wooden coasters can become miniature canvases for creative expression.
Materials Needed:
- Smooth river rocks (cleaned) or plain cork/wooden coasters
- Acrylic paints (various colors)
- Small paintbrushes
- Clear sealant spray or varnish (adult assistance for spray)
- Optional: permanent markers, stencils
Process:
- Clean & Dry: Ensure rocks/coasters are clean and dry.
- Paint Designs: Let your child paint anything they imagine – animals, mandalas, abstract patterns, inspirational words, or garden themes.
- Dry Thoroughly: Allow paint to dry completely.
- Seal: Apply a clear sealant (adult supervised for spray) to protect the artwork and make it weather-resistant (for rocks).
- Presentation Tips: Arrange rocks in a small basket or on a bed of moss. Coasters can be stacked or fanned out. A small sign suggesting uses (garden decor, paperweights, gifts) can be helpful.
Skills Cultivated: Artistic expression, color mixing, fine motor control, patience, understanding protective finishes.
3. Mini Terrariums & Fairy Gardens
These tiny worlds bring nature indoors and are incredibly popular for their charm and low-maintenance appeal.
Materials Needed:
- Small glass jars, bowls, or containers
- Small pebbles or gravel (for drainage)
- Activated charcoal (optional, for air purification)
- Potting soil
- Small plants (succulents, moss, air plants are ideal)
- Miniature figurines, polished stones, small twigs, dried flowers (for decoration)
- Tweezers or small spoons for arranging
Process:
- Drainage Layer: Place a layer of pebbles at the bottom.
- Charcoal (Optional): Add a thin layer of activated charcoal.
- Soil Layer: Add potting soil (for plants needing it).
- Planting: Gently place small plants or moss.
- Decorate: Let your child arrange figurines, stones, and other decorative elements to create their miniature scene.
- Presentation Tips: Emphasize the unique nature of each garden. Provide care instructions if living plants are included.
Skills Cultivated: Botany basics, layering, composition, fine motor skills, creative storytelling, patience.
4. Bath Bombs, Sugar Scrubs, & Lip Balms
These homemade spa delights are always a hit, combining simple chemistry with luxurious self-care. They're a fantastic way to introduce children to the science behind everyday products. Always ensure adult supervision, especially with melting ingredients or handling essential oils.
Materials Needed (Bath Bombs):
- Baking soda, citric acid, cornstarch, Epsom salt
- Carrier oil (coconut oil, almond oil), essential oils (for fragrance), food coloring (optional)
- Bath bomb molds (sphere, heart shapes)
- Mixing bowls, spray bottle with water
Process (Bath Bombs):
- Mix Dry Ingredients: Combine baking soda, citric acid, cornstarch, and Epsom salt in a bowl.
- Add Wet Ingredients: In a separate bowl, mix carrier oil, essential oils, and food coloring. Slowly add wet to dry, mixing well.
- Spritz & Mold: Lightly spritz with water until the mixture holds its shape when squeezed. Pack firmly into molds.
- Dry: Let dry for at least 24 hours.
- Package: Wrap in cellophane, tie with a ribbon, add a small label.
Materials Needed (Sugar Scrub):
- Granulated sugar, carrier oil (coconut, almond), essential oils
- Small jars with lids
Process (Sugar Scrub):
- Mix: Combine sugar and carrier oil.
- Add Scent: Add a few drops of essential oil for fragrance.
- Package: Spoon into jars, decorate with ribbon and a label.
Materials Needed (Lip Balm):
- Beeswax pellets, coconut oil, shea butter or cocoa butter
- Essential oils (peppermint, vanilla), lip balm tubes or small containers
- Double boiler or microwave-safe bowl, stirring utensil
Process (Lip Balm):
- Melt: Melt beeswax, coconut oil, and shea butter in a double boiler (adult supervised).
- Cool & Scent: Remove from heat, let cool slightly, then add essential oils.
- Pour & Set: Carefully pour into tubes/containers. Let solidify.
- Package: Add a label with ingredients.
Skills Cultivated: Basic chemistry, precise measuring, following recipes, understanding ingredients, product development, packaging design.
For a wider array of engaging, hands-on activities that combine learning with creativity, Browse our complete collection of one-time kits in our shop. You might find the perfect inspiration for your next family project!
5. Decorated Flower Pots
Transforming a plain terracotta pot into a vibrant piece of art is a simple yet effective craft.
Materials Needed:
- Plain terracotta pots (various sizes)
- Acrylic paints, paintbrushes
- Clear sealant spray or outdoor varnish (adult assistance for spray)
- Optional: small plants or seeds to go with the pot
Process:
- Clean Pots: Ensure pots are clean and dry.
- Paint: Let your child paint designs, patterns, or even characters on the pots.
- Dry & Seal: Allow paint to dry completely, then apply a sealant to protect the artwork.
- Presentation Tips: Pair with a small packet of seeds, a starter plant, or even a miniature gardening tool for added value.
Skills Cultivated: Artistic design, color theory, fine motor skills, understanding materials and finishes, gardening basics (if paired with plants).
6. Candles (Kid-Friendly Method)
While making traditional poured candles involves hot wax and requires significant adult supervision, a kid-friendly alternative using granulated wax is safer and just as fun!
Materials Needed:
- Granulated wax (various colors)
- Wicks with bases
- Heat-safe glass containers (small jars, votive holders)
- Popsicle sticks or clothespins (to hold wicks upright)
Process:
- Anchor Wick: Place a wick in the center of the container, securing the top to a popsicle stick laid across the rim.
- Layer Wax: Let your child spoon layers of different colored granulated wax into the container around the wick. They can create patterns, stripes, or gradients.
- Presentation Tips: Emphasize the unique layered designs. Add a small tag with instructions for safe candle burning.
Skills Cultivated: Layering, design, color coordination, fine motor skills, understanding safety precautions.
7. Bookmarks (Origami or Crafted)
Bookmarks are small, affordable, and appeal to readers of all ages.
Materials Needed:
- Colorful cardstock, patterned paper, or origami paper
- Scissors, glue
- Markers, stickers, glitter
- Ribbon, tassels, charms
- Laminator (optional, for durability)
Process:
- Design: Cut cardstock into bookmark shapes. Your child can then draw, collage, or decorate.
- Origami: Follow simple origami instructions for corner bookmarks (e.g., animal faces).
- Embellish: Add ribbons, tassels, or charms.
- Laminate (Optional): Laminate for durability.
- Presentation Tips: Display in a small basket or hung from a string. Offer a variety of themes (animals, flowers, abstract designs).
Skills Cultivated: Fine motor skills, artistic design, papercraft, understanding durability.
Themed & Imaginative Play Items
These crafts tap into a child's love for play and can be irresistible to other kids (and adults looking for unique gifts for children). These items encourage imaginative exploration, much like our I'm the Chef Too! kits turn learning into an imaginative adventure.
1. Slime (Various Types)
Slime remains incredibly popular, and its appeal lies in its sensory experience and endless variations.
Materials Needed:
- PVA school glue (white or clear)
- Liquid starch, borax solution, or contact lens solution (with baking soda)
- Food coloring, glitter, small beads, foam balls, scents (essential oils or flavorings)
- Small containers with lids for packaging
Process (Basic Slime - adult supervision required for borax/activators):
- Mix Glue & Color: Combine glue and food coloring in a bowl.
- Add Glitter/Add-ins: Stir in glitter or other desired embellishments.
- Activate: Gradually add your chosen activator (liquid starch/borax/contact solution) while stirring vigorously until the slime forms and pulls away from the sides of the bowl.
- Knead: Knead the slime until it reaches the desired consistency.
- Package: Store in airtight containers.
- Presentation Tips: Offer a variety of colors, textures (fluffy, crunchy, glitter), and scents. Use clear containers to showcase the slime. Include a small label listing ingredients and "fun facts."
Skills Cultivated: Chemistry (polymers, reactions), precise measuring, sensory exploration, creativity in adding variations, understanding consistency.
Ready for a new adventure every month? Think of how many skills your child could develop with continuous hands-on projects! Join The Chef's Club and enjoy free shipping on every box, bringing new "edutainment" experiences right to your door.
2. Paper Bag Puppets
Simple, whimsical, and perfect for inspiring storytelling and imaginative play.
Materials Needed:
- Paper lunch bags
- Construction paper (various colors)
- Googly eyes, pom-poms, pipe cleaners
- Markers, crayons, scissors, glue sticks
- Yarn or felt scraps for hair/details
Process:
- Base: Use the bottom flap of the paper bag as the puppet's mouth.
- Decorate: Your child can cut out shapes from construction paper for ears, noses, clothing. Use markers to draw features.
- Attach Details: Glue on googly eyes, pom-poms, yarn hair, or pipe cleaner whiskers.
- Presentation Tips: Display a collection of different characters (animals, monsters, people). A small sign inviting customers to "Adopt a Storyteller!" can be charming.
Skills Cultivated: Artistic design, character creation, fine motor skills, imaginative play, storytelling.
3. Felt Ornaments
These are especially popular during holiday seasons, but can be made year-round with different themes. Felt is easy to work with for little hands.
Materials Needed:
- Assorted felt sheets
- Scissors
- Embroidery floss and needle (or fabric glue)
- Stuffing (polyester fiberfill)
- Ribbon or string for hanging
- Buttons, sequins, beads (for embellishment)
Process:
- Cut Shapes: Cut two identical felt shapes (stars, trees, animals, hearts).
- Decorate: Decorate one side with embroidery, sequins, or small felt cutouts.
- Stitch/Glue: Stitch or glue the two shapes together, leaving a small opening.
- Stuff: Gently stuff with fiberfill, then close the opening.
- Add Hanger: Attach a loop of ribbon or string for hanging.
- Presentation Tips: Display them hanging from a small decorative branch or arranged in a basket.
Skills Cultivated: Fine motor skills (cutting, stitching), design, color coordination, understanding 3D forms, patience.
4. Dreamcatchers
These beautiful, symbolic crafts are perfect for older children who enjoy intricate work and a touch of bohemian style.
Materials Needed:
- Embroidery hoops or craft rings (various sizes)
- Yarn or string (various colors)
- Assorted beads, feathers
- Scissors, glue (optional, for securing knots)
Process:
- Wrap Ring: Wrap the embroidery hoop tightly with yarn.
- Weave Web: Create a "web" inside the hoop using a single strand of yarn, knotting it as you go (there are many simple tutorials online).
- Add Adornments: Attach strands of yarn or string to the bottom of the hoop. Thread beads onto these strands and tie feathers to the ends.
- Presentation Tips: Hang them at various heights to create an ethereal display. Offer a story about the legend of dreamcatchers to engage customers.
Skills Cultivated: Fine motor skills, knot tying, pattern creation, patience, cultural appreciation (if discussing the origins of dreamcatchers).
I'm the Chef Too! and Your Little Entrepreneur
At I'm the Chef Too!, our core belief is that learning should be an adventure – engaging, inspiring, and above all, fun! We see many parallels between the skills cultivated through our unique blend of food, STEM, and the arts, and those your child will develop while preparing for a craft fair.
Our "edutainment" experiences, developed by mothers and educators, are designed to teach complex subjects through tangible, hands-on activities. Think about it: when a child measures ingredients for our Erupting Volcano Cakes Kit, they're not just baking; they're learning about fractions and chemical reactions. When they design their edible solar system with our Galaxy Donut Kit, they're exploring astronomy and artistic composition. These are the same foundational skills – precision, creativity, problem-solving, and following instructions – that become invaluable in the world of craft fairs.
We are committed to sparking curiosity and creativity in children, facilitating family bonding, and providing a screen-free educational alternative. The journey of creating crafts, from concept to sale, offers precisely this kind of enriching, screen-free engagement. It fosters a love for learning by showing children that their efforts can lead to tangible rewards and recognition.
One of the challenges for busy parents when embarking on a craft project is sourcing all the right materials. This is where the convenience of I'm the Chef Too! truly shines. Just as our monthly "Chef's Club" subscription delivers pre-measured dry ingredients and specialty supplies right to your door, simplifying complex cooking projects, our philosophy extends to simplifying the learning process. While we don't provide craft fair kits, we provide the foundational experiences that build confidence and skill.
Whether you're looking for a specific theme or just want to explore different STEM activities, you can Browse our complete collection of one-time kits anytime. Each kit is a stepping stone to more complex understanding, nurturing those crucial creative and critical thinking muscles.
We believe in celebrating the process: fostering a love for learning, building confidence, developing key skills, and creating joyful family memories. These benefits are not guaranteed outcomes, but rather wonderful possibilities that emerge from embracing hands-on, creative endeavors – whether it's baking a fantastic STEM treat or selling a handmade treasure at a local craft fair.
Ready for a new adventure every month? Give the gift of learning that lasts all year with a 12-month subscription to our STEM cooking adventures! Each box is a complete experience, containing pre-measured dry ingredients and specialty supplies, making it easy to create more joyful family memories. Join The Chef's Club today!
Tips for a Successful Craft Fair Experience
Participating in a craft fair is more than just making and selling; it's a holistic experience that can be incredibly rewarding. Here are some tips to ensure your child's craft fair debut is memorable and positive:
- Practice Makes Perfect (Especially Selling): Before the big day, practice how your child will greet customers, explain their crafts, and handle money. Role-play different scenarios, like someone asking a question or declining a purchase. This builds confidence and reduces anxiety.
- Be Prepared for Transactions: Have a small cash box with plenty of small bills and coins for making change. A simple calculator can also be helpful for quick mental math.
- Create a Welcoming Booth: A tidy, attractive booth invites customers to stop and browse. Let your child help arrange items, create signage, and add personal touches. A comfortable chair for your child to sit in between customers is also a good idea.
- Parental Support, Not Takeover: Your role is to supervise, guide, and offer encouragement, not to do the selling for them. Let your child handle interactions as much as they're comfortable. Step in only when needed, or if your child asks for help.
- Embrace the Learning Curve: Not every item will sell, and that's okay! Use it as a learning opportunity. Afterward, talk about what went well, what could be improved, and what crafts were most popular. Did the pricing feel right? Was the display appealing?
- Celebrate Small Victories: Whether they sold one item or a dozen, acknowledge their effort, creativity, and courage. The experience itself, the skills gained, and the memories made are far more valuable than the monetary earnings.
- Stay Hydrated and Fed: Craft fairs can be long and tiring. Pack snacks, drinks, and ensure your child takes breaks to stay energized and happy.
- Engage with Other Vendors: Encourage your child to say hello to neighboring vendors. It's a great way to learn about community and networking.
Conclusion
Embarking on a craft fair adventure with your child is truly an enriching experience that extends far beyond the monetary gains. It's an opportunity to nurture their innate creativity, instill valuable entrepreneurial skills, and create lasting family memories through shared, screen-free engagement. From the joy of designing a personalized keychain to the satisfaction of selling a delicious homemade cookie, each step in the process builds confidence, fosters problem-solving abilities, and sparks a deeper love for hands-on learning.
At I'm the Chef Too!, we believe in the power of "edutainment" – blending food, STEM, and the arts to create unique experiences that ignite curiosity. These craft fair endeavors perfectly align with our mission to provide engaging, tangible activities that turn complex subjects into delightful discoveries. We know that the journey of making, presenting, and selling crafts teaches children resilience, creativity, and the immense pride of accomplishment.
So, whether you're looking to dip your toes into the world of edible science or exploring the vast universe of creative crafting, remember that every project is a chance for your child to learn, grow, and shine. Why not continue this journey of discovery and creativity year-round?
Ready to inspire your child with a new, exciting adventure delivered right to your door every month? Join The Chef's Club and enjoy free shipping on every box for ongoing educational fun that sparks curiosity, fosters family bonding, and provides unforgettable "edutainment" experiences!
FAQ Section
Q1: What age is appropriate for selling at a craft fair?
A: Children of almost any age can participate with appropriate adult supervision. Younger children (4-7) can help with simpler tasks like decorating pre-baked cookies, layering ingredients in jars, or painting rocks, focusing on the fun of creation and interaction. Older children (8+) can take on more complex crafts, handle transactions, and actively engage with customers, developing more independent entrepreneurial skills. The key is to choose age-appropriate crafts and provide the right level of support.
Q2: How do we decide on fair pricing for kids' crafts?
A: A good starting point is to calculate the cost of materials for each item. Then, you can double that cost and add a small amount for the child's time and effort. For example, if a bracelet costs $1 in materials, you might price it at $2.50 or $3. It’s also helpful to look at what similar handmade items are selling for in your area. Involve your child in this decision-making process to teach them about value and profit margins.
Q3: What are the easiest crafts for very young children to make and sell?
A: For young children, focus on crafts that require minimal intricate skills but offer plenty of creative freedom. Ideas include:
- Painted Rocks: Simple to paint, easy to create unique designs.
- Decorated Sugar Cookies/Cupcakes: The fun is in the frosting and sprinkles.
- Layered Hot Chocolate Mix Jars: Focus on simple layering.
- Simple Friendship Bracelets: Using basic knotting.
- Hand-Drawn Greeting Cards: Free-form artistic expression. These projects help develop fine motor skills, color recognition, and a sense of accomplishment without overwhelming them.
Q4: How can we make our craft fair booth stand out?
A: A visually appealing booth is crucial for attracting customers. Here are some tips:
- Clear Signage: A catchy name for your child's "business" and clear pricing.
- Levels and Layers: Use boxes, small shelves, or even pretty fabric-draped risers to create height and visual interest for your items.
- Lighting: If possible, good lighting can make your products shine.
- Thematic Decor: If your crafts have a theme, incorporate it into your display.
- Personal Touch: A photo of your child crafting or a small handwritten "About the Artist" sign adds charm.
- Keep it Tidy: A clean, organized booth looks professional and inviting.
Q5: What if nothing sells or very little sells? How do we handle disappointment?
A: This is an important learning moment. It's crucial to manage expectations beforehand and emphasize that the experience of creating and participating is the main reward. If sales are slow, you can:
- Reframe the Experience: Focus on the fun they had, the skills they learned, and the compliments they received.
- Analyze (Gently): Talk about why items might not have sold. Was the price too high? Was the display clear? Was the item appealing to the audience? This isn't about blame, but about learning for next time.
- Discuss Options: Suggest reducing prices towards the end of the fair, bundling items, or donating leftover crafts.
- Celebrate Effort: Regardless of sales, acknowledge the hard work and courage it took to participate. The confidence gained from trying something new is invaluable, far more lasting than any profit.