Thanksgiving Placemats Craft for Kids: Creative Table Fun

Table of Contents
- Introduction
- Why Thanksgiving Placemats Craft for Kids are More Than Just Decoration
- Planning Your Thanksgiving Placemat Adventure: Themes, Materials, and Age-Appropriate Ideas
- Core Craft Ideas: Detailed Thanksgiving Placemats Craft for Kids
- Making It a Lasting Keepsake: Preservation and Display
- Tips for a Smooth and Joyful Crafting Session
- Connecting Crafts to Culinary Adventures: The I'm the Chef Too! Philosophy
- Beyond the Placemat: Extending the Thanksgiving Learning
- Conclusion
- FAQ Section
The aroma of roasting turkey, the warmth of cherished company, and the cheerful bustle in the kitchen – these are the hallmarks of Thanksgiving. But for many families, the holiday also presents a unique opportunity for connection and creativity with their children. Imagine your Thanksgiving table, not just adorned with beautiful dishes, but also with vibrant, handmade placemats, each a testament to your child’s creativity and a snapshot of their gratitude. What if these seemingly simple crafts could do more than just decorate? What if they were portals to discovery, sparking curiosity, developing fine motor skills, and fostering a love for learning, all while creating precious family memories?
At I'm the Chef Too!, we believe in the magic of blending food, STEM, and the arts into one-of-a-kind "edutainment" experiences. We know that the kitchen, and indeed any creative space in your home, is a natural laboratory for learning. This Thanksgiving, we invite you to embark on a delightful journey with your children, transforming plain paper and simple materials into meaningful thanksgiving placemats craft for kids. This comprehensive guide will walk you through a variety of ideas, from classic handprint turkeys to gratitude-filled designs, all while weaving in opportunities for educational growth and family bonding. We'll explore the why, the how, and the incredible benefits of these festive projects, ensuring your holiday is not just delicious, but also wonderfully educational and creatively inspiring. Get ready to make memories that will last long after the last piece of pie is gone!
Introduction
As autumn leaves paint the landscape in hues of gold and crimson, our thoughts often turn to the warmth and togetherness of Thanksgiving. It's a time for reflection, gratitude, and, of course, delicious food shared with loved ones. While the adults might be busy orchestrating the feast, children are often looking for ways to contribute, to feel a part of the grand celebration. This is where the simple yet profoundly rewarding activity of creating Thanksgiving placemats comes into its own. Far more than just a decorative element for the dinner table, these crafts offer a rich tapestry of developmental benefits, transforming idle moments into meaningful learning experiences.
The act of designing and crafting a Thanksgiving placemat engages children on multiple levels. It hones their fine motor skills as they cut, glue, and draw. It ignites their artistic expression through color, composition, and personal touches. Crucially, it provides a gentle, tangible way to explore the very essence of the holiday: gratitude. When children create something with their own hands, particularly something that expresses thanks, they develop a deeper understanding and appreciation for the people and things in their lives. These aren't just crafts; they're heartfelt expressions, becoming cherished keepsakes that capture a moment in time, a child’s unique perspective on thankfulness.
In the spirit of I'm the Chef Too!'s mission to provide screen-free educational alternatives that spark curiosity and creativity, we're going to dive deep into the world of Thanksgiving placemats for kids. We'll explore various craft ideas, discuss age-appropriate adaptations, delve into the hidden STEM and art connections, and offer practical tips for making these projects successful and enjoyable for the entire family. By the end of this post, you'll be armed with a wealth of ideas to make this Thanksgiving not just a meal, but a masterpiece of shared learning and joyful creation. So, gather your craft supplies, rally your little artists, and let's get ready to make some unforgettable Thanksgiving placemats!
Why Thanksgiving Placemats Craft for Kids are More Than Just Decoration
Before we dive into the delightful details of various placemat crafts, let's take a moment to understand the profound benefits these activities offer. At I'm the Chef Too!, we're passionate about hands-on learning, recognizing that children absorb information and develop skills most effectively when they're actively engaged. Thanksgiving placemats perfectly embody this philosophy, blending creativity, education, and emotional development into one fun package.
Fostering Creativity and Artistic Expression
Children are naturally artistic, and giving them a blank canvas – in this case, a placemat – empowers them to explore their imagination. They choose colors, design patterns, and decide how to represent their ideas. This freedom of expression is crucial for developing a sense of self and for understanding that there's no single "right" way to create. It builds confidence as they see their unique vision come to life.
Enhancing Fine Motor Skills and Hand-Eye Coordination
From holding crayons and markers to manipulating scissors, glue sticks, and small decorative elements, crafting placemats is a fantastic workout for little hands. These activities strengthen the muscles in their fingers and hands, preparing them for writing and other detailed tasks. The coordination required to cut along a line or place a sticker precisely is invaluable.
Introducing Foundational STEM Concepts
You might not immediately think "STEM" when you hear "placemat craft," but the connections are surprisingly strong!
- Science: Children observe the properties of different materials (how does glue work? What happens when paint dries?), explore cause and effect (if I press hard, the crayon is darker), and even engage in a bit of biology if they're tracing hands or incorporating natural elements like leaves.
- Technology: While not high-tech, using simple tools like scissors (which are a form of technology!) or even a laminator involves understanding how tools work to achieve a desired outcome.
- Engineering: Designing a placemat involves planning and problem-solving. How will all the elements fit? What's the best arrangement? How can I make it sturdy? These are fundamental engineering questions.
- Math: Measuring paper, understanding shapes (rectangles, circles, triangles), recognizing symmetry, counting feathers or handprints – these are all mathematical concepts integrated naturally into the craft.
This type of integrated learning is at the heart of what we do at I'm the Chef Too!. We believe that when children explore subjects like science through tangible, hands-on, and delicious cooking adventures, or in this case, through a fun craft, complex concepts become accessible and exciting.
Cultivating Gratitude and Emotional Intelligence
Thanksgiving is, at its core, a celebration of thankfulness. Many placemat crafts encourage children to reflect on what they are grateful for, whether by drawing pictures, writing words, or discussing their blessings. This practice helps children develop empathy, recognize the positive aspects of their lives, and articulate their feelings – all crucial components of emotional intelligence. It’s a wonderful way to foster meaningful conversations around the dinner table, long before the meal even begins.
Building Confidence and a Sense of Accomplishment
Completing a project from start to finish gives children an immense sense of pride. When they see their handmade placemat displayed at the family dinner, or when it’s carefully laminated as a keepsake, their self-esteem soars. They learn that their efforts can produce something beautiful and valued by others. This confidence translates into a greater willingness to try new challenges, both in and out of the kitchen.
Facilitating Family Bonding and Screen-Free Engagement
In our increasingly digital world, finding dedicated screen-free time for family bonding is more important than ever. Crafting Thanksgiving placemats offers a perfect opportunity. Parents and children can work side-by-side, chatting, laughing, and creating together. It’s a shared experience that strengthens relationships and creates lasting memories. This aligns perfectly with our mission at I'm the Chef Too! to provide engaging, hands-on activities that bring families closer, away from screens and into a world of shared discovery.
Ready to bring more educational fun into your home, month after month? Join The Chef's Club today! A new adventure is delivered right to your door, complete with pre-measured dry ingredients and specialty supplies, making it easy to create delicious learning experiences together.
Planning Your Thanksgiving Placemat Adventure: Themes, Materials, and Age-Appropriate Ideas
A successful craft session, especially with children, starts with thoughtful planning. By preparing your materials and considering the ages and interests of your young crafters, you can ensure a smooth, enjoyable, and educational experience.
Choosing Your Theme
The beauty of Thanksgiving placemats is their versatility. You can stick to traditional autumn and turkey themes or branch out into more personalized expressions of gratitude.
- Classic Thanksgiving: Turkeys, pumpkins, cornucopias, fall leaves, harvest imagery.
- Gratitude Focus: "I am thankful for..." prompts, family portraits, drawings of beloved pets or toys.
- Nature's Bounty: Incorporating real pressed leaves, twigs, or seeds for a tactile experience.
- Family Tree: A placemat that highlights family members, perhaps with photos or hand-drawn portraits.
- Place Setting Practice: For younger children, a placemat that outlines where the plate, silverware, and cup go, subtly teaching table manners and spatial awareness.
Essential Materials for Your Crafting Arsenal
Having your supplies ready beforehand minimizes interruptions and keeps the creative momentum going. Most of these items are readily available at craft stores or even around your home.
-
Base Material:
- Construction Paper (12x18 inches or larger): Sturdy and comes in many colors.
- Cardstock: Even thicker for greater durability.
- Poster Board: Can be cut down to size for multiple placemats.
- Brown Craft Paper/Butcher Paper: Great for a rustic feel, especially for larger groups.
-
Coloring & Drawing Tools:
- Crayons, Markers, Colored Pencils: A diverse range of colors is always a hit.
- Tempera Paint or Finger Paints: For a more sensory, hands-on experience (especially for younger kids).
-
Cutting & Sticking:
- Kid-Safe Scissors: Essential for developing fine motor skills.
- Glue Sticks: Less messy for paper crafts.
- Liquid School Glue: Stronger adhesion for heavier embellishments.
- Craft Foam, Felt, Fabric Scraps: For adding texture and dimension.
-
Decorative Elements:
- Googly Eyes: A classic for turkey crafts!
- Feathers: Real or craft feathers for a tactile turkey.
- Glitter, Sequins, Buttons: For sparkle and visual interest (use sparingly to avoid overwhelming!).
- Autumn Stickers: Pre-made shapes like leaves, pumpkins, or turkeys.
- Yarn or Ribbon: For borders or accents.
- Nature Finds: Pressed leaves, small twigs, acorns (ensure they are clean and dry).
-
Other Useful Items:
- Pencils and Erasers: For sketching outlines.
- Newspaper or Craft Mat: To protect your work surface.
- Aprons or Old Shirts: To protect clothing, especially with paint.
- Wipes or Damp Cloths: For quick clean-ups.
- Camera: To capture the process and the proud moments!
Age-Appropriate Adaptations: Ensuring Fun for Everyone
One of the beauties of a Thanksgiving placemat craft is its adaptability. We can tailor the complexity to suit different developmental stages, ensuring that toddlers, preschoolers, and older children all feel engaged and successful.
For Toddlers (Ages 1-3): Sensory Exploration and Simple Adhesion
At this age, the focus is on sensory input and developing very basic motor skills. Adult supervision is paramount.
-
Activities:
- Pre-cut Shapes: Parents cut out large turkey bodies, feathers, or leaf shapes. Toddlers can then use glue sticks (with assistance) to attach them. The goal is the act of sticking, not perfection.
- Finger Painting: Provide a large sheet of paper and non-toxic finger paints in fall colors. Let them explore textures and colors. This can be the background for their placemat.
- Leaf Rubbings: Place real leaves under a paper, then guide their hands as they rub crayons over the paper to reveal the leaf's texture.
- Handprint/Footprint Turkeys: A classic! Parents paint the child's hand (or foot) with washable paint and press it onto the paper. Later, parents can add eyes, beak, and legs. This is a wonderful keepsake.
- I'm the Chef Too! Connection: Even though a toddler might not be ready for complex cooking, the idea of exploring textures, colors, and simple transformations (like paint on paper) aligns with the early stages of sensory learning that our cooking kits offer.
For Preschoolers (Ages 3-5): Developing Fine Motor Skills and Basic Concepts
Preschoolers are ready for more independence and specific instruction, but still thrive with open-ended creativity.
-
Activities:
- Handprint Turkeys (Self-Decorated): After the handprint is made, let them glue on googly eyes, pre-cut beaks, and feathers.
- "I Am Thankful For" Drawings: Encourage them to draw pictures of things they are thankful for. Parents can scribe their words underneath.
- Shape Recognition: Pre-cut shapes like circles (for plates), rectangles (for napkins), and ovals (for turkeys). Have them identify the shapes as they glue them down.
- Collage Art: Provide a variety of fall-themed materials (torn paper, fabric scraps, small leaves) and let them create a collage.
- I'm the Chef Too! Connection: The cutting, pasting, and simple design involved in these crafts build on the foundational skills (like using tools, following simple instructions, and understanding sequences) that are crucial for engaging with our STEM cooking kits. They're learning to manipulate materials and see an idea through to completion, much like baking.
For Early Elementary (Ages 6-8): Combining Craft with Literacy and Personal Expression
Children in this age group are ready for more detailed instructions, writing, and expressing complex ideas.
-
Activities:
- "My Plate is Full of Blessings" Placemat: Divide the placemat into sections like a plate. In each section, children can draw or write something specific they are thankful for (e.g., "Family," "Friends," "Pets," "Food," "School").
- Gratitude Journal Placemat: Have them write short sentences or a poem about gratitude directly on the placemat.
- Detailed Handprint Turkey: After the handprint, they can cut out and attach their own feathers, adding details with markers or crayons.
- Place Setting Challenge: Provide cut-outs of silverware, plates, and cups. Have them correctly arrange and glue them onto the placemat, then decorate around the "setting."
- Design a Feast: Encourage them to draw their dream Thanksgiving meal on the placemat.
- I'm the Chef Too! Connection: This age group is perfectly poised for the blend of science, math, and creativity found in our kits. Activities like making Erupting Volcano Cakes allow them to observe chemical reactions firsthand, similar to how they might observe how different glues work on their placemats, or how colors mix. It’s all about hands-on discovery!
For Older Elementary (Ages 9-12): Advanced Design and Conceptual Thinking
Older children can handle more intricate designs, multi-step processes, and can delve deeper into the conceptual aspects of gratitude and design.
-
Activities:
- Thematic Design Challenges: "Design a placemat that tells a story of Thanksgiving." or "Create a placemat representing a specific aspect of the harvest."
- Pop-Up or 3D Elements: Incorporate folded paper elements, small accordions, or layered cut-outs to add dimension.
- Calligraphy or Fancy Lettering: Encourage them to practice different fonts for their "Thankful" messages.
- Map of Gratitude: Create a map-like placemat, where different "regions" represent different aspects of their gratitude (e.g., a "family island," a "hobby forest").
- Collaborative Placemat: For siblings, create a placemat that combines their individual ideas into one cohesive design.
- I'm the Chef Too! Connection: This group is ready for the exciting challenges in our kits, where they're not just following instructions but understanding why things happen. Just as they might consider the structural integrity of a 3D placemat, they'll appreciate the precision and scientific principles behind creating a perfect edible masterpiece, like our Galaxy Donut Kit, which involves understanding how colors blend and designs take shape.
By keeping these age-specific guidelines in mind, you can set up a crafting environment where every child feels capable, challenged, and thrilled with their Thanksgiving creation.
Core Craft Ideas: Detailed Thanksgiving Placemats Craft for Kids
Now let's roll up our sleeves and explore some fantastic Thanksgiving placemat craft ideas. Each one offers unique learning opportunities and a chance to create something truly special.
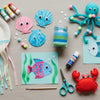
1. The Classic Handprint Turkey Placemat
This is a timeless favorite for a reason! It’s simple, personal, and creates an adorable turkey that captures the size of your child's hand at that moment in time.
Educational Angle:
- Science (Biology): Discuss the structure of the hand, fingers, palm. How does a handprint form?
- Art: Color mixing (if using paints), understanding basic shapes (circle for head, triangle for beak), composition.
- Math: Counting fingers, recognizing different sizes if multiple children participate.
- Emotional: The handprint serves as a tangible reminder of their growth, becoming a treasured keepsake.
Materials Needed:
- Large sheet of construction paper (brown, orange, yellow, red, or white for the background)
- Washable craft paint (brown for the palm, various bright colors for "feathers" – or just use brown for the whole handprint and add feathers later)
- Googly eyes
- Orange or yellow construction paper scraps for beak and wattle
- Craft feathers (optional, for extra texture)
- Glue stick or liquid glue
- Markers (brown or black for legs)
Step-by-Step Instructions:
- Prepare the Canvas: Lay out your large construction paper.
-
The Handprint:
- Option A (Traditional Turkey): Paint the child's palm brown, and each finger a different vibrant "feather" color (red, orange, yellow).
- Option B (Simple): Paint the entire hand (palm and fingers) brown.
- Carefully press the child's hand onto the placemat paper, fingers spread wide. Lift straight up to avoid smudging. This is the turkey's body and feathers. Let it dry completely.
- Add the Head & Features: Once dry, glue a googly eye (or two!) onto the brown palm area where the thumbprint usually is. Cut a small orange or yellow triangle for a beak and a wavy red wattle, and glue them below the eye.
- Legs & Details: Use a brown or black marker to draw two stick legs extending from the bottom of the turkey's body.
- Feathering (Optional): If you didn't use multi-colored fingers, or if you want extra texture, glue actual craft feathers around the painted handprint for a fuller look.
- Personal Touch: Encourage your child to write their name and the year on the placemat, or even a short message about what they are thankful for, making it truly their own.
2. "I Am Thankful For..." Writing & Drawing Placemats
This craft directly engages with the theme of gratitude, encouraging children to express their appreciation through words and pictures.
Educational Angle:
- Literacy: Writing, spelling, sentence structure, storytelling.
- Emotional Intelligence: Reflection on personal blessings, articulating feelings, empathy.
- Art: Drawing, visual representation of abstract concepts (like love or friendship).
- Social Studies: Understanding holiday traditions and the concept of giving thanks.
Materials Needed:
- Large sheet of construction paper or white cardstock
- Crayons, markers, colored pencils
- Pencil and eraser
- Ruler (optional, for making sections)
- Magazines or family photos (optional, for a collage effect)
Step-by-Step Instructions:
-
Layout the Gratitude Zones:
- Option A (Open Canvas): Simply provide the paper and let the child draw and write freely.
- Option B (Structured): Use a pencil and ruler to divide the placemat into sections, like a plate with different food servings. Label each section with a prompt such as "I am thankful for my family," "I am thankful for my friends," "I am thankful for yummy food," "I am thankful for my pets," "I am thankful for my home," etc.
- Brainstorming Gratitude: Talk with your child about all the things they are thankful for. Help them articulate their thoughts.
- Draw and Write: In each section (or across the open canvas), have them draw pictures representing what they are thankful for. Below or next to their drawings, they can write words or sentences expressing their gratitude. For younger children, parents can write their words.
- Decorate: Encourage them to add decorative borders, fall-themed doodles, or even small cut-outs from magazines that represent their thankfulness. If using family photos, they can glue them into relevant sections.
This type of reflective activity not only creates a beautiful placemat but also nurtures a sense of positive well-being. It’s a wonderful precursor to the deeper learning found in our STEM cooking kits, where understanding ingredients and processes leads to a sense of accomplishment. Not ready to subscribe? Explore our full library of adventure kits available for a single purchase in our shop.
3. Nature-Inspired Placemats: Bringing the Outdoors In
Harness the beauty of autumn by incorporating natural elements into your placemat designs. This encourages observation and appreciation for the environment.
Educational Angle:
- Science (Botany/Ecology): Identifying different types of leaves, discussing why leaves change color, understanding natural cycles.
- Art: Texture exploration, color palettes inspired by nature, natural composition.
- Sensory Development: Touching different leaf textures, feeling twigs.
- Environmental Awareness: Fostering a connection to nature.
Materials Needed:
- Large sheet of sturdy paper (cardstock or construction paper in earthy tones)
- Collection of dried, pressed autumn leaves, small twigs, acorns, small pinecones, seeds
- Liquid school glue or craft glue
- Clear contact paper or laminator (for preservation)
- Markers or crayons (optional, for drawing natural elements)
Step-by-Step Instructions:
- Nature Walk & Collection: Take a stroll outdoors to collect fallen leaves, small twigs, and other natural treasures. Encourage children to observe differences in shapes, sizes, and colors.
- Preparation: Allow collected items to dry completely. For flatter leaves, press them between heavy books for a few days.
- Arrangement: On their placemat base, children can arrange their natural finds into a design. They can create patterns, a landscape, or abstract art.
- Adhesion: Carefully glue each item into place. For heavier items like acorns or small pinecones, use a stronger craft glue and hold them in place for a few seconds.
- Adding Details (Optional): Once the natural elements are secure, children can draw additional details with markers, like spiderwebs between twigs, or ladybugs on leaves.
- Preservation: This is crucial for nature placemats. Once dry, cover the entire placemat with clear contact paper on both sides, or take it to be laminated. This will protect the delicate natural elements and make the placemat durable for use.
4. Edible Art Placemats (An I'm the Chef Too! Twist!)
While not literally edible placemats to eat the entire thing, this concept integrates edible elements into the placemat design, offering a unique sensory experience and a nod to our culinary focus. This activity transitions beautifully into the idea of cooking as a creative and scientific endeavor.
Educational Angle:
- Science (Properties of Ingredients): Discussing textures, states of matter (solids, liquids), and how ingredients can be used artistically.
- Art: Food styling, color theory with edible components, designing with edible textures.
- Sensory Exploration: Taste, smell, touch with food items.
- Life Skills: Understanding food as a craft, basic kitchen safety (even if not cooking, discussing food handling).
Materials Needed:
- Sturdy placemat base (cardstock is best)
- Edible "glue" (e.g., a thin layer of cream cheese, peanut butter, or icing if you want it sweet)
- Small crackers, pretzels, dried fruit (raisins, cranberries), nuts (if no allergies), sunflower seeds, small candies (corn kernels, candy corn)
- Optional: Small cookies or large crackers to serve as a "mini plate" glued onto the placemat.
- Markers (for non-edible parts of the design)
Step-by-Step Instructions:
- Design the Base: Children can draw a traditional placemat design first with markers, leaving spaces for edible elements. Perhaps draw an outline of a plate, cup, and silverware.
- Apply Edible Adhesive: In the designated "decoration zones," spread a thin layer of your chosen edible glue.
-
Create Edible Art: Let children arrange the crackers, pretzels, dried fruit, seeds, and small candies onto the edible glue. They can make patterns, create a mini turkey out of pretzels and seeds, or form borders.
- Example: A large round cracker glued as a "plate" in the center. Then, pretzels can be arranged like silverware, and dried cranberries or candy corn can decorate the "plate" in an edible design.
- Discuss the "Art": Talk about how the different shapes and colors of food items create the overall design. What textures do they see? What do they think it might taste like?
- Enjoy (Carefully!): This placemat is more about the experience of creating with food. While parts might be edible, the entire placemat itself is not for consumption. It emphasizes the artistry of food.
- Capture the Moment: Take photos of their edible creations, as these will naturally be temporary!
This kind of playful interaction with food is exactly what we champion at I'm the Chef Too!. It’s a delicious way to learn. Even beloved characters can make learning fun, like when kids make Peppa Pig Muddy Puddle Cookie Pies – combining a favorite character with hands-on culinary creativity!
5. STEM-Focused Placemats: Design & Structure Challenge
This approach encourages children to think about the engineering and mathematical aspects of their placemat.
Educational Angle:
- Engineering: Planning, design constraints, structural integrity, problem-solving.
- Math (Geometry): Shapes, symmetry, patterns, measurement, tessellations.
- Science (Materials Science): Discussing which materials are strongest, most flexible, or best for adhesion.
- Critical Thinking: How can I make this placemat both beautiful and functional?
Materials Needed:
- Sturdy placemat base (cardstock or even thin cardboard)
- Rulers, protractors (for older kids)
- Pencils, erasers
- Pre-cut geometric shapes (circles, squares, triangles, rectangles) in various colors
- Scissors
- Glue sticks
- Yarn, string, or thin ribbon
- Hole punch
- Markers
Step-by-Step Instructions:
- Design Brief: Present the challenge: "Design a placemat that is not only beautiful but also strong and uses repeating patterns or symmetrical designs."
- Sketching & Planning: Have children sketch their ideas first. Encourage them to think about how different shapes fit together. Will they create a border with alternating triangles and squares? A central mandala-like pattern?
- Measurement & Cutting: Use rulers to cut out precise shapes or to measure sections of the placemat. For younger children, provide pre-cut shapes. Discuss terms like "symmetry" (folding the placemat in half and having matching designs) or "pattern repetition."
- Constructing Patterns: Glue the geometric shapes onto the placemat, focusing on creating repeating patterns, symmetrical designs, or tessellations (shapes that fit together perfectly without gaps).
- Structural Elements (Optional): For older kids, challenge them to add a "reinforced edge" using a different material, or to create small folded paper elements that add strength or texture.
- Weaving/Lacing (Optional): Punch holes along the edges of the placemat. Provide yarn or string and teach them how to weave it through the holes, creating a decorative and structurally interesting border. This is fantastic for fine motor skills.
- Testing (Playful!): Discuss the "strength" of their placemat. If it were to spill on, would it hold up? What materials would make it even stronger? This playful inquiry reinforces engineering principles.
This hands-on exploration of design, measurement, and materials echoes the STEM learning embedded in our monthly Chef's Club kits. It's about understanding how things work and how to create them intentionally. Give the gift of ongoing discovery and delicious learning with The Chef's Club! Our 3, 6, and 12-month pre-paid plans are perfect for extended enrichment.
Making It a Lasting Keepsake: Preservation and Display
One of the most heartwarming aspects of these Thanksgiving placemats is their potential to become treasured family keepsakes. They capture a child’s creativity, handwriting, and reflections at a specific age. To ensure these memories last, proper preservation is key.
The Magic of Lamination
Laminating is the gold standard for preserving paper crafts like placemats. It protects them from spills, tears, and general wear and tear, allowing them to be used year after year.
- Home Laminators: If you have a small home laminator, ensure your placemats are appropriately sized for the laminating pouches. This is ideal for smaller, letter-sized placemats.
- Office Supply Stores: For larger placemats (e.g., 12x18 inches), most office supply stores or print shops offer lamination services. It's usually inexpensive and ensures a professional, durable finish.
- Clear Contact Paper: As an alternative, clear adhesive contact paper can be used. It's less durable than heat lamination but provides good protection. Carefully apply it to both sides of the placemat, smoothing out any bubbles.
Displaying Your Child's Masterpiece
Beyond the dinner table, there are many wonderful ways to display these creations:
- The Thanksgiving Table: The primary purpose! Set each guest's place with a child-made placemat. Imagine the delight on a grandparent's face seeing a placemat made just for them!
- Wall Art: After the holiday, hang them on a kitchen wall, in a child's bedroom, or on a family bulletin board.
- Scrapbook/Memory Box: For very precious ones, store them in a family scrapbook or memory box. They are perfect for reflecting on years later.
- Gift to Grandparents/Loved Ones: A handmade placemat is a truly heartfelt gift.
By preserving and proudly displaying these crafts, you reinforce to your child that their efforts are valued and that their creativity is cherished. It also provides a wonderful talking point, bringing back happy memories of the craft session and the holiday.
Tips for a Smooth and Joyful Crafting Session
We want your Thanksgiving placemat crafting adventure to be filled with laughter and creativity, not stress. Here are some tips developed by mothers and educators, much like those who design our I'm the Chef Too! kits, to ensure a smooth and joyful experience:
- Preparation is Key: Gather ALL materials before you start. There's nothing that derails a craft session faster than realizing you're out of glue or can't find the scissors mid-activity.
- Set Up a Dedicated Space: Cover your table with newspaper, a plastic tablecloth, or a craft mat. This signals "craft time" and makes clean-up much easier.
- Dress for Mess: Encourage children to wear old clothes or aprons, especially if using paint or liquid glue. Accidents happen, and it's better to be prepared.
- Explain the Project Clearly: Briefly outline what you'll be making and what the steps are. For younger children, demonstrate each step.
- Embrace Imperfection: The goal is creativity and fun, not perfection. Encourage unique designs and personal touches. Remind them that every placemat will be special in its own way.
- Provide Choices, But Not Too Many: Offer a selection of colors, shapes, or decorative items, but don't overwhelm them with too many options. "Do you want red or orange feathers?" is better than "What color do you want?"
- Offer Assistance, Not Control: Be there to help with tricky cuts or glue applications, but let your child take the lead on the creative direction. It's their placemat.
- Talk and Engage: Use the craft time as an opportunity for conversation. Ask them about their design choices, what they are thankful for, or what they like about Thanksgiving. This enhances family bonding.
- Allow for Drying Time: Factor in drying time, especially if using paint or liquid glue, before moving to the next step or laminating.
- Celebrate Their Work: Once completed, praise their efforts and admire their finished product. Display it prominently! This boosts their confidence and makes them excited for the next creative endeavor.
Remember, the process of creating is often more valuable than the final product itself. It's about the shared experience, the learning, and the memories you're building together.
Connecting Crafts to Culinary Adventures: The I'm the Chef Too! Philosophy
At I'm the Chef Too!, our core belief is that learning comes alive when it's hands-on, engaging, and delicious. While Thanksgiving placemat crafts might seem purely artistic, they lay foundational groundwork for the kind of "edutainment" experiences we specialize in. The very same skills your child uses to design a placemat – planning, measuring, following steps, experimenting with materials, and expressing creativity – are directly transferable to the kitchen.
Consider how these skills translate:
- Following Instructions: Just as a child follows steps to create a handprint turkey, they learn to follow a recipe for a delectable treat.
- Measurement: Understanding how much glue to use on a placemat prepares them for measuring ingredients for a cake.
- Problem-Solving: If a placemat design isn't working, a child learns to adapt. In the kitchen, if a dough is too sticky, they learn to add more flour – a practical application of problem-solving.
- Material Properties: Recognizing how different papers and glues behave is a precursor to understanding how different ingredients react when mixed or heated.
- Artistic Presentation: Arranging elements on a placemat mirrors the skill of plating food beautifully.
We are mothers and educators who understand that children learn best by doing. Our monthly Chef's Club kits are meticulously designed to blend the excitement of cooking with vital STEM principles, all while delivering a complete experience right to your door. Imagine the joy of transitioning from crafting a vibrant placemat to baking a scientific dessert, discovering the magic behind ingredients and chemical reactions!
These crafts and our cooking kits are both screen-free educational alternatives that spark curiosity and creativity, encouraging family bonding. When you see your child proudly displaying their Thanksgiving placemat, you're witnessing the growth of a young mind, ready for their next adventure – perhaps even a culinary one with us! Ready for more hands-on learning? Explore our Chef's Club subscriptions! Each box comes with pre-measured dry ingredients and specialty supplies, ensuring convenience and endless fun.
Beyond the Placemat: Extending the Thanksgiving Learning
The creativity doesn't have to stop with the placemats! These crafts can be a springboard for even more Thanksgiving-themed learning and fun.
- Storytelling: Encourage children to tell a story about their placemat. Why did they choose those colors? What are the characters (if any) doing? What does their "thankful" drawing mean to them?
- Thanksgiving Feast Role-Play: Use the placemats to set up a pretend Thanksgiving feast. Children can "cook" imaginary food, practice table manners, and serve their stuffed animals. This is wonderful for imaginative play and social development.
- Gratitude Jar: Extend the "I am thankful for" theme by starting a gratitude jar. Throughout November, everyone in the family writes down something they are grateful for on small slips of paper and puts them in the jar. On Thanksgiving Day, take turns reading them aloud.
- Themed Books: Read Thanksgiving-themed books or stories about gratitude. Connect the themes in the books back to their placemat creations.
- Cooking Together: Take the plunge into real culinary adventures! Even simple tasks like washing vegetables, stirring ingredients, or helping to set the table can be a significant learning experience. This directly aligns with our mission at I'm the Chef Too! to bring food, STEM, and the arts together.
- Family Recipe Book: Start a family recipe book where children can draw pictures of their favorite Thanksgiving dishes or even write down simple family recipes. This is a beautiful way to connect generations and build a culinary legacy.
- Table Setting Skills: For older children, use the placemat as a guide to teach proper table setting. Discuss why each piece of silverware or glassware goes in a specific spot. This is a practical life skill often overlooked.
By extending the learning beyond the initial craft, you create a richer, more immersive educational experience for your children, making Thanksgiving a time of continuous discovery and joy. Don't forget that our unique approach to "edutainment" is designed to make learning complex subjects through tangible, hands-on cooking adventures accessible and fun. To see all the exciting themes we offer, browse our complete collection of one-time kits today!
Conclusion
As our journey through the world of thanksgiving placemats craft for kids comes to a close, we hope you feel inspired and equipped to bring a touch of handmade magic to your holiday table this year. We've seen how these seemingly simple crafts are, in fact, powerful tools for fostering creativity, honing fine motor skills, introducing foundational STEM concepts, cultivating gratitude, and building cherished family memories. They are a beautiful testament to a child's imagination and a heartwarming reminder of the true spirit of Thanksgiving.
At I'm the Chef Too!, our mission is to blend food, STEM, and the arts into one-of-a-kind "edutainment" experiences, sparking curiosity and creativity in children, facilitating family bonding, and providing screen-free educational alternatives. The principles of hands-on discovery, imaginative exploration, and joyful learning that underpin these placemat crafts are precisely what we infuse into every one of our unique cooking adventures, developed by mothers and educators. We believe that learning should be a delightful journey, filled with tangible experiences and delicious outcomes.
So, this Thanksgiving, as you gather around the table, let your children’s handmade placemats be a centerpiece of conversation and appreciation. Let them be a symbol of the wonderful moments you shared in the process of creating them. And when the holiday festivities wind down, remember that the adventure of learning and creating never has to end.
Are you ready to continue sparking curiosity and building confidence in your little learners, month after month? We invite you to dive into a world where science meets sweetness, and learning is always delicious. Join The Chef's Club today and enjoy free shipping on every box. Discover the convenience of having pre-measured dry ingredients and specialty supplies delivered right to your door, ready for your next screen-free, educational, and utterly delicious family adventure!
FAQ Section
Q1: What age group are Thanksgiving placemat crafts best for?
A1: Thanksgiving placemat crafts are incredibly versatile and can be adapted for almost any age group, from toddlers to pre-teens. For toddlers (1-3), focus on sensory experiences like finger painting and assisted handprints. Preschoolers (3-5) can work on basic cutting, gluing, and drawing. Early elementary children (6-8) can incorporate more writing and detailed designs. Older elementary kids (9-12) can tackle more complex themes, intricate designs, and even integrate basic STEM principles like patterns and symmetry. Adult supervision and assistance should always be adjusted to the child's age and skill level.
Q2: How can I make these placemats durable enough to be used at the dinner table?
A2: The best way to make Thanksgiving placemats durable and reusable is to laminate them. You can use a home laminator if the placemats fit, or take them to an office supply store or print shop for professional lamination, which is usually quite affordable for larger sizes. Alternatively, clear adhesive contact paper can provide a good level of protection, though it's generally less durable than heat lamination. This protection shields them from spills and tears, allowing them to be cherished and used for many Thanksgivings to come.
Q3: What materials are essential for a basic Thanksgiving placemat craft?
A3: For a basic Thanksgiving placemat craft, you'll need:
- A sturdy base material like large construction paper (12x18 inches or larger), cardstock, or thin poster board.
- Coloring tools such as crayons, markers, or colored pencils.
- Kid-safe scissors.
- Glue sticks or liquid school glue.
- And of course, imagination! Optional but highly recommended items include googly eyes, craft feathers, fall-themed stickers, and paper scraps for adding details.
Q4: My child isn't very artistic. How can I encourage them to participate?
A4: Encourage participation by focusing on the process, not the "perfect" outcome. Emphasize effort and enjoyment over artistic skill. Offer structured options like pre-cut shapes to assemble, or "I am thankful for..." prompts where they can draw simple pictures or you can write their words. Remember, there's no right or wrong way to create, and the value is in the personal expression and the shared experience. Talking about their choices and praising their effort can significantly boost their confidence. Our I'm the Chef Too! kits are designed with the same philosophy – focusing on the joy of discovery and creation, regardless of skill level.
Q5: How can I incorporate STEM learning into a placemat craft?
A5: STEM learning can be woven into placemat crafts in many ways:
- Science: Discuss the properties of materials (paper absorbency, glue adhesion), explore leaf patterns, or observe cause and effect (e.g., paint mixing).
- Technology: Using tools like scissors or a laminator.
- Engineering: Designing the layout, considering how elements fit together (composition), or reinforcing edges for durability.
- Math: Measuring paper, counting objects, recognizing geometric shapes, creating patterns, and understanding symmetry. By simply asking questions like "What shape is that?" or "How many leaves can fit here?" or "How can we make this stronger?" you naturally introduce STEM concepts.
Q6: Can these placemats be used as gifts?
A6: Absolutely! A handmade Thanksgiving placemat is a truly heartfelt and personal gift. Grandparents, aunts, uncles, or other cherished family members will adore receiving a unique placemat made especially for them. The "I am thankful for..." placemat is particularly thoughtful, as it directly expresses gratitude to the recipient or for blessings in the child's life. Laminating the placemat makes it a durable and long-lasting keepsake gift.
Q7: How long does a typical placemat craft take?
A7: The time required can vary greatly depending on the complexity of the craft and the child's age and attention span. A simple handprint turkey might take 15-30 minutes (plus drying time), while a detailed "I am thankful for..." placemat with writing and multiple drawings could take 45 minutes to an hour or more, possibly spread over a few sessions for younger children. It's always a good idea to break down longer projects into smaller, manageable steps to maintain engagement.