Spark Joy: Mason Jar Christmas Crafts for Kids

Table of Contents
- Why Mason Jar Crafts are Perfect for Kids (and Parents!) during Christmas
- Getting Started: Your Mason Jar Crafting Essentials
- Our Top Mason Jar Christmas Craft Ideas for Kids
- Extending the Learning & Fun with I'm the Chef Too!
- Conclusion
- FAQ: Your Mason Jar Christmas Crafting Questions Answered
The holiday season often feels like a whirlwind of activities, bright lights, and the joyful anticipation of celebrations. Amidst the hustle and bustle, many of us find ourselves searching for meaningful, screen-free ways to connect with our children and ignite their creative spirit. What if we told you that tucked away in your pantry, you likely have the perfect ingredient for dozens of heartwarming, educational, and delightfully festive projects? Enter the humble mason jar – a versatile canvas waiting to be transformed into a Christmas masterpiece by little hands.
At I'm the Chef Too!, our mission is to blend food, STEM, and the arts into one-of-a-kind "edutainment" experiences. We believe that learning should be an adventure, sparking curiosity and creativity through tangible, hands-on activities. Mason jar Christmas crafts perfectly embody this philosophy, offering a unique opportunity for children to explore scientific concepts, develop artistic skills, and experience the joy of creating something beautiful and functional. Developed by mothers and educators, these activities not only facilitate family bonding but also provide a wonderful alternative to endless screen time, fostering a love for learning that extends far beyond the holiday season.
In this comprehensive guide, we'll dive deep into the wonderful world of mason jar Christmas crafts for kids. We'll explore why these simple jars are such a fantastic medium for holiday creativity, detail essential supplies, and walk you through a delightful array of projects – from charming character jars to edible gift kits and mesmerizing luminaries. Each craft is designed to engage young minds, nurture essential skills, and create cherished family memories. So, gather your jars, unleash your imagination, and get ready to transform ordinary glass into extraordinary holiday magic!
Why Mason Jar Crafts are Perfect for Kids (and Parents!) during Christmas
Mason jars might seem like just simple containers, but for kids, they’re portals to boundless creativity. During the festive period, when schedules can get hectic and attention spans might be stretched, mason jar crafts offer a calming, focused, and incredibly rewarding activity for children of all ages. This isn’t just about making something pretty; it’s about engaging young minds in a way that aligns perfectly with I'm the Chef Too!'s educational philosophy, blending the best of art, science, and hands-on discovery.
First and foremost, accessibility and affordability are huge draws. Mason jars are incredibly common, often found in kitchen cupboards, thrift stores, or available new at very low prices. This reusability teaches children about sustainability and resourcefulness. Paired with everyday craft supplies like paint, paper, glue, and maybe a few natural elements like pinecones or twigs, you have the makings of a fantastic project without breaking the bank. This ease of access encourages spontaneous creativity, allowing you to whip up a craft session whenever inspiration strikes – or when a moment of quiet, focused activity is desperately needed!
The versatility of mason jars is truly astounding. They can become decorative accents for your home, heartfelt handmade gifts for loved ones, or even clever containers for homemade treats and small treasures. This multi-functionality allows kids to think about design and purpose simultaneously. Is this jar going to hold a candle, or will it be filled with cookies? The answer influences the artistic choices they make, introducing basic design thinking.
But beyond being cute and convenient, mason jar crafts are packed with educational benefits, truly embodying the "edutainment" approach we champion at I'm the Chef Too!:
- Fine Motor Skills Development: From ripping tissue paper into small pieces for a luminary to carefully applying dots of paint for a snowman's smile, children refine their hand-eye coordination and dexterity. Gluing small buttons or tying ribbons strengthens those tiny hand muscles, which are crucial for writing and other tasks.
- Creativity and Imagination: A blank jar is an invitation to dream. Kids are encouraged to imagine characters, scenes, and patterns. There's no single "right" way to decorate a jar, fostering self-expression and original thought. This open-ended approach is at the heart of our unique cooking adventures, where children learn to experiment and innovate.
- Problem-Solving: How do you make the paint stick evenly? What's the best way to attach a felt hat? How can you make a "snow globe" truly snowy? These seemingly simple challenges encourage critical thinking and experimentation. They learn about adhesion, layering, and stability through trial and error.
-
Early STEM Concepts:
- Science: Exploring the properties of different materials (how paint adheres to glass, how glitter floats in water for a snow globe), observing chemical reactions (like paint drying or Mod Podge setting), and understanding light (luminaries). When creating edible gifts, they even touch on concepts like states of matter with dry ingredients versus baked goods.
- Math: Counting buttons, measuring ribbon lengths, recognizing geometric shapes (circles, triangles, squares). Layering ingredients in an edible gift jar can even introduce simple concepts of volume and fractions.
- Art: Color mixing, texture exploration, composition, and form.
- Patience and Persistence: Crafting takes time. Waiting for paint to dry, carefully arranging small pieces, or building up layers teaches children the value of seeing a project through, step by patient step. The reward of a finished, beautiful object reinforces this positive behavior.
- Family Bonding: In an increasingly digital world, these hands-on, screen-free activities provide invaluable opportunities for parents and children to collaborate, share ideas, and simply enjoy each other's company. These shared moments become cherished holiday memories, embodying the spirit of togetherness that I'm the Chef Too! believes in.
- Empathy and Gift-Giving: When children craft gifts, they learn about the joy of giving, thinking about what might make a recipient happy. This nurtures empathy and understanding beyond themselves.
At I'm the Chef Too!, we understand the profound impact these experiences have. Our kits, developed by mothers and educators, mirror this approach by turning complex subjects into tangible, delicious cooking adventures. Just as our kits blend chemistry with culinary arts, these mason jar crafts merge scientific observation with artistic expression.
Ready to embark on a journey of discovery and fun that lasts all year long? Spark a love for learning and creativity with new projects delivered to your door. Join The Chef's Club today and enjoy free shipping on every box! Our monthly subscriptions bring the magic of hands-on "edutainment" right to your kitchen, making every month a new adventure in blending food, STEM, and the arts!
Getting Started: Your Mason Jar Crafting Essentials
Before diving into the wonderful world of mason jar Christmas crafts, it’s helpful to gather your supplies and set up a crafting station. Having everything organized will make the process smoother, more enjoyable, and minimize interruptions – allowing for maximum creative flow!
Basic Crafting Arsenal
Most of these items are probably already lurking in your craft cupboard or can be easily found at any local dollar, craft, or hardware store.
- Mason Jars (and Lids!): Of course! Collect various sizes – pint, quart, wide-mouth, narrow-mouth. Don't be afraid to repurpose old pickle or jam jars; just clean them thoroughly.
- Acrylic Paints: A rainbow of colors is always fun, but for Christmas, focus on red, green, white, gold, silver, brown, and black. Acrylics work well on glass and are water-soluble for easy cleanup while wet.
- Paint Brushes: A variety of sizes, from larger flat brushes for covering surfaces to smaller, finer brushes for details. Sponges or foam brushes can also be great for even coating.
- Mod Podge: This magical decoupage medium acts as a glue, sealer, and finish. It's fantastic for adhering tissue paper, glitter, or fabric to glass. You can choose different finishes like matte, gloss, or satin.
- Craft Glue: White school glue for lighter materials like paper, cotton balls, or glitter. For more robust attachments (buttons, felt, pipe cleaners), a strong liquid craft glue (like Tacky Glue) is excellent.
- Hot Glue Gun (Adult Supervision REQUIRED): For quickly attaching heavier embellishments like ribbons, pompoms, or larger buttons. This tool should only be operated by an adult due to the risk of burns.
- Scissors: Kids' safety scissors for paper, and a sharper pair for adult use on fabric or ribbon.
- Construction Paper/Craft Foam: Red, green, white, brown, gold, silver – for cutting shapes, hats, buckles, or simple designs.
- Ribbons, Twine, Yarn: Various colors and textures for bows, belts, hangers, or decorative wraps.
-
Embellishments:
- Buttons: Black for snowman eyes, white for Santa's suit, or decorative ones for gingerbread men.
- Pompoms: White for Santa's hat, red for reindeer noses.
- Googly Eyes: Always a hit for bringing characters to life!
- Glitter: Extra fine glitter or chunky glitter for a touch of sparkle.
- Cotton Balls/Fake Snow: For fluffy snow effects or Santa's beard.
- Pipe Cleaners/Chenille Stems: For reindeer antlers or other 3D details.
- Small Figurines/Mini Ornaments: For creating festive scenes inside snow globes or decorative jars.
- LED Tea Lights or Battery-Operated String Lights: These are crucial for turning your decorated jars into safe, glowing luminaries. Never use real candles with flammable materials inside or directly on painted jars due to fire risk, and never leave any candle unattended.
- Permanent Markers (Optional): For fine details or writing on labels.
Safety First! Essential Considerations
At I'm the Chef Too!, safety is paramount in all our activities, and crafting is no different.
- Adult Supervision: Especially when using scissors, hot glue guns, or sharp craft knives (for adults).
- Non-Toxic Materials: Ensure all paints, glues, and embellishments are labeled non-toxic, particularly since kids will be handling them.
- Ventilation: If using spray paints or strong-smelling glues (though acrylics and school glues are usually fine), ensure good ventilation.
- Clean Hands: Encourage frequent hand washing, especially before and after handling materials.
Preparation Tips for a Smooth Crafting Experience
- Clean Jars: Wash jars thoroughly with soap and water, then dry completely. For glass painting, some crafters recommend wiping the outside with rubbing alcohol to remove any oils that might repel paint.
- Protect Your Workspace: Lay down old newspapers, disposable tablecloths, or craft mats. This makes cleanup a breeze and protects your surfaces from paint and glue.
- Organize Supplies: Use small bowls or old muffin tins to hold different paint colors, beads, or buttons. This helps kids easily access what they need.
- Wear Play Clothes: Accidents happen! Dress kids in clothes you don't mind getting paint or glue on. An old t-shirt or apron is a great idea.
- Patience and Flexibility: Remember, the goal is fun and creativity, not perfection. Kids' crafts will have a charming, handmade quality. Embrace the process! If a design doesn't turn out exactly as planned, encourage adaptation and celebrate the unique result. This mindset is key to fostering a love for learning, just as we do with our I'm the Chef Too! kits where the focus is on the journey of discovery, not just the final edible creation.
Not ready to subscribe for a monthly adventure? Explore our full library of exciting STEM cooking kits available for a single purchase in our shop! Browse our complete collection of one-time kits and find the perfect theme for your little learner, from science experiments to delicious culinary creations.
Our Top Mason Jar Christmas Craft Ideas for Kids
Now for the fun part! Let's dive into some specific mason jar Christmas crafts that are perfect for kids. Each project is designed to be engaging, educational, and a fantastic way to celebrate the holiday season. We'll offer step-by-step guidance and connect the activities to the kind of "edutainment" experiences you find in our I'm the Chef Too! kits.
A. Festive Character Jars: Bringing Holiday Friends to Life
Transforming a simple jar into a beloved Christmas character is a magical process for children. These projects encourage imaginative play, color recognition, and the development of fine motor skills as they carefully paint and apply small details.
1. Santa Mason Jar
Imagine Santa's cheerful face glowing on your mantel, ready to hold sweet treats or a battery-operated candle!
What you'll need: Mason jar, red acrylic paint, black acrylic paint (or black glitter ribbon), gold craft foam or yellow paint, white felt or cotton balls, small white pom-pom, red ribbon, craft glue, hot glue gun (adult use only).
How to make it:
- Red Base: Start by painting the entire outside of the mason jar with red acrylic paint. Kids can use a brush or even sponge paint for a textured look. This is a great exercise in even coating and patience. Allow it to dry completely. You may need a second or third coat for opaque coverage.
- Santa's Belt: Once the red is dry, paint a black 1/2-inch wide strip horizontally around the middle of the jar for Santa's belt. Alternatively, you can use a strip of black glitter ribbon, which adds a lovely festive sparkle!
- The Buckle: Cut a small square or rectangle from gold craft foam (or paint a yellow square) and glue it onto the center of the black belt for the buckle. For extra detail, an adult can carefully use a craft knife to cut a small "H" or "I" shape out of the center of the gold buckle.
- Santa's Hat: Cut a piece of red felt into a cone shape. An adult can use hot glue to form it into a hat and attach it to the metal ring of the jar lid. For a softer look, glue cotton balls around the bottom edge of the felt hat and on the tip for a fluffy pom-pom.
- Finishing Touches: For Santa's beard, glue cotton balls or white felt cut into a wavy beard shape just below the lid. For Santa's face, you can paint simple eyes and a nose, or glue on googly eyes for extra fun.
Educational Angle: This craft emphasizes color recognition (red, black, gold), shape identification (cone, square), and fine motor control when painting details and gluing small elements. Discuss how different materials (felt, cotton, paint) have different textures and how they represent different parts of Santa's outfit.
2. Snowman Mason Jar Luminary
Light up the dark winter nights with a cheerful snowman that twinkles! This craft explores light and shadow, and the sensory experience of fuzzy textures.
What you'll need: Mason jar, white acrylic paint, black acrylic paint, orange paint, black buttons or googly eyes, cotton balls or fake snow, small red pom-pom (optional), festive ribbon/scarf, LED tea light or battery-operated string lights.
How to make it:
- White Body: Paint the entire outside of the mason jar white. This is a chance for kids to practice covering a surface evenly. Let it dry completely. Multiple coats might be needed.
- Snowman Face: Once dry, glue two black buttons or googly eyes onto the upper part of the jar. Below the eyes, paint a small orange triangle or carrot shape for the nose. For the mouth, paint small black dots in a curved line or use a permanent marker.
- Rosy Cheeks (Optional): Add a tiny red dot on each side of the nose for rosy cheeks, or have kids dab a little red paint with their fingertip.
- Fuzzy Snow: Apply a layer of craft glue to the top portion of the jar and around the lid. Kids can then stick cotton balls or sprinkle fake snow onto the glue for a soft, snowy texture.
- Accessories: Tie a festive ribbon or a small strip of felt around the neck of the jar (just under the lid) to create a snowman's scarf. You can even add a tiny pom-pom hat if desired.
- Light It Up: Place an LED tea light or a short string of battery-operated fairy lights inside the jar. Watch your snowman glow!
Educational Angle: This craft teaches about layering, texture (smooth paint vs. fluffy cotton), and the properties of light when used as a luminary. It's also a great exercise in facial feature recognition and emotional expression. This sensory engagement is similar to how our Erupting Volcano Cakes Kit allows kids to explore exciting chemical reactions in a tangible way, making learning unforgettable! Discover the delicious science behind our Erupting Volcano Cakes Kit!
3. Gingerbread Man Jar
A sweet-looking jar that’s perfect for holding real gingerbread cookies!
What you'll need: Mason jar, light brown acrylic paint, white acrylic paint or puffy paint, small black beads or buttons, red or green pom-poms (for gumdrop buttons), craft glue.
How to make it:
- Gingerbread Base: Paint the entire jar light brown and let it dry completely.
- Icing Details: Using white acrylic paint or white puffy paint (which gives a great raised "icing" effect), draw squiggly lines around the top and bottom rim of the jar, mimicking gingerbread cookie icing.
- Gingerbread Face: Paint two small black dots for eyes and a curved line for a smile. You can also glue on small black beads or buttons for the eyes.
- Buttons & Accents: Glue two or three small red or green pom-poms down the front of the jar to represent gumdrop buttons. Kids can also draw small "stitches" with a fine-tipped black marker or paint for added character.
Educational Angle: This activity focuses on pattern creation (squiggly lines, dots), counting (buttons), and color differentiation. It also encourages storytelling as children imagine their gingerbread friend.
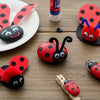
4. Reindeer Mason Jar
A friendly reindeer to guide Santa's treats or light the way!
What you'll need: Mason jar, brown acrylic paint, googly eyes, red pom-pom, brown pipe cleaners, craft glue, hot glue gun (adult use only).
How to make it:
- Brown Reindeer Body: Paint the jar brown and let it dry thoroughly.
- Eyes & Nose: Glue two googly eyes onto the upper part of the jar. Below them, glue a red pom-pom for Rudolph's iconic nose!
- Antlers: Take two brown pipe cleaners. For each antler, twist one pipe cleaner around the top of another pipe cleaner near one end, creating a branching shape. An adult can then use hot glue to attach the base of the antlers to the sides of the metal lid or directly to the top of the jar if the lid isn't used.
- Optional Mouth: Paint a small, happy smile below the nose with white or black paint.
Educational Angle: This craft develops skills in attaching objects, creating 3D shapes (antlers), and basic animal recognition. It’s also a wonderful way to introduce the story of Rudolph and his friends.
These character jars are fantastic for sparking imagination, much like how our Galaxy Donut Kit allows kids to explore astronomy by creating their own edible solar system. Explore astronomy and create your own edible solar system with our Galaxy Donut Kit! Each project, whether a craft or a culinary adventure, is designed to open up new worlds of learning.
B. Edible Gift Jars: Delicious Learning & Thoughtful Giving
Combining the art of crafting with the joy of baking makes for truly memorable gifts. These edible mason jar gifts teach kids about measurement, sequencing, and the thoughtfulness of homemade presents. At I'm the Chef Too!, our focus on edible STEM makes these types of projects particularly exciting, showing how chemistry and creativity come together in the kitchen.
1. Sugar Cookie Mix Mason Jar
This layered jar makes a beautiful and delicious gift, perfect for the aspiring baker in your life or a kind teacher.
What you'll need: Large mason jar (pint or quart), dry ingredients for sugar cookies (flour, sugar, baking powder, salt), brown sugar, chocolate chips, sprinkles, small cookie cutter, gift tag, festive ribbon or twine.
How to make it:
- Gather Ingredients: Find your favorite sugar cookie recipe. Note all the dry ingredients.
- Layering Magic: Carefully layer the dry ingredients into the clean mason jar. For instance, start with flour, then sugar, then a layer of baking powder and salt (mixed), followed by brown sugar, and top with chocolate chips or sprinkles. The visual layers are part of the gift's charm, teaching kids about careful pouring and precision.
- Lid & Extras: Secure the lid tightly.
- Instructions Tag: Write out the full recipe instructions (including wet ingredients to add) on a gift tag. This is a great opportunity for older kids to practice their writing and sequencing skills.
- Decorate: Attach the instruction tag, a small cookie cutter, and any other festive decorations (like a mini whisk or a small bag of extra sprinkles) to the jar with colorful ribbon or twine.
Educational Angle: This activity involves careful measurement (for accurate layering), understanding recipe instructions (sequencing), and basic culinary science (the purpose of each dry ingredient). It highlights the joy of preparing a gift for someone else. Imagine the joy of baking adventures delivered to your door, perfectly portioned and ready for discovery. Join The Chef's Club for ongoing educational fun delivered monthly with free shipping!
2. Hot Chocolate Mugs/Jars
A cozy and comforting gift for a chilly Christmas evening.
What you'll need: Small mason jar or mug-shaped mason jar, hot cocoa mix, mini marshmallows, chocolate chips, crushed starlight mints or peppermints, festive ribbon, gift tag.
How to make it:
- Layering Warmth: Spoon hot cocoa mix into the bottom of the jar.
- Sweet Toppings: Layer mini marshmallows on top of the cocoa mix, then add a layer of chocolate chips, and finally, crushed starlight mints or peppermints for a festive touch. This teaches kids about creating visually appealing layers.
- Seal & Decorate: Secure the lid. Attach a gift tag with instructions for making the hot cocoa (e.g., "Add 1-2 scoops to hot milk or water, stir, and enjoy!") using festive baker's twine.
Educational Angle: This simple layering exercise teaches about different textures, colors, and the concept of a complete "kit." It's also a great way to think about presentation and how to make a gift look appealing.
3. Spice Rub Mason Jar
For the aspiring grill master or chef in the family (or a thoughtful gift for adults!). This is great for older kids to experiment with.
What you'll need: Small mason jar, various dried spices (e.g., paprika, garlic powder, onion powder, cumin, chili powder, salt, pepper, brown sugar), small wooden spoon, gift tag, twine.
How to make it:
- Mix & Match: With adult guidance, kids can help measure and mix different spices to create a custom blend. This is an olfactory adventure!
- Fill the Jar: Carefully spoon the homemade spice rub into the small mason jar.
- Label & Present: Attach a gift tag with the name of the rub, a brief description of its flavor, and suggested uses. Tie a small wooden spoon to the jar with colorful twine.
Educational Angle: This craft introduces children to different aromas, basic chemistry (how spices combine to create new flavors), and precise measurement skills. It encourages experimentation and understanding of ingredients.
4. Sweet & Spicy Candied Nuts in a Festive Jar
A delightful snack for holiday gatherings or a thoughtful hostess gift.
What you'll need: Mason jar, your favorite candied nuts recipe ingredients (nuts, sugar, spices, egg white), baking sheet, parchment paper, festive ribbon, gift tag.
How to make it:
- Bake the Nuts (Adult Supervised): Follow a simple recipe for candied nuts. Kids can help mix the ingredients (nuts, spices, sugar, often an egg white to make the sugar stick) and spread them onto a parchment-lined baking sheet.
- Cool & Fill: Once baked and cooled completely, carefully transfer the candied nuts into the mason jar.
- Decorate: Secure the lid and adorn the jar with a festive ribbon and a personalized gift tag.
Educational Angle: This involves following a recipe, understanding the transformation of ingredients through baking, and sensory exploration (smell, taste, texture). It's a wonderful lesson in creating a delicious, edible product from scratch.
These edible gift kits connect directly to our I'm the Chef Too! mission, showing how learning about food can be a thrilling adventure. We teach complex subjects like chemistry and biology through tangible, hands-on, and delicious cooking adventures. Don't miss out on the monthly excitement! Give the gift of learning that lasts all year with a 12-month subscription to our STEM cooking adventures through The Chef's Club!
C. Decorative & Sensory Jars: Light, Sparkle, and Wonder
Mason jars are fantastic vessels for creating captivating decorative pieces that appeal to multiple senses. These projects encourage observation, fine motor skills, and an appreciation for aesthetics, aligning with the "art" component of our "edutainment" philosophy.
1. Christmas Tree Luminaries (Tissue Paper & Mod Podge)
Light up your home with these charming, glowing jars that resemble stained glass!
What you'll need: Mason jar, green tissue paper (ripped or cut into small pieces), Mod Podge, paintbrush, green construction paper or felt (for tree shapes), LED tea light or battery-operated string lights.
How to make it:
- Prepare Tissue Paper: Kids can have fun ripping or cutting green tissue paper into small, irregular pieces. Ripping is excellent for gross motor skills for younger children.
- Mod Podge Base: Work in small sections. Apply a medium layer of Mod Podge to one area of the mason jar.
- Apply Tissue Paper: Place tissue paper pieces onto the wet Mod Podge, overlapping them slightly. Use the paintbrush to lightly smooth the tissue paper down, adding more Mod Podge over the top as a sealer. It’s okay if there are some wrinkles; they add to the charm!
- Add Trees: While the Mod Podge is still wet (or once dry, and then glue), have kids cut out simple Christmas tree shapes from green construction paper or felt and adhere them to the jar.
- Dry & Seal: Continue until the entire jar is covered, leaving some areas unpainted if you want a more varied light effect. Apply a final layer of Mod Podge over everything to seal it. Let it dry completely – this can take a few hours.
- Illuminate: Once fully dry, place an LED tea light or a string of battery-operated lights inside the jar to watch it glow.
Educational Angle: This craft teaches about adhesion, translucency (how light passes through tissue paper), color layering, and patience. It's a fantastic sensory experience, touching on texture and visual appeal. This blend of art and science in hands-on projects is exactly what we champion at I'm the Chef Too!
2. DIY Mason Jar Snow Globe Ornament
Capture a tiny winter wonderland inside a jar! This project offers a fascinating glimpse into physics.
What you'll need: Small mason jar (with a tight-sealing lid), waterproof figurines (e.g., small plastic animals, mini trees, tiny Santa), glitter (extra-fine for slow fall), distilled water, glycerin (food-grade, found in baking aisle – helps glitter float longer), strong waterproof glue (like E6000 or hot glue for adult use).
How to make it:
- Glue Figurines to Lid: An adult should use strong waterproof glue to attach the small figurines to the inside of the mason jar lid. Make sure they fit comfortably inside the jar when the lid is screwed on. Allow the glue to dry completely (important for a clear snow globe!).
- Fill the Jar: Fill the jar almost to the top with distilled water (distilled water helps prevent cloudiness).
- Add Glycerin: Add a few drops of glycerin. Start with 1/2 teaspoon for a pint jar and add more if you want the glitter to fall slower. This is where the science of viscosity comes in!
- Add Glitter: Have kids spoon in glitter. Start with 1-2 teaspoons and add more to your liking.
- Seal It Up: Carefully screw the lid with the attached figurines onto the jar. You might want an adult to put a bead of waterproof glue around the rim of the lid before sealing for a permanent, leak-proof seal.
- Shake It! Once sealed, turn the jar upside down and shake gently to watch the "snow" fall.
Educational Angle: This is a fantastic science lesson! Kids learn about density, sedimentation, and how liquids of different viscosities affect the movement of particles. It's also great for fine motor skills and following instructions. This kind of hands-on experimentation is what we love at I'm the Chef Too!, where every kit is an opportunity for discovery.
3. Floating Yuletide Candles in Mason Jars
Elegant and simple, these add a beautiful glow to any holiday table.
What you'll need: Mason jars (various sizes), fresh cranberries, small sprigs of evergreen (pine, cedar), distilled water, floating candles.
How to make it:
- Layer the Bottom: Kids can carefully place a handful of fresh cranberries at the bottom of each mason jar, followed by a small sprig of evergreen.
- Add Water: Fill the jars with distilled water, leaving about an inch from the top.
- Place Candles: Gently place a floating candle on top of the water.
- Light (Adults Only!): An adult can light the candles for a warm, festive display. Remember, never leave burning candles unattended.
Educational Angle: This craft engages senses (sight, smell of evergreens). Kids learn about buoyancy (why the cranberries and candles float), and basic principles of design and arrangement.
4. Christmas Tree Mason Jar Votives
A simple yet effective way to add a festive glow.
What you'll need: Mason jars, green or white acrylic paint, Christmas tree stencils (or freehand drawing), fine paint brush or sponge dauber, glitter (optional), LED tea lights.
How to make it:
- Paint the Jar: Paint the entire jar green or white, and let it dry.
- Stenciling: Place a Christmas tree stencil on the jar. Kids can then dab paint over the stencil with a sponge dauber or brush. If freehand, they can carefully paint simple tree shapes.
- Add Sparkle: While the paint is wet, sprinkle some glitter over the tree for extra sparkle.
- Dry & Light: Let the paint dry completely, then place an LED tea light inside.
Educational Angle: This focuses on shape recognition, stencil use (or drawing skills), and understanding how light creates silhouettes and patterns.
These creative adventures align perfectly with I'm the Chef Too!'s philosophy. We believe in providing versatile "edutainment" experiences that ignite curiosity. Whether it's crafting a festive luminary or baking a delicious treat, the process of hands-on discovery is what truly matters. We are committed to providing screen-free educational alternatives that spark creativity in children.
Bring our hands-on STEM adventures to your classroom, camp, or homeschool co-op! Our versatile programs for schools and groups are available with or without food components, making learning exciting for everyone. Learn more about our School & Group Programs!
D. Personalized & Practical Gift Jars: Heartfelt Keepsakes
Mason jars can also be transformed into deeply personal gifts or practical items that carry a touch of holiday cheer. These projects emphasize thoughtfulness, repurposing, and the joy of giving a handmade item.
1. Mason Jar Family Photos Centerpiece
Turn cherished memories into a glowing holiday display.
What you'll need: Mason jar, printed family photos (scaled to fit inside the jar), small string of battery-operated fairy lights, faux snow (optional), small pinecones or greenery.
How to make it:
- Prep Photos: Select favorite family photos. If possible, print them on slightly thicker paper or cardstock. Kids can help choose the photos and carefully cut them out.
- Arrange Inside: Gently roll or curl the photos and place them inside the mason jar against the glass. You might use a thin line of double-sided tape to secure them to the inside wall of the jar.
- Add Lights: Carefully thread a small string of battery-operated fairy lights into the center of the jar, behind the photos.
- Winter Wonderland (Optional): Sprinkle a little faux snow at the bottom, or add tiny pinecones and sprigs of faux greenery for a festive touch.
- Lid Decoration: Decorate the lid with a festive ribbon or a mini ornament.
Educational Angle: This project encourages storytelling and recalling family memories, fostering a sense of connection and appreciation for loved ones. It also involves careful arrangement and understanding how light illuminates images.
2. Apple Teacher Gift Jar
A thoughtful and useful gift for a favorite educator, showing appreciation with a homemade touch.
What you'll need: Mason jar, red acrylic paint, green craft paper, hole punch, twine, pens/pencils/colored pencils to fill.
How to make it:
- Red Apple Base: Paint the outside of the mason jar with bright red acrylic paint. Let it dry completely, applying multiple coats for an opaque finish.
- Green Leaf Tag: From green craft paper, cut out an apple leaf shape. Have kids write a personalized message to their teacher on the leaf. This is a wonderful opportunity for practicing handwriting and expressing gratitude.
- Attach Leaf: Punch a small hole in one end of the leaf and attach it to the jar with a length of twine, tying it around the neck of the jar.
- Fill with Goodies: Fill the jar with new pencils, colored pencils, markers, or even a small gift card.
Educational Angle: This craft teaches about color association (red for apple, green for leaf), writing and communication skills, and the importance of showing appreciation. It also involves practical organization when filling the jar.
3. Spa Pedicure Gift in a Mason Jar
A pampering treat for a special grown-up, ideal for older children to assemble.
What you'll need: Mason jar, small nail polish bottle, nail file, toe separators, small tube of lotion, foot soak salts (homemade or store-bought), small scrub brush, ribbon/gift tag.
How to make it:
- Gather Spa Items: Collect miniature spa items. Kids can help choose colors of nail polish or scents of lotion.
- Layer & Arrange: Carefully arrange the items inside the mason jar. Some items might need to be stacked or nestled together.
- Decorate: Secure the lid and tie a pretty ribbon around the top. Attach a gift tag that says "Relax & Rejuvenate!" or "Spa Day in a Jar."
Educational Angle: This project fosters organizational skills, aesthetic arrangement, and the concept of thoughtful gift assembly. It also encourages consideration for others' well-being.
4. Mason Jar Lid Wreath Ornaments
An eco-friendly craft that repurposes old mason jar lids into charming tree decorations.
What you'll need: Mason jar lids (just the flat inserts), various scraps of festive fabric, ribbon, yarn, small pompoms, bells, craft glue, scissors.
How to make it:
- Gather Lids: Collect the flat metal inserts from mason jar lids.
- Decorate: Kids can use craft glue to cover the metal disc with fabric scraps, wrapping yarn around it, or gluing small festive items like pompoms or tiny bells onto the surface.
- Add Hanger: Loop a piece of ribbon or yarn through a hole punched (by an adult) at the top of the lid or simply glue a loop to the back for hanging.
Educational Angle: This craft highlights the concept of upcycling and creative reuse, teaching children how to transform discarded items into something new and beautiful. It also develops fine motor skills in gluing and arranging small components.
From turning a simple jar into a beloved holiday character to crafting an edible treat or a glowing luminary, these projects demonstrate the incredible potential of everyday objects for learning and fun. At I'm the Chef Too!, we believe every child has an innate curiosity, and our role is to provide the tools and experiences to nurture it. Our educational philosophy, rooted in hands-on discovery and creative problem-solving, is perfectly echoed in these delightful mason jar crafts.
If you're looking for more exciting ways to engage your children in "edutainment," our kits offer a seamless blend of science, art, and delicious culinary experiences, developed by mothers and educators. Each box is a complete adventure waiting to unfold. Browse our complete collection of one-time kits and discover the perfect recipe for learning and fun!
Extending the Learning & Fun with I'm the Chef Too!
The joy and educational value derived from these mason jar Christmas crafts perfectly encapsulate the core philosophy of I'm the Chef Too!. We firmly believe that the most impactful learning happens when children are fully engaged, using their hands, senses, and imaginations to explore new concepts. These festive crafts are more than just holiday decorations; they are mini "edutainment" experiences, blending art with elements of science, math, and practical skills.
Just as a child discovers the properties of light by crafting a luminary or learns about layering through an edible gift jar, our I'm the Chef Too! kits take this hands-on discovery to the next level by integrating food, STEM, and the arts into one-of-a-kind adventures. We transform complex subjects into tangible, delicious cooking projects, developed by mothers and educators who understand the importance of sparking curiosity and fostering a love for learning.
Our unique approach ensures that while children are having fun baking and creating, they are also subtly absorbing scientific principles (like chemical reactions in baking or the states of matter), honing their math skills (through measuring and fractions), and developing artistic expression (through decorating and presentation). These experiences build confidence, encourage critical thinking, and, most importantly, create joyful family memories – all while being a wonderful screen-free educational alternative.
Whether your child is meticulously painting a gingerbread jar, carefully layering ingredients for a cookie mix, or experimenting with the "snow" in a snow globe, they are developing key skills that extend far beyond the craft table. They are building fine motor control, practicing patience, engaging in problem-solving, and expressing their creativity – all essential foundations for future academic success and life skills.
We encourage you to continue these journeys of discovery with your children, beyond the holiday season. The principles learned from simple crafts can be expanded into more elaborate projects. For instance, if your child loved creating a layered hot cocoa mix, they might be fascinated by the more complex layering and chemical reactions involved in baking a cake from one of our kits. If they enjoyed designing a snowman, they might love the artistic challenge of decorating themed cupcakes.
At I'm the Chef Too!, we're committed to providing these enriching experiences directly to your home. Our Chef's Club subscription ensures a steady stream of new adventures, each carefully curated to be educational, engaging, and utterly delicious. It's about nurturing that innate curiosity and transforming everyday moments into extraordinary learning opportunities.
Looking for even more ways to bring our hands-on "edutainment" to a wider audience? Our programs aren't just for home kitchens! We offer versatile options for schools, camps, and homeschool co-ops, available with or without food components, making our unique blend of STEM and culinary arts accessible for group learning environments. Learn more about our School & Group Programs and how we can bring an unforgettable learning experience to your organization!
Conclusion
As the holiday season twinkles with excitement, the simple mason jar emerges as an extraordinary tool for blending creativity, education, and family fun. We've journeyed through a delightful array of mason jar Christmas crafts for kids, from charming character jars and heartfelt edible gifts to mesmerizing luminaries and personalized keepsakes. Each project offers more than just a beautiful outcome; it provides a hands-on pathway for children to develop crucial fine motor skills, engage in imaginative play, explore basic STEM concepts, and experience the immense satisfaction of creating something with their own two hands.
These crafts embody the very essence of "edutainment" that we cherish at I'm the Chef Too!. They spark curiosity, encourage problem-solving, and facilitate screen-free, meaningful family bonding – all while fostering a love for learning that lasts. The holiday season is a perfect time to slow down, connect with our children, and embark on these delightful projects, creating not just crafts, but cherished memories and valuable skills.
We hope this guide inspires you to gather your jars, paints, and festive embellishments, and dive into the magical world of mason jar Christmas crafts with your little ones. Remember, it's not about perfection, but about the joy of the process and the boundless creativity it unleashes.
Ready to keep the "edutainment" adventures going all year long? Give the gift of discovery and delicious learning. Join The Chef's Club today and have a new, exciting blend of food, STEM, and the arts delivered to your door every month with free shipping in the US! Unlock endless possibilities for curiosity, creativity, and family fun with I'm the Chef Too!
FAQ: Your Mason Jar Christmas Crafting Questions Answered
Here are some common questions parents and educators often have about mason jar Christmas crafts for kids:
Q1: What kind of mason jars should I use? A1: Any clean glass jar will work! Standard canning mason jars (pint, quart, wide-mouth) are excellent because they're durable and readily available. However, repurposed pickle, jam, or spaghetti sauce jars also work beautifully. Just ensure they are thoroughly cleaned and dried before starting your craft.
Q2: What is Mod Podge and do I really need it? A2: Mod Podge is a decoupage medium that acts as a glue, sealer, and finish all in one. It's incredibly versatile for adhering paper, fabric, glitter, and other materials to glass, and then sealing them for durability. While not strictly necessary for every craft (e.g., simple painted jars), it's highly recommended for projects involving tissue paper, glitter, or fabric, as it provides a smooth, protective, and often glossy finish that regular school glue might not.
Q3: How do I get the paint to stick to the glass without peeling? A3: For best results with acrylic paint on glass, make sure your jars are sparkling clean and completely dry. You can wipe the outside with rubbing alcohol before painting to remove any oils or residue. Apply paint in thin, even coats, allowing each coat to dry fully before adding the next. For added durability, especially if the item will be handled frequently or cleaned, you can apply a clear sealant (like Mod Podge or a clear acrylic spray sealant) after the paint has fully cured. Remember that craft paints are generally not dishwasher safe.
Q4: Are these crafts safe for all ages? A4: Most mason jar crafts are suitable for a wide range of ages with appropriate supervision. Younger children (toddlers and preschoolers) will enjoy painting, ripping tissue paper, and gluing larger embellishments. Older children can handle more intricate painting, cutting, and assembly. Any steps involving sharp tools (scissors for intricate cuts, craft knives) or hot tools (hot glue guns) should always be performed by or with very close supervision from an adult. Always use non-toxic paints and glues.
Q5: How long does it take for the paint/glue to dry? A5: Drying times vary depending on the type of paint, glue, thickness of application, and humidity.
- Acrylic paint: Thin coats usually dry to the touch in 15-30 minutes, but it's best to wait at least an hour between coats and several hours for it to fully cure before handling or adding more layers.
- Craft glue/Mod Podge: Can dry to the touch in 30-60 minutes, but a full cure can take 24 hours or more. Always check the specific product instructions.
- Hot glue: Dries almost instantly, which is why it requires adult supervision.
Q6: Can I use real candles in my mason jar luminaries? A6: For safety, we strongly recommend using LED tea lights or battery-operated string lights in your mason jar luminaries, especially for crafts made by children. If using flammable materials like tissue paper, cotton balls, or ribbon on the outside or inside of the jar, real candles pose a significant fire hazard. Even with bare glass, real candles can heat the glass to extreme temperatures. Never leave any candle, real or LED, unattended.
Q7: How can I clean my painted mason jars? A7: For jars painted with acrylic craft paint, gentle hand washing with a soft cloth and mild soap is usually best. Avoid scrubbing or using abrasive sponges, as this can damage the paint. These crafts are generally not dishwasher safe. If you used a sealant, it might offer a bit more protection, but hand washing is always the safest bet.
Q8: What if my child's craft doesn't look "perfect"? A8: That's the beauty of it! Encourage your child's unique style and creative expression. The goal of these activities, and all I'm the Chef Too! experiences, is to foster a love for learning, develop skills, and create joyful memories, not to achieve museum-quality perfection. Celebrate their effort and the unique charm of their handmade creation!
Q9: Where can I find more ideas for hands-on learning activities? A9: We're so glad you asked! At I'm the Chef Too!, our mission is to provide continuous "edutainment." Explore our website for a wealth of ideas. For ongoing, themed, hands-on STEM and art adventures conveniently delivered to your door, we highly recommend our monthly subscription. Join The Chef's Club today for a new culinary and scientific adventure every month, with free shipping in the US!