Nature's Treasure: Fun Kids Crafts with Pine Cones

Table of Contents
- Introduction
- The Humble Pine Cone: More Than Meets the Eye
- Harvesting & Preparing Your Pine Cone Treasures (Safety & Science!)
- The Art of Transforming Pine Cones: Painting & Adorning
- Why Pine Cone Crafts are "Edutainment" (Our I'm the Chef Too! Philosophy in Action)
- A Forest of Ideas: Engaging Pine Cone Craft Projects for Every Season
- Tailoring the Fun: Pine Cone Crafts for Different Ages
- Beyond the Craft: Extending the Learning
- The I'm the Chef Too! Connection: Nurturing Young Minds
- FAQ Section
- Conclusion
Imagine this: a crisp autumn afternoon, sun filtering through the trees, a gentle breeze rustling the leaves. Your child, eyes wide with discovery, spots a fallen pine cone, perfectly shaped and ready for adventure. What if that simple treasure from nature could spark hours of creative play, unlock scientific curiosity, and strengthen family bonds, all while being completely screen-free?
At I'm the Chef Too!, we believe in the magic of hands-on exploration, whether it's whipping up edible creations in the kitchen or transforming natural elements into works of art. This blog post is dedicated to showing you how to harness the humble pine cone for incredible "edutainment" experiences right at home. We'll delve into everything from how to safely prepare these woodland wonders to a forest-full of imaginative craft ideas, explaining the hidden STEM and artistic lessons within each activity. Get ready to gather your little explorers, because by the end, you'll be armed with endless inspiration for delightful, educational adventures with kids crafts with pine cones that perfectly align with our mission to blend food, STEM, and the arts into one-of-a-kind experiences.
Introduction
There's something uniquely enchanting about a pine cone. Often overlooked as simple ground cover, these sturdy, textured marvels are actually nature's perfect craft supply – free, abundant, and surprisingly versatile. More than just pretty objects, pine cones offer a tangible link to the natural world, inviting children to touch, explore, and create. In an age filled with digital distractions, reconnecting with nature through crafting provides a much-needed breath of fresh air, encouraging imaginative play and practical skill development.
This comprehensive guide aims to transform your perception of pine cones from ordinary forest debris into extraordinary creative catalysts. We'll walk you through everything you need to know, from how to responsibly collect and prepare your pine cones to a vibrant array of craft ideas suitable for all ages and seasons. But we won't stop there. We'll also uncover the rich educational opportunities embedded in these activities – the science, technology, engineering, and math (STEM) lessons, the artistic expression, and the fine motor skill development. At I'm the Chef Too!, our mission is to blend food, STEM, and the arts into one-of-a-kind "edutainment" experiences, sparking curiosity and creativity in children while facilitating precious family bonding. Pine cone crafts, much like our unique cooking adventures, offer a fantastic avenue for this screen-free educational alternative, teaching complex subjects through tangible, hands-on activities that are as fun as they are informative. Get ready to embark on a journey where creativity blossoms from the simplest gifts of the forest, creating not just crafts, but lasting memories and a love for learning.
The Humble Pine Cone: More Than Meets the Eye
Before we dive into the fun world of crafting, let's take a moment to appreciate the pine cone itself. Far from being just a fallen seed pod, a pine cone is an ingenious structure, meticulously designed by nature. Its primary purpose is to protect the seeds of coniferous trees, like pines, firs, and spruces. Those woody scales you see are perfectly arranged to keep the seeds safe from animals and harsh weather.
But here’s where the science gets really cool: pine cones are masters of adaptation. You'll notice they change their shape depending on the weather! On dry, sunny days, the scales open up to release their seeds, allowing the wind to carry them far and wide. When it's wet or humid, the scales close tightly to protect the seeds from moisture, preventing them from rotting. This natural "weather-responsive" mechanism is a fantastic example of simple engineering and biology in action, right in your backyard!
There are many different types of pine cones, each with its own unique size, shape, and texture. Some are small and delicate, like those from hemlock trees, while others are large and robust, like sugar pine cones. Observing these differences can be a wonderful mini-lesson in botany and classification for your children. Where can you find these natural treasures? A simple walk in a local park, a forest, or even your own backyard can yield an abundant harvest. This hunt for materials is the first step in our crafting adventure, transforming a simple outdoor stroll into an exciting treasure hunt!
Harvesting & Preparing Your Pine Cone Treasures (Safety & Science!)
The journey from forest floor to fantastic craft begins with proper preparation. While it might seem easy to just grab a pine cone and start gluing, a little forethought goes a long way in ensuring a clean, pest-free, and long-lasting creation. Plus, the preparation itself offers some fascinating STEM insights!
Collection: Tips for a Successful Nature Walk
Before you even start crafting, the collection process is an adventure in itself.
- Be Mindful of Nature: Teach children to collect only what has already fallen to the ground. We want to respect the trees and their ecosystems.
- Look for Variety: Encourage kids to observe the different shapes, sizes, and textures of pine cones. "Which one is biggest? Which one feels spikiest?" These questions foster observation skills.
- Bring a Bag: A reusable canvas bag or even a simple paper bag is perfect for collecting your treasures.
- Wear Gloves (Optional but Recommended): Some pine cones can be sticky with sap, so gloves can save hands from a messy cleanup.
- Safety First: Always supervise children during nature walks, ensuring they stay on paths and avoid anything that looks unsafe.
Cleaning for Crafting Success: Why It's Important
Once you've gathered your bounty, the next crucial step is cleaning. This isn't just about aesthetics; it's about hygiene and longevity. Pine cones can harbor small insects, spiders, or even fungi, and they often come coated in sticky tree sap, dirt, and debris. Cleaning them ensures your crafts are free of unwanted guests and sticky residue, making them pleasant to work with and long-lasting decorations. This stage also offers a practical lesson in cleanliness and patience.
The Oven Method: A Speedy Science Experiment
This is often the quickest way to clean and dry your pine cones, and it comes with a built-in science lesson!
- Pre-heat Your Oven: Set your oven to a low temperature, around 200°F (93°C).
- Prepare Your Baking Sheet: Line a baking sheet with aluminum foil or parchment paper. This will catch any melting sap and make cleanup easier.
- Arrange Pine Cones: Spread your pine cones in a single layer on the prepared sheet, ensuring they don't overlap too much.
- Bake: Place them in the oven for about 30 minutes to an hour. Keep a close eye on them, as baking times can vary depending on the size and moisture content of your pine cones. You'll notice the scales gradually opening up further, a beautiful demonstration of how heat and dryness affect their structure. The heat also helps to kill off any tiny critters that might be hiding within and melts away sticky sap.
- Cool Down: Once they're dry and fully opened, remove them from the oven and let them cool completely on the baking sheet. They will be hot!
The Science Bit: The heat from the oven causes the moisture within the pine cone to evaporate, forcing the scales to open wider. This is the same natural process that happens on a sunny day, just sped up. It's a great opportunity to talk about evaporation, temperature, and how plants adapt to their environment.
Washing with Water and Vinegar: A Gentle Approach
If you prefer a no-bake method or have very sap-heavy cones, a water and vinegar soak can work wonders.
- Prepare the Soak: In a large bucket or tub, mix warm water with 1/2 to 1 cup of white vinegar. The vinegar acts as a natural disinfectant and helps to break down sap.
- Submerge Pine Cones: Place your pine cones in the solution, making sure they are fully submerged. You might need to place a heavy object on top to keep them down, as they tend to float.
- Soak: Let them soak for about 20-30 minutes. You'll notice the pine cones closing up as they absorb the water – another cool demonstration of their natural mechanism!
- Rinse and Dry: Remove the pine cones, rinse them thoroughly under clean water, and then spread them out on newspaper or paper towels to air dry. This can take several days, so be patient. They will gradually open up again as they dry out.
The Science Bit: Observing the pine cones close up in water is a fantastic visual lesson in hydration and how they protect their seeds. The vinegar's mild acidity can also be discussed in terms of its cleaning properties.
Safety First: Crafting with Care
Throughout all stages, adult supervision is key, especially when involving ovens or sharp tools.
- Oven Use: Only adults should handle hot pine cones or place them in/out of the oven.
- Crafting Tools: If using hot glue guns, ensure adults apply the glue or closely supervise older children. For younger kids, stick to craft glue or tape.
- Small Parts: Be mindful of choking hazards with very young children if using small beads, pom-poms, or other adornments.
- Allergies: While rare, some individuals may have sensitivities to pine sap. It's good to be aware.
By taking these steps, you transform raw nature into a perfect canvas, ready for imaginative kids crafts with pine cones.
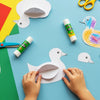
The Art of Transforming Pine Cones: Painting & Adorning
Now that your pine cones are clean, dry, and ready, it's time for the true artistic transformation! Painting and adorning pine cones is where creativity truly shines, allowing children to experiment with colors, textures, and design.
Choosing Your Medium: A Palette of Possibilities
The type of paint you choose can dramatically change the look and feel of your pine cone crafts.
- Acrylic Paints: These are fantastic for detailed work. With acrylics, children can carefully brush paint onto specific scales, create patterns, or add highlights. They dry quickly and offer a wide range of vibrant colors. This method encourages fine motor control and precision.
- Spray Paint: For a quick, even coat of color, especially for a large batch of pine cones, spray paint is your go-to. This is best done by an adult or older child in a well-ventilated area, with proper protection for hands and surfaces. Spray paint offers a smooth finish and can create stunning uniform colors, perfect for decorative pieces like wreaths or garlands.
- Natural Dyes and Food Coloring: For a more natural, gentle approach, especially with younger children, you can experiment with watered-down food coloring or natural dyes made from fruits and vegetables (though these may not be as vibrant or long-lasting). This subtly connects the crafting process back to the edible explorations we champion at I'm the Chef Too!, showing how color can come from various sources.
Painting Techniques for Kids: Unleashing Inner Artists
Encourage experimentation! There's no "wrong" way to paint a pine cone.
- Dabbing: Using a sponge or cotton ball to dab paint onto the scales creates a textured, snow-like, or fuzzy effect.
- Brushing: A small paintbrush allows for more controlled application, perfect for painting individual scales or adding tiny details.
- Dipping: For younger kids, dipping the entire pine cone into a shallow tray of paint can be a fun sensory experience. The result is a beautifully coated pine cone with an organic, uneven charm.
- Ombre Effects: For older children, trying an ombre effect (gradually blending one color into another, or different shades of the same color) can be a fun challenge, teaching about color gradients.
- Color Blocking: Painting different sections of the pine cone in distinct colors creates a bold, modern look.
Adornments: Adding Sparkle and Personality
Once the paint is dry, the real personality comes out through adornments. This is where children can truly make their pine cone creations unique.
- Glitter and Sparkles: A classic choice that adds instant magic. Apply craft glue to the pine cone, then sprinkle glitter generously.
- Googly Eyes: Instantly transform a pine cone into an animal, monster, or silly character.
- Felt and Foam: Cut out shapes for ears, wings, beaks, hats, or clothing. These soft textures contrast beautifully with the pine cone's roughness.
- Pipe Cleaners: Bend them into antennae, legs, arms, or halos. They're flexible and easy for small hands to manipulate.
- Pom-Poms: Small, fluffy pom-poms can represent berries, snow, or decorative accents.
- Ribbons and Twine: Perfect for hanging ornaments, creating garlands, or adding a festive touch.
- Small Beads or Sequins: For older children with fine motor control, these can add intricate detail and sparkle.
Encourage children to think about what story their pine cone wants to tell. Is it a whimsical fairy, a grumpy owl, or a sparkling Christmas tree? The possibilities are as endless as their imaginations.
Why Pine Cone Crafts are "Edutainment" (Our I'm the Chef Too! Philosophy in Action)
At I'm the Chef Too!, we don't just create kits; we craft experiences. We believe that learning should be an adventure, a hands-on exploration that sparks joy and curiosity. This is precisely why we’re so passionate about kids crafts with pine cones – they embody the very essence of "edutainment" that drives our unique approach, blending food, STEM, and the arts.
Sparking Curiosity: The Foundation of Learning
The journey begins outdoors. A simple walk to collect pine cones transforms into an opportunity to observe, question, and explore the natural world. Why do pine cones look different? How do they open and close? What kinds of trees do they come from? These aren't just questions; they are the seeds of scientific inquiry, sparking a curiosity that can lead to a lifelong love for learning and discovery.
STEM Connections: Learning Through Doing
Pine cone crafts are a stealthy way to introduce complex STEM concepts in a tangible, accessible manner.
- Science: Children observe the natural world, understanding plant life cycles, adaptation, and the properties of materials. Preparing pine cones (like our oven method) demonstrates the effects of heat and moisture on organic matter. It’s an informal lesson in botany and environmental science.
- Technology: While not tech-heavy, using tools like scissors, glue guns (with supervision), or even a paint sprayer introduces concepts of utility and function.
- Engineering: Designing a pine cone animal or ornament requires thinking about structure, balance, and how different components fit together. How do you make the owl stand up? Where do the wings attach so they look realistic? This is practical engineering in action.
- Math: Counting scales, comparing sizes, recognizing patterns (the spiral arrangement of scales!), and even measuring materials for a wreath or garland all engage mathematical thinking.
Art & Creativity: Self-Expression in Every Scale
Pine cone crafting is a fantastic canvas for artistic expression.
- Color Theory: Choosing paint colors, blending, and creating contrasting or harmonious palettes.
- Design & Composition: Deciding where to place features, how to arrange adornments, and thinking about the overall aesthetic of their creation.
- Self-Expression & Imagination: Transforming a simple cone into a fantastical creature or a festive decoration empowers children to bring their inner worlds to life, fostering confidence and imaginative thinking.
Fine Motor Skills & Sensory Play: Building Essential Abilities
Manipulating pine cones, holding paintbrushes, gluing small pieces, and tying ribbons all contribute to the development of crucial fine motor skills. The diverse textures of pine cones, paints, and craft supplies also offer rich sensory input, engaging children's tactile senses and encouraging focused play.
Problem-Solving & Patience: Learning from Challenges
Sometimes, the glue won't stick quite right, or a scale breaks. These small challenges become opportunities for problem-solving. Children learn to adapt, try new approaches, and understand that sometimes, patience is key to achieving their vision.
Family Bonding & Screen-Free Fun: Our Core Mission
Perhaps most importantly, pine cone crafts provide invaluable opportunities for family bonding. Sitting together, sharing ideas, and collaborating on a project creates lasting memories and strengthens connections. In a world saturated with screens, these hands-on activities offer a refreshing, engaging, and educational alternative that brings families together.
This blend of natural discovery, scientific inquiry, artistic creation, and shared experiences is what we strive for in every single box at I'm the Chef Too!. Ready to extend this spirit of hands-on, creative learning to your kitchen? Imagine the joy of receiving a new adventure delivered right to your door every month, packed with pre-measured dry ingredients and specialty supplies. Our monthly Chef's Club subscription offers exactly that, with free shipping in the US and flexible 3, 6, and 12-month pre-paid plans perfect for gifting or long-term enrichment.
A Forest of Ideas: Engaging Pine Cone Craft Projects for Every Season
The versatility of pine cones means they can be transformed into almost anything you can imagine, bringing joy and a touch of nature to every season. Here’s a collection of inspiring kids crafts with pine cones to get your creative juices flowing:
Nature's Whimsy: Animal Kingdom Crafts
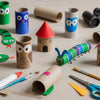
Pine cones are naturally shaped to be the perfect base for all sorts of adorable creatures!
- Pine Cone Owls: A classic for a reason! Use cotton balls or felt pieces tucked between the scales for fluffy feathers. Add large googly eyes and a felt beak. You can make snowy owls with white paint and cotton, or forest owls with natural colors and brown felt. This craft enhances fine motor skills as kids carefully place the "feathers" and teaches about animal habitats.
- Paper Roll and Pine Cone Squirrels: Combine a toilet paper roll (for the body) with a fluffy pine cone tail. Add felt ears and a drawn face. This encourages imaginative play and teaches about combining different materials.
- Felt Foxes: Using a downloadable template, cut out felt shapes for a fox's head, ears, and tail, attaching them to a pine cone body with craft glue. This helps with cutting skills and following instructions.
- Reindeer Ornaments: Paint a pine cone brown, add googly eyes, tiny twig antlers, and a red pom-pom nose. Perfect for holiday cheer and developing dexterity.
- Pine Cone Turkeys: Attach colorful construction paper or felt "feathers" to the wider end of the pine cone. Add a small pom-pom head with googly eyes and a tiny felt wattle. This is a wonderful craft for discussing patterns and fall colors.
- Farm Animals: With a little paint and imagination, pine cones can become chickens, cows, pigs, and sheep. Use felt or construction paper for ears, snouts, and other features. This encourages creative role-play and learning about farm life.
- Peacocks: Paint your pine cone vibrant colors and then attach colorful craft feathers for the peacock's impressive tail. This craft focuses on color and form.
Speaking of beloved characters and fun animal-themed crafts, your little ones will also adore making our Peppa Pig Muddy Puddle Cookie Pies – a delicious, hands-on activity that brings their favorite pig to life!
Festive Flair: Seasonal & Holiday Decorations
Pine cones are staples for seasonal decor, offering endless possibilities for festive embellishments.
-
Fall Harvest Decor:
- Pine Cone Apples: Paint smaller pine cones red or green, and add a small twig stem and a felt leaf. These make charming teacher gifts or table decorations.
- Pine Cone Pumpkins: Paint pine cones orange, then add a green pipe cleaner stem or felt leaves.
- Fall Trees: Paint pine cones in vibrant autumn hues (red, orange, yellow, brown) and glue them onto a cork base to stand upright.
- Pine Cone Potpourri: For older kids, create fragrant potpourri by gently baking pine cones with essential oils, dried orange slices, cinnamon sticks, and star anise. This introduces them to aromatics and natural home decor.
-
Winter Wonderland & Christmas Creations:
- Pine Cone Christmas Trees: Paint pine cones green, then decorate with tiny pom-poms, glitter, or small beads as "ornaments." A star can be glued to the top.
- Snowy Scenes & Skiing Snowmen: Paint pine cones white, add cotton balls for snow, and create miniature skiing snowmen using felt and small twigs.
- Snow Globe Ornaments: Fit small, decorated pine cones into clear plastic or glass ornaments, adding faux snow or glitter. (Adult assistance needed for assembling these).
- Pine Cone Wreaths: Paint a collection of pine cones in various colors (or leave natural), and then hot glue them onto a cardboard ring or a floral foam base to create a stunning DIY wreath.
- Pom-Pom Pine Cone Ornaments: Glue colorful pom-poms between the scales of pine cones for a cheerful, kid-friendly ornament.
- Ombre Pine Cones: Achieve a sophisticated look by spray-painting pine cones with an ombre effect, blending shades of white, silver, or blue for winter.
-
Spooky Season Fun (Halloween):
- Pine Cone Spiders: Paint pine cones black or brown, then attach eight black pipe cleaner "legs" bending them at the joints. Add googly eyes.
- Pine Cone Bats: Paint pine cones black, then attach black felt or construction paper wings and googly eyes. Add a string to hang them as spooky-cute ornaments.
- Pine Cone Ghosts: Paint pine cones white, add two black dots for eyes, and hang with string. Simple, yet effective!
Playful Creations: Imaginative Worlds & Practical Uses
Beyond specific seasons, pine cones can inspire year-round fun and even serve practical purposes.
- Rainbow Fairies: Attach a wooden bead head, yarn hair, and colorful felt or fabric wings to a small pine cone body. These can be moved into a magical fairy garden, fostering imaginative play.
- Bird Feeders: A classic project! Smear a pine cone with peanut butter (or a nut-free alternative), then roll it in birdseed. Hang it from a tree branch to observe local birds – a wonderful lesson in nature and caring for wildlife.
- Colorful Zinnias: Paint the tips of the pine cone scales in bright, contrasting colors to mimic the look of zinnia flowers. Group several together in a vase for a lasting floral arrangement.
- Rhinestone Pine Cones: For a touch of sparkle, let kids glue on various self-adhesive gems or small rhinestones. This can turn a simple pine cone into a shimmering decoration.
- Paint-Dipped Pine Cone Garland: Dip pine cones partially into different colors of paint, let them dry, then string them together to create a colorful garland for any time of year.
- Fire Starters (Older Kids/Adults): Dip clean, dry pine cones into melted wax (with adult supervision) and add a wick. These make lovely, fragrant gifts that also serve a practical purpose for campfires or fireplaces.
Exploring these activities provides such a rich foundation for learning, much like our very own I'm the Chef Too! experiences. Not ready for a subscription yet? That's perfectly fine! You can always explore our full library of adventure kits available for a single purchase in our shop and find the perfect hands-on STEM and cooking experience for your child today!
Tailoring the Fun: Pine Cone Crafts for Different Ages
One of the greatest strengths of kids crafts with pine cones is their adaptability. With a little modification and appropriate supervision, they can engage children across a wide range of ages, ensuring everyone from toddlers to tweens can enjoy the creative process.
Toddlers & Preschoolers (Ages 2-5): Sensory Exploration & Simple Creations
For the youngest crafters, the focus should be on sensory exploration, developing basic motor skills, and simple, satisfying outcomes.
- Sensory Bins: Offer a bin filled with clean, unprepared pine cones of various sizes. Add scoops, tongs, and small containers for open-ended play, encouraging exploration of texture, shape, and weight.
- Simple Painting: Provide large pine cones, chunky paintbrushes, and washable paints. Let them explore color by dabbing, brushing, or even dipping pine cones into shallow trays of paint. The goal is the process, not perfection!
- Basic Gluing: Use large, easy-to-handle items like pom-poms, googly eyes, or pre-cut felt shapes with child-safe craft glue. Supervise closely to ensure items are not ingested.
- Bird Feeders (with help): Toddlers can help smear peanut butter onto a pine cone and roll it in birdseed, developing hand-eye coordination and experiencing a unique texture.
- Nature Collages: Gather pine cones, leaves, twigs, and other natural items. Provide a large piece of paper and glue, letting them arrange and attach items freely.
Elementary School Kids (Ages 6-10): Developing Skills & Detailed Creations
This age group is ready for more complex projects that require finer motor control, planning, and multi-step instructions.
- Detailed Animal & Character Crafts: Kids can cut out their own felt shapes for foxes, owls, or squirrels, carefully gluing them onto pine cones. They can add more intricate details with markers or acrylic paints.
- Holiday Ornaments: Creating Christmas trees, reindeer, or snowmen ornaments involves more precise painting, glitter application, and attaching smaller embellishments.
- Wreaths & Garlands: Constructing a pine cone wreath or stringing a garland requires planning, spatial reasoning, and repetitive gluing/tying, building patience and persistence.
- Science Experiments: Encourage them to observe how pine cones open and close. Keep some in water and some dry to demonstrate the changes over time, then record their observations.
- Gift-Giving Crafts: Encourage them to make pine cone crafts as gifts, fostering generosity and understanding the value of handmade items.
Older Kids & Tweens (Ages 11-14+): Advanced Techniques & Problem-Solving
Older children can tackle more sophisticated crafts, experiment with advanced techniques, and integrate pine cones into larger projects.
- Ombre & Detailed Painting: Challenge them to achieve specific color gradients or intricate patterns on their pine cones using acrylics or spray paint.
- Pine Cone Potpourri & Fire Starters: These projects involve understanding mixtures, scents, and for fire starters, the basics of combustion (always with adult supervision for melting wax).
- Dioramas & Nature Scenes: Use pine cones as trees, animals, or elements in a larger nature-themed diorama, incorporating storytelling and environmental design.
- Pine Cone Jewelry/Art: Explore drilling small holes (with adult help) to string pine cone scales into unique necklaces or use sections of pine cones in mixed-media art pieces.
- Understanding Biology: Research different types of pine trees and their cones, delving deeper into botany and ecosystems.
Just as pine cone crafts can be adapted for various ages, our I'm the Chef Too! kits are designed to engage children across developmental stages. For instance, kids can explore geology and chemistry by creating a delicious reaction that makes our Erupting Volcano Cakes bubble over with deliciousness! Or, for those fascinated by the cosmos, they can dive into astronomy by creating their own edible solar system with our Galaxy Donut Kit. Each kit is a tailored adventure waiting to unfold, delivering hands-on STEM and culinary fun right to your door.
Beyond the Craft: Extending the Learning
The beauty of hands-on activities like kids crafts with pine cones is that the learning doesn't stop once the glue dries. These projects can be springboards for even richer educational experiences, nurturing curiosity and expanding knowledge in multiple directions.
- Storytelling with Pine Cone Characters: Once your children have created their pine cone animals or fairies, encourage them to invent stories about them. Where do they live? What adventures do they go on? This fosters imaginative play, language development, and narrative skills. You can even create a small "stage" or "forest" out of cardboard or other natural elements for their characters to interact within.
- Creating a Diorama or Nature Scene: Take their individual pine cone creations and integrate them into a larger scene. Using a shoebox, construction paper, twigs, moss, and other natural finds, children can design an entire miniature world for their pine cone friends. This activity strengthens spatial reasoning, planning, and collaborative skills if done as a group.
- Learning About Different Tree Types: Use the pine cones as a starting point to research the trees they came from. What do the leaves (needles) look like? How tall does the tree grow? Where do these trees typically live? This is a fantastic way to introduce basic dendrology (the study of trees) and local ecology. Visit a local arboretum or park to identify the trees in person.
- Gifting Handmade Creations: Encourage children to give their pine cone crafts as gifts to family members, friends, or teachers. This teaches valuable social-emotional lessons about generosity, thoughtfulness, and the joy of sharing something handmade and unique. It also reinforces the idea that their creative efforts have value and can bring happiness to others.
- Nature Journaling: After collecting and crafting, encourage kids to draw or write about their experiences in a nature journal. They can sketch the pine cones, record their observations about how they opened/closed, or write about their favorite craft. This combines art with scientific recording and language arts.
- Observing Wildlife: If you make a pine cone bird feeder, set up a spot near a window to observe which birds come to visit. Keep a tally or draw pictures of the different species you see. This provides an ongoing science lesson in ornithology (the study of birds) and local ecosystems.
By extending the learning beyond the immediate craft, you transform a fun activity into a continuous cycle of discovery, reinforcing the idea that learning is all around us, waiting to be explored.
The I'm the Chef Too! Connection: Nurturing Young Minds
At I'm the Chef Too!, our very essence is built around the idea of hands-on, engaging, and educational experiences that delight children and parents alike. Our mission is to seamlessly blend food, STEM, and the arts, creating "edutainment" adventures that spark curiosity, foster creativity, and provide meaningful screen-free family bonding time. When we look at the magic of kids crafts with pine cones, we see so many parallels with our own philosophy.
Just as pine cone crafts invite children to explore the natural world, understand scientific principles (like how heat affects matter or how plants adapt), and express themselves artistically, our kits invite them into the kitchen to do the same. Imagine a child learning about chemical reactions while making our Erupting Volcano Cakes, or exploring geometry by decorating cookies. Both activities emphasize tangible learning, where concepts come alive through touch, taste, and sight.
We are deeply committed to providing screen-free educational alternatives that encourage children to use their hands and minds. The joy of a child meticulously painting a pine cone owl is akin to the excitement of a child mixing ingredients to create a delicious, scientifically inspired treat. Both experiences build confidence, develop fine motor skills, encourage problem-solving, and most importantly, create joyful family memories. Our kits are developed by mothers and educators, ensuring that every adventure is not only fun but also thoughtfully designed to deliver meaningful educational outcomes without overpromising specific academic achievements. Instead, we focus on fostering a love for learning, building confidence in their abilities, and developing key skills that will serve them well in all areas of life.
Whether you're transforming pine cones into whimsical creatures or baking up a batch of delicious, educational treats, the core value remains the same: engaging children in discovery, empowering their creativity, and celebrating the power of hands-on learning. Ready to bring more hands-on, educational fun into your home every month? Join The Chef's Club today and enjoy free shipping on every box, designed to keep curiosity and creativity bubbling!
FAQ Section
Do I need to clean pine cones before crafting?
Yes, it's highly recommended. Pine cones can harbor small insects, spiders, dirt, and sticky sap. Cleaning them ensures your crafts are pest-free, hygienic, and easier to work with.
How do I get pine cones to open or close?
Pine cones naturally open in dry conditions (to release seeds) and close in humid or wet conditions (to protect seeds).
- To open them: Place dry pine cones in an oven preheated to 200°F (93°C) for 30 minutes to an hour. This evaporates moisture and makes them open wider.
- To close them: Submerge pine cones in water for several hours or overnight. They will absorb the water and close up.
What kind of paint works best on pine cones?
- Acrylic paints are excellent for detailed work, vibrant colors, and quick drying.
- Spray paint offers a smooth, even coat and is great for covering many pine cones quickly. Always use spray paint in a well-ventilated area with adult supervision.
- Washable tempera paints are good for younger children as they are easy to clean up.
Are pine cones safe for crafting with young children?
Yes, generally. However, adult supervision is always necessary, especially for very young children.
- Ensure pine cones are thoroughly cleaned and free of pests.
- Be mindful of small embellishments (googly eyes, beads) that could be choking hazards for toddlers.
- Supervise closely when using glue or scissors.
- Some pine cones can be sharp or spiky; choose smoother ones for younger kids if possible.
Can I use pine cones for cooking or baking?
No, pine cones themselves are not edible. While they protect edible pine nuts from some species of pine trees, the woody cone structure is not meant for consumption. At I'm the Chef Too!, we focus on delicious, edible STEM adventures through our cooking kits, but pine cones are best kept for crafting and decoration!
How long do pine cone crafts last?
If properly cleaned, dried, and stored, pine cone crafts can last for many years, even decades! Keep them in a dry place to prevent moisture, which could cause them to re-close, or potentially grow mold over time.
Where can I find pine cones if I don't have pine trees nearby?
Check local parks, nature preserves, or hiking trails. Many craft stores also sell pre-cleaned pine cones, especially during the fall and winter seasons.
Conclusion
From a simple walk in the woods to a dazzling display of artistic expression, kids crafts with pine cones offer a treasure trove of learning and laughter. We've explored everything from the fascinating biology of these natural wonders to practical preparation tips and a forest-full of creative ideas. More than just pretty decorations, these activities are vibrant lessons in science, engineering, and art, nurturing curiosity, building skills, and providing precious screen-free moments for families.
At I'm the Chef Too!, we believe in the transformative power of hands-on "edutainment," where children discover the joy of learning through tangible, imaginative play. Pine cone crafts perfectly align with our mission to blend food, STEM, and the arts, proving that the most profound lessons often come from the simplest materials and the shared moments of creation.
Why wait for inspiration to strike? Give the gift of learning that lasts all year with a 3, 6, or 12-month subscription to our STEM cooking adventures! Each month, a new, exciting kit arrives at your door with free shipping, complete with pre-measured dry ingredients and specialty supplies. Ready for a new adventure every month? Join The Chef's Club and enjoy free shipping on every box to continue sparking curiosity and creativity in your child!