Melting Snowman Craft for Kids: A Winter Wonderland of Learning

Table of Contents
- Introduction
- The Magic of Melting Snowmen: More Than Just a Craft
- Crafting a "Melted" Masterpiece: Puffy Paint Snowmen
- Building with Nature: Wood Slice Melting Snowman Ornaments
- Geometric Fun: The Shape-Shifting Melted Snowman Craft
- The Ultimate STEM Adventure: The Fizzing, Melting Snowman Experiment
- Bringing It All Together: Beyond the Craft Table
- Conclusion
- FAQ Section
Does the thought of a cold, grey winter day fill you with a longing for warmth, but your little ones are still dreaming of snow? There's a certain magic in the idea of a snowman, pristine and perfect, slowly succumbing to the sun's gentle rays. But what if we told you that magic doesn't have to end with real snow? What if that melting moment could spark incredible curiosity, ignite creativity, and even teach fundamental STEM principles right in your home?
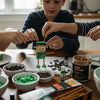
At I'm the Chef Too!, we believe that the kitchen and craft table are some of the most exciting classrooms. Our mission is to blend food, STEM, and the arts into one-of-a-kind "edutainment" experiences, and the humble melting snowman craft for kids offers a perfect canvas for this philosophy. This isn't just about sticking googly eyes on something white; it's about exploring textures, understanding chemical reactions, practicing fine motor skills, and fostering imaginative play. In this comprehensive guide, we'll dive deep into several fantastic ways to create "melting snowmen," each packed with unique educational benefits, ensuring your child develops key skills, builds confidence, and creates joyful family memories.
Introduction
Imagine this: a flurry of excitement as snow falls, building the perfect snowman, only for it to slowly, delightfully melt away. This bittersweet transition, from solid to liquid, from structured to whimsical, captures the imagination of children everywhere. It's a natural phenomenon that offers a charming entry point into various scientific concepts, artistic expressions, and sensory explorations. Instead of just observing, why not recreate this enchanting process with your children, transforming a simple craft into a hands-on learning adventure?
This blog post is designed to be your ultimate companion in exploring the world of melting snowman crafts. We’ll guide you through different techniques, from tactile puffy paint creations to scientifically stimulating fizzing experiments, and even durable wooden keepsakes. For each craft, we’ll break down the materials, step-by-step instructions, and most importantly, the incredible developmental and educational benefits your child will gain. We’ll highlight how these seemingly simple activities nurture curiosity, enhance problem-solving abilities, and offer wonderful opportunities for family bonding away from screens. Get ready to turn a cold winter theme into a warm, engaging, and educational experience that you and your little ones will cherish.
The Magic of Melting Snowmen: More Than Just a Craft
The melting snowman craft for kids might seem like a simple seasonal activity, but beneath its charming exterior lies a treasure trove of developmental benefits. For us at I'm the Chef Too!, every activity is an opportunity to learn, grow, and connect. These crafts are more than just an end product; they are a journey into discovery, an exercise in creativity, and a tangible way to explore complex subjects through fun, hands-on adventures.
Think about it: when a child manipulates materials, mixes ingredients, or designs a miniature hat, they are engaging multiple senses and critical thinking skills. They are observing, predicting, problem-solving, and expressing themselves. This "edutainment" approach, which blends education with entertainment, is at the heart of what we do. We believe that when learning is fun, it becomes memorable, sparking a lifelong love for discovery. A melting snowman craft, in its many forms, serves as an excellent example of how art can intersect with science, how play can lead to profound understanding, and how precious screen-free moments can become rich educational experiences.
Why Melting Snowmen? A Relatable Concept for Learning
The concept of a melting snowman is inherently relatable for children. Most have experienced the joy of building one and the slight sadness of watching it shrink. This familiarity makes the craft instantly engaging, providing a context for learning that feels natural and exciting. Instead of abstract lessons, children are exploring a concept they understand, making the learning process more concrete and impactful.
When children embark on a melting snowman craft, they aren't just creating art; they are embodying scientific principles. They are witnessing states of matter change, understanding cause and effect, and developing hypotheses about why things melt. They are also using their imagination to give personality to their "melted" creations, making choices about color, texture, and accessories. This holistic approach to learning—where art, science, and imaginative play converge—is exactly what we strive to achieve with every kit we develop. It's about empowering children to be curious, creative thinkers, and confident little chefs in their own right.
Crafting a "Melted" Masterpiece: Puffy Paint Snowmen
One of the most popular and delightfully tactile ways to create a melting snowman craft for kids is through the magic of puffy paint. This isn't just any paint; it’s a sensory experience that adds a whole new dimension to their artistic endeavors. The unique texture, which dries into a three-dimensional, soft finish, makes the snowman look genuinely melted and incredibly fun to touch.
Materials & Prep: Your Puffy Paint Palette
Creating homemade puffy paint is a simple science experiment in itself! You'll need just a few common household items, making this an accessible activity for almost anyone.
-
For the Puffy Paint:
- 1.5 cups shaving cream (Barbasol is often recommended for best puffiness, but most brands work)
- 1/2 cup Elmer's white glue (essential for binding and drying)
- 1/4 cup all-purpose flour (adds body and texture, can be omitted for a puffier, lighter mixture or for gluten sensitivities)
- Optional: a few drops of peppermint essential oil (for a festive scent!) or food coloring (for colored snow, though white is classic for snowmen)
-
For the Snowman Details & Base:
- Colored paper or cardstock (blue or black provides great contrast for white snow)
- Googly eyes (various sizes add character!)
- Tiny black pom-poms or construction paper circles (for buttons or coal eyes/mouth)
- Orange construction paper (for carrot noses)
- Brown construction paper or small twigs (for arms)
- Black construction paper (for hats)
- Other embellishments: glitter, sequins, small buttons, fabric scraps
Preparation is key for smooth crafting:
- Mix the Puffy Paint: In a bowl, combine the shaving cream and white glue. Stir gently to combine. Add the flour (if using) and stir until just blended. Overmixing can deflate the shaving cream, so aim for a light, airy consistency. If adding essential oil or food coloring, mix it in now.
- Transfer to Applicator: Scoop about one-third of the mixture into a plastic baggie. Seal the bag tightly, then snip one of the bottom corners. This creates a makeshift piping bag, allowing for controlled application, which is a fantastic fine motor exercise in itself. Alternatively, children can simply use a paintbrush or spoon.
Step-by-Step Instructions: Bringing Your Snowman to Life
Once your puffy paint is ready, the fun truly begins!
- Create the "Melted Puddle": Squeeze a generous amount of puffy paint onto your chosen paper. Encourage your child to spread it around with a paintbrush or spoon, shaping it into an irregular "puddle" or a wavy, melting form. There’s no right or wrong way – this is process art, where the experience is as important as the outcome.
-
Add the Snowman's Features: While the paint is still wet and wonderfully sticky, invite your child to add the classic snowman elements.
- Eyes: Press googly eyes into the puffy paint.
- Nose: Cut a small triangle from orange paper and place it.
- Mouth/Buttons: Add tiny black pom-poms or cut-out circles.
- Arms: Glue small twigs or brown paper strips for twig arms, perhaps peeking out from the melting "snow."
- Hat: A black paper hat can be placed near the top, as if it's just started to slide off.
- Embellish and Personalize: This is where creativity truly shines! Let your child sprinkle glitter, add sequins, or experiment with other small craft items to make their melted snowman unique.
- Dry Time: Set the masterpiece aside to dry for several hours, or even overnight. The paint will dry puffy and firm, creating a wonderfully tactile and permanent representation of their melting friend.
The Science Behind Puffy Paint: Chemistry in Action
Even a simple puffy paint craft offers exciting scientific insights. The "puff" comes from the air trapped in the shaving cream. When mixed with glue, which acts as a binder, and flour, which adds structure, this airy mixture holds its shape as it dries. The drying process involves the evaporation of water from the glue, solidifying the mixture and trapping the air bubbles, resulting in that delightful three-dimensional texture. This is a subtle introduction to concepts like:
- States of Matter: Though not a complete change, children observe how a liquid-like mixture transforms into a solid, textured form.
- Emulsions: The shaving cream is an emulsion (air dispersed in liquid), and the glue helps stabilize it as it dries.
- Viscosity: Discuss how the paint is thick and doesn't run, allowing it to hold its shape.
Sensory Exploration & Fine Motor Skills
This activity is a sensory powerhouse! The feel of the shaving cream, the stickiness of the glue, the texture of the flour, and the final puffy result all engage the tactile sense. Squeezing the baggie, spreading the paint, and carefully placing small embellishments are fantastic for developing:
- Fine Motor Control: The precision required for handling small pieces and controlling the paint flow strengthens hand muscles and coordination.
- Hand-Eye Coordination: Aligning googly eyes or placing a tiny carrot nose requires careful visual-motor integration.
- Sensory Processing: Exploring different textures helps children categorize and understand their environment.
Creative Additions & Variations
- Scented Snowmen: As mentioned, a few drops of essential oil (peppermint, vanilla) can transform the sensory experience.
- Colored Snow: Add a drop or two of food coloring to the puffy paint mixture for a rainbow melted snowman!
- Seasonal Scenes: Instead of just a puddle, children can draw a background like melting ice or spring grass emerging.
- Storytelling: Encourage your child to tell a story about why their snowman melted – did the sun come out? Did a warm gust of wind blow by?
Ready to keep the creative learning flowing every month? We believe in sparking curiosity and creativity in children with tangible, hands-on, and delicious cooking adventures. That’s why we offer The Chef's Club subscription, delivering a new adventure right to your door with free shipping in the US!
Building with Nature: Wood Slice Melting Snowman Ornaments
For a more permanent and rustic take on the melting snowman craft for kids, consider using natural elements like wood slices and twigs. This approach encourages children to connect with nature, utilize found objects, and develop spatial reasoning as they assemble a three-dimensional piece of art. These ornaments make wonderful keepsakes or thoughtful handmade gifts, embodying the spirit of creativity and personal touch.
Connecting with the Outdoors: Sourcing Materials
Before you begin, consider a nature walk! This adds another layer of engagement and discovery to the project.
- Wood Slices: If you have access to a large branch (3-5 inches in diameter), you can carefully saw thin slices (about 3/8 inch thick). This is an adult task, emphasizing safety. Alternatively, wood slices are readily available at craft stores or online. Our ideal size is around 4 inches in diameter.
- Twigs: Look for small, thin twigs, ideally with little "V" shapes at the ends to represent snowman hands. These are perfect for a nature scavenger hunt!
- Other Natural Elements: Small pebbles for buttons, pine needles for eyebrows, or even tiny dried leaves could add unique touches.
Materials & Tools: Safety First
Beyond the wood slices and twigs, you'll need a few more crafting essentials:
- For the "Melted Snow": White cardstock, felt, or craft foam.
- For Features: Black felt or construction paper (for hat, buttons), orange cardstock (for nose), small styrofoam ball (1-2 inches diameter for head), googly eyes or black permanent marker, red felt (for scarf).
- Tools: Hot glue gun (adult supervision required!), scissors, orange permanent marker (for coloring toothpick nose), toothpicks.
- Optional for Hanging: Twine or ribbon.
Important Safety Note: A hot glue gun is invaluable for this craft but requires direct adult supervision and careful handling. Teach children about the hot tip and glue, and help them apply it safely. For younger children, adults can handle the glue gun while the child directs where to place pieces.
Step-by-Step Assembly: Designing Your Rustic Snowman
This craft involves cutting, shaping, and precise placement, making it excellent for developing fine motor control and design thinking.
- Prepare the "Melted Puddle": Trace your wood slice onto white cardstock (or felt/foam). Draw a wavy line inside the circle to mimic a melted snow puddle. Cut this out. This forms the base for your snowman's head.
-
Craft the Snowman's Hat:
- Cut black felt rectangles: one 1 inch wide x 2.75 inches long, and two circles (e.g., 1 inch and 1.25 inches diameter).
- Cut a thin red felt strip (e.g., 0.25 inches wide x 2.75 inches long) for the hat band.
- Glue the red strip onto the bottom edge of the long black rectangle.
- Form the black rectangle into a cylinder and glue the ends together. This is the main body of the hat.
- Glue the wider black felt circle to the bottom of the cylinder (the brim).
- Glue the smaller black felt circle to the top of the cylinder. Trim any excess felt around the edges for a neat finish.
-
Create the Snowman's Head:
- Color about 1/2 inch of a toothpick orange with a marker. Cut off the colored portion.
- Poke a hole in the center of a small styrofoam ball (1.5 inches works well) and insert the orange toothpick "carrot nose."
- Draw two black dots for eyes with a marker, or glue on googly eyes.
-
Assemble the Melted Snowman:
- Glue the white "snow puddle" onto the wood slice.
- Glue the snowman's head to the top center of the snow puddle.
- Glue the hat onto the snowman's head, perhaps slightly askew for a whimsical look.
- The Scarf: Cut a longer, thin strip of red felt (e.g., 0.25 inches wide x 6.5 inches long). Wrap it around the snowman's neck, securing with hot glue. Trim the ends to align with the wood slice edge and cut small fringes to create a scarf-like appearance.
- Twig Arms: Cut twigs to about 2 inches long. Hot glue the straight ends under the scarf, positioning them as if they've fallen into the melting snow.
- Buttons: Glue three small buttons (or button stickers, pom-poms, rhinestones) onto the white "puddle" below the head, making them slightly uneven to emphasize the "melted" effect.
- Add a Hanger (Optional): If making an ornament, cut a 9-inch piece of twine, tie it into a loop, and hot glue the knot and loose ends to the center back of the wood slice.
Geometric Thinking & Spatial Awareness
This craft involves working with various shapes (circles, rectangles, triangles) and arranging them in three-dimensional space. Children practice:
- Shape Recognition & Manipulation: Identifying and cutting specific shapes.
- Spatial Reasoning: Understanding how different parts fit together to form a whole, considering dimensions and placement.
- Problem-Solving: Deciding where to place the arms or how to make the scarf look natural.
Durability & Gifting Potential
Unlike the temporary nature of real snow or even some paper crafts, the wood slice snowman is a durable keepsake. It can be hung on a tree, displayed on a mantel, or given as a thoughtful, handmade gift. This adds a sense of accomplishment and pride for children, knowing they’ve created something lasting.
Our mission at I'm the Chef Too! is to facilitate family bonding and provide screen-free educational alternatives. Creating lasting crafts like these is a perfect example of that! You can find a fantastic array of projects designed to foster creativity and learning in our full library of adventure kits, available for a single purchase in our shop!
Geometric Fun: The Shape-Shifting Melted Snowman Craft
For our youngest learners, or for those who love a focus on foundational skills, the shape-based melted snowman craft for kids is an absolute delight. This process art activity allows children to explore shapes, practice fine motor skills like cutting and gluing, and express their creativity without the pressure of a "perfect" outcome. Each snowman will be unique, reflecting the individual artistic vision of its creator.
Shapes in Action: Learning Through Play
This craft is a wonderful way to introduce or reinforce geometric shapes in a fun, contextual setting. Instead of simply naming shapes, children are actively manipulating them to create something recognizable and personal.
Supplies Needed:
- Construction Paper: Blue (for the background), white (for snow/body), black (for eyes, buttons), orange (for nose), brown (for arms).
- Tools: Child-safe scissors (if age-appropriate for cutting), glue sticks.
Preparation (can be done by adults or older children):
- White Squares: Cut various sizes of white squares (or rectangles, irregular shapes) from white construction paper. These will be the melting body of the snowman.
- Black Circles: Cut small black circles for buttons and larger ones for eyes.
- Orange Triangle: Cut a small orange triangle for the carrot nose.
- Brown Rectangles/Strips: Cut thin brown strips for arms.
Fine Motor Dexterity: Cutting, Gluing, and Arranging
The simple act of picking up and placing paper shapes is incredibly beneficial for developing crucial fine motor skills.
- Scissor Skills: If children are ready, letting them cut the shapes themselves (even if they're not perfect) is excellent practice. It strengthens hand muscles and improves bilateral coordination.
- Pincer Grasp: Picking up small pieces of paper helps refine the pincer grasp, essential for writing and other detailed tasks.
- Gluing Techniques: Using glue sticks teaches children about adhesion and control, applying just enough glue to make pieces stick.
Open-Ended Art & Self-Expression
This is a prime example of "process art," where the emphasis is on the journey of creation rather than a specific end product. There's no "right" way for the snowman to look melted, allowing for maximum self-expression.
- The Canvas: Provide each child with a piece of blue construction paper as their winter sky or icy ground.
- The Melting Snow: Encourage them to glue the white squares all over the paper, creating their interpretation of a melted snowman puddle. Some might overlap them, some might spread them out, some might build a wonky tower – all are valid!
- Adding Features: Once the white base is down, invite them to add the black circles for eyes and buttons, the orange triangle for the nose, and the brown strips for arms.
- Personal Touches: Some children might draw extra details with crayons, add glitter, or even tell a story about their unique melting snowman.
This freedom allows children to explore their own ideas, make decisions, and develop confidence in their artistic choices. It also teaches them that there can be multiple solutions to a creative problem, fostering flexible thinking.
Adaptability for Different Ages
This craft is remarkably versatile for various age groups:
- Toddlers: Can focus on gluing and placing pre-cut shapes, exploring textures and colors.
- Preschoolers: Can practice simple scissor skills (if ready) and make more deliberate choices about arrangement.
- Early Elementary: Can cut their own shapes, perhaps even designing unique hat or scarf elements, adding more intricate details.
This craft is a perfect fit for a classroom setting, a homeschool co-op, or even a large group activity. We're passionate about bringing these hands-on STEM adventures to wider audiences. Discover how we can support your educational environment with our versatile programs for schools and groups, available with or without food components!
The Ultimate STEM Adventure: The Fizzing, Melting Snowman Experiment
For the budding scientists and those who love a bit of theatrics, the baking soda and vinegar melting snowman experiment is undoubtedly the most dynamic and exciting melting snowman craft for kids. This isn't just a craft; it's a full-blown chemistry lesson disguised as winter fun, offering a tangible demonstration of chemical reactions, states of matter, and the power of observation.
The Thrill of Chemical Reactions: A Predictable Surprise
There's nothing quite like the fizz and bubble of baking soda meeting vinegar to capture a child's attention. This experiment taps into that natural curiosity, allowing children to be active participants in a captivating scientific process. They're not just watching; they're causing a reaction, observing its effects, and learning fundamental scientific principles.
Materials: Your Kitchen Chemistry Basics
The beauty of this experiment lies in its simplicity and reliance on common household ingredients.
-
For the Snowman:
- 1-2 boxes of baking soda (sodium bicarbonate)
- Water
- Optional: Glitter, blue food coloring (for "snow" effect), small craft eyes, miniature carrot nose (e.g., from orange clay or paper)
-
For the "Melting" Solution:
- Vinegar (acetic acid)
- Optional: Blue food coloring (for "ice water" effect)
-
Tools:
- Bowl and spoon (for mixing)
- Container for freezing (optional, but makes the melting more dramatic)
- Squirt bottle, eyedropper, or baster (for applying vinegar – excellent for fine motor skills!)
Step-by-Step Experimentation: From Snow to Fizz
- Make the Moldable Snow: In a bowl, combine baking soda with a small amount of water. Add water slowly, mixing until you achieve a moldable, snow-like consistency. It shouldn't be too wet, or it won't hold shape, nor too dry that it crumbles. A few drops of blue food coloring can make the "snow" more visually appealing, and glitter adds a touch of magic.
- Build Your Snowman: This is the creative part! Let your child sculpt their snowman. They can create traditional stacked balls or a more abstract form. If desired, press in small craft eyes or a mini carrot nose.
- Freeze for Drama (Optional but Recommended): Place the baking soda snowman in a freezer-safe container and freeze for a few hours or overnight. This step isn't strictly necessary for the reaction, but it prolongs the melting process, making the observation even more engaging.
- Prepare the "Melting" Agent: In a separate cup, pour vinegar. Add a few drops of blue food coloring if you want to mimic icy water.
- Let the Melting Begin! Present the frozen snowman and the vinegar solution. Explain that they are about to make the snowman "melt" using science! Using a squirt bottle, eyedropper, or baster, have your child slowly pour or squirt the vinegar over the snowman. Watch the amazing fizzing and bubbling reaction!
What's Happening? Acid-Base Reactions Explained
This experiment is a classic demonstration of an acid-base chemical reaction:
- Baking Soda (Sodium Bicarbonate): This is a base.
- Vinegar (Acetic Acid): This is an acid.
When an acid and a base combine, they react to produce a gas: carbon dioxide. This gas is what creates all those exciting bubbles and fizzing sounds, making the snowman appear to "melt" as the solid baking soda is converted into gas and water. Children can see and hear the chemical reaction happening, making the abstract concept of chemistry incredibly tangible.
- Observation: What do you see? What do you hear? What do you feel (if you gently touch the container, it might feel cool due to the endothermic reaction)?
- Prediction: What do you think will happen when we add the vinegar? Will it melt fast or slow?
- Cause and Effect: The vinegar causes the snowman to fizz and disappear.
- States of Matter: Observe the solid snowman transform into a bubbling liquid and an invisible gas.
Extending the Learning: Variables and Inquiry
This experiment lends itself beautifully to further scientific inquiry:
- Varying Temperatures: Does warm vinegar make the snowman melt faster than cold vinegar?
- Different Concentrations: What if we dilute the vinegar with water? Does the reaction change?
- Measuring: Can we measure how much vinegar it takes to melt the snowman completely?
- Sensory Descriptors: Encourage children to describe what they are seeing, hearing, and feeling with descriptive words.
We believe in fostering a love for learning and developing key skills through engaging activities like these. Our unique approach of teaching complex subjects through tangible, hands-on, and delicious cooking adventures is designed to spark that same curiosity. Every I'm the Chef Too! kit, developed by mothers and educators, is an opportunity for your child to explore, create, and learn. Why wait for winter? Join The Chef's Club and enjoy free shipping on every box, bringing a new adventure to your door every month!
Bringing It All Together: Beyond the Craft Table
The beauty of a simple melting snowman craft for kids, in all its various forms, extends far beyond the immediate activity. These moments of hands-on creation are integral to a child's holistic development, fostering skills that will serve them throughout their lives. At I'm the Chef Too!, we see these crafts as vital components of a rich educational tapestry, perfectly aligning with our mission to make learning an unforgettable, joyful experience.
Fostering a Love for Learning: The I'm the Chef Too! Way
When children engage in activities that are fun and stimulating, they naturally develop a love for learning. The melting snowman, whether crafted with puffy paint, natural elements, or fizzing ingredients, provides a perfect blend of novelty and familiarity. It encourages children to ask "why?" and "how?", to experiment, and to discover answers through their own actions. This intrinsic motivation to learn is far more powerful than rote memorization. Our kits, developed by mothers and educators, are specifically designed to cultivate this curiosity, transforming concepts like chemistry and engineering into delicious, digestible adventures.
Family Bonding & Screen-Free Fun
In an increasingly digital world, carving out time for screen-free, hands-on activities is more important than ever. The melting snowman craft is an ideal activity for family bonding. Parents and children can collaborate, share ideas, troubleshoot challenges, and celebrate successes together. These shared experiences create lasting memories and strengthen familial connections. Imagine the laughter as the baking soda snowman fizzes, or the quiet concentration as tiny felt pieces are glued into place. These are the moments that truly matter, building confidence and fostering a strong sense of togetherness.
Developing Critical Thinking & Problem Solving
Every step of these crafts involves an element of critical thinking and problem-solving:
- "How can I make the paint look like a melted puddle?"
- "Where should the arms go so they look like they've fallen off?"
- "What happens if I add more vinegar?"
Children are constantly making decisions, evaluating outcomes, and adjusting their approach. This iterative process of experimentation and refinement is fundamental to scientific inquiry and creative expression. They learn that mistakes are opportunities for new discoveries, building resilience and an analytical mindset.
At I'm the Chef Too!, we are committed to sparking curiosity and creativity in children. Our approach, whether it's through edible science experiments or crafting adventures, is always about teaching complex subjects through tangible, hands-on experiences. Our goal is to equip children with confidence, foster a love for learning, and create joyful family memories through engaging, screen-free educational alternatives.
Ready for more adventures that combine food, STEM, and the arts into unique "edutainment" experiences? Our Chef's Club subscription delivers a new, exciting kit to your door every month with free shipping in the US. It's the perfect way to keep the learning and fun going all year long!
Safety First in Your Creative Kitchen/Craft Space
While these crafts are designed to be fun and engaging, safety should always be the top priority.
- Adult Supervision: Implicitly, all kitchen and craft activities, especially those involving scissors, hot glue, or chemical reactions, require direct adult supervision.
- Age-Appropriate Tools: Ensure children are using tools suitable for their age and skill level (e.g., child-safe scissors).
- Non-Toxic Materials: Always use non-toxic glues, paints, and craft supplies. For the baking soda experiment, while ingredients are food-grade, they are not intended for consumption in craft quantities.
Choosing Your Melting Snowman Adventure
With so many exciting options for a melting snowman craft for kids, how do you choose? Consider:
- Age of the Child: Younger children might benefit from the simplicity and sensory aspects of puffy paint or shape crafts. Older children will thrive with the detailed work of a wood slice ornament or the scientific inquiry of the baking soda experiment.
- Available Materials: Use what you have! The beauty of these crafts is their adaptability.
- Learning Goals: Are you focusing on fine motor skills, artistic expression, or scientific principles?
Encourage exploration and don't be afraid to try all variations! Each offers a unique pathway to learning and fun. And remember, the journey of discovery doesn't have to stop here. Our complete collection of one-time kits offers a wide variety of themes and learning opportunities to keep little hands and minds busy.
Conclusion
The melting snowman craft for kids is far more than a simple winter activity; it's a gateway to discovery, creativity, and invaluable skill development. From the tactile joy of puffy paint and the rustic charm of wood slices to the foundational learning of geometric shapes and the exhilarating fizz of a chemical reaction, each version offers a unique blend of art, science, and sensory exploration. These hands-on adventures foster fine motor skills, ignite curiosity, build problem-solving abilities, and create cherished moments of family togetherness away from screens.
At I'm the Chef Too!, we are dedicated to providing these rich "edutainment" experiences, proving that learning can be incredibly fun, tangible, and delicious. We believe that by engaging children in these delightful activities, we're not just creating crafts; we're nurturing future innovators, thinkers, and confident learners. So, embrace the winter season, gather your supplies, and embark on a melting snowman adventure with your children. Watch their eyes light up with wonder as they create, learn, and grow.
Ready to transform your home into a hub of culinary and scientific exploration? Keep the adventure going all year long. Join The Chef's Club today and receive a new, exciting STEM cooking kit delivered right to your door every month, complete with pre-measured dry ingredients, specialty supplies, and free shipping in the US. Spark curiosity, foster creativity, and make unforgettable family memories with us!
FAQ Section
Q1: What age group is best suited for melting snowman crafts? A1: Melting snowman crafts are incredibly versatile! Younger children (toddlers, preschoolers) benefit most from crafts focusing on sensory exploration (like puffy paint) or simple shape recognition and gluing. Older children (early elementary and up) can engage with more detailed crafts (like wood slices) or scientific experiments (baking soda and vinegar) that involve observation, prediction, and understanding chemical reactions.
Q2: Are the materials for these crafts expensive or hard to find? A2: Not at all! Most of the materials for these melting snowman crafts are common household items or easily found at dollar stores or craft stores. Shaving cream, glue, construction paper, baking soda, and vinegar are typically affordable and accessible, making these activities budget-friendly and convenient.
Q3: How can I make the puffy paint mixture ahead of time? A3: You can prepare the puffy paint mixture up to two hours in advance. Store it in a sealed plastic baggie or airtight container. However, for the best puffiness and texture, it's generally recommended to make and use the mixture relatively fresh, as the trapped air in the shaving cream can slowly deflate over time.
Q4: My child doesn't like the smell of shaving cream. Any tips? A4: Yes! A great trick is to add a few drops of essential oil to the puffy paint mixture. Peppermint oil is a popular choice for winter-themed crafts, providing a fresh, festive scent that can mask the shaving cream aroma. Vanilla or orange essential oils can also work well.
Q5: What are the main educational benefits of a melting snowman craft? A5: These crafts offer a wealth of educational benefits! They help develop fine motor skills (cutting, gluing, squeezing), hand-eye coordination, sensory processing, and creativity. The science-based versions introduce concepts like chemical reactions, states of matter, and observation skills. All variations encourage problem-solving, critical thinking, and provide wonderful opportunities for family bonding and screen-free engagement.
Q6: What if my child isn't interested in making it look exactly like a snowman? A6: That's perfectly fine, and even encouraged! Many of these crafts, especially the puffy paint and shape-based versions, are excellent examples of "process art." The focus is on the act of creation, exploration, and self-expression, not on achieving a perfect, identical outcome. Embrace their unique interpretations and celebrate their creativity!
Q7: Can I adapt these crafts for a group setting, like a classroom or party? A7: Absolutely! Many of these crafts are fantastic for groups. The puffy paint recipe can make enough for several snowmen, and pre-cutting shapes for the paper craft simplifies setup for multiple children. The baking soda experiment is also captivating for group observation. We even offer flexible school and group programs tailored for classrooms, camps, or homeschool co-ops, available with or without food components, perfect for sparking curiosity in larger settings!
Q8: Are there any specific safety precautions I should take, especially with the science experiment? A8: Yes, always prioritize safety. For the baking soda and vinegar experiment, ensure adult supervision throughout. While the ingredients are non-toxic, they are not for consumption in craft quantities. Avoid direct contact with eyes. For crafts involving scissors or hot glue, ensure appropriate child-safe tools are used, and provide direct adult assistance with hot glue guns.