Little Hands, Big Smiles: The Perfect Handprint Bunny Craft for Kids

Table of Contents
- Introduction
- Why Handprint Bunny Crafts are a Parent's Best Friend
- Getting Started: Essential Supplies for Your Bunny Craft Adventure
- Method 1: The Classic Paper Handprint Bunny (Simple & Sweet)
- Method 2: Painted Handprint Bunny Cards (A Tactile & Artistic Twist)
- Method 3: Handprint Bunny with Template (Structured Creativity)
- Beyond the Basics: Creative Twists and Enhancements
- The I'm the Chef Too! Approach to Hands-On Learning
- Frequently Asked Questions (FAQ)
- Conclusion
Introduction
Ever found yourself in the midst of a busy week, searching for that elusive activity that captivates your child's imagination without involving a screen? The struggle is real! We understand the desire for engaging, educational, and genuinely fun ways to spend time with our little ones, especially activities that don't require an advanced degree in craft supplies. It’s a joy to witness their eyes light up with discovery, but the thought of complex setups or messy cleanups can often deter even the most enthusiastic parent.
That's where the magic of the handprint bunny craft for kids comes in. Simple, sweet, and bursting with charm, this delightful project isn't just a craft; it's an opportunity. It's a chance to transform everyday materials into a cherished keepsake, a moment to bond, and a playful avenue for learning and skill development. At I'm the Chef Too!, our mission is to blend food, STEM, and the arts into one-of-a-kind "edutainment" experiences, and while this particular adventure doesn't involve baking, it perfectly embodies our commitment to sparking curiosity and creativity in children, facilitating family bonding, and providing screen-free educational alternatives.
In this comprehensive guide, we'll hop into the enchanting world of handprint bunny crafts, exploring why they're such a fantastic choice for kids of all ages. We'll walk you through several methods, from the classic paper version to painted masterpieces and template-assisted creations, offering detailed, easy-to-follow steps. Beyond the how-to, we'll delve into the incredible developmental benefits, share creative twists to personalize your bunnies, and show you how these simple crafts foster essential STEM and artistic skills. Our goal is to empower you with practical advice and realistic expectations, focusing on the joy of the process, the confidence building, and the creation of priceless family memories.
Why Handprint Bunny Crafts are a Parent's Best Friend
It’s easy to look at a handprint bunny and simply see a cute decoration. But for parents and educators, these crafts are so much more. They're a powerful tool disguised as play, offering a multitude of benefits that extend far beyond the finished product. At I'm the Chef Too!, we believe that learning should be an adventure, and even the simplest craft can be a profound educational experience.
Developmental Benefits for Children
- Fine Motor Skills and Dexterity: The act of tracing a hand, holding scissors, making precise cuts, folding paper, and carefully drawing facial features all contribute significantly to the development of fine motor skills. These are crucial for tasks like writing, buttoning clothes, and eating independently. As children manipulate small objects and tools, their hand-eye coordination improves, laying a strong foundation for future learning.
- Hand-Eye Coordination: From guiding a pencil along the outline of their hand to positioning tiny googly eyes, every step of the handprint bunny craft refines a child’s hand-eye coordination. This skill is vital for sports, academic tasks, and everyday activities.
- Creativity and Self-Expression: While there are basic steps, the beauty of this craft lies in its flexibility. Children are encouraged to choose colors, draw unique expressions, and add their own personal touches. This freedom to create fosters self-expression, allowing them to communicate emotions and ideas without words. It's a safe space to experiment and realize that there's no "wrong" way to be imaginative.
- Following Instructions and Patience: Crafts inherently involve a sequence of steps. Following these instructions, even with adult assistance, teaches children about sequential thinking and the importance of patience. Waiting for paint to dry or carefully cutting along a line develops persistence and the understanding that good things take time.
- Shape and Color Recognition: Discussing the shapes of the bunny's ears, nose, and eyes, or choosing different colors for the paper or paint, naturally reinforces shape and color recognition. It’s learning woven seamlessly into a fun activity.
- Problem-Solving: What if the ears are too skinny? How can we make the whiskers stick? These small challenges encourage children to think critically and find solutions, developing early problem-solving skills that are invaluable in all areas of life.
- Emotional Connection: There's something truly special about a craft made from one's own handprint. It creates a tangible link between the child and their creation, fostering a sense of ownership, pride, and accomplishment. It’s a "snapshot" of their growth at a particular age, making it a powerful personal keepsake.
Benefits for Parents and Family Bonding
- Affordable and Low-Supply: Many handprint bunny crafts require only a few basic items you likely already have at home: paper, scissors, and markers. This makes them an accessible activity for any family, removing the barrier of expensive specialized supplies.
- Screen-Free Engagement: In an increasingly digital world, finding activities that pull children away from screens is a treasure. This craft offers a delightful, tactile, and interactive alternative that stimulates different parts of the brain and encourages real-world interaction. It perfectly aligns with our belief at I'm the Chef Too! in providing meaningful, hands-on, screen-free educational alternatives.
- Family Bonding: Crafting together creates shared experiences and memories. Parents can guide, assist, and engage in conversation, strengthening their bond with their children. It’s an opportunity to laugh, create, and simply be present with one another.
- Personalized Keepsakes: Unlike store-bought decorations, a handprint bunny is uniquely yours. It captures a moment in time – the size of your child's hand, their individual artistic choices – creating a heartwarming keepsake that will be cherished for years to come. Imagine looking back at these tiny handprints as your children grow, a tangible reminder of their early years and shared moments.
- Relatively Easy Cleanup: Compared to some elaborate art projects or cooking adventures (though we love those too!), many handprint bunny crafts are quite manageable in terms of mess. With a bit of preparation, cleanup can be quick, allowing you more time to enjoy the process and the finished creation.
At I'm the Chef Too!, we craft experiences that spark joy and curiosity, whether it’s through edible science experiments or simple art projects. These handprint bunnies embody our philosophy: they are hands-on, creative, encourage learning through doing, foster family bonding, and provide a wonderful screen-free opportunity for growth. Ready to keep the fun and learning going all year long? Join The Chef's Club today and enjoy free shipping on every box, bringing a new adventure to your door every month!
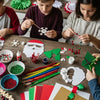
Getting Started: Essential Supplies for Your Bunny Craft Adventure
One of the most appealing aspects of the handprint bunny craft is its simplicity and adaptability. You don't need a craft store overhaul to get started. Most of what you need might already be tucked away in your home, which makes it perfect for those impromptu moments of creative inspiration!
Basic Supplies: The Minimalist Approach
For the simplest version of a handprint bunny, you truly need very little. This is fantastic news for busy parents or those looking for an activity that can be pulled together at a moment's notice.
-
Paper: This is your canvas!
- Construction Paper: A classic choice, offering a wide array of vibrant colors. It’s sturdy enough for cutting and holds its shape well.
- Colored Printer Paper: A lighter alternative, still great for a pop of color.
- Plain White Paper: Don't underestimate the humble white sheet! It's a fantastic base for coloring, painting, or decorating, and easily available.
- Cardstock: If you want a more durable bunny, perhaps one that stands up or will be handled a lot, cardstock is an excellent option due to its thickness and rigidity.
- Scissors: Child-safe scissors are a must for little hands. For younger children, an adult should handle all cutting steps.
-
Drawing Tools:
- Pens, Markers, Pencil Crayons: For drawing faces, adding details like whiskers, eyes, and inner ear color. Black is great for outlines, and pink is perfect for noses and ear interiors. Gel pens can add a nice smooth, dark line for features.
- A Pencil: Essential for tracing your child's hand. It's also easy to erase mistakes if needed.
Optional Enhancements: Taking Your Bunny to the Next Level
Once you have the basics down, you might want to add a little extra flair or texture to your handprint bunnies. These additions can further boost creativity and engage different sensory experiences.
-
Glue:
- Glue Stick: Ideal for attaching paper cutouts, less mess.
- Liquid School Glue: Great for heavier embellishments like cotton balls or pom-poms.
- Cotton Balls: The quintessential fluffy bunny tail! These are inexpensive and add a lovely 3D element.
- Googly Eyes: Instantly bring a craft to life! They add a playful, whimsical touch that kids adore.
- Pipe Cleaners: Perfect for creating sturdy, stand-out whiskers or even tiny glasses for a scholarly bunny.
- Pom-Poms: Can be used for a cute little nose, a fluffy tail, or even as decorative accents on the bunny's body.
- Glitter: For bunnies that sparkle! Use glitter glue for less mess, or fine glitter with liquid glue for a dazzling effect.
- Watercolors or Paint: If you're opting for a painted handprint bunny, or want to add color to a white paper bunny, washable tempera or acrylic paints are excellent.
- Ribbon or Bows: To create a bow tie, a hair bow, or a tiny accessory for your bunny.
Setting Up Your Creative Space
Preparation is key to a smooth and enjoyable crafting session, minimizing stress and maximizing fun!
- Protect Your Surfaces: Lay down old newspapers, a plastic tablecloth, or a craft mat. This is especially important if you're using paints or glitter.
- Gather Supplies: Have everything you need within easy reach before you begin. This prevents interruptions and keeps the creative flow going.
- Good Lighting: Ensure your workspace is well-lit for tracing, cutting, and drawing details.
- Comfortable Seating: Make sure your child is comfortable at a table or on the floor, allowing them to focus on their task.
- Small Cleanup Station: Keep a damp cloth or paper towels nearby for quick cleanups, especially with little ones.
Safety First: Our Top Priority
While handprint bunny crafts are generally safe, adult supervision is always recommended, especially when children are using scissors or glue.
- Child-Safe Scissors: Always use scissors designed for children, with blunt tips and smaller handles.
- Non-Toxic Materials: Ensure all paints, glues, and markers are labeled non-toxic, particularly if working with toddlers who might still put things in their mouths.
- Ventilation: If using any sprays or strong-smelling glues (though typically not needed for this craft), ensure you're in a well-ventilated area.
By taking these simple steps, you can create a safe, engaging, and inspiring environment for your child to dive into the wonderful world of handprint bunny crafting. And if you're looking for more ready-to-go, hands-on fun, remember you can always Browse our complete collection of one-time kits for a wide variety of "edutainment" experiences, from culinary chemistry to artistic baking!
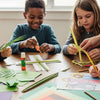
Method 1: The Classic Paper Handprint Bunny (Simple & Sweet)
This method is perhaps the most popular and straightforward way to create a handprint bunny. It relies mostly on clever folding and cutting, making it highly accessible and requiring minimal supplies. It’s an ideal starting point for crafters of all ages, from preschoolers (with adult help) to independent school-aged children.
Step-by-Step Guide
Let's break down how to transform a simple handprint into an adorable paper bunny.
1. Trace with Intention: The Foundation of Your Bunny
- Positioning: Have your child place one hand flat on the paper, fingers slightly splayed.
- The "Fatter" Trace: Here’s a pro-tip from experienced crafters: when tracing, make the outline of the fingers a little wider or "fatter" than the actual fingers. If you trace too tightly, the bunny's ears and arms can end up looking super skinny and delicate. A slightly chunkier trace gives them a more robust, cartoon-like appearance that's easier to work with and looks more proportional as a bunny.
- Trace Carefully: Using a pencil, slowly trace around your child's hand. Make sure to get clear V-shapes between each finger at the base, as these will be important later.
2. Careful Cutting: Bringing the Shape to Life
- Cut Out the Handprint: Carefully cut along the pencil lines. Emphasize making a distinct V at the bottom between each finger, rather than a soft curve. This V will help define the separation of the bunny's features.
- Optional Slit for Proportion: Some crafters find it helpful to cut a small slit beside the pinky finger (the smallest finger). The bottom of this cut should align with the bottom of the space beside the thumb. This step, while optional, can make the bunny's arms more proportional when folded. If the pinky looks a bit crooked after the slit, you can trim it slightly to fix the shape.
3. Shaping the Ears: The Bunny's Signature Feature
-
The Middle Finger Transformation: Gently fold down the middle finger towards the palm. This finger will be trimmed or completely removed to create the top of the bunny's head and separate the remaining fingers into two distinct ears.
- Option A (Trimmed): For a simpler approach, you can just trim the middle finger shorter, or make a rounded cut at its base, so it's gone, leaving the index and ring fingers as the two ears.
- Option B (Cut Completely): The most common method is to simply cut off the middle finger at its base. You will be left with two fingers – the index finger and the ring finger – which will become your bunny's ears!
- Adding Inner Ear Details: With a pink marker, crayon, or colored pencil, draw an oval or a rounded rectangle inside each "ear" to create the iconic pink inner ear. This instantly makes them look more like bunny ears!
4. Creating the Arms: A Clever Fold
- Fold Down the Pinky: Take the pinky finger and gently fold it down towards the center of the handprint. This forms one of the bunny's arms.
- Fold Down the Thumb: Do the same with the thumb, folding it down towards the center.
- "Touching" Hands: Many like to fold them so the tips of the pinky and thumb (the new "hands" or paws) touch or overlap slightly in the middle, as if the bunny is holding its paws together or leaning on them. This gives the bunny a sweet, contemplative pose.
5. Bringing the Face to Life: Personality on Paper
This is where your child's creativity truly shines!
- The Nose: Start by drawing an oval or a small upside-down triangle for the rabbit's nose, typically in pink.
- Eyes: Using a black pen or marker, draw two eyes. These can be simple dots, small circles, or more elaborate expressive eyes. Encourage different emotions – happy, surprised, sleepy!
- Mouth: From the bottom of the nose, draw a short vertical line, then two curving lines extending outwards and upwards to create a classic bunny mouth.
- Whiskers: Add a few short, horizontal lines on either side of the nose for whiskers. Three on each side usually look great.
- Other Details: Maybe some rosy cheeks with a pink crayon, or tiny eyebrows for extra expression!
6. Adding Feet/Paws: Completing the Look
- Draw Paws: At the bottom of the handprint (below where the arms are folded), draw two small rounded shapes to represent the bunny's feet or paws. You can add a few short lines within each shape to suggest toes. This gives the bunny a grounded appearance and truly completes the transformation from handprint to hopping friend.
7. Optional Finishing Touches
- Fluffy Tail: Glue a small cotton ball onto the back of the bunny for an instant fluffy tail.
- Bow Tie/Hair Bow: Add a small ribbon or bow for a touch of elegance or fun.
- Textures: Experiment with gluing on tiny pieces of felt for the nose or ears.
Tips for Different Age Groups
- Toddlers and Preschoolers (Ages 2-5): This age group will need significant adult assistance. An adult can do the tracing and cutting, while the child focuses on the fun part: decorating! Let them color the ears pink, draw the face, and glue on cotton tails. The emphasis should be on exploration and tactile experience rather than perfection.
- School-Aged Children (Ages 6+): Most children in this age range should be able to manage much of the craft independently, with guidance on more intricate steps like cutting the V-shapes or making the "fatter" trace. Encourage them to be truly creative with the faces and details. A parent looking for a screen-free weekend activity for their 7-year-old could easily set up this craft and watch their child enjoy the creative process.
Imagine a little one proudly showcasing their unique bunny creation, each one a testament to their budding artistic abilities and your shared time together. This simple paper handprint bunny craft is a fantastic example of how we at I'm the Chef Too! believe in fostering creativity and learning through hands-on engagement. If you're looking to explore a wider array of engaging and educational projects, Explore our full library of adventure kits available for a single purchase in our shop – each designed to spark curiosity and delight!
Method 2: Painted Handprint Bunny Cards (A Tactile & Artistic Twist)
While the paper handprint bunny is fantastic, introducing paint opens up a whole new sensory experience and artistic dimension. This method is especially popular for creating personalized cards or framed keepsakes, as the paint captures the unique texture of a child’s handprint beautifully.
Step-by-Step Guide
Here's how to create a charming painted handprint bunny, perfect for gifting or displaying.
1. Card Preparation: Setting the Scene
- Choose Your Cardstock: Select a sturdy piece of cardstock (white, pastel, or any color that complements your bunny). Folding an A4 sheet in half creates a standard greeting card size.
- Protect Your Surface: Lay down newspaper, a plastic tablecloth, or a craft mat. Painting can be wonderfully messy, and preparation makes cleanup a breeze!
2. Paint Application: The White Base
- Select White Paint: Washable acrylic or tempera paint is usually best for this activity. Ensure it’s non-toxic and child-safe.
- Apply Paint to Hand: Gently paint the palm and four fingers of your child’s hand with a brush. Crucially, do not paint the thumb. The four painted fingers will become the bunny's ears and the body, while the unpainted thumb allows for a cleaner impression that looks more like a bunny.
- Even Coat: Ensure an even, but not overly thick, coat of paint to get a clear print.
3. The Press: Making the Impression
- Positioning: Guide your child to firmly press their painted hand (without the thumb) onto the cardstock. Depending on the desired orientation, the fingers can point upwards (for a standing bunny) or sideways.
- Firm and Steady: Encourage them to press down firmly and keep their hand still for a few seconds.
- Lift Carefully: Help them lift their hand straight up to avoid smudging.
- Fill in Gaps (Optional): If there are any unpainted spots in the handprint, you can gently dab them with a paintbrush and a little more white paint.
4. Drying Time: Patience is a Virtue!
- Allow to Dry Completely: This is a critical step! Paint needs time to dry thoroughly before you add any details. Depending on the paint thickness and humidity, this could take anywhere from 30 minutes to a couple of hours. Resist the urge to rush this step to prevent smudges and tears!
5. Adding Features: Bringing the Bunny to Life
Once the paint is completely dry, it’s time for the fun details!
-
Eyes:
- Googly Eyes: For an instant dose of charm and playfulness, glue on two googly eyes.
- Painted Eyes: Alternatively, use a black marker or a fine paintbrush with black paint to draw eyes. You can create simple dots, closed eyes, or expressive rounded eyes.
- Nose: Use a pink marker, crayon, or a dab of pink paint to draw a small oval or heart-shaped nose.
- Mouth: Draw a small vertical line downwards from the nose, then two curved lines extending outwards and upwards to form a classic bunny mouth.
- Whiskers: Add a few thin lines on either side of the nose with a black marker or fine brush.
- Inner Ears: Use a pink marker or paint to color in the inside of the two top "finger" prints, which now serve as the bunny's ears.
6. Embellishments: Extra Sparkle and Texture
- Cotton Ball Tail: Glue a fluffy cotton ball onto the lower part of the handprint for a cute, soft tail.
- Rosy Cheeks: A light dab of pink paint or crayon beneath the eyes can give your bunny rosy cheeks.
- Decorative Dots: Use a cotton bud or the eraser end of a pencil dipped in colorful paint to create polka dots around the bunny, adding a festive touch.
- Bow/Accessory: Tie a tiny ribbon or fabric bow near one of the ears or below the chin.
- Glitter: For a touch of magic, carefully add some fine glitter while glue is still wet, or use glitter glue.
Connecting to Art Education
This painted handprint bunny method offers a wonderful opportunity to discuss various artistic concepts:
- Color Mixing: If using multiple paint colors, briefly discuss how colors are made.
- Texture: The paint creates a different tactile experience than paper, and adding cotton balls introduces another texture.
- Composition: Where on the paper should the handprint go? How do the features balance the overall design?
- Self-Portrait (Abstract): In a way, it’s an abstract self-portrait, using the child’s own hand as the starting point.
This artistic adventure perfectly aligns with I'm the Chef Too!'s philosophy of integrating arts into our "edutainment" experiences. Just like we explore the chemical reactions that make our Erupting Volcano Cakes bubble over with deliciousness, crafting with paint allows children to see how different materials interact to create something new and exciting. It’s all about hands-on discovery!
Method 3: Handprint Bunny with Template (Structured Creativity)
For those who appreciate a bit more structure, or for younger children who might find the folding and intricate cutting of Method 1 challenging, using a pre-made bunny head template offers a fantastic alternative. This method allows the handprints to shine solely as the bunny's ears, simplifying the overall design process while still encouraging personal creative expression.
Step-by-Step Guide
Let's outline how to combine a simple template with handprints to create an adorable bunny.
1. Template Selection and Preparation
- Choose a Bunny Head Template: You can find many free printable bunny head templates online, ranging from very simple outlines to slightly more detailed designs. Choose one that suits your child's age and desired complexity.
- Print and Cut the Head: Print the bunny head template onto cardstock or construction paper of your chosen color (white, pastel pink, light blue, etc.). Carefully cut out the bunny head. This will be the main body/face of your bunny.
- Prepare the Inner Ear Ovals (Optional but Recommended): Some templates include smaller ovals for the inner ears. If not, you can freehand draw and cut out two smaller ovals in a contrasting color (like pink or a darker shade of your ear color) to add depth to the ears later.
2. Handprint Ears: The Star of the Show
- Choose Paper Color for Ears: Select a different color of construction paper for the handprints that will become the ears. White, light blue, or yellow are popular choices, or a shade that contrasts nicely with the bunny's head.
- Trace Two Handprints: Have your child place one hand flat on the paper, fingers together (or slightly splayed for wider ears). Trace around the entire hand. Repeat this step to create a second handprint.
- Cut Out Handprints: Carefully cut out both handprints. These will serve as the bunny's main ears.
- Attach Inner Ear Ovals (if using): If you prepared inner ear ovals, glue one onto the palm area of each handprint (where the "ear" will be). This gives the ears a more finished and detailed look.
3. Assembly: Bringing the Bunny Together
- Attach Ears to Head: Turn the bunny head template over (to the back side). Apply glue along the top edge of the bunny head.
- Position Handprints: Carefully position the two handprints, fingers pointing upwards, behind the top of the bunny's head. The "palm" part of the handprint should be glued to the back of the head, allowing the "fingers" to stand up as ears. You can overlap them slightly or position them side-by-side, depending on the desired look.
- Let Glue Dry: Allow the glue to dry for a few minutes to ensure the ears are securely attached.
4. Facial Details: Giving Your Bunny Personality
Now comes the fun part – bringing your bunny’s face to life!
-
Eyes:
- Googly Eyes: The easiest and most engaging option! Glue two googly eyes onto the face.
- Drawn Eyes: Use a black marker to draw circular eyes, sleepy eyes, or expressive cartoon eyes.
- Nose: Use a pink marker, crayon, or a small pink pom-pom glued in place for the nose.
- Mouth: Draw a classic bunny mouth extending from the bottom of the nose.
- Whiskers: Use black marker or thin pieces of white pipe cleaner glued around the nose to create whiskers.
- Rosy Cheeks: A light dab of pink crayon or marker adds a sweet touch.
5. 3D Elements and Final Touches
- Pom-Pom Tail: Glue a small white pom-pom to the back of the bunny's head (if making it a wall decoration) or on the lower back if it's a stand-alone figure.
- Bow: Add a small ribbon bow near the ears or chin.
- Decoration: Use glitter, sequins, or small stickers to further embellish the bunny.
Benefits of the Template Method
- Ease for Younger Children: With the bunny head already shaped, children can focus on the tracing, cutting of hands, and decorating, making it less frustrating for smaller hands.
- Consistent Results: If you're making multiple bunnies (e.g., for a party or classroom), the template ensures a uniform basic shape, while still allowing for individual creativity in the ears and facial features.
- Focus on Detail: By providing the main structure, this method allows children to dedicate more energy and creativity to the intricate details of the ears and face.
- Versatility: These bunnies can be used as decorations, puppets (by gluing a craft stick to the back), or elements in a larger spring-themed collage.
This method exemplifies how a little structure can still lead to immense creativity, a principle we often apply in our I'm the Chef Too! kits. Just as our kits provide all the necessary components for a delightful culinary adventure, a template provides the foundation for an artistic journey. If you're looking for more structured yet incredibly fun activities, consider exploring our offerings. For instance, our Peppa Pig Muddy Puddle Cookie Pies kit similarly blends a beloved character with hands-on creativity and delicious outcomes, proving that learning and fun can go hand-in-hand with a little guidance.
Beyond the Basics: Creative Twists and Enhancements
Once you've mastered the foundational handprint bunny crafts, the real fun begins: personalization and expansion! At I'm the Chef Too!, we encourage children to think outside the box and truly make each experience their own. These creative twists not only make each bunny unique but also deepen the educational value of the activity.
Personalization is Key
- Unique Expressions: Encourage your child to go beyond a simple smiley face. How does their bunny feel? Happy, surprised, silly, sleepy? Experiment with different eye shapes, mouth positions, and even eyebrows.
- Accessorize: Give your bunny a personality! Add a tiny paper carrot, a flower tucked behind an ear, a bow tie, glasses, or even a mini hat. Use fabric scraps, yarn, or pipe cleaners for these details.
- Texture Play: Incorporate various textures beyond cotton balls. Use felt for ears or noses, yarn for fur or whiskers, or even crumpled tissue paper for a textured background.
- Patterns and Colors: Instead of solid paper, use patterned paper (stripes, polka dots, floral) for the handprints or the bunny body. Encourage drawing patterns directly onto the bunny's outfit or ears.
Storytelling with Bunnies
- Puppets: Glue a craft stick to the back of a finished handprint bunny. Now your child has a puppet for imaginative play! They can put on a show, invent stories, and develop their narrative skills.
- Bunny Family: Make several handprint bunnies using different hand sizes (if possible) or different paper colors. Assign each bunny a name and a role in a "bunny family." This encourages social play and imaginative world-building, much like the children who played with their bunnies for a solid hour after crafting, creating a whole new world for them.
- Seasonal Scenes: Create a backdrop for your bunnies. For spring, draw a field of grass and flowers. For winter, a snowy landscape. This adds another layer of artistic engagement and thematic learning.
Seasonal Adaptations
Handprint bunnies aren't just for Easter! They can be adapted for various holidays and seasons:
- Spring/Easter: Pastels, flowers, tiny paper eggs. Perhaps the bunny is holding a basket.
- Summer: A bunny with sunglasses and a tiny beach ball.
- Autumn: Earthy tones, a bunny holding a miniature paper pumpkin or leaf.
- Winter/Holidays: A white bunny in a "snowy" scene, wearing a paper scarf or hat, or even dressed as a tiny Santa bunny.
- Halloween: A spooky bunny with vampire fangs, a witch's hat, or a ghost costume.
Making it a Keepsake
- Frame It: Place your favorite handprint bunny in a picture frame. This elevates it from a craft to a piece of art.
- Laminate It: For added durability, especially if it’s a treasured item, laminate the finished bunny. This protects it from wear and tear.
- Add Dates and Names: Always write your child's name and the date on the back (or front, tastefully) of the craft. It transforms it into a priceless memory marker.
- Photo Album Addition: Take a photo of your child with their finished bunny and add it to a scrapbook or digital album, documenting their creative journey.
Integrating STEM Concepts (The I'm the Chef Too! Way!)
Even a simple handprint bunny craft can be a gateway to STEM learning. At I'm the Chef Too!, we specialize in making learning tangible and fun, and these crafts are no exception.
-
Science (Biology & Physics):
- Animal Science: Briefly discuss real bunnies – their long ears for hearing, their twitching noses for smelling, and their powerful legs for hopping. Talk about their natural habitats.
- Properties of Materials: What happens when paper folds? How does glue make things stick? How do scissors cut? These are basic physics principles at play.
-
Technology:
- Tool Use: Discussing how scissors and drawing tools are simple technologies designed to help us create.
- Design Tools: If using a template, it’s a basic form of design technology.
-
Engineering:
- Structure and Stability: How do the folds create the bunny's arms? How can you make your bunny stand up? This involves understanding basic structural integrity.
- Design and Iteration: If a feature doesn’t look right, how can we fix it? This teaches the engineering design process of experimenting and refining.
-
Math:
- Measurement and Proportion: Discussing how to make ears proportional to the head, or how many whiskers to add. Comparing the size of their handprint now to previous ones.
- Geometry: Identifying shapes like circles (eyes), ovals (nose, inner ears), and rectangles (paper). Discussing symmetry in the bunny's face.
- Counting: Counting fingers, ears, whiskers, and other details.
Just like a chemical reaction makes our Erupting Volcano Cakes bubble over with deliciousness, the combination of simple materials and creative input in a handprint bunny craft leads to an exciting and tangible outcome. We believe that every activity, from baking to crafting, offers an opportunity to subtly introduce complex subjects in a fun, engaging way. Our goal is always to spark that innate curiosity, allowing children to discover the wonders of the world through tangible, hands-on, and often delicious adventures developed by mothers and educators.
Ready to bring more of these incredible learning experiences home? We deliver a new adventure to your door every month with free shipping in the US. It's the perfect way to ensure continuous screen-free fun and learning. Join The Chef's Club today!
The I'm the Chef Too! Approach to Hands-On Learning
At I'm the Chef Too!, we passionately believe that the most profound learning happens when children are fully engaged, using all their senses, and having an absolute blast. Our entire philosophy revolves around the concept of "edutainment" – blending education and entertainment seamlessly. While our signature kits often involve the delicious world of cooking, the principles behind our offerings extend to all forms of creative, hands-on activities, including the delightful handprint bunny craft.
We are committed to sparking curiosity and creativity in children, facilitating family bonding, and providing a screen-free educational alternative. The handprint bunny craft perfectly embodies these core values:
- Hands-On Engagement: Just like our kits invite kids to mix, measure, and bake, the handprint bunny craft requires direct physical interaction – tracing, cutting, gluing, and drawing. This tactile experience is crucial for developing fine motor skills, hand-eye coordination, and spatial awareness, all foundational elements of early learning.
- Sparking Curiosity and Creativity: We don't just provide instructions; we provide a springboard for imagination. With handprint bunnies, children are encouraged to choose colors, design unique faces, and add personal touches. This freedom to explore and create, without the pressure of perfection, nurtures their inner artist and problem-solver. It’s about the journey of discovery, not just the destination.
- Facilitating Family Bonding: Our kits are designed to be enjoyed together, fostering meaningful interactions and shared laughter in the kitchen. Similarly, creating handprint bunnies becomes a cherished memory-making session. Parents and children work side-by-side, communicating, assisting, and celebrating each other's efforts. These moments of connection are invaluable in strengthening family relationships.
- Screen-Free Educational Alternatives: In an age dominated by digital distractions, we champion activities that bring children back to tangible experiences. Handprint crafts, like our STEM cooking adventures, offer a refreshing break from screens, stimulating different cognitive functions and encouraging real-world engagement. They prove that learning can be incredibly fun and captivating, even without a digital interface.
- Teaching Complex Subjects Through Tangible Adventures: While a handprint bunny might seem simple, as we've explored, it touches upon concepts from geometry and biology to fine motor skill development and creative expression. Our unique approach of teaching complex subjects through tangible, hands-on, and delicious cooking adventures developed by mothers and educators means we look for these learning opportunities in every activity. Whether it's the science of baking or the art of paper crafting, the core idea is to make learning concrete and enjoyable.
We understand that parents lead busy lives. That's why we create comprehensive kits with pre-measured dry ingredients and specialty supplies, making it easy to dive straight into the fun without the hassle of planning or shopping. This allows families to focus on the joy of the activity and the precious time spent together. When you receive an I'm the Chef Too! kit, you're not just getting ingredients; you're getting a complete, educational, and delicious experience delivered right to your door.
We don't promise your child will become a top scientist overnight, but we do promise to foster a love for learning, build confidence through accomplishment, develop key skills through hands-on practice, and create countless joyful family memories. Every activity, whether it's an edible volcano or a paper bunny, is an opportunity for growth and wonder.
Ready to experience the convenience and joy of screen-free learning with your family? Our 3, 6, and 12-month pre-paid plans are perfect for gifting or long-term enrichment, ensuring a steady stream of "edutainment" right to your doorstep with free shipping in the US. Join The Chef's Club today! Or, if you prefer to choose specific themes, remember you can always Browse our complete collection of one-time kits to find the perfect adventure for your little learner.
Frequently Asked Questions (FAQ)
Q1: What age group is best for handprint bunny crafts?
A1: Handprint bunny crafts are wonderfully versatile and can be adapted for a wide range of ages.
- Toddlers (18 months - 3 years): Will need significant adult assistance with tracing and cutting. They can enjoy the sensory aspect of paint (with adult supervision) and help with decorating by gluing on cotton balls or coloring with large crayons.
- Preschoolers (3-5 years): Can participate more actively in tracing (with guidance), choosing colors, and decorating. Adult help with cutting is often still necessary.
- School-aged Children (6 years and up): Many children in this age range can complete most of the craft independently, including tracing, cutting, and detailed drawing. They can also contribute more to planning and problem-solving aspects of the craft.
Q2: What kind of paper works best?
A2: You have several excellent options, depending on your desired outcome:
- Construction Paper: A classic, affordable choice with vibrant colors. It's sturdy enough for most methods.
- Cardstock: Ideal if you want a more durable bunny that will stand up or be handled a lot, like a card or a framed piece.
- Colored Printer Paper: Lighter than construction paper but still works well, especially if you have a variety of colors on hand.
- Plain White Paper: A great option if you want your child to color or paint their entire bunny, offering a blank canvas for complete artistic freedom.
Q3: How do I make the handprint "fatter" for better bunny proportions?
A3: When tracing your child's hand, instead of tracing tightly against their fingers, intentionally move the pencil slightly outwards, adding a small border around each finger. Imagine you're drawing a slightly inflated version of their hand. This extra width will prevent the folded "arms" and "ears" from appearing too skinny once cut and folded, giving your bunny a more robust and cuddly look. You can also watch a video tutorial for a visual guide on this technique.
Q4: How can I prevent paint from smudging on painted handprint bunnies?
A4: The key to preventing smudges is patience and proper drying:
- Thin, Even Coat of Paint: Don't apply too much paint to the hand. A thin, even layer is less likely to smudge and dries faster.
- Firm Press, Gentle Lift: Ensure your child presses their hand firmly and holds it still. When lifting, help them pull their hand straight up, avoiding any sliding motion.
- Complete Drying Time: Allow the paint to dry completely before adding any drawn details or embellishments. This can take anywhere from 30 minutes to several hours, depending on paint thickness and humidity. Placing it in a warm, dry spot can help.
- Work in Stages: If you're adding multiple layers of details (e.g., paint eyes, then glue on whiskers), allow each layer to dry before proceeding to the next.
Q5: What if my child struggles with cutting the handprint?
A5: It's common for younger children to struggle with cutting precise shapes. Here are some tips:
- Adult Assistance: For toddlers and preschoolers, it's best for an adult to do most, if not all, of the cutting.
- Child-Safe Scissors: Ensure your child is using appropriate, blunt-tipped scissors.
- Practice: Offer scrap paper for practice cutting straight lines or simple shapes before tackling the handprint.
- Pre-Cut for Them: If frustration sets in, don't hesitate to pre-cut the handprint outline, allowing your child to focus on the fun decorating aspect. The goal is enjoyment and skill-building, not perfection.
- Template Method: Consider Method 3 (Handprint Bunny with Template), where the handprints are simply cut out and glued as ears, often requiring less intricate cutting than shaping the fingers.
Q6: How can I make this craft more "educational"?
A6: Beyond the inherent developmental benefits, you can easily integrate more educational elements:
- Math: Count fingers, discuss symmetry, compare hand sizes (e.g., adult hand vs. child hand).
- Science: Talk about real bunnies (habitat, diet, senses), discuss material properties (paper stiffness, glue stickiness).
- Art: Discuss color theory, texture, facial expressions, and composition.
- Language Arts: Encourage storytelling with the finished bunny, or have your child describe their bunny using adjectives.
- Following Instructions: Practice listening and following multi-step directions.
Q7: Can these bunnies be used as gifts or decorations?
A7: Absolutely! Handprint bunnies make wonderful gifts and decorations:
- Greeting Cards: The painted handprint bunny method is perfect for personalizing Easter, Mother's Day, or "just because" cards.
- Spring/Holiday Decorations: Hang them on a string as a garland, tape them to windows, or create a springtime mobile.
- Framed Keepsakes: A framed handprint bunny, especially with the child's name and date, becomes a cherished memento.
- Puppets: Glue a craft stick to the back for instant imaginative play.
Q8: How can I make cleanup easier?
A8: A little preparation goes a long way:
- Cover Surfaces: Lay down old newspaper, a plastic tablecloth, or a craft mat before starting.
- Wear Aprons/Old Clothes: Protect clothing, especially if using paint.
- Keep Wipes/Damp Cloth Handy: For quick hand or surface cleanups.
- Contain Glitter: If using glitter, work inside a box or over a large tray to catch fallout.
- Designated Drying Area: Have a clear space for painted items to dry undisturbed.
By anticipating these common questions, we aim to make your handprint bunny crafting experience as smooth, enjoyable, and enriching as possible!
Conclusion
The humble handprint bunny craft for kids is far more than just a piece of paper and a dab of glue; it's a doorway to creativity, skill development, and cherished family moments. We've explored how these simple yet utterly adorable creations offer incredible benefits, from honing fine motor skills and encouraging self-expression to fostering patience and igniting curiosity about the world around us. Whether you opt for the classic paper fold, a vibrant painted impression, or a template-assisted design, each method provides a unique pathway for your child to explore and grow.
At I'm the Chef Too!, our core philosophy revolves around providing engaging, screen-free "edutainment" that blends STEM and the arts into tangible, hands-on experiences. The handprint bunny craft perfectly aligns with our mission to spark that innate curiosity, allowing children to discover the wonders of the world through creative adventures. It’s about celebrating the process, building confidence, and creating those priceless memories that truly last a lifetime. These crafting sessions, much like our unique cooking kits developed by mothers and educators, offer a wonderful opportunity for family bonding and joyful learning without the pressure of a perfect outcome.
So, the next time you're searching for that special activity to share with your child, remember the simple charm and profound impact of the handprint bunny. It’s a testament to how even the most basic materials can transform into something truly magical when combined with a child’s imagination and a parent’s love.
Ready to keep the fun and learning going all year long? Imagine a new adventure delivered to your door every single month, complete with pre-measured dry ingredients and specialty supplies, designed to spark endless curiosity and joy. Give the gift of learning that lasts with our flexible 3, 6, and 12-month pre-paid plans, perfect for ongoing enrichment or a thoughtful present. Join The Chef's Club today and enjoy free shipping on every box, bringing delightful, screen-free educational fun straight to your home!