Festive Ornament Craft Ideas for Kids

Table of Contents
- Introduction to Ornament Crafting: More Than Just Decoration
- Nature's Canvas: Ornaments from the Great Outdoors
- Recycled & Repurposed Magic: Sustainable Ornament Crafts
- Edible & Aromatic Ornaments: A Treat for the Senses
- Artistic & Expressive Ornaments: Unleashing Creativity
- Character & Story-Inspired Ornaments: Bringing Tales to Life
- STEM-Infused Ornaments: Learning Through Play
- Crafting for Different Age Groups: Tailoring the Fun
- The I'm the Chef Too! Philosophy in Every Craft
- Safety First: Essential Tips for Crafting with Kids
- Conclusion: Crafting Memories, One Ornament at a Time
- FAQ: Your Ornament Crafting Questions Answered
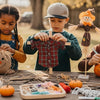
The air fills with magic, carols hum softly, and cozy evenings invite us indoors. For many, this time of year conjures images of sparkling lights, evergreen trees, and the shared joy of holiday traditions. But what if those glittering decorations held more than just aesthetic charm? What if they were tangible reminders of laughter, learning, and the incredible achievements of tiny hands? At I'm the Chef Too!, we believe in transforming everyday activities into extraordinary "edutainment" experiences, blending food, STEM, and the arts in ways that spark curiosity and creativity. And there's no better canvas for this blend than crafting homemade ornaments with your children.
Imagine pulling out a box of decorations years from now and finding a lopsided, glitter-covered star made by a three-year-old, or a perfectly painted pinecone from a proud six-year-old. These aren't just ornaments; they're milestones, memories, and proof of countless learning moments. In an age dominated by screens, we champion hands-on, screen-free alternatives that foster genuine engagement and family bonding. Crafting ornaments isn't just about making something pretty; it's about developing fine motor skills, understanding scientific principles, expressing artistic vision, and building confidence in a fun, pressure-free environment.
This post is your comprehensive guide to a treasure trove of ornament craft ideas for kids, designed to ignite imagination and create cherished holiday keepsakes. We'll explore a wide array of projects, from simple nature-inspired creations perfect for toddlers to more intricate STEM-infused designs for older children. Each idea is chosen not only for its festive appeal but also for its inherent educational value, aligning perfectly with our mission to make learning delicious and exciting. Get ready to gather your supplies, put on some festive tunes, and embark on a crafting journey that promises joy, discovery, and a beautifully decorated tree filled with stories.
Introduction to Ornament Crafting: More Than Just Decoration
Crafting ornaments with kids is a beloved holiday tradition for a reason. It offers a unique opportunity for families to come together, create something beautiful, and make lasting memories. But beyond the festive cheer, these activities are powerhouses of developmental growth. When a child carefully glues a pom-pom onto a snowman or threads beads onto a pipe cleaner, they're not just making an ornament; they're engaging in a multi-faceted learning experience.
We believe that learning should be an adventure, not a chore. That's why our cooking STEM kits are developed by mothers and educators who understand how to make complex subjects tangible and delicious. The same philosophy applies to crafting. Every snip, every dab of glue, every color choice contributes to a child's development. From boosting fine motor skills and hand-eye coordination to encouraging problem-solving and critical thinking, ornament crafting covers a broad spectrum of educational benefits. It's a fantastic way to introduce STEM concepts through practical application, even if it's as simple as understanding why glue sticks or how different materials behave. Plus, the sense of accomplishment a child feels when they see their handmade creation hanging proudly on the tree is immeasurable, building self-esteem and fostering a lifelong love for creative expression.
In the following sections, we'll dive into various categories of ornament crafts, providing detailed ideas, material lists, and tips to ensure a successful and joyful crafting experience for all ages. So, let's roll up our sleeves and get ready to create some magic!
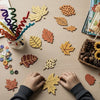
Nature's Canvas: Ornaments from the Great Outdoors
One of the easiest and most accessible ways to start crafting is by looking no further than your own backyard or local park. Nature offers a bounty of free, beautiful, and interesting materials that can be transformed into stunning ornaments. This approach not only encourages creativity but also fosters an appreciation for the natural world and introduces children to basic ecology.
Painted Pinecone Wonders
Pinecones are perhaps the quintessential nature ornament. Their unique texture and sturdy structure make them perfect for a variety of decorations.
- Materials: Pinecones (collected and cleaned), acrylic paints (various colors), glitter, paintbrushes, small eye hooks, twine or ribbon.
- The Craft: Start with a nature walk to gather pinecones. This is a mini science lesson in itself – discussing different tree types, seed dispersal, and the concept of dormancy. Once clean and dry, let your child paint the pinecones in any color scheme they desire. Classic reds and greens are festive, but bright blues, silvers, or even multi-colored stripes can create a unique, maximalist tree. For an extra sparkle, sprinkle glitter while the paint is still wet. Once dry, an adult can carefully twist a small eye hook into the top of the pinecone (or simply hot-glue a loop of twine) to add a hanging loop.
-
Educational Connections:
- Art & Design: Color theory, pattern creation, texture exploration.
- Fine Motor Skills: Holding the paintbrush, controlling strokes, precise application of glitter.
- Science: Observing natural forms, understanding plant life cycles (even if simple).
- I'm the Chef Too! Connection: Just like we turn everyday ingredients into exciting scientific explorations with kits like our Erupting Volcano Cakes Kit, nature walks and pinecone painting transform simple outdoor elements into art and learning opportunities. We love activities that allow children to connect with the world around them in a tangible, hands-on way.
Pressed Flower & Leaf Ornaments
Capture the ephemeral beauty of the seasons with pressed flower and leaf ornaments. These create a delicate and sophisticated look, perfect for a personalized touch.
- Materials: Collected flowers and leaves (pressed and dried), clear contact paper or laminating pouches, cardstock, scissors, hole punch, twine/ribbon.
- The Craft: After pressing flowers and leaves for a few weeks (you can use heavy books or a dedicated flower press), arrange them creatively on a piece of cardstock cut into a desired shape (circle, star, heart). Once arranged, carefully cover with clear contact paper, pressing firmly to remove air bubbles, or laminate them. Trim any excess, punch a hole, and add twine for hanging. This is a lovely way to preserve memories from a special garden or walk.
-
Educational Connections:
- Botany: Identification of plants, understanding plant structure, concept of preservation.
- Composition & Design: Arranging elements aesthetically, understanding balance and color.
- Patience: The process of pressing flowers requires waiting, a valuable lesson in itself.
- I'm the Chef Too! Connection: This project, much like our Galaxy Donut Kit that explores the universe through edible art, uses creative mediums to explore natural wonders. We encourage children to observe, experiment, and appreciate the beauty in both the cosmos and their own backyards.
Recycled & Repurposed Magic: Sustainable Ornament Crafts
Transforming everyday household items into treasures is a fantastic way to teach children about sustainability, resourcefulness, and imaginative thinking. It’s also incredibly budget-friendly!
Clothespin Snowflakes & Wreaths
Simple wooden clothespins or even small plastic ones can be glued together to form intricate snowflake patterns or mini wreaths.
- Materials: Wooden clothespins, strong craft glue (adult supervision!), paints, glitter, small pom-poms, miniature bows, twine/ribbon.
- The Craft: For snowflakes, disassemble the clothespins by removing the metal spring. Kids can then glue the wooden halves together in various snowflake patterns (e.g., eight pieces radiating from a center point, or stacked in layers). For wreaths, use miniature clothespins and glue them around a small ring or even a cookie cutter shape. Once dry, let kids paint them in classic white, silver, or bright, cheerful colors. Add glitter, tiny pom-poms, or miniature bows for extra flair. A loop of ribbon or twine completes the ornament.
-
Educational Connections:
- Geometry: Understanding symmetry, patterns, and shapes.
- Engineering/Construction: Problem-solving to create a stable structure, understanding adhesive properties.
- Fine Motor Skills: Precision in gluing small parts, painting details.
- I'm the Chef Too! Connection: We believe in nurturing problem-solvers. Just as children learn about chemical reactions while making our delectable treats, they learn about structural integrity and design when assembling these clothespin creations. Every activity is an opportunity to explore.
Popsicle Stick Characters & Designs
Popsicle sticks are an incredibly versatile crafting material, perfect for creating everything from simple geometric shapes to adorable characters.
- Materials: Popsicle sticks, craft glue, paints, markers, googly eyes, pom-poms, pipe cleaners, felt scraps, glitter, ribbon/twine.
-
The Craft:
- Snowflakes: Glue popsicle sticks into snowflake patterns. Paint them white or silver and add glitter.
- Christmas Trees: Arrange sticks into a triangle shape for a tree. Paint green and decorate with mini pom-poms as ornaments.
- Reindeer/Gnomes: Use a few sticks for a body, add googly eyes, pom-pom noses, and felt ears/hats.
-
Educational Connections:
- Spatial Reasoning: Arranging sticks to form desired shapes.
- Creativity & Imagination: Transforming simple sticks into characters.
- Fine Motor & Hand-Eye Coordination: Gluing, painting, attaching small embellishments.
- I'm the Chef Too! Connection: Our commitment to screen-free learning shines through in activities like these. By using everyday items, children engage their minds and hands, developing crucial skills that extend far beyond the craft table. Ready for a new adventure every month? Join The Chef's Club and enjoy free shipping on every box, bringing more creative fun directly to your door!
Canning Lid Wreaths & Dioramas
Don't toss those canning lids! The rings are perfect for crafting miniature wreaths, and the flat inserts can become the base for tiny dioramas.
- Materials: Canning jar lids (rings and inserts), ribbon, yarn, small decorative elements (miniature pom-poms, beads, sequins, tiny pinecones), craft glue, felt, small figures.
-
The Craft:
- Wreaths: Wrap the canning lid ring tightly with festive ribbon or yarn, securing with glue. Decorate the wrapped ring with small bows, beads, or tiny felt leaves to create a mini wreath.
- Dioramas: Use the flat insert as the base. Kids can paint a snowy scene, glue on small felt trees, miniature animals, or tiny figures to create a magical winter wonderland inside the ring. An adult can hot glue the entire assembly to the ring and add a hanger.
-
Educational Connections:
- Upcycling & Environmental Awareness: Understanding how to reuse materials.
- Storytelling: Creating a miniature scene encourages imaginative narrative.
- Design & Aesthetics: Considering composition and scale within a small space.
- I'm the Chef Too! Connection: We love fostering ingenuity and an appreciation for how things work. Just as we use food to teach chemistry and physics, these crafts use repurposed materials to teach design and environmental responsibility. If you're looking for more ways to spark curiosity, browse our complete collection of one-time kits for a wide variety of engaging adventures!
Edible & Aromatic Ornaments: A Treat for the Senses
Why limit ornaments to just sight? Engaging other senses, like smell and taste (for edible ones!), adds another layer of magic to holiday crafting. These projects are particularly fun for younger children and offer delightful sensory experiences.
Baked Applesauce & Cinnamon Dough Ornaments
These classic ornaments fill your home with a wonderful, cozy aroma and are surprisingly simple to make.
- Materials: 1 cup applesauce, 1 ½ cups ground cinnamon, 1 tbsp craft glue (optional, for durability), cookie cutters, baking sheet, parchment paper, skewer or straw (for hole), ribbon/twine.
- The Craft: Mix applesauce and cinnamon in a bowl until a stiff dough forms. (Adding a tablespoon of craft glue can make them more durable, but they'll still smell great without it!). Roll out the dough to about ¼ inch thick on a parchment-lined surface. Let kids use cookie cutters to create various shapes. Use a skewer or straw to make a hole for hanging before baking. Bake at 200°F (93°C) for 2-2 ½ hours, or until hardened. Let cool completely. Once hardened, they can be decorated with puff paint or glitter if desired, then hung with ribbon.
-
Educational Connections:
- Measurement & Math: Practicing basic measuring skills.
- Chemistry (simplified): Understanding how heat changes consistency and aroma.
- Sensory Exploration: Engaging smell, touch, and even taste (if curious, but remind them it's for hanging!).
- I'm the Chef Too! Connection: This is where our passion for blending food and STEM truly shines! Just like making delicious cookies in our kits, this activity teaches foundational kitchen skills, the science of baking, and the joy of creating something beautiful and functional. Our mission is to make learning an engaging, multi-sensory journey.
Melted Peppermint Candy Ornaments
These vibrant, stained-glass-like ornaments are a visual and aromatic delight.
- Materials: Hard peppermint candies (or other hard candies), metal cookie cutters, baking sheet, parchment paper, skewer/straw, ribbon/twine.
- The Craft: Preheat oven to 300°F (150°C). Line a baking sheet with parchment paper. Place metal cookie cutters on the parchment. Have children carefully arrange peppermint candies inside the cookie cutters, making sure they touch to melt together. Bake for 5-8 minutes, or until the candies have melted and spread evenly within the cutters. Watch them closely! Immediately after removing from the oven, use a skewer to make a hole in the top of each ornament for hanging. Let cool completely on the baking sheet until hardened before gently removing from the cookie cutters.
-
Educational Connections:
- States of Matter: Observing solids turn to liquid and back again with heat.
- Color & Light: How light passes through the translucent candy.
- Patience & Observation: Carefully watching the candies melt without burning.
- I'm the Chef Too! Connection: This craft perfectly embodies our "edutainment" philosophy – a fun, visually appealing project that secretly teaches basic scientific principles. We love showing kids how simple ingredients can undergo amazing transformations, whether it's in the oven or in a mixing bowl for a tasty treat!
Artistic & Expressive Ornaments: Unleashing Creativity
These crafts focus more on free expression, color, and texture, allowing children to personalize their ornaments and develop their unique artistic style.
Marbled Ornaments (Shaving Cream Method)
This technique creates beautiful, unique patterns and is a wonderful way to explore abstract art.
- Materials: Plain wooden cutouts (circles, stars, etc.) or thick paper ornaments, shaving cream, liquid food coloring or watered-down acrylic paints, toothpicks or craft sticks, shallow tray or baking dish, paper towels, ribbon/twine.
- The Craft: Squirt a generous layer of shaving cream into a shallow tray. Drop various colors of food coloring or paint onto the shaving cream. Use a toothpick or craft stick to swirl the colors, creating marbled patterns. Place your wooden cutout or paper ornament face-down onto the marbled shaving cream, pressing gently to ensure contact. Lift it off, scrape off excess shaving cream with a ruler or cardboard edge (don't worry, the color stays!), and let dry completely.
-
Educational Connections:
- Color Mixing & Diffusion: Observing how colors blend and spread.
- Pattern Recognition & Creation: Understanding how swirls create unique designs.
- Sensory Play: The tactile experience of shaving cream (for some kids).
- I'm the Chef Too! Connection: Art is a powerful tool for learning! We integrate artistic expression into our kits, like designing whimsical toppings for our treats. Marbled ornaments teach children about aesthetic principles and the joy of spontaneous creation, much like the unexpected discoveries often found in science experiments.
Stamped Clay Ornaments (Air Dry Clay)
Air-dry clay is wonderfully tactile and forgiving, allowing children to create textured ornaments that can be customized with stamps or natural objects.
- Materials: Air-dry clay, rolling pin, cookie cutters, various textured objects (leaves, lace, stamps, small toys), skewer/straw, ribbon/twine, optional: paints or glitter for decorating after drying.
- The Craft: Roll out the air-dry clay to about ¼ to ½ inch thickness. Let kids use cookie cutters to make shapes. While the clay is still wet, encourage them to press various textured objects into the clay to create unique patterns and designs. Remember to make a hole at the top with a skewer or straw for hanging. Allow the ornaments to dry completely (this can take 24-72 hours, depending on thickness and humidity). Once dry, they can be left natural or painted and sealed.
-
Educational Connections:
- Tactile & Sensory Exploration: Working with clay is excellent for sensory development.
- Texture & Pattern: Experimenting with different objects to create varied surfaces.
- Fine Motor Strength: Rolling, pressing, cutting the clay.
- I'm the Chef Too! Connection: Our hands-on approach to learning encourages children to explore materials and their properties. Just as they learn about dough consistency with our baking kits, they understand the pliability and drying process of clay here. Give the gift of learning that lasts all year with a 12-month subscription to our STEM cooking adventures! Join The Chef's Club today!
Personalized Chalkboard Ornaments
These ornaments are interactive and can be changed year after year, or even day by day, making them a fun evolving decoration.
- Materials: Round papier-mâché ornaments or wood slices, chalkboard paint, white paint pen or chalk, patterned paper (for embellishments), craft glue, pom-pom trim (optional), ribbon/twine.
- The Craft: Paint papier-mâché or wood slice ornaments with chalkboard paint according to package directions. Once dry, let kids decorate the edges with patterned paper or pom-pom trim. Then, the real fun begins: writing and drawing! Kids can write their name, the year, a special holiday message, or draw a festive picture. The beauty of chalkboard paint is that it can be erased and redone.
-
Educational Connections:
- Literacy & Numeracy: Practicing writing names, dates, or simple messages.
- Fine Motor Control: Writing with a pen or chalk on a small surface.
- Creativity & Personalization: Expressing individual ideas repeatedly.
- I'm the Chef Too! Connection: We believe in empowering children to be creators. This ornament fosters that sense of ownership and the joy of personal expression, much like customizing their culinary creations in our kits. Every child loves seeing their mark on the world, and their name on the tree is a wonderful way to do it.
Character & Story-Inspired Ornaments: Bringing Tales to Life
Connecting crafts to beloved characters or stories can make the activity even more engaging and spark imaginative play.
DIY Gnome Ornaments
These adorable little figures bring a touch of whimsical folklore to your tree.
- Materials: Small wooden eggs (with a flat bottom) or wooden beads (for heads), felt for hats, cotton balls or faux fur for beards, small wooden balls (for noses), craft glue, ribbon/twine.
- The Craft: For each gnome, glue a felt hat onto the top of a wooden egg or a large wooden bead (this will be the head). Below the hat, glue a cotton ball or a small piece of faux fur for the beard. Finally, glue a small wooden ball on top of the beard for the nose, peeking out from under the hat. Add a loop of twine for hanging.
-
Educational Connections:
- Storytelling & Imagination: Connecting to folklore and creating character.
- Assembly & Sequencing: Following steps to build a figure.
- Fine Motor Skills: Gluing small components precisely.
- I'm the Chef Too! Connection: We love fostering imagination! Activities like this encourage children to dive into stories and create their own characters, just as our kits inspire them to imagine they are scientists or master chefs. And sometimes, even beloved characters can make learning fun, like when kids make Peppa Pig Muddy Puddle Cookie Pies with our popular kit!
Rudolph the Red-Nosed Reindeer Ornaments
A classic character that brings smiles and a familiar story to the holiday season.
- Materials: Brown felt circles or pre-cut reindeer head shapes, red pom-poms (for noses), googly eyes, brown pipe cleaners (for antlers), craft glue, ribbon/twine.
- The Craft: Take a brown felt circle (or cut a reindeer head shape). Glue two googly eyes onto the top half. Below the eyes, glue a bright red pom-pom for Rudolph's famous nose. Bend brown pipe cleaners into antler shapes and glue them to the back of the felt head. Add a loop for hanging.
-
Educational Connections:
- Character Recognition & Story Recall: Reinforcing knowledge of a popular holiday tale.
- Shape Recognition: Identifying circles, and creating antler shapes.
- Emotional Expression: Discussing Rudolph's journey and feelings.
- I'm the Chef Too! Connection: We believe in creating joyful family memories. Crafting Rudolph, much like sharing a culinary adventure, builds connections and reinforces beloved traditions. Our kits are designed to be shared experiences that go beyond the activity itself. Not ready to subscribe? Explore our full library of adventure kits available for a single purchase in our shop for a wide selection of themed fun!
Snowman Ornaments (Pom-Poms or Felt)
These cheerful winter friends are simple to make and always bring a smile.
- Materials: White pom-poms (various sizes) or white felt, orange felt scraps (for noses), black buttons or markers (for eyes/mouth), pipe cleaners for scarves, craft glue, ribbon/twine.
-
The Craft:
- Pom-Pom Snowmen: Glue two or three white pom-poms of decreasing size together to form a snowman body. Glue on black buttons or draw eyes and a smile with a marker. Cut a small orange triangle from felt for the nose. Wrap a thin pipe cleaner around the "neck" for a scarf.
- Felt Snowmen: Cut snowman shapes from white felt. Glue on eyes, nose, and mouth. Decorate with small felt buttons or add a tiny felt scarf.
-
Educational Connections:
- Size & Order: Arranging pom-poms from largest to smallest.
- Facial Recognition & Expression: Creating expressive faces.
- Textile Exploration: Working with soft felt and fluffy pom-poms.
- I'm the Chef Too! Connection: Our kits encourage children to build and assemble, whether it's a delicious dessert or a cute character. These snowman crafts reinforce sequencing and spatial awareness, vital skills we nurture through every hands-on activity.
STEM-Infused Ornaments: Learning Through Play
Integrating STEM (Science, Technology, Engineering, Math) into crafts doesn't mean it has to be complex. It simply means highlighting the natural scientific and mathematical principles at play.
Crystal Candy Cane Ornaments (Borax Crystals)
This is a fantastic science experiment that results in beautiful, sparkling ornaments. (Adult supervision is absolutely required due to hot water and borax.)
- Materials: White pipe cleaners, string, pencil or craft stick, wide-mouthed jar, boiling water, borax, food coloring (optional).
- The Craft: Bend pipe cleaners into candy cane shapes (or other shapes like stars, snowflakes). Tie a string to one end of the pipe cleaner shape and tie the other end to a pencil or craft stick. Suspend the pipe cleaner shape in a wide-mouthed jar, ensuring it doesn't touch the bottom or sides. Carefully pour boiling water into the jar until the pipe cleaner is fully submerged. Add borax (about 3 tablespoons per cup of water) and stir until dissolved. Add a few drops of food coloring if desired. Let the jar sit undisturbed overnight (or for several hours). Crystals will form on the pipe cleaner. Carefully remove, let dry, and hang.
-
Educational Connections:
- Chemistry: Understanding supersaturated solutions, crystallization, and molecular bonding.
- Observation: Watching the crystals grow over time.
- Patience & Scientific Method: Following steps, waiting for results.
- I'm the Chef Too! Connection: This is a prime example of our "edutainment" philosophy in action! We believe in making learning fun and tangible, turning science experiments into magical experiences. This crystal project is much like the exciting chemical reactions kids explore with our Erupting Volcano Cakes Kit – hands-on science that yields delightful results.
Geometric Paper Ornaments (3D Shapes)
Explore basic geometry and spatial reasoning by constructing 3D ornaments from flat paper.
- Materials: Cardstock (various colors), ruler, pencil, scissors, craft glue or tape, hole punch, ribbon/twine.
- The Craft: Find templates online for simple 3D geometric shapes like cubes, pyramids, or polyhedra that can be folded from flat paper. Print them onto cardstock. Kids can cut out the shapes, fold along the lines, and glue or tape the tabs to form the 3D structure. They can also decorate the flat paper before assembly. Once complete, punch a hole and add a hanger.
-
Educational Connections:
- Geometry: Understanding 2D nets transforming into 3D shapes, identifying vertices, edges, and faces.
- Spatial Reasoning: Visualizing how flat shapes fold into three-dimensional objects.
- Precision & Fine Motor Skills: Accurate cutting, folding, and gluing.
- I'm the Chef Too! Connection: Math and engineering are integral to our kits, from measuring ingredients to understanding how structures hold together. This craft provides a wonderful introduction to these concepts in a creative, engaging way. We are committed to sparking curiosity and creativity in children, facilitating family bonding, and providing a screen-free educational alternative. Join The Chef's Club for more monthly STEM adventures!
LED Light-Up Ornaments (Simple Circuits)
For older children interested in electronics, creating a simple circuit to light up an ornament can be incredibly rewarding. (This requires adult guidance and basic components).
- Materials: Coin cell batteries, small LED lights, copper tape or thin wires, pre-made cardboard or plastic ornament bases, craft glue, decorative elements.
- The Craft: This is a more advanced craft requiring an understanding of basic circuits. Kids can design a simple circuit path on the inside of a cardboard ornament using copper tape. An adult helps connect the LED light and coin cell battery so that when the circuit is completed (e.g., by pressing a specific point), the LED lights up. The outside of the ornament can then be decorated.
-
Educational Connections:
- Physics/Electronics: Understanding basic electrical circuits, conductivity, and how LEDs work.
- Problem-Solving: Troubleshooting why a circuit might not be working.
- Engineering Design: Planning and constructing a functional object.
- I'm the Chef Too! Connection: While our kits primarily focus on the science of food, the underlying principles of experimentation, design, and problem-solving are universal across STEM fields. We believe in empowering children to explore, innovate, and see the science in everything around them.
Crafting for Different Age Groups: Tailoring the Fun
The beauty of ornament crafting is its adaptability. We can adjust the complexity of projects to suit various developmental stages, ensuring everyone feels successful and engaged.
For Toddlers (Ages 2-4)
Focus on sensory experiences, simple gluing, and large, easy-to-handle materials. Adult prep is key here, with the child doing the "finishing touches."
-
Ideas:
- Pom-Pom & Pipe Cleaner Ornaments: Provide large pom-poms, pre-cut pipe cleaners, and a base (like a paper plate circle or craft stick shape). Let them glue and stick without too much pressure for perfection.
- Painted Pinecones (Messy Fun!): Give them chunky brushes and washable paint. Let them go wild! The end result will be beautifully abstract.
- Sticker & Crayon Ornaments: Pre-cut shapes from cardstock. Let toddlers decorate with large stickers, crayons, or dot markers.
-
Tips:
- Pre-prep: Cut all shapes, lay out all materials.
- Washable Materials: Use washable paints, glues, and markers.
- Focus on the Process: The goal is exploration and sensory input, not a perfect finished product.
- Supervision: Constant adult supervision, especially with small parts.
For Preschoolers & Early Elementary (Ages 5-8)
Introduce more steps, practice scissor skills, and encourage independent decision-making.
-
Ideas:
- Felt Cookie Ornaments: Provide pre-cut felt cookie shapes. Kids can glue on beads for sprinkles or use fabric glue for icing designs. (Older kids can try simple stitching with plastic needles).
- Salt Dough Handprint Ornaments: This is a classic for a reason! Kids love getting their hands messy and seeing their print preserved. They can also paint them once dry.
- Mini Wreath Ornaments (Pipe Cleaners & Cookie Cutters): Kids can wrap pipe cleaners around cookie cutters, learning about coiling and securing.
-
Tips:
- Clear Instructions: Break down steps into manageable chunks.
- Choice: Let them choose colors, materials, and designs within the project's framework.
- Scissor Skills: Provide child-safe scissors and guidance.
- Encourage Problem-Solving: If something doesn't work, encourage them to think of a solution.
- I'm the Chef Too! Connection: This age group thrives on discovery! Our kits are designed to engage this curiosity, presenting challenges that build skills and confidence. Browse our complete collection of one-time kits to find a perfect adventure for your child's age and interests!
For Older Elementary & Tweens (Ages 9-12)
Challenge them with more intricate designs, multi-step processes, and projects that involve specific techniques or require more precision. Introduce basic STEM concepts explicitly.
-
Ideas:
- Crystal Candy Cane Ornaments: Perfect for budding scientists! The explicit chemistry lesson is engaging.
- Stamped Clay Ornaments: They can create more detailed patterns, even using alphabet stamps for names or messages.
- Geometric Paper Ornaments: Introduce the concept of nets and 3D shapes.
- Melted Peppermint Candy Ornaments: They can experiment with color combinations and placement.
-
Tips:
- Research & Planning: Encourage them to look up ideas, gather materials, and plan their design.
- Advanced Techniques: Introduce simple sewing, more complex gluing, or even basic circuitry (with adult supervision).
- Independent Work: Allow for more autonomy, stepping in for guidance rather than doing it for them.
- Discuss STEM Connections: Talk about the science, math, or engineering at play.
- I'm the Chef Too! Connection: Our focus on "edutainment" means we're constantly seeking ways to make learning deeply engaging. For this age group, we lean into more complex ideas that build foundational understanding in STEM, all while having fun. Ready for ongoing educational fun? Join The Chef's Club and receive a new adventure delivered to your door every month!
The I'm the Chef Too! Philosophy in Every Craft
At I'm the Chef Too!, our mission is simple yet profound: to blend food, STEM, and the arts into one-of-a-kind "edutainment" experiences. We are passionate about sparking curiosity and creativity in children, fostering invaluable family bonding, and providing a screen-free educational alternative that truly engages young minds. Our unique approach teaches complex subjects through tangible, hands-on, and delicious cooking adventures, all developed by mothers and educators who understand what truly captivates and educates children.
When we look at ornament crafting, we see these core values reflected in every project:
- Hands-On Learning: Every craft, whether it's painting a pinecone or assembling a clay ornament, requires direct interaction with materials. This tactile engagement is crucial for cognitive development, sensory processing, and skill acquisition. It’s the same philosophy that underpins our baking kits, where children physically mix, measure, and mold.
- Sparking Curiosity: Why does the clay harden? How do crystals grow? What happens when colors mix? These simple questions naturally arise during crafting and open doors to scientific inquiry and exploration. We don't just give kids instructions; we encourage them to ask "why" and "how."
- Creativity and Self-Expression: There's no single "right" way to decorate an ornament. Children are empowered to choose colors, patterns, and embellishments, allowing them to express their unique personalities and artistic vision. This builds confidence and fosters a sense of accomplishment.
- Family Bonding: Crafting together is a shared experience that creates warm memories and strengthens family ties. Parents and children collaborate, laugh, and learn from each other in a relaxed and joyful setting – a cornerstone of our mission.
- Screen-Free Engagement: In a world saturated with digital distractions, we champion activities that pull children away from screens and into the tangible world. Ornament crafting offers a rich, immersive experience that captivates attention and nurtures real-world skills.
- STEM in Disguise: From the geometry of a snowflake to the chemical reaction of crystal growth, and the fine motor skills required for precise gluing (like engineering), STEM principles are woven into the fabric of crafting. We help you recognize and highlight these learning opportunities, turning fun into foundational education.
By embracing these ornament craft ideas, you're not just decorating a tree; you're investing in your child's holistic development, creating a learning environment that is both nurturing and incredibly fun. And if you love the idea of blending learning with delicious, hands-on activities, we invite you to explore what we offer. Join The Chef's Club for a monthly dose of "edutainment" delivered right to your home and continue the adventure all year long!
Safety First: Essential Tips for Crafting with Kids
While ornament crafting is immense fun, ensuring a safe environment is paramount, especially when working with younger children. Here are some key safety considerations:
- Adult Supervision is Key: Never leave young children unsupervised with craft materials, especially those that could be choking hazards or sharp.
- Non-Toxic Materials: Always opt for non-toxic glues, paints, and markers. Read labels carefully.
- Age-Appropriate Tools: Provide child-safe scissors for younger kids. For tasks requiring utility knives or hot glue guns, adults should always handle these tools.
- Small Parts: Be mindful of small beads, buttons, or sequins around toddlers and infants who might put them in their mouths. Keep these materials out of reach until needed, and closely supervise during use.
- Heat Safety: When working with ovens (for baked dough or melted candy ornaments) or hot glue guns, adults must handle all hot components and ensure children are at a safe distance.
- Allergies: If using food-based crafts, be aware of any food allergies in your household or among children participating.
- Clean-Up: Establish a designated crafting area and have cleaning supplies (wipes, paper towels) readily available for spills. Ensure good ventilation, especially when using paints or strong glues.
By keeping these safety tips in mind, you can create a worry-free and enjoyable crafting experience for everyone!
Conclusion: Crafting Memories, One Ornament at a Time
As we wrap up our journey through a dazzling array of ornament craft ideas for kids, one thing becomes abundantly clear: these are not just fleeting holiday activities. They are profound opportunities to connect, create, and educate. Each handmade ornament, whether it's a glitter-dusted pinecone, a vibrant crystal candy cane, or a personalized clay charm, carries with it the story of a child's imagination, their developing skills, and the precious moments shared with family. These are the heirlooms that truly matter, woven with love and learning.
At I'm the Chef Too!, we wholeheartedly champion the power of hands-on, screen-free "edutainment" to ignite curiosity and foster genuine connections. We believe that learning is an adventure best explored with messy hands, open hearts, and a dash of creative courage. The joy of discovery, the pride of accomplishment, and the warmth of family bonding are the true gifts of these crafting endeavors. They reinforce the very values we embody: sparking creativity, building confidence, and making learning an exciting, tangible experience.
So, this holiday season, skip the endless scrolling and embrace the tangible magic of crafting. Gather your little ones, pick a few of these delightful ornament ideas, and embark on an adventure that promises not just beautiful decorations, but invaluable memories and lifelong skills.
Ready to extend the learning and fun all year round? Transform your kitchen into a science lab, an art studio, and a culinary classroom with us! Join The Chef's Club today and have a new, exciting cooking STEM adventure delivered to your door every month with free shipping in the US. It's the perfect way to keep the spirit of discovery alive, one delicious and educational experience at a time!
FAQ: Your Ornament Crafting Questions Answered
Q1: What's the best age to start ornament crafting with kids? A1: You can start as early as 18-24 months with very simple, supervised activities focusing on sensory play (e.g., squishing clay, painting large pinecones with fingers). For more structured crafts involving gluing and simple assembly, 2-3 years old is a great starting point, always with close adult supervision. As children grow, the complexity of crafts can increase significantly.
Q2: How do I make homemade ornaments last longer? A2: For paper or cardboard ornaments, a coat of clear sealant or Mod Podge can help protect them. For clay ornaments, ensure they are fully dry before painting or sealing. Baked applesauce ornaments can be quite durable if fully dried. Store delicate ornaments carefully, wrapped in tissue paper, in a sturdy box after the holidays.
Q3: My child gets frustrated easily when crafting. How can I help? A3: Focus on the process, not the perfect outcome. Choose simpler crafts with fewer steps. Have all materials prepped and ready. Offer choices (e.g., "Do you want red or green paint?"). Provide positive encouragement for effort, not just results. If frustration mounts, take a break or pivot to a different, less demanding activity. Remember, the goal is joy and connection, not perfection.
Q4: What are some good non-messy ornament crafts for kids? A4: While some mess is often part of the fun (and learning!), you can minimize it with:
- Sticker-based ornaments on pre-cut shapes.
- Pipe cleaner sculptures.
- Beading on pipe cleaners or string (for older kids).
- Pre-cut felt shapes glued onto a base.
- Decorating clear plastic ornaments with non-liquid fillers like glitter, small pom-poms, or beads (using a funnel).
Q5: Can I adapt these ideas for a classroom or group setting? A5: Absolutely! Many of these ideas are perfect for groups. Pre-prep materials extensively to make stations for different parts of the craft. Consider simplified versions that require fewer steps. For larger groups, projects like painted pinecones, sticker ornaments, or simple felt shapes work wonderfully. If you're an educator or run a group, we also offer versatile programs for schools and groups, available with or without food components. Learn more about our school and group programs here.
Q6: What if I don't have all the specific materials listed? A6: Don't let a lack of specific materials stop you! Crafting is all about improvisation. Look for substitutes around your house: cotton balls for snow, yarn scraps for hair, old buttons for eyes, pasta shapes for decoration. Nature walks can provide free materials like twigs, leaves, and pebbles. The most important ingredient is imagination!