Table of Contents
- Introduction
- The Magic of Quick Thanksgiving Crafts: More Than Just Play
- Prepping for Quick Crafting Success: Tips and Essential Supplies
- Section 1: Classic & Beloved Thanksgiving Crafts
- Section 2: Gratitude-Focused Crafts
- Section 3: Edible & Table Decor Crafts
- Section 4: Nature-Inspired Fall Crafts
- Section 5: Upcycled & Easy Material Crafts
- Connecting Crafts to Core Learning: The I'm the Chef Too! Philosophy
- Making it a Family Affair: Joyful Memories and Screen-Free Moments
- Beyond Thanksgiving Day: Extending the Fun
- Conclusion
- FAQ: Quick Thanksgiving Crafts for Kids
As the vibrant colors of autumn paint our landscapes, there's a unique magic in the air that beckons families closer. Thanksgiving, a cherished time of gratitude and togetherness, often arrives with a whirlwind of activity, from meal preparations to travel plans. Amidst the hustle, you might find yourself wondering how to keep eager little hands engaged, entertained, and perhaps even learning, without adding extra stress to your holiday plate. The answer lies in the joy of crafting!
At I'm the Chef Too!, we wholeheartedly believe in the power of hands-on "edutainment," blending food, STEM, and the arts to spark curiosity and creativity. We understand that finding screen-free, educational activities that also foster family bonding can sometimes feel like a treasure hunt. That’s why we’re diving into the wonderful world of quick Thanksgiving crafts for kids. These aren't just time-fillers; they are opportunities to explore art, engage with science (even in subtle ways), practice fine motor skills, and most importantly, create lasting memories and heartfelt decorations. This post will serve as your ultimate guide, offering a cornucopia of simple, engaging, and meaningful craft ideas that can be whipped up in a flash, ensuring your holiday is filled with laughter, learning, and a dash of delightful creativity.
Introduction
The aroma of pumpkin spice, the rustle of fallen leaves, and the promise of family gatherings – Thanksgiving truly is a season for the senses. Yet, for many parents and educators, the joyous chaos of the holidays can also bring the challenge of keeping children happily occupied. How do we transform those moments of "I'm bored!" into bursts of creative engagement, especially when time is a precious commodity? Imagine a quiet afternoon, a few simple supplies spread across the table, and your children's faces lit up with concentration and excitement as they transform ordinary materials into festive masterpieces. This isn't just wishful thinking; it's the accessible reality of quick Thanksgiving crafts.
This guide is designed to empower you with a wealth of easy-to-execute, high-impact craft projects that celebrate the spirit of Thanksgiving. We’ll delve into a variety of ideas – from classic turkey transformations to heartfelt gratitude expressions and charming table decorations – all designed with minimal prep and maximum fun in mind. Our goal is to provide practical, valuable advice and realistic expectations, helping you foster a love for learning, build confidence, develop key skills, and create joyful family memories. You’ll discover how everyday items can become tools for artistic expression and how a few minutes of crafting can turn into meaningful moments of connection. Let's roll up our sleeves and discover how simple crafts can make this Thanksgiving truly unforgettable!
The Magic of Quick Thanksgiving Crafts: More Than Just Play
Crafting is far more than just a way to pass the time; it's a powerful educational tool that aligns beautifully with our mission at I'm the Chef Too!. Just as our STEM cooking kits teach complex subjects through tangible, hands-on, and delicious adventures, quick Thanksgiving crafts offer a similar pathway to learning and development. They provide a unique blend of "edutainment" that nurtures a child's holistic growth.
Sparking Curiosity and Creativity
Every time a child picks up a crayon, cuts a shape, or glues a feather, they are engaging their imagination. Crafts encourage children to think outside the box, experiment with colors and textures, and bring their unique visions to life. It's an open invitation to explore, innovate, and express themselves freely. This creative freedom is crucial for developing problem-solving skills and an imaginative spirit – qualities we strive to cultivate in every I'm the Chef Too! experience.
Developing Essential Skills
Beyond the artistic output, crafting hones a multitude of developmental skills:
- Fine Motor Skills: Cutting, gluing, drawing, and manipulating small objects strengthens the muscles in little hands, improving dexterity and hand-eye coordination – essential for writing and other daily tasks.
- Cognitive Development: Following instructions, understanding sequences, identifying shapes and colors, and making choices about materials all contribute to cognitive growth.
- Problem-Solving: When a craft doesn't go exactly as planned, children learn to adapt, find alternative solutions, and persevere, building resilience.
- Sensory Exploration: The feel of different textures (pinecones, leaves, paper, paint), the vibrant colors, and sometimes even the scent of natural materials provide rich sensory input.
- Language and Communication: Discussing their creations, explaining their process, and sharing their ideas with others enhances vocabulary and communication skills.
Fostering Family Bonding
In our increasingly digital world, finding screen-free activities that bring families together is more important than ever. Quick Thanksgiving crafts offer a wonderful opportunity for quality time. Parents, grandparents, and children can work side-by-side, sharing ideas, helping each other, and simply enjoying each other's company. These shared experiences become the fabric of cherished family memories, building traditions that last a lifetime. Just like our I'm the Chef Too! kits are designed to be a catalyst for family togetherness in the kitchen, these crafts provide another avenue for meaningful connection.
Cultivating Gratitude and Reflection
Many Thanksgiving crafts naturally lend themselves to themes of thankfulness. Creating "gratitude trees" or "thankful turkeys" encourages children to pause, reflect on the blessings in their lives, and express appreciation – core values of the holiday. This thoughtful engagement can be a powerful way to instill empathy and a positive outlook.
Building Confidence and Self-Esteem
Completing a craft project, no matter how simple, gives children a sense of accomplishment. Seeing their creation displayed, whether on the refrigerator or as part of the Thanksgiving table decor, boosts their self-esteem and pride in their abilities. It reinforces the idea that their efforts and ideas are valued.
Embracing quick Thanksgiving crafts is a fantastic way to infuse your holiday with educational fun and meaningful connections, much like how our Chef's Club subscription delivers monthly doses of discovery and delight directly to your door.
Prepping for Quick Crafting Success: Tips and Essential Supplies
The key to "quick" crafts is often in the preparation. A little planning goes a long way in turning potential chaos into joyful creativity. Before you dive into specific projects, consider these tips to ensure a smooth and enjoyable crafting experience for everyone.
Minimal Prep, Maximum Fun
- Gather Materials First: Nothing derails a crafting session faster than realizing you're missing a crucial item midway through. Review your chosen craft's material list and gather everything before you invite the children to the table.
- Designate a Craft Zone: Protect your surfaces! Lay down newspaper, an old tablecloth, or a craft mat. Have wet wipes or a damp cloth readily available for quick clean-ups, especially when paint is involved.
- Simplify Instructions: Break down complex crafts into small, manageable steps. For younger children, demonstrate each step rather than just explaining it.
- Embrace Imperfection: The beauty of kid crafts lies in their unique, handmade charm. Encourage effort and creativity over perfection. Remind children (and yourself!) that there's no "right" or "wrong" way to be creative.
- Set Realistic Timeframes: Don't bite off more than you can chew. Choose crafts that fit into your available time slot, remembering that children's attention spans vary by age. A 15-minute craft might be perfect for a toddler, while a 30-minute project could suit an older child.
Your Quick Crafting Toolkit: Everyday Essentials
You don't need a specialty craft store to get started! Many fantastic Thanksgiving crafts can be made with items you likely already have around the house or can easily gather.
-
Paper Power:
- Construction Paper: A rainbow of colors for feathers, leaves, and various cut-outs.
- Brown Paper Bags: Perfect for turkey puppets, pilgrim hats, or even simple placemats.
- Paper Plates: The ultimate versatile base for masks, turkeys, or wreaths.
- Cardstock: A bit sturdier for projects that need to stand up.
- Newspaper/Magazines: Great for collages, tearing, or protecting surfaces.
-
Adhesive Allies:
- Kid-Friendly Glue Sticks: Less mess, quicker drying for paper projects.
- Liquid School Glue: Stronger hold for heavier embellishments.
- Tape: Quick and easy for attaching items, especially for younger crafters.
-
Color Creators:
- Crayons, Markers, Colored Pencils: Essential for drawing, decorating, and adding details.
- Washable Paint: Acrylic or tempera paints in fall colors (red, orange, yellow, brown, green) for stamping, handprints, or pinecone painting.
- Paint Brushes: A variety of sizes for different tasks.
-
Cutting & Shaping Tools:
- Kid-Safe Scissors: For developing fine motor skills and cutting shapes.
- Hole Punch: For creating holes for stringing or decorative accents.
-
Nature's Bounty (Gathered on a Fall Walk!):
- Leaves: Of various shapes, sizes, and colors for collages, stamping, or turkey feathers.
- Pinecones: A fantastic base for turkeys or fall decorations.
- Twigs/Small Branches: For "thankful trees" or natural sculptures.
- Acorns, Small Stones: For added texture or "gratitude rocks."
-
Fun Embellishments (Optional, but highly recommended for personality!):
- Googly Eyes: Instantly brings any creation to life!
- Feathers: Real craft feathers for turkey tails.
- Pipe Cleaners/Chenille Stems: Bendable and colorful for legs, arms, or accents.
- Pom-Poms: For soft textures and adding dimension.
- Yarn/String/Ribbon: For hanging, tying, or decorative touches.
Having a dedicated craft box stocked with these basics will make spur-of-the-moment creative sessions incredibly easy. If you're looking for more structured, pre-planned experiences that arrive with all the specialty supplies and dry ingredients, remember that our Chef's Club subscription offers just that, blending cooking and STEM into delightful monthly adventures!
Section 1: Classic & Beloved Thanksgiving Crafts
Some crafts are timeless for a reason. They are simple, universally loved, and instantly recognizable as symbols of Thanksgiving. These classics are perfect for all ages and require minimal materials, making them truly "quick."
The Ever-Popular Handprint Turkey
This iconic craft is a rite of passage for many children and a treasured keepsake for parents. It’s incredibly simple, wonderfully personal, and requires only a few basic supplies.
What You'll Need:
- Construction paper (brown, white, and various fall colors for feathers)
- Washable brown paint (or a brown marker)
- Googly eyes (or a black marker)
- Orange and red construction paper scraps (for beak and wattle)
- Glue stick or liquid glue
- Optional: Real craft feathers, glitter, fall-themed stickers
How to Make It:
- The Body: Help your child paint their palm and fingers with brown paint. Press their hand firmly onto a piece of construction paper (white or light-colored works well as a base). Wiggle fingers slightly to ensure good coverage. Lift carefully. If using a marker, trace their hand instead.
- The Feathers: Once the handprint (the turkey's body) is dry, use different colored construction paper to cut out feather shapes. Kids can trace leaf shapes or just freehand wavy feathers. Glue these around the 'fingers' of the handprint. Alternatively, use real craft feathers for a textured look, or have kids dip their fingers in various fall-colored paints and press them above the handprint for colorful painted feathers.
- The Face: Cut a small orange triangle for the beak and a tiny red squiggly shape for the wattle. Glue them onto the thumb part of the handprint (which becomes the turkey's head).
- The Eyes: Add two googly eyes above the beak. If you don't have googly eyes, simply draw them on with a black marker.
- Personalize: Write the child's name and the year on the craft. This turns it into a cherished memento.
Educational Connection: This craft reinforces body awareness, color recognition, and fine motor skills through painting, cutting, and gluing. It also provides a wonderful opportunity to discuss family history and growth.
Charming Pinecone Turkeys
Bringing a bit of nature indoors, pinecone turkeys are delightful, rustic, and incredibly easy to assemble. They make excellent table decorations or little gifts.
What You'll Need:
- Pinecones (collected from outside or store-bought)
- Colored construction paper or felt in fall colors
- Googly eyes
- Small pom-poms (brown or yellow for the head)
- Orange and red construction paper scraps (for beak and wattle)
- Liquid glue (stronger hold for natural materials)
- Scissors
How to Make It:
- Gather Pinecones: Head outdoors for a nature walk to find the perfect pinecones! This adds an extra layer of adventure to the craft. (Adult supervision recommended, especially when gathering in wooded areas.)
- The Feathers: Cut various leaf or feather shapes from construction paper or felt. Encourage children to use a mix of fall colors. Glue these "feathers" into the crevices at the wider end of the pinecone, fanning them out like a turkey's tail.
- The Head: Glue a small pom-pom onto one end of the pinecone to form the turkey's head. If you don't have pom-poms, you can cut a circular head shape from brown construction paper.
- The Face: Glue two googly eyes onto the pom-pom head. Cut a tiny orange triangle for the beak and a small red wattle, then glue them below the eyes.
- Finishing Touches: Let the glue dry completely. These little turkeys can stand on their own and add a festive touch to any setting.
Educational Connection: This craft encourages observation skills (finding materials in nature), fine motor skills (gluing small parts), and creativity in designing their turkey's personality. It's a wonderful way to connect with the natural world around us.
Section 2: Gratitude-Focused Crafts
Thanksgiving is, at its heart, about gratitude. These crafts provide a beautiful and tangible way for children and families to reflect on and express what they are thankful for, making the holiday even more meaningful.
The Heartfelt Thankful Tree
A gratitude tree is a powerful visual reminder of all the blessings in your life. It's a collaborative family project that can grow throughout the month of November.
What You'll Need:
- A small branch (about 1-2 feet tall), ideally with a few smaller twigs branching off, or a paper cutout of a tree trunk.
- A sturdy vase or container (if using a real branch)
- Construction paper in fall colors (red, orange, yellow, brown, green)
- Scissors
- Markers or pens
- Hole punch
- String, yarn, or ribbon
How to Make It:
- The Tree: If using a real branch, place it securely in a vase or pot. If crafting a paper tree, draw or print a large tree trunk with branches on a piece of poster board or large construction paper and attach it to a wall.
- The Leaves of Gratitude: Cut out numerous leaf shapes from the colored construction paper. Make sure they are large enough for writing.
- Expressing Thanks: Invite each family member to write down things they are thankful for on individual leaves. For younger children, they can draw pictures or dictate their thoughts to an adult. Encourage specific examples (e.g., "I'm thankful for my cozy blanket," "I'm thankful for our family dog," "I'm thankful for delicious pie").
- Attaching Leaves: Punch a hole in the top of each leaf. Thread a piece of string through the hole and tie it to a branch on your tree. If using a paper tree, simply glue or tape the leaves onto the paper branches.
- Growing Gratitude: Continue adding leaves throughout the Thanksgiving season, making it a living testament to your family's blessings.
Educational Connection: This craft fosters social-emotional learning by encouraging reflection, empathy, and positive thinking. It also enhances writing and drawing skills, and promotes family discussion.
Gratitude Garland or Paper Chain
This is a simple, repetitive craft that's great for fine motor practice and creating a decorative reminder of thankfulness.
What You'll Need:
- Strips of colored construction paper (fall colors)
- Markers or pens
- Glue stick or stapler
How to Make It:
- Gratitude Strips: Cut construction paper into strips (e.g., 1-2 inches wide and 8-10 inches long).
- Write or Draw: On each strip, have children write or draw something they are thankful for.
- Form the Chain: Form the first strip into a loop and glue or staple the ends together. Thread the next strip through the first loop, then glue or staple its ends together to form a second loop. Continue this process, linking the strips to create a long chain.
- Display: Drape your gratitude chain around a doorway, across a mantel, or as a festive garland for the Thanksgiving table.
Educational Connection: Excellent for fine motor skills, sequencing, and practicing writing or drawing. It’s also a communal activity that strengthens family bonds through shared reflection.
Thankful Placemats or Coasters
These can be personalized by each family member and serve as a beautiful, meaningful addition to your Thanksgiving table.
What You'll Need:
- Large sheets of construction paper or cardstock (for placemats) OR smaller squares/circles for coasters
- Markers, crayons, colored pencils
- Nature items (pressed leaves, small twigs)
- Glue stick
- Optional: Laminator or clear contact paper to preserve them
How to Make It:
- Design: Give each child a piece of paper for their placemat or coaster. Encourage them to draw pictures of things they are thankful for, write words, or create a collage using natural items.
- Decorate: They can incorporate real pressed leaves (if collected and pressed beforehand), small twigs, or simply draw autumn scenes.
- Personalize: Make sure they write their name on their creation.
- Protect (Optional): To make them reusable, laminate the placemats or cover them with clear contact paper.
Educational Connection: Encourages self-expression, artistic design, and reflection on personal gratitude. It also teaches functional art – creating something beautiful that also serves a purpose.
These crafts are not only quick but also infuse your home with the true spirit of the season. For more fantastic ideas that merge creativity with deliciousness, don't forget to browse our complete collection of one-time kits in our shop!
Section 3: Edible & Table Decor Crafts
Thanksgiving is synonymous with delicious food, so why not blend that love for taste with creative crafting? These ideas combine the joy of making something with the satisfaction of a festive display, or even a tasty treat.
"Pilgrim Hat" Cookies (Edible Craft)
Turn simple cookies into adorable, edible pilgrim hats – a fun activity that doubles as a dessert or party favor.
What You'll Need:
- Round chocolate cookies (like fudge striped cookies, with the stripe facing down as the brim)
- Peanut butter cups (standard size, unwrapped)
- Melted chocolate or chocolate frosting (for "glue")
- Yellow frosting or a yellow candy melt (for the "buckle")
- Small piping bag or Ziploc bag with a corner snipped
How to Make It:
- Assemble the Base: Place the round cookie stripe-side down on a plate. This forms the brim of the hat.
- Attach the Hat: Put a dab of melted chocolate or chocolate frosting on the bottom of an unwrapped peanut butter cup. Press it firmly onto the center of the round cookie. This forms the crown of the hat.
- Add the Buckle: Once the chocolate "glue" has set a bit, use the yellow frosting or melted yellow candy melt to pipe a small square or rectangle onto the front of the peanut butter cup, creating a "buckle" effect.
- Chill and Enjoy: Let the cookies set completely in the refrigerator for about 10-15 minutes before serving or packaging.
Educational Connection: This edible craft involves basic assembly, measurement (of ingredients if making cookies from scratch), and artistic decoration. It’s a delicious way to explore shapes and fine motor control. While these quick crafts are fun, imagine creating truly edible art with a scientific twist, like the bubbling delight of our Erupting Volcano Cakes! Our kits offer a unique opportunity to combine baking with engaging STEM concepts.
Mini Pumpkin Turkeys (Non-Edible Table Decor)
These charming little turkeys make fantastic place card holders or centerpieces. They're quick, cute, and perfect for adding a touch of whimsy to your Thanksgiving table.
What You'll Need:
- Small decorative pumpkins or gourds (real or faux)
- Fall leaves (real or artificial)
- Googly eyes
- Orange and red felt or construction paper scraps (for beak and wattle)
- Hot glue gun (adult use only!) or strong liquid glue
- Optional: Pipe cleaners for legs, small name tags
How to Make It:
- Select Pumpkin: Choose a mini pumpkin for each turkey. The stem usually faces forward, acting as a nose, or you can turn it around for a smoother face.
- Feather Fan: Gather several fall leaves. Using hot glue (adults only!) or strong liquid glue, carefully attach the stems of the leaves to the back of the pumpkin, fanning them out to create a colorful tail. You might need to hold them in place for a moment until the glue sets.
- Face Details: Glue two googly eyes onto the front of the pumpkin. Cut a small orange triangle for the beak and a tiny red wattle from felt or paper, then glue them below the eyes.
- Add Legs (Optional): Bend two pipe cleaners into a "W" shape for legs and attach them to the bottom of the pumpkin with glue.
- Place Cards (Optional): If using as place card holders, attach a small name tag to one of the feathers or tie it around the pumpkin's stem.
Educational Connection: This craft involves pattern recognition, understanding symmetry (when fanning leaves), and fine motor control. It also encourages creativity in designing each turkey's unique "personality."
Woven Paper Placemats
These are practical, decorative, and a fantastic way to introduce children to basic weaving concepts.
What You'll Need:
- Construction paper or cardstock in two contrasting fall colors
- Scissors
- Ruler (optional, for straight lines)
How to Make It:
- Base Mat: Take one piece of construction paper. Fold it in half lengthwise. Starting from the folded edge, cut parallel lines about 1 inch apart, stopping about 1 inch from the unfolded edge. Unfold the paper – you'll have a series of slits. This is your loom.
- Weaving Strips: Take the second piece of construction paper and cut it into strips, also about 1 inch wide and the length of the first paper.
- Weave: Show your child how to weave the strips through the slits in the base mat, alternating "over and under" each time. For the next strip, start with the opposite pattern ("under and over").
- Secure Ends: Once all strips are woven, you can glue the ends of the woven strips to the edges of the base mat to secure them.
- Decorate: Children can draw on their woven placemats or add small stickers to personalize them.
Educational Connection: This craft introduces fundamental concepts of weaving, patterns, and spatial reasoning. It significantly develops fine motor skills and hand-eye coordination.
These crafts bring a festive charm to your table, adding a personal touch that store-bought decorations simply can't match. They also echo our philosophy at I'm the Chef Too! – making learning an integral, and often delicious, part of everyday life. Our monthly Chef's Club subscription is designed to deliver this kind of engaging, hands-on "edutainment" directly to your home with free shipping, ensuring a steady stream of creative adventures for your family.
Section 4: Nature-Inspired Fall Crafts
The autumn season provides an abundance of free and beautiful materials just outside your door. Incorporating natural elements into your crafts not only makes them unique but also encourages children to connect with and appreciate their environment.
Fall Leaf Suncatchers
Capture the vibrant colors of autumn with these stunning suncatchers that glow beautifully when hung in a window.
What You'll Need:
- Assorted fall leaves (freshly fallen, not too brittle)
- Contact paper or clear adhesive shelf liner
- Scissors
- Hole punch
- Yarn or string
How to Make It:
- Gather Leaves: Take a nature walk to collect a variety of beautiful fall leaves. Look for different shapes, sizes, and colors.
- Prepare Contact Paper: Cut two pieces of contact paper (or shelf liner) to the desired size for your suncatcher. Peel the backing off one piece and lay it sticky side up.
- Arrange Leaves: Have your child arrange the collected leaves onto the sticky side of the contact paper. Encourage them to create a colorful mosaic, layering leaves slightly.
- Seal It Up: Carefully peel the backing off the second piece of contact paper and place it sticky side down over the arranged leaves, pressing down firmly to seal everything inside and remove any air bubbles.
- Trim and Hang: Trim the edges of the suncatcher, perhaps into a square, circle, or even a large leaf shape. Punch a hole at the top and thread a piece of yarn or string through it. Hang your suncatcher in a window to catch the light.
Educational Connection: This craft promotes appreciation for nature, teaches about color and light, and develops fine motor skills through arranging and pressing. It's a lovely way to observe the changing seasons.
Leaf Rubbings
A classic and wonderfully simple way to capture the intricate beauty of leaves.
What You'll Need:
- Assorted fall leaves (with prominent veins)
- Thin paper (printer paper or tracing paper works well)
- Crayons (peeled of their paper wrappers)
How to Make It:
- Collect Leaves: Find a variety of leaves with interesting textures and strong veins.
- Arrange: Place a leaf vein-side up on a hard, flat surface. Lay a piece of paper over the leaf.
- Rub: Take a peeled crayon and lay it on its side. Gently but firmly rub the crayon over the paper where the leaf is underneath. The texture and veins of the leaf will magically appear on the paper.
- Create a Collage: Children can do multiple rubbings on one paper, layering different leaves and colors to create a unique autumn collage.
Educational Connection: This activity is fantastic for sensory exploration, teaching about texture, and observing the natural patterns in leaves. It’s also a great exercise for hand strength and fine motor control.
Pinecone Bird Feeders
Combine crafting with a act of kindness for nature's feathered friends.
What You'll Need:
- Pinecones
- Peanut butter (or sunflower butter for allergies)
- Birdseed
- Yarn or string
- Spoon or craft stick
How to Make It:
- Attach String: Tie a piece of yarn or string securely around the top of each pinecone, leaving a loop for hanging.
- Spread Butter: Using a spoon or craft stick, help your child spread peanut butter (or sunflower seed butter) into all the nooks and crannies of the pinecone. This can be a delightfully messy but fun sensory experience!
- Roll in Birdseed: Pour birdseed onto a plate or shallow dish. Roll the peanut-butter-covered pinecone in the birdseed, pressing gently so the seeds stick to all the sticky parts.
- Hang: Hang your completed bird feeders on tree branches outside and watch for visitors!
Educational Connection: This craft promotes empathy for animals, teaches about local wildlife, and involves sensory exploration. It’s a wonderful way to give back to nature.
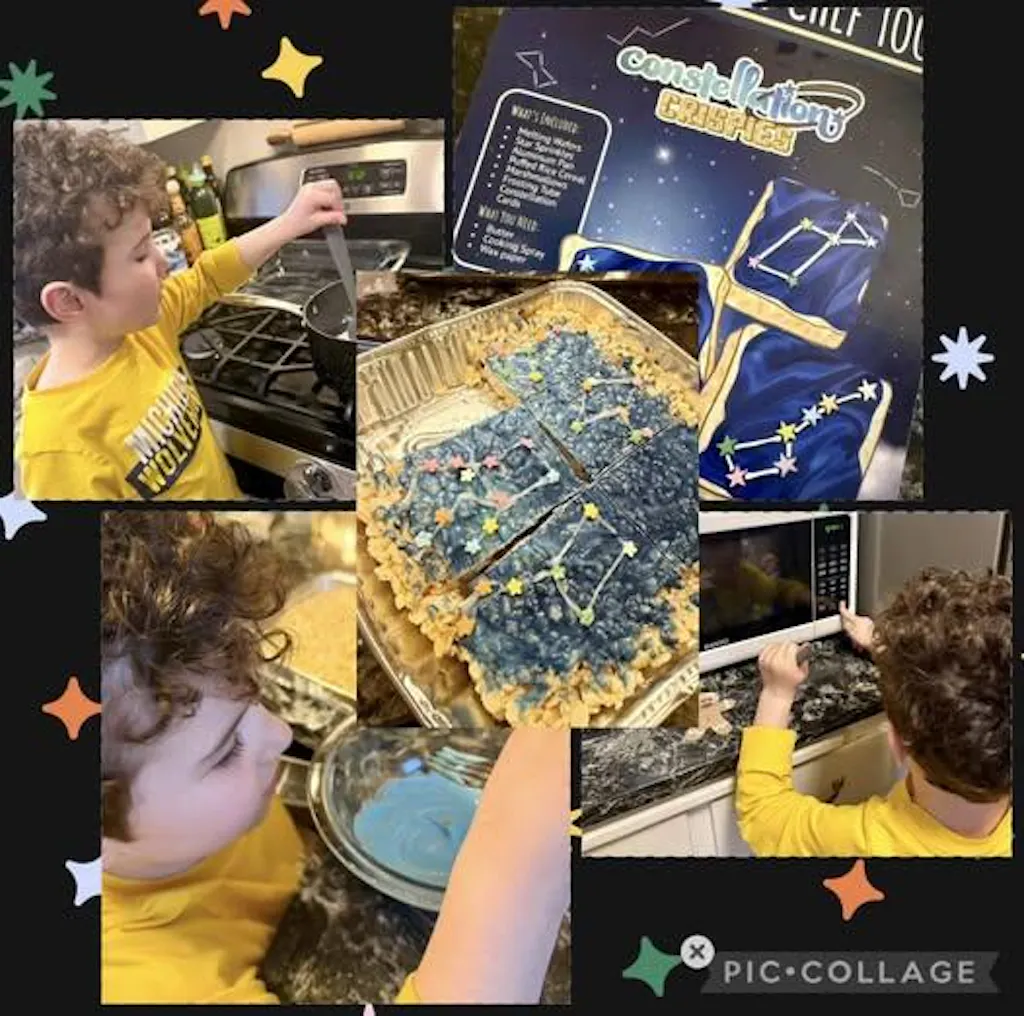
These nature-inspired crafts are a fantastic way to engage children with their environment while fostering creativity and fine motor skills. For more structured STEM fun that also involves nature, consider our Galaxy Donut Kit, where children can explore astronomy by creating their own edible solar system!
Section 5: Upcycled & Easy Material Crafts
Transforming everyday household items or inexpensive craft supplies into festive Thanksgiving decorations is a smart, sustainable, and wonderfully creative way to craft. These ideas prove that you don't need fancy materials to make something special.
Paper Roll Turkeys
Before you toss those empty toilet paper or paper towel rolls, transform them into adorable turkeys! This craft is a fantastic way to upcycle.
What You'll Need:
- Empty toilet paper or paper towel rolls
- Brown paint or brown construction paper
- Colored construction paper (fall colors for feathers)
- Googly eyes
- Orange and red construction paper scraps (for beak and wattle)
- Liquid glue or glue stick
- Scissors
- Optional: Pipe cleaners for legs
How to Make It:
- Turkey Body: Paint the paper roll brown and let it dry, or wrap it in brown construction paper and secure with glue.
- Feather Fan: Cut out various feather shapes from colored construction paper. Glue these onto the back of the paper roll, fanning them out to create a vibrant tail.
- Head and Face: Cut a circle or oval shape from brown construction paper for the head. Glue on googly eyes, an orange triangle beak, and a red wattle.
- Attach Head: Glue the head onto the front of the paper roll body.
- Legs (Optional): Bend two short pipe cleaners into "L" shapes for legs and glue them to the inside bottom of the paper roll.
Educational Connection: This craft promotes recycling and repurposing, develops fine motor skills through cutting and gluing, and encourages imaginative play.
Paper Bag Turkey Puppets
These simple puppets are quick to make and provide endless entertainment for imaginative storytelling long after the crafting is done.
What You'll Need:
- Brown paper lunch bags
- Colored construction paper (fall colors for feathers, brown for head)
- Googly eyes
- Orange and red construction paper scraps (for beak and wattle)
- Glue stick
- Scissors
- Optional: Markers for details
How to Make It:
- Feathers: Cut out a variety of colorful feather shapes from construction paper. Glue these to the flat bottom flap of the paper bag (which will become the turkey's tail).
- Head: Cut a circle or oval from brown construction paper for the turkey's head.
- Face: Glue googly eyes, an orange triangle beak, and a red wattle onto the brown head shape.
- Assemble Puppet: Glue the completed head onto the main body of the paper bag, just below the flap that has the feathers.
- Playtime: Once dry, children can slip their hand into the bag and make their turkey puppet "talk" by moving the flap up and down.
Educational Connection: Encourages imaginative play, storytelling, and dramatic expression. It also strengthens fine motor skills through cutting and gluing. Even beloved characters can make learning fun, like when kids make Peppa Pig Muddy Puddle Cookie Pies – a delightful way to combine play with delicious creation!
Clothespin Turkeys
These little turkeys are simple, stand-alone, and perfect for adorning napkins, place settings, or even as decorative clips.
What You'll Need:
- Wooden clothespins (the spring-loaded kind)
- Brown paint or brown craft foam
- Colored craft foam or construction paper (fall colors)
- Googly eyes
- Orange and red felt or construction paper scraps (for beak and wattle)
- Liquid glue or hot glue (adults for hot glue)
- Scissors
How to Make It:
- Clothespin Body: Paint the wooden clothespin brown and let it dry. If using craft foam, cut a brown oval shape large enough to cover the top of the clothespin and glue it on.
- Feather Shapes: Cut out several small, colorful feather shapes from craft foam or construction paper.
- Attach Feathers: Glue the feathers in a fan shape to one side of the clothespin (the side that will be the back of the turkey).
- Face: Glue two googly eyes onto the "head" end of the clothespin. Add a small orange beak and red wattle below the eyes.
- Display: Once dry, clip these charming turkeys onto cards, napkins, or simply let them stand on their own.
Educational Connection: Develops fine motor skills, hand-eye coordination, and encourages creative design. It’s also a great way to introduce the concept of using simple household items for crafts.
These upcycled and easy material crafts demonstrate that creativity doesn't require expensive supplies. They are a testament to our philosophy at I'm the Chef Too! – making engaging, hands-on learning accessible and fun for every family. If you're looking for more inspiration, remember to browse our complete collection of one-time kits for a wide array of creative adventures!
Connecting Crafts to Core Learning: The I'm the Chef Too! Philosophy
At I'm the Chef Too!, our core mission is to blend food, STEM, and the arts into "edutainment" experiences that ignite curiosity and creativity in children. While our specialty is delicious cooking adventures, the principles behind quick Thanksgiving crafts are deeply rooted in this same educational philosophy.
When children engage in crafting, they are not just making something pretty; they are actively learning through tangible, hands-on experiences. This is precisely what we champion.
- Science in Action: Even simple crafts can introduce scientific concepts. Mixing paints to create new colors is a basic lesson in color theory. Observing how glue dries (a chemical reaction) or how different materials react to light (like in a suncatcher) introduces fundamental scientific phenomena. These are the building blocks for more complex STEM understanding, much like how our kits might teach about yeast activation or the properties of different ingredients.
- Engineering and Design: Every craft involves an element of engineering. How do you make the turkey stand up? How do you attach the feathers so they stay? Children are experimenting with balance, structure, and design, developing spatial reasoning and problem-solving skills. They learn through trial and error, iterating on their designs – crucial engineering habits of mind.
- Artistic Expression and Aesthetics: Crafts are a direct avenue for artistic exploration. Children learn about color palettes, composition, texture, and form. They develop their aesthetic sense and find their unique voice, which is vital for holistic development. This kind of self-expression builds confidence and fosters a love for the arts.
- Mathematics in Disguise: Counting supplies, measuring paper strips, recognizing shapes, and understanding patterns in weaving or feather arrangements are all mathematical concepts woven subtly into the crafting process.
- Sensory Engagement: The tactile nature of crafts – feeling different textures, seeing vibrant colors, even the smell of fresh leaves or paint – provides rich sensory input that supports cognitive development and keeps children engaged.
Just as our I'm the Chef Too! kits are thoughtfully developed by mothers and educators to deliver complex subjects in an accessible, enjoyable way, these quick Thanksgiving crafts offer similar benefits. They provide a screen-free educational alternative that stimulates young minds and encourages exploration beyond traditional learning environments. We focus on fostering a love for learning, building confidence in their abilities, developing key skills, and, above all, creating joyful family memories that will be cherished for years to come. These moments, whether spent crafting a paper turkey or baking a scientific treat, are invaluable for a child's growth and family connection.
Making it a Family Affair: Joyful Memories and Screen-Free Moments
Thanksgiving, more than any other holiday, is about gathering with loved ones. Quick Thanksgiving crafts offer a fantastic framework for enhancing this spirit of togetherness, creating a hub of activity that naturally draws everyone in.
The Power of Shared Creation
When you sit down to craft with your children, you're not just supervising; you're participating. This shared experience is incredibly valuable for building bonds.
- Conversation Starters: Crafting naturally leads to conversation. "What are you thankful for?" "What color feather should we use next?" "How can we make this turkey stand up?" These simple questions open doors to meaningful dialogue.
- Teamwork and Collaboration: Older children can help younger siblings, parents can guide, and everyone can contribute to a larger project, like a gratitude tree. This fosters a sense of teamwork and mutual support.
- Intergenerational Connection: Grandparents, aunts, and uncles can join in the fun, sharing stories, teaching techniques, and relishing the joy of creating with the younger generation. It's a beautiful way to pass down traditions and create new ones.
A Welcome Screen-Free Alternative
In a world saturated with digital distractions, offering engaging, hands-on activities is more important than ever. Quick Thanksgiving crafts provide a refreshing break from screens, encouraging children to use their hands, minds, and imaginations in a tangible way. This allows for a deeper level of engagement and focus, fostering a calm yet stimulating environment during a busy holiday.
Creating New Family Traditions
Crafting can become a beloved Thanksgiving tradition. Perhaps every year you make a new handprint turkey to compare growth, or a new gratefulness chain to add to the previous year's. These small rituals build anticipation and create a sense of continuity and history within the family.
Practical Tips for Family Crafting Success:
- Offer Choices, Not Demands: Present a few craft options and let children choose what excites them. This gives them ownership and boosts engagement.
- Designate Roles: For younger children, assign simple tasks like tearing paper or sticking pre-cut shapes. Older children can handle more complex cutting or gluing.
- Set the Mood: Put on some festive fall music, light a fall-scented candle (safely, out of reach of children), and have some warm apple cider ready.
- Display with Pride: Showcasing your children's creations prominently makes them feel valued and appreciated. Hang them, use them as table decor, or gift them to family members.
These shared moments of crafting are an investment in your family's happiness and connection. They are about the process, the laughter, the learning, and the indelible memories created together. For continuous screen-free fun and learning, remember that a new adventure is delivered to your door every month with free shipping in the US when you join The Chef's Club!
Beyond Thanksgiving Day: Extending the Fun
While these crafts are perfect for Thanksgiving, their spirit of creativity and learning doesn't have to end with the holiday feast. Many of these activities and the skills they foster can be carried forward, making them valuable well beyond the last slice of pumpkin pie.
Year-Round Crafting Habits
- Nature's Inspiration: Encourage your children to continue collecting natural materials on walks – leaves in spring, flowers in summer, interesting stones anytime. These can fuel new craft projects throughout the year, keeping their connection to nature alive.
- Upcycling Continues: Keep a designated "crafts bin" for clean paper rolls, interesting packaging, fabric scraps, and other items that can be repurposed. This teaches resourcefulness and reduces waste.
- Themed Kits: If your children enjoyed the structured fun of these quick crafts, consider introducing them to our themed one-time kits from our main shop collection. Each kit is a complete "edutainment" experience, blending food, STEM, and the arts, perfect for continued hands-on learning.
Journaling and Reflection
- Gratitude Journals: Extend the concept of the "thankful tree" by encouraging children to keep a simple gratitude journal. A few minutes each day or week to draw or write what they're thankful for can cultivate a lifelong habit of positivity.
- Art Journals: Provide blank sketchbooks where children can continue to draw, paint, or make rubbings inspired by their surroundings or their imaginations. This fosters continuous artistic development.
Gifting and Giving Back
- Handmade Gifts: Teach children the value of handmade gifts. The crafts they create can be thoughtful presents for birthdays, holidays, or just to show appreciation to friends and family. This instills generosity and personal touch.
- Community Projects: Explore opportunities to use crafting for good. Perhaps decorate cards for local nursing home residents or create small ornaments for a community tree. This connects their creativity to a sense of social responsibility.
Expanding on STEM and Art Concepts
- Kitchen Science: If the edible crafts sparked interest, delve deeper into kitchen science. Our I'm the Chef Too! kits are specifically designed for this, offering a unique approach to teaching complex subjects through delicious cooking adventures developed by mothers and educators.
- Art Exploration: Introduce them to different art forms – collage, sculpture, drawing techniques. Visit local art museums or galleries to inspire new ideas.
By embracing the spirit of these quick Thanksgiving crafts, you're not just filling a few hours during a holiday; you're nurturing a child's inherent curiosity, fostering creativity, developing essential skills, and strengthening family bonds that will enrich their lives all year long. The journey of "edutainment" is continuous, and we at I'm the Chef Too! are thrilled to be a part of it, providing enriching experiences that spark imagination and a love for learning every step of the way.
Conclusion
As we've explored a cornucopia of quick Thanksgiving crafts for kids, it's clear that these simple activities offer far more than just a way to keep little hands busy. They are powerful tools for "edutainment," blending the joy of creativity with fundamental lessons in STEM, art, and social-emotional development. From the classic handprint turkey to the heartfelt gratitude tree and the charming upcycled decorations, each craft provides a unique opportunity to spark curiosity, build confidence, develop essential skills, and, most importantly, create cherished family memories.
At I'm the Chef Too!, our mission is to facilitate these very connections – providing screen-free, engaging experiences that bring families together over shared discovery. We understand the value of tangible, hands-on learning, and these Thanksgiving crafts perfectly echo our philosophy of blending food, STEM, and the arts into one-of-a-kind adventures. Remember, the goal isn't guaranteed educational outcomes, but rather the immense benefits of the process: fostering a lifelong love for learning, building self-esteem, and creating joyful moments that become the fabric of your family's story.
So, as you gather with your loved ones this Thanksgiving season, embrace the magic of crafting. Let your children's imaginations soar, their creativity shine, and their little hands bring warmth and personality to your holiday celebrations.
Ready to continue the adventure of learning and laughter long after the Thanksgiving dishes are put away? Imagine a new, exciting "edutainment" experience delivered right to your doorstep every month! With our unique blend of STEM and culinary fun, you can spark ongoing curiosity and creativity in your child, all while enjoying precious screen-free family time. Don't miss out on the magic of discovery – join our community of young chefs and scientists today!
Join The Chef's Club and subscribe to our monthly "Chef's Club" for ongoing educational fun!
FAQ: Quick Thanksgiving Crafts for Kids
Q1: What age group are these crafts best suited for?
A: Many of these crafts are adaptable for a wide range of ages! Simple tasks like finger painting handprint turkeys or gluing pre-cut shapes are perfect for toddlers and preschoolers (with adult supervision, of course). Older elementary children can engage in more intricate cutting, detailed decorating, and reflective writing for gratitude crafts. The key is to adapt the complexity to your child's developmental stage.
Q2: How can I make these crafts truly "quick" if I'm short on time?
A: The best way to ensure quick crafting is preparation!
- Pre-cut shapes: For younger kids, cut out all the paper shapes (feathers, beaks, etc.) beforehand.
- Limit choices: Offer a small selection of materials to reduce decision-making time.
- Choose simpler crafts: Focus on 1-2 step projects like leaf rubbings or handprints.
- Embrace "less perfect": Let go of the idea of a Pinterest-perfect craft and just enjoy the process with your child.
Q3: What are the most common household items I can use for Thanksgiving crafts?
A: You'd be surprised!
- Paper: Construction paper, paper plates, paper bags, empty toilet paper/paper towel rolls.
- Nature: Leaves, pinecones, small twigs, stones (collected from a walk).
- Kitchen: Sponges (for stamping), aluminum foil, dried pasta or beans (for sensory bins or textured art).
- Recycling: Cardboard, plastic containers (cleaned), old magazines for collages. Basic art supplies like glue, scissors, markers, and crayons are always helpful.
Q4: How do these crafts align with STEM education, like I'm the Chef Too!'s kits?
A: Just like our cooking kits teach STEM through delicious, hands-on experiences, crafts incorporate STEM principles in fun ways:
- Science: Observing how colors mix, the properties of different materials (e.g., sticky glue, rigid paper), or the anatomy of a leaf.
- Technology: Using tools like scissors or hole punches effectively.
- Engineering: Designing how parts fit together, how to make a 3D object stand up, understanding balance and structure.
- Math: Counting, recognizing shapes, creating patterns, understanding symmetry. These seemingly simple activities lay foundational understanding for more complex STEM concepts in an engaging way.
Q5: My child gets frustrated if their craft doesn't look "perfect." How can I encourage them?
A: This is a common challenge!
- Focus on the process: Emphasize the fun of creating, not just the final product. Say things like, "Look at all the beautiful colors you're using!" or "I love how you experimented with that shape!"
- Embrace uniqueness: Point out how special their craft is because it's their own unique creation. "No one else's turkey looks exactly like yours, and that's wonderful!"
- Model acceptance: Don't stress over perfection yourself. Your calm and encouraging attitude will rub off on them.
- Talk about "happy accidents": Sometimes mistakes lead to new, interesting ideas. Remember, the goal is to foster a love for learning and creativity, not to produce flawless art.
Q6: How can I integrate gratitude into these crafts for younger children who can't write?
A: Absolutely!
- Drawing: Ask them to draw pictures of things they are thankful for (e.g., their pet, a favorite toy, a family member) on gratitude leaves or chains.
- Verbalizing: Have them tell you what they're thankful for, and you can write it on their craft for them.
- Photo Collage: For a gratitude placemat, print photos of things or people they are thankful for and let them glue the photos onto their craft. The act of reflection, even without words, is powerful for developing empathy and appreciation.
Q7: Where can I find more ideas for engaging, screen-free educational activities like these?
A: If you love the hands-on, educational fun of these crafts, you'll adore our I'm the Chef Too! experiences! We offer a unique blend of culinary and STEM adventures designed to spark curiosity and creativity.
- Explore our full range of themed activities available for a single purchase by browsing our complete collection of one-time kits.
- For continuous educational fun, consider our Chef's Club subscription, where a new adventure is delivered to your door every month with free shipping in the US! It's the perfect way to keep the learning and family bonding going all year long.