Designing Brilliance: The Ultimate Propeller Car STEM Project for Curious Kids

Table of Contents
- The Magic of Motion: What is a Propeller Car STEM Project?
- Igniting Curiosity: Why Propeller Cars are Essential STEM Learning Tools
- The Science Behind the Speed: Unpacking STEM Concepts in Your Propeller Car
- Building Your Own Propeller Car: A Journey of Creation
- Expanding the Adventure: Variations and Challenges
- Safety First: A Note for Parents and Educators
- Nurturing Lifelong Learners with I'm the Chef Too!
- Conclusion
- Frequently Asked Questions (FAQ)
Imagine the thrill in your child's eyes as a creation of their own hands zips across the floor, powered by nothing but clever engineering and a little bit of air! This isn't just about building a toy; it's about igniting a passion for discovery, understanding the world through tangible experiences, and sparking that unique "aha!" moment that truly makes learning unforgettable. The propeller car STEM project is one such gateway to wonder, transforming everyday materials into a vehicle for scientific exploration.
At I'm the Chef Too!, our mission is deeply rooted in this very philosophy: to blend food, STEM, and the arts into one-of-a-kind "edutainment" experiences that captivate young minds. Just as our edible science kits turn baking into a biology lesson or a chemical reaction, the propeller car project offers a dynamic, hands-on opportunity to delve into fundamental principles of physics and engineering. In this comprehensive guide, we'll explore what makes a propeller car such a powerful STEM tool, break down the fascinating science behind its motion, walk you through the essential steps and concepts of building one, and show how this aligns perfectly with our commitment to fostering curiosity and creativity in children. Get ready to rev up those imaginations and embark on an exciting journey of design and discovery!
The Magic of Motion: What is a Propeller Car STEM Project?
A propeller car, at its heart, is a simple yet ingenious vehicle that uses the thrust generated by a spinning propeller to move forward. Unlike traditional cars powered by internal combustion engines or even electric motors directly driving wheels, a propeller car pushes against the air, and the air, in turn, pushes the car. It’s a beautiful demonstration of physics in action, often built from readily available materials right in your home or local craft store.
There are generally two main types of propeller cars that kids can build, each offering distinct learning opportunities:
- Electric Motor-Powered Propeller Cars: These often use a small DC motor connected to a battery pack and a mini propeller. The circuit created provides the electricity to spin the motor, which then rotates the propeller. This version introduces concepts of basic electrical circuits, energy conversion, and motor mechanics.
- Rubber Band-Powered Propeller Cars: This type relies on stored potential energy. A rubber band is twisted or wound, and as it unwinds, it releases its energy to spin a propeller. This version is fantastic for teaching about potential and kinetic energy, tension, and mechanical advantage without needing any electrical components.
Regardless of the power source, the core concept remains the same: transforming a simple force (spinning air) into forward motion. This hands-on experience demystifies abstract scientific ideas, making them concrete and exciting. Think of it this way: just as we might explore the geological layers of the earth by creating our own edible "Fudgy Fossil Dig" kit, a propeller car project offers a tangible way to build, test, and understand the invisible forces that govern movement. It’s a microcosm of real-world engineering, allowing children to experiment with design, overcome challenges, and celebrate their creations.
Igniting Curiosity: Why Propeller Cars are Essential STEM Learning Tools
In an age where screens often dominate playtime, finding engaging, educational, and screen-free activities can feel like a quest. This is precisely where a propeller car STEM project shines, offering a multitude of benefits that extend far beyond simply building a toy. At I'm the Chef Too!, we believe in the power of hands-on "edutainment" to spark genuine curiosity, and the propeller car perfectly embodies this philosophy.
Here’s why building a propeller car is an essential learning tool for children:
- Hands-On Learning that Sticks: Children learn best by doing. Instead of passively reading about concepts, they actively build, test, and observe. This direct engagement solidifies understanding in a way that textbooks rarely can. They don’t just hear about thrust; they feel their car push forward.
- Fosters Critical Thinking and Problem-Solving: A propeller car rarely works perfectly on the first try. Wheels might stick, the propeller might spin in the wrong direction, or the car might not move at all. These "failures" aren't setbacks; they're invitations to analyze, troubleshoot, and iterate. This process cultivates vital problem-solving skills and resilience.
- Encourages Creativity and Innovation: There’s no single "right" way to build a propeller car. Children can experiment with different materials for the chassis, various wheel designs, and unique ways to mount the propeller. This freedom to design and innovate encourages imaginative thinking and personal expression.
- Develops Fine Motor Skills: Cutting, gluing, stripping wires (with supervision), attaching small parts, and winding rubber bands all contribute to the development of fine motor skills and hand-eye coordination.
-
Introduces Cross-Disciplinary Concepts: The project naturally integrates elements from all four pillars of STEM:
- Science: Newton's Laws of Motion, forces (thrust, drag, friction), energy (potential, kinetic, electrical), aerodynamics.
- Technology: Understanding how motors and circuits work (for electric versions).
- Engineering: The entire design and build process, from ideation to refinement.
- Mathematics: Measurement, geometry in design, calculating speed or distance.
- Promotes Patience and Persistence: Seeing a project through from start to finish, especially when faced with challenges, teaches children the value of patience and persistence. The reward of a working car is incredibly satisfying.
- Offers a Screen-Free Educational Alternative: In alignment with our core values, this project provides a wonderful break from digital devices, offering a tangible, engaging activity that stimulates the mind in a different way. It's about experiencing the joy of creation in the real world.
-
Facilitates Family Bonding: Working on a
propeller car STEM projecttogether creates a shared experience, fostering communication, teamwork, and lasting memories. Just like our delicious cooking adventures bring families together in the kitchen, building a propeller car can be a fantastic collaborative effort. - Builds Confidence: Successfully building and understanding how their car works gives children a tremendous boost in confidence, empowering them to tackle future challenges with a can-do attitude.
This comprehensive learning experience is exactly what we champion at I'm the Chef Too!. We believe in empowering children to become active participants in their learning journey, transforming complex subjects into accessible and exciting adventures. If you love the idea of hands-on learning but prefer a pre-packaged adventure, explore our full library of STEM-infused kits available for a single purchase in our shop. From delicious chemical reactions to edible explorations of the solar system, we have something to spark every child's imagination. Browse our complete collection of one-time kits.
The Science Behind the Speed: Unpacking STEM Concepts in Your Propeller Car
Building a propeller car STEM project isn't just about glue and craft sticks; it's a deep dive into some of the most fundamental concepts in science and engineering. Every component, every design choice, and every test run offers a lesson waiting to be discovered.
Physics in Motion: Newton's Laws and Beyond
The propeller car is a dynamic classroom for understanding core physics principles. Let's break down the magic:
- Newton's Third Law of Motion: Action-Reaction! This is the star of the show for any propeller-driven vehicle. The propeller blades are angled to push air forcefully backward (the "action"). According to Newton's Third Law, for every action, there is an equal and opposite reaction. So, as the propeller pushes the air backward, the air pushes the propeller – and thus the car – forward (the "reaction"). This principle is what creates thrust, the force that propels your car.
- Thrust: This is the forward-driving force generated by the propeller. Factors like the propeller's size, shape, pitch (the angle of its blades), and rotational speed all influence how much thrust is produced. A larger, faster-spinning propeller with a steeper pitch generally creates more thrust.
- Drag: As the car moves through the air, it encounters resistance, known as drag. The shape of the car body, its surface texture, and its overall size affect how much drag it experiences. An aerodynamic design, like a sleek body or smooth surfaces, helps reduce drag, allowing the car to go faster and further.
- Friction: This is the force that opposes motion when two surfaces rub against each other. In a propeller car, friction occurs between the wheels and the ground, and between the axles and their supports. Reducing friction, perhaps by using smooth axles and well-fitting wheels, allows the car to roll more freely.
- Inertia: This is an object's resistance to changes in its state of motion. An object at rest wants to stay at rest, and an object in motion wants to stay in motion. A lightweight car with small, lightweight wheels has less inertia, meaning it requires less force to get moving and can reach its maximum speed more quickly. This is why many propeller cars are designed to be as light as possible.
- Aerodynamics: This is the study of how air interacts with moving objects. The design of your propeller car – from its overall shape to the angle of the propeller – impacts its aerodynamic efficiency. A more aerodynamic car will experience less drag and therefore perform better.
At I'm the Chef Too!, we often explore concepts like states of matter when melting chocolate or chemical reactions when baking our Erupting Volcano Cakes. Similarly, building a propeller car allows children to tangibly experiment with fundamental forces like thrust and drag, observing their direct impact on motion. Discover the science of edible eruptions with our Erupting Volcano Cakes kit.
Engineering Design: The Blueprint of Success
Beyond physics, the propeller car is a fantastic vehicle for introducing children to the engineering design process, a cyclical method engineers use to solve problems.
-
The Engineering Design Process: This isn't a linear checklist but an iterative loop:
- Ask: What is the problem? (e.g., "How can I build a car that moves using a propeller?")
- Imagine: Brainstorm different solutions and designs. (e.g., "Should I use cardboard or craft sticks for the body? What kind of wheels?")
- Plan: Choose the best solution, draw a sketch, list materials.
- Create: Build a prototype based on the plan.
- Improve: Test the prototype, identify what works and what doesn't, then go back to "Imagine" or "Plan" to make changes and refine the design.
- Material Selection: Children learn that different materials have different properties. Cardboard is lightweight and easy to cut but might lack rigidity. Craft sticks offer more strength but might be heavier. Choosing the right material for each part is a key engineering decision.
- Structural Integrity: A well-designed car needs a stable chassis (body) and straight, parallel axles to ensure it moves efficiently. Kids learn the importance of sturdy construction and proper alignment.
-
Prototyping & Iteration: The beauty of a DIY
propeller car STEM projectis that it's okay if the first version isn't perfect. Each test run provides valuable data, encouraging children to modify, rebuild, and re-test, fostering a mindset of continuous improvement. This iterative process is central to how we design our kits, testing recipes and activities rigorously to ensure they are both educational and fun.
The Spark of Electricity: Powering an Electric Propeller Car
For those building an electric propeller car, an entirely new layer of STEM learning emerges: basic electronics and circuits.
-
Simple Circuits: An electric propeller car relies on a simple circuit to power its motor. A circuit is a path that electricity can flow through.
- Open Circuit: If there's a break or gap in the path (e.g., a battery isn't inserted, or a switch is off), no current can flow, and the motor won't spin.
- Closed Circuit: When the path is complete (batteries inserted, switch on, wires connected), current flows, and the motor works.
-
Essential Components:
- Batteries: The power source, providing electrical energy.
- DC Motor: Converts electrical energy from the batteries into mechanical (rotational) energy to spin the propeller.
- Wires: Conduct electricity from the batteries to the motor.
- Switch (Optional but Recommended): Allows you to easily open and close the circuit to turn the car on and off without removing batteries.
- Voltage & Current: Kids get a basic introduction to how more batteries (higher voltage) can potentially make the motor spin faster, but also consider the added weight and potential for overheating.
- Polarity and Propeller Direction: The way the wires are connected to the motor determines the direction it spins. If the propeller pushes air forward instead of backward, the car will move backward! Learning to reverse connections or use the correct propeller (clockwise vs. counter-clockwise) is a practical lesson in polarity and cause-and-effect.
While our kits might focus on edible chemistry and biology, understanding basic circuits in a propeller car STEM project is another fantastic pathway to demystifying the mechanical and electrical wonders of the world around us. These kinds of projects truly build confidence and foster a love for learning, encouraging children to ask "how does that work?" about everything they encounter.
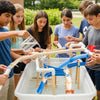
Building Your Own Propeller Car: A Journey of Creation
Embarking on a propeller car STEM project is an exciting journey that blends creativity with engineering principles. It's less about following a rigid instruction manual and more about understanding the core components and design considerations, then letting imagination guide the build. Remember, adult supervision is crucial, especially when using tools like hot glue guns or wire strippers.
Essential Materials to Gather
The beauty of a propeller car is that many components can be repurposed from everyday items. Here’s a general list to get you started, whether you’re going electric or rubber band powered:
-
For the Car Body/Chassis:
- Cardboard (cereal boxes, shipping boxes)
- Craft sticks (popsicle sticks)
- Plastic bottles or containers
- Foam sheets
-
For Axles:
- Wooden skewers
- Dowel rods (small diameter)
- Toothpicks (for smaller, lighter cars)
- Straws (for axle housings, allowing axles to spin freely)
-
For Wheels:
- Bottle caps (soda, milk jugs)
- Plastic beads (larger ones for less friction)
- CDs or DVDs (lightweight, large diameter)
- Foam disks
- Cardboard circles
-
For Propulsion (Electric Motor Version):
- Small DC motor (e.g., 6x15mm DC motor)
- Mini plastic propeller (sized to fit motor shaft, usually 1mm)
- AAA or AA battery holder (for 2 batteries)
- AAA or AA batteries (2)
- Thin electrical wire
- Small switch (optional, but highly recommended for convenience)
- Electrical tape or heat shrink tubing
-
For Propulsion (Rubber Band Version):
- Rubber bands (various sizes/strengths)
- A craft stick or small wooden piece for the propeller shaft
- A small hook or bent paper clip to hold the rubber band
- Materials to make a propeller (e.g., lightweight cardstock, thin plastic, foam, or a small plastic propeller meant for RC toys)
-
Tools (Require Adult Supervision):
- Scissors
- Wire strippers (for electric version)
- Needle-nose pliers
- Hot glue gun and glue sticks
- Ruler or measuring tape
- Permanent marker
- X-Acto knife or box cutter (for cardboard)
- Small drill or awl (for making holes in wheels)
- Sandpaper (for smoothing axles if needed)
Step-by-Step Principles: Your Conceptual Guide
Instead of a single prescriptive blueprint, let’s consider the fundamental design principles involved in building a propeller car STEM project. This approach encourages creative problem-solving and adaptation!
- Conceive Your Design: Before you even touch a material, brainstorm! Sketch out ideas for your car. What shape will the body be? How many wheels? Where will the propeller go? Will it be electric or rubber band powered? Thinking through these questions helps clarify the project.
-
Construct the Chassis (The Body): This is the foundation of your car.
- Cut a base from cardboard or craft sticks. Aim for something relatively flat and stable.
- Consider how you will attach your axles. Straws glued parallel to each other on the underside of the chassis make excellent, low-friction axle housings. Ensure they are wide enough apart for stability.
- If using craft sticks, you might create a simple rectangular frame.
-
Mount the Axles and Wheels:
- Cut your wooden skewers or dowel rods to length, ensuring they extend beyond the width of your car body.
- Insert them through your straw housings.
- Prepare your wheels: If using bottle caps, carefully make a hole in the center (a small drill bit is ideal, or carefully cut an 'X' with an X-Acto knife, with adult help).
- Slide a wheel onto each end of the axles. You'll need a way to secure them so they don't slide off but can still spin freely. Hot glue can work if applied carefully only to the outer side of the wheel against the axle, or you can crimp the end of a toothpick axle with pliers as some designs suggest. Ensure all wheels spin without getting stuck!
-
Integrate the Power System: This is where the electric and rubber band versions diverge.
-
For Electric:
- Prepare your wires: Strip a small amount of insulation from the ends of the motor and battery pack wires.
- Create the circuit: Twist the motor wires to the battery pack wires (e.g., red to red, black to blue/black). If adding a switch, cut one of the battery wires (usually the red one) and connect the switch in between the cut ends.
- Secure connections: Wrap twisted connections with electrical tape or use heat shrink tubing to prevent short circuits.
- Mount the motor: You'll need a small platform to elevate the motor so the propeller doesn't hit the car body or the ground. Small pieces of stacked cardboard or wood blocks glued to the rear of the chassis work well. Glue the motor securely to this platform, ensuring the propeller faces backward.
-
For Rubber Band:
- Create a propeller shaft: This could be a craft stick or dowel with a hook at one end.
- Build your propeller: Use lightweight material (cardstock, thin plastic) and attach it to one end of the propeller shaft.
- Create supports: You'll need a way to mount the propeller shaft to the car body, allowing it to spin freely. This might involve small wooden blocks with holes or simply securing the shaft loosely to the chassis.
- Attach the rubber band: Hook one end of the rubber band to the propeller shaft and the other to a fixed point on the front of the car.
-
For Electric:
-
Attach the Propeller:
- For electric motors, firmly press the propeller onto the motor shaft. Ensure it’s a counter-clockwise propeller if your motor spins that way (or vice-versa), to push air backward. If it spins the wrong way, you can often reverse the motor's connections or use a different propeller type.
- For rubber band versions, ensure your handmade or store-bought propeller is securely attached to the shaft.
-
Test and Refine: This is the most crucial, and often most fun, part!
- Insert batteries (if electric) or wind the rubber band (if mechanical).
- Observe what happens. Does it move? Does it go straight? Does it spin in circles?
-
Troubleshooting:
- If it spins in circles: Check if wheels are stuck or if the axles are not parallel.
- If it doesn't move: For electric, check connections, batteries, and propeller direction. For rubber band, check if the band is wound enough or if there's too much friction.
- If it's slow: Consider reducing friction, making the car lighter, or increasing propeller thrust.
- Based on your observations, go back and make improvements. This iterative process is where true learning happens!
Ready for a new adventure every month? Join The Chef's Club and enjoy free shipping on every box. Our expertly designed kits provide all the pre-measured dry ingredients and specialty supplies you need for a complete experience, just like the structured fun of a well-planned STEM project but with edible results! Join The Chef's Club today!
Expanding the Adventure: Variations and Challenges
Once your basic propeller car STEM project is complete and zooming, the real fun of experimentation begins! This project is wonderfully versatile, allowing for endless variations and challenges that can deepen understanding and further ignite that engineering spark.
Here are some ideas to expand your propeller car adventure:
-
Power Source Experiments:
- Compare Electric vs. Rubber Band: Build both types and race them. Which is faster? Which goes further? Discuss the pros and cons of each power source.
- Different Battery Configurations: For electric cars (with adult supervision and care not to overload the motor), experiment with using one vs. two batteries. How does increased voltage (from more batteries) affect speed and power? What about the added weight? (Always check motor specifications to avoid burnout).
-
Chassis Design Exploration:
- Lightweight vs. Sturdy: Build cars with different body materials (e.g., ultra-light foam vs. sturdy cardboard). Which performs better? Discuss the trade-offs between weight and durability.
- Aerodynamic Shapes: Experiment with streamlining the car's body. Can adding a sloped front or side panels reduce drag?
- Different Wheel Materials and Sizes: Try bottle caps, CDs, or foam wheels. How does wheel size and weight affect acceleration and top speed? Do wider wheels offer more stability?
-
Propeller Optimization:
- Propeller Pitch: If you have access to different propellers or can make your own, vary the angle (pitch) of the blades. How does a steeper pitch affect thrust?
- Number of Blades: Compare propellers with two, three, or even four blades. What are the differences in performance?
- Directional Control: For electric cars, discuss how reversing the wire connections or using a different propeller type (CW vs. CCW) can make the car go backward.
-
Race Day Challenges:
- Longest Distance Race: See which car can travel the furthest on a single "charge" or winding.
- Fastest Speed Challenge: Time cars over a set distance.
- Accuracy Challenge: Set up targets or a simple maze for the cars to navigate.
- Weight-Carrying Challenge: Can the car still move if it has to carry a small load? How much weight can it move?
- Creative Decoration: Once the engineering is sound, encourage artistic expression! Decorate the car with paints, markers, googly eyes, or found objects. This brings in the "arts" component of STEAM.
Imagine bringing these exciting challenges to your classroom, homeschool co-op, or camp! Our programs are designed to engage every young learner, providing flexible and educational options. Learn more about our versatile programs for schools and groups, available with or without food components, perfectly tailored to your needs. Explore our School & Group Programs for an unforgettable learning experience.
These variations transform a simple build into a continuous learning loop, encouraging children to think like scientists and engineers, constantly questioning, testing, and refining their creations.
Safety First: A Note for Parents and Educators
While a propeller car STEM project is incredibly rewarding and educational, safety should always be the top priority. Children are naturally curious, but certain tools and components require careful handling and adult supervision.
Here are key safety considerations:
- Adult Supervision is Paramount: Always ensure an adult is present and actively supervising children throughout the entire building process, especially when using tools or working with electrical components.
- Hot Glue Gun Safety: Hot glue guns can cause burns. Teach children to handle them with extreme care, pointing the hot tip away from themselves and others. Better yet, adults should handle the glue gun, with children directing where the glue should go.
- Wire Stripping Tools: Wire strippers are sharp and can easily nick skin. An adult should demonstrate proper use and ideally perform the wire stripping, or closely supervise older children.
- Small Parts: Many components (beads, small propellers, batteries) can be choking hazards for young children. Keep these out of reach and ensure proper disposal of any small scraps.
-
Battery Safety:
- Always use the correct battery type and quantity recommended for the motor. Overloading a motor with too much voltage can cause it to overheat and burn out, posing a fire risk.
- Ensure batteries are inserted correctly according to polarity (+ and -).
- Never mix old and new batteries or different battery types.
- Remove batteries when the car is not in use to prevent accidental activation.
-
Propeller Safety: A spinning propeller can move very quickly.
- Keep fingers, hair, clothing, and loose objects away from the propeller when it is active.
- Consider wearing eye protection during testing, especially if the propeller is flimsy or if components might fly off.
- Emphasize that the propeller is a moving part and should not be touched while spinning.
- Sharp Tools: When cutting cardboard with X-Acto knives or scissors, always cut away from the body and ensure a stable cutting surface. An adult should handle sharp blades.
At I'm the Chef Too!, just as we prioritize safety in the kitchen with clear, easy-to-follow instructions for all our edible STEM kits, we strongly advocate for safe practices in all hands-on STEM activities. By taking these precautions, you can ensure that the propeller car STEM project remains a fun, educational, and safe experience for everyone involved.
Nurturing Lifelong Learners with I'm the Chef Too!
The journey of building a propeller car STEM project beautifully illustrates the core philosophy we champion at I'm the Chef Too!. Our mission is to blend food, STEM, and the arts into one-of-a-kind "edutainment" experiences that go beyond mere instruction. We are committed to sparking genuine curiosity and creativity in children, facilitating precious family bonding moments, and providing a truly screen-free educational alternative that makes learning an adventure.
Our unique approach, developed by mothers and educators, focuses on teaching complex subjects through tangible, hands-on, and utterly delicious cooking adventures. Just as a child learns about forces and engineering by physically assembling a propeller car, they grasp concepts like chemical reactions, biology, and even geology by mixing, baking, and decorating our themed treats. We believe that when learning is engaging, accessible, and fun, it naturally builds confidence and fosters a lifelong love for discovery.
The iterative process of designing, building, testing, and refining a propeller car mirrors the scientific method and engineering design cycle that underpins our own kit development. We meticulously craft each recipe and activity to ensure it's not only exciting and delicious but also deeply educational, allowing children to see, touch, taste, and understand the science at play. From exploring astronomy by creating your own edible solar system with our Galaxy Donut Kit to understanding habitats while making Peppa Pig Muddy Puddle Cookie Pies, we turn abstract ideas into memorable, edible experiences. Explore astronomy by creating your own edible solar system with our Galaxy Donut Kit. Even beloved characters can make learning fun, like when kids make Peppa Pig Muddy Puddle Cookie Pies.
We understand the joy of a child's eyes lighting up with understanding, the satisfaction of a successful creation, and the value of shared experiences. These are the moments that truly matter, forging connections between learning and fun. Our kits are designed to replicate this magic, delivering complete experiences with pre-measured dry ingredients and specialty supplies right to your door, taking the guesswork out of educational fun.
Ready to explore a world where learning is always an exciting adventure delivered right to your door? Join The Chef's Club and embark on new educational journeys every month with free shipping in the US! Join The Chef's Club and start your culinary STEM adventure! Our convenient 3, 6, and 12-month pre-paid plans make gifting or long-term enrichment a breeze, ensuring a continuous stream of discovery. Give the gift of learning that lasts all year with a 12-month subscription to our STEM cooking adventures! Give the gift of ongoing discovery with a Chef's Club subscription.
Conclusion
The propeller car STEM project is far more than just a fun craft; it's a dynamic gateway to understanding the fundamental principles of science, technology, engineering, and mathematics. From Newton's Laws of Motion to the intricacies of electrical circuits and the iterative process of engineering design, this hands-on activity offers a powerful, tangible way for children to engage with complex concepts. It sparks curiosity, builds confidence, hones problem-solving skills, and creates invaluable opportunities for family bonding, all while being a fantastic screen-free alternative.
We hope this deep dive has inspired you to embark on your own propeller car adventure, embracing the challenges and celebrating the triumphs that come with hands-on creation. Don't let the learning stop here! Extend the joy of discovery and hands-on education with I'm the Chef Too!. We are dedicated to providing unique "edutainment" experiences that blend the magic of cooking with the power of STEM and the beauty of art. Experience the convenience of a new, engaging STEM adventure delivered to your home every month. Join The Chef's Club today and ignite a lifelong passion for learning in your child! Join The Chef's Club and bring endless STEM fun to your home!
Frequently Asked Questions (FAQ)
Q: What age is a propeller car STEM project suitable for?
A: A propeller car STEM project can be adapted for a wide range of ages, generally from 5 years old and up. Younger children (5-7) will need significant adult assistance with cutting, gluing, and wiring, focusing more on assembly and understanding basic concepts. Older children (8-12+) can take on more independent design and building roles, delving deeper into the physics and engineering principles, and even troubleshooting electrical circuits with supervision. The complexity can be adjusted based on the child's skill level and interest.
Q: How long does it typically take to build a propeller car?
A: The time required can vary greatly depending on the complexity of the design, the materials used, and the child's age and experience. A basic propeller car might take 30-60 minutes for initial construction. However, the true "project" involves testing, troubleshooting, and refining, which can extend the activity over several hours or even multiple sessions, making it a wonderful ongoing learning experience.
Q: What if our propeller car doesn't work after we build it?
A: This is a common and incredibly valuable part of the engineering design process! Don't get discouraged. First, troubleshoot systematically:
- Check the basics: Are batteries inserted correctly? Are all wires securely connected? Is the propeller firmly attached?
- Propeller direction: Is the propeller pushing air backward or forward? If forward, your car will go backward or not move efficiently. You might need to reverse the motor's wire connections or use a different propeller.
- Friction: Do the wheels spin freely? Are the axles straight and parallel? Too much friction in the wheels or axles can prevent movement.
- Design flaws: Is the car too heavy? Is the chassis unbalanced? Is the propeller hitting the ground or the car body? Use these "failures" as learning opportunities to redesign and improve!
Q: Can I reuse parts from this project for other STEM activities?
A: Absolutely! Many components are reusable. Motors, propellers, battery holders, switches, and even the car body materials like cardboard or craft sticks can often be disassembled and repurposed for new creations. This teaches children about resourcefulness and sustainable engineering practices. You could, for instance, use the motor and propeller to build a mini boat or a small fan!
Q: How can I make my propeller car go faster or further?
A: To improve performance, consider these factors:
- Reduce weight: A lighter car has less inertia to overcome.
- Reduce friction: Ensure wheels spin very freely on smooth axles.
- Increase thrust: Use a propeller with an efficient design, and ensure your motor/rubber band provides sufficient power to spin it quickly.
- Improve aerodynamics: Streamline the car's body to reduce air drag.
- Ensure straight movement: A car that wobbles or veers off course wastes energy. Ensure axles are perfectly parallel and wheels are securely aligned.
Q: Are there other STEM projects I can do at home with similar principles?
A: Definitely! Once you've mastered the propeller car, you can explore other projects that demonstrate similar principles of motion and energy:
- Balloon-powered cars: Uses thrust from escaping air (Newton's Third Law).
- Simple circuit projects: Build a flashlight, or a buzzing alarm to understand electricity.
- Catapults or trebuchets: Explore potential and kinetic energy, force, and trajectory.
- Paper airplanes: Dive deeper into aerodynamics and lift.
- Rubber band-powered boats: Apply the same propulsion principles to water.
Q: What makes I'm the Chef Too! kits unique for STEM learning?
A: At I'm the Chef Too!, we uniquely blend food, STEM, and the arts into exciting "edutainment" experiences. Our kits, developed by mothers and educators, offer tangible, hands-on learning through delicious cooking adventures. We provide pre-measured dry ingredients and specialty supplies, making it convenient for families to explore complex subjects like chemical reactions, biology, and even geology (for example, with our Fudgy Fossil Dig kit!) in an engaging, screen-free, and memorable way. Our goal is to spark curiosity, build confidence, and facilitate family bonding through the joy of creating and learning together.