Creepy-Cute Toilet Paper Roll Halloween Crafts for Kids

Table of Contents
- Introduction
- The Magic of the Modest Paper Roll: Why Craft with Them?
- Gearing Up for Ghoulish Creations: Essential Supplies & Safety Tips
- A Parade of Paper Roll Personalities: Step-by-Step Halloween Crafts
- Weaving in the Learning: STEM and Art Connections
- Making it a Family Affair: Crafting Together for Lasting Memories
- The I'm the Chef Too! Philosophy: Edutainment Beyond the Kitchen
- Conclusion
- FAQ Section
The air is crisp, the leaves are turning, and a whisper of magic fills the autumn evenings. For families everywhere, Halloween is a time of enchanting traditions, from choosing the perfect costume to trick-or-treating adventures. But before the big night, there’s a whole season of spooky fun to be had! If you’re looking for engaging, budget-friendly activities that spark creativity and offer a delightful break from screens, you’ve stumbled upon a treasure trove. What if we told you that the humble cardboard tubes typically tossed aside could become the stars of your Halloween décor and playtime?
At I'm the Chef Too!, we believe in transforming everyday moments into extraordinary learning experiences. Our mission is to blend food, STEM, and the arts into one-of-a-kind "edutainment" adventures that ignite curiosity and foster family bonding. We know how much joy comes from hands-on creation, and that’s why we’re diving deep into the wonderfully versatile world of toilet paper roll Halloween crafts for kids. This post isn't just about making cute decorations; it's about exploring creativity, refining fine motor skills, understanding basic engineering, and creating cherished memories, all while using materials you likely already have. Get ready to turn trash into treasure as we guide you through a fantastic array of spooky, silly, and undeniably fun Halloween characters and decorations, all crafted from those endlessly useful paper rolls!
Introduction
As autumn leaves begin to crunch underfoot and the scent of pumpkin spice fills the air, minds everywhere turn to the delightful anticipation of Halloween. For families, this holiday presents a fantastic opportunity to engage in creative activities that go beyond just costumes and candy. Yet, finding screen-free, educational, and budget-friendly projects that truly capture a child’s imagination can sometimes feel like a monstrous task. Imagine, however, transforming something as common as an empty toilet paper roll into a cast of ghoulishly grinning characters or a spooky-sweet decoration that brings a personalized touch to your home.
We understand the challenge of keeping little hands busy and minds engaged, especially when you want to nurture their budding interests in a tangible, meaningful way. That's precisely why we're so passionate about hands-on learning, and why we’ve dedicated this comprehensive guide to the magic of toilet paper roll Halloween crafts for kids. From classic mummies and Frankenstein's monsters to whimsical ghosts and black cats, we'll explore a plethora of ideas that are not only easy to make but also packed with opportunities for skill development and imaginative play. These crafts tap into a child's natural curiosity, encouraging them to explore textures, colors, and the satisfaction of bringing an idea to life. So gather your empty paper rolls and get ready to unleash a wave of creativity; by the end of this guide, you’ll be fully equipped to transform these everyday items into a parade of Halloween wonders, fostering a love for creation and making unforgettable family memories along the way.
The Magic of the Modest Paper Roll: Why Craft with Them?
Before we dive into the exciting world of mummies and monsters, let’s take a moment to appreciate why toilet paper rolls (and other cardboard tubes like paper towel rolls, cut down to size) are truly craft superheroes, especially for Halloween.
A Treasure Trove of Accessibility and Sustainability
One of the greatest appeals of crafting with toilet paper rolls is their sheer availability. We all use them, meaning there's a constant, free supply of crafting material right in your home. This makes them an incredibly sustainable choice, offering a wonderful way to teach children about recycling and repurposing everyday items. Instead of sending these tubes straight to the recycling bin, you’re giving them a second, creative life. This simple act reinforces the concept of reducing waste and caring for our planet, all while having fun.
Fueling Creativity on a Budget
Crafting can sometimes become an expensive hobby, but not when you're working with paper rolls. Most of the additional supplies you’ll need—like paint, markers, glue, and construction paper—are likely already in your craft drawer. This budget-friendly approach means you can undertake multiple projects without worrying about the cost, encouraging more experimentation and imaginative play. It frees up resources for other enriching activities, perhaps even one of our unique STEM cooking kits designed to spark curiosity and creativity through delicious adventures.
Developmental Benefits Beyond the Spooky Fun
Beyond the obvious joy of creation, toilet paper roll crafts offer a surprising array of developmental benefits for children of all ages:
- Fine Motor Skills: Cutting, gluing, painting, and wrapping small details onto a cylindrical surface are excellent exercises for developing dexterity and hand-eye coordination. These are crucial skills for everything from writing to self-care.
- Problem-Solving: Deciding how to attach a ghost's arms, or what shape to cut for Frankenstein’s hair, encourages critical thinking and spatial reasoning. Children learn to adapt and find solutions to small design challenges.
- Creativity and Imagination: With a blank canvas like a paper roll, the possibilities are limitless. Children can dream up their own unique characters, choose their favorite colors, and tell stories through their creations. This fosters imaginative play and narrative development.
- Following Instructions: When working on a specific craft, children practice listening to and following multi-step instructions, a vital skill for both academic and everyday life.
- Patience and Persistence: Crafting requires focus and the ability to see a project through to completion. Children learn the value of patience and the satisfaction of finishing what they start.
- Family Bonding: Crafting together is a fantastic way to create shared experiences and strengthen family ties. It offers a screen-free environment where conversations flow naturally, laughter is encouraged, and memories are made. This echoes our core belief at I’m the Chef Too! – that hands-on activities are powerful tools for building connections.
Imagine a busy parent, looking for a meaningful weekend activity that doesn't involve more screen time for their 6-year-old. Turning empty paper rolls into a collection of Halloween monsters isn't just about the end product; it's about the hours of focused engagement, the proud display of their creations, and the shared joy of making something together. It's about witnessing that spark of accomplishment in their child’s eyes. These simple crafts embody the spirit of "edutainment" that we champion, making learning an exciting and delicious adventure!
Gearing Up for Ghoulish Creations: Essential Supplies & Safety Tips
Before we transform our humble cardboard tubes into a haunted cast of characters, let's make sure we have all our crafting essentials ready and remember some important safety guidelines. Part of fostering a love for learning and hands-on activities is ensuring a safe and supportive environment for exploration.
Your Basic Halloween Crafting Toolkit
The beauty of toilet paper roll crafts is that they require very few specialized items. Most of these you probably already have lying around your house or can easily pick up without breaking the bank.
- The Stars of the Show: Empty toilet paper rolls (collect as many as you can!). Paper towel rolls, cut into segments, also work wonderfully, offering a bit more variety in height.
-
Colorful Coverage:
- Acrylic Paints: These are fantastic for full coverage and come in a wide array of colors. Orange, green, black, white, purple, and yellow are great for Halloween.
- Paint Brushes: Various sizes for broad strokes and fine details.
- Water Container & Paper Towels: For rinsing brushes and cleaning up spills.
- Construction Paper/Cardstock: Black, orange, green, white, purple, red, and yellow are excellent choices for cutting out features, clothes, and accessories.
-
The Sticky Stuff:
- School Glue (PVA Glue): Perfect for kids, safe, and works well for paper. It takes a little longer to dry but is very forgiving.
- Tacky Glue: A bit thicker and dries faster than regular school glue, great for slightly heavier embellishments.
- Hot Glue Gun (ADULT USE ONLY): For quick, strong bonds, especially for attaching googly eyes or small embellishments securely. Crucially, this tool should only be handled by an adult due to the risk of burns.
-
Cutting & Drawing:
- Kid-Safe Scissors: For little hands to practice their cutting skills.
- Pencil: For drawing shapes before cutting.
- Black Markers/Sharpies: For drawing faces, details, and outlines. Fine-tip markers are great for intricate work.
- White Correction Pen (Optional): For adding highlights or small details like vampire fangs.
-
Sparkly & Spooky Embellishments:
- Googly Eyes: A must-have! They instantly bring characters to life. Various sizes are fun.
- Yarn/String: For hair, hanging elements, or adding texture.
- Pipe Cleaners: Flexible and colorful, great for arms, antennae, or decorative accents.
- Glitter/Glitter Glue: For a touch of sparkle (use sparingly to avoid a glitter explosion!).
- Felt Scraps: For hats, capes, or textural details.
- Toilet Paper/Gauze: Essential for mummy crafts!
- Craft Foam: Can be good for sturdy accessories.
Safety First: Crafting with Confidence
While toilet paper roll crafts are generally very safe, adult supervision is always key, especially when younger children are involved. Here are a few pointers to ensure everyone has a fun and safe crafting session:
- Designated Craft Area: Lay down newspaper or a washable tablecloth to protect surfaces from paint and glue spills.
-
Tool Supervision:
- Scissors: Teach children how to use scissors safely, always cutting away from their body and passing them to others handle-first.
- Hot Glue Guns: As mentioned, these are strictly for adult use. If a child wants to place an item, the adult should apply the glue, and the child can gently press the item into place once the adult confirms it's safe.
- Non-Toxic Materials: Ensure all paints, glues, and markers are labeled non-toxic, especially if crafting with very young children who might be tempted to put things in their mouths.
- Ventilation: If using spray paint (for base coats, adult use only) or particularly strong-smelling glues, ensure you are in a well-ventilated area.
- Choking Hazards: Be mindful of small embellishments like googly eyes, beads, or tiny cut-out pieces. Keep them out of reach of infants and toddlers who are still exploring with their mouths.
- Wash Up: Always have soap and water ready for cleaning hands after crafting, especially if using paints or glues.
By setting up a safe and organized crafting station and providing appropriate guidance, you create an environment where children can confidently explore their creativity. This foundational experience is invaluable, just like the hands-on learning provided by our STEM cooking kits, which are designed to teach complex subjects through tangible, delicious adventures, always with an implicit understanding of adult supervision.
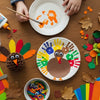
A Parade of Paper Roll Personalities: Step-by-Step Halloween Crafts
Now for the fun part! Let's transform those empty cardboard tubes into a fantastic array of Halloween characters. We’ll cover some classics, expand on the ideas you might have seen, and even throw in a few unique concepts. Each craft is designed to be accessible for various age groups, with tips for simplifying or adding complexity.
The Classic Halloween Monsters
These are the quintessential spooky figures that instantly scream "Halloween!"
1. The Not-So-Scary Mummy
The mummy is a perennial favorite, and toilet paper rolls make the perfect base for these ancient, wrapped wonders.
Materials:
- Toilet paper roll
- White paint (optional, for base coat)
- Toilet paper (the real star!) or white strips of fabric/gauze
- Googly eyes (medium or large)
- School glue or tacky glue
- Black marker (optional, for mouth)
Instructions:
- Base Coat (Optional): If you want a truly opaque mummy, paint the paper roll white and let it dry completely. This isn't strictly necessary as the toilet paper will cover most of it.
- Attach Eyes: Glue two googly eyes onto the top third of your toilet paper roll. Let them dry for a moment.
- Start Wrapping: Take a strip of toilet paper (about 1-2 inches wide and as long as you can manage without tearing). Apply a line of glue vertically down the back of the paper roll, near the top. Press one end of your toilet paper strip onto this glue.
- Wrap and Glue: Begin wrapping the toilet paper strip around the roll, overlapping the edges slightly. As you wrap, add small dabs or lines of glue periodically to secure the toilet paper in place. Be sure to wrap over and under the googly eyes to make them look like they're peeking out from the bandages.
- Distress (Optional): For a more aged look, you can gently tear or fray the edges of some toilet paper strips before gluing them. Leave some gaps to reveal the "body" underneath, especially if you painted a base coat.
- Secure the End: Once you reach the bottom, snip off any excess toilet paper and glue the final end securely to the roll.
- Finishing Touch: Use a black marker to draw a small, wavy mouth peeking out from the bandages if desired.
2. Friendly Frankenstein's Monster
Who says Frankenstein has to be terrifying? Ours is wonderfully whimsical!
Materials:
- Toilet paper roll
- Lime green or light green paint
- Black construction paper
- Googly eyes (medium)
- School glue or tacky glue
- Pencil
- Kid-safe scissors
- Black marker (for mouth and stitches)
- Small paper fasteners (optional, for neck bolts)
Instructions:
- Paint the Body: Paint the entire toilet paper roll lime green and let it dry completely. You might need two coats for even coverage.
- Cut the Hair: Take a piece of black construction paper. Draw a jagged line along one long edge to create Frankenstein's iconic spiky hair. Cut this out. Wrap it around the top of your paper roll to determine the length, then glue it around the top edge, making sure the zig-zag "hair" points downwards.
- Attach Features: Glue the googly eyes onto the face area.
- Draw the Mouth: Use a black marker to draw a square-shaped or slightly wavy mouth below the eyes.
- Add Stitches: Draw small horizontal lines over the mouth and a few other places on the face and neck area to represent stitches.
- Create Neck Bolts (Optional): Cut two small squares from black construction paper. If using paper fasteners, poke a tiny hole through each black square and then through the bottom sides of the paper roll. Secure the fasteners. Alternatively, simply glue the black squares to the sides.
3. Dapper Vampire
Elegant and a little bit spooky, our vampire is ready for a Halloween ball!
Materials:
- Toilet paper roll
- Paint for the face (peach, light gray, or white)
- Black construction paper
- Red construction paper (for cape)
- White cardstock (for fangs)
- Googly eyes (small or medium)
- Black marker
- School glue or tacky glue
- Red glitter paper or red felt (for bow tie)
Instructions:
- Paint the Face: Paint the toilet paper roll in your chosen face color and let it dry.
- Cut the Hair: From black construction paper, cut out a bat-wing shape or a swept-back hairstyle with a pointy widow's peak in the center. Glue this to the top front of the paper roll, letting the peak come down slightly towards where the eyes will be.
- Attach Eyes & Draw Mouth: Glue on the googly eyes. Below them, use a black marker to draw a slight smile or a straight line for the mouth.
- Add Fangs: Cut two tiny, sharp triangles from white cardstock. Glue these under the mouth line, pointing downwards, to create the fangs.
- Make the Cape: Cut a large triangle or a semicircular cape shape from red construction paper. Glue this to the back of the toilet paper roll, letting it extend out like a dramatic cape.
- Bow Tie: Cut a small bow tie shape from red glitter paper or red felt. Glue it to the front of the vampire, just below the face.
4. Ghostly Ghoul
Simple, classic, and always a hit!
Materials:
- Toilet paper roll
- White paint
- Black marker
- Googly eyes (optional)
- White tissue paper or thin white fabric (optional, for wavy bottom)
- School glue
Instructions:
- Paint White: Paint the entire toilet paper roll white and let it dry.
- Draw Face: With a black marker, draw two oval eyes and a wide, wavy mouth for a classic ghost face. Alternatively, glue on googly eyes for a more friendly ghost.
- Wavy Bottom (Optional): For a floating effect, cut several strips of white tissue paper or thin white fabric (about 1-inch wide and 4-5 inches long). Glue these around the inside bottom edge of the toilet paper roll, letting them hang down to create a flowing, ethereal look.
5. Batty Buddy
A cute, not creepy, bat!
Materials:
- Toilet paper roll
- Black paint
- Black construction paper
- Googly eyes (small)
- White cardstock (for fangs)
- School glue or tacky glue
Instructions:
- Paint Black: Paint the toilet paper roll black and let it dry completely.
- Cut Wings: From black construction paper, cut out two bat wing shapes. Make them wide and a bit jagged, like classic bat wings.
- Cut Ears: Cut two small, pointy ear shapes from black construction paper.
- Assemble Face: Glue the googly eyes onto the top half of the black roll. Cut two tiny white triangles for fangs and glue them below the eyes.
- Attach Wings and Ears: Glue the wings to the back sides of the toilet paper roll. Glue the ears to the inside top rim of the roll, or slightly behind the top edge.
6. Wicked Witch
This witch is more charming than cackling!
Materials:
- Toilet paper roll
- Green or purple paint (for face)
- Black construction paper (for hat, hair, cape)
- Yellow or orange construction paper (for hat band)
- Googly eyes (medium)
- Orange yarn or shredded paper (for hair)
- Black marker
- School glue or tacky glue
Instructions:
- Paint Body: Paint the toilet paper roll green or purple for the witch's skin and let it dry.
- Hair: Glue strands of orange yarn or shredded orange paper around the top rim of the paper roll for hair.
- Face: Glue on googly eyes. Use a black marker to draw a nose and a whimsical smile.
- Hat: From black construction paper, cut a large circle for the brim and a cone shape for the hat top. Glue the cone to the center of the brim circle. Cut a thin strip of yellow or orange paper for a hat band and glue it around the base of the cone. Once assembled, glue the hat onto the witch's head.
- Cape (Optional): Cut a simple cape shape from black construction paper and glue it to the back.
Spooky-Cute Characters & More
Beyond the traditional monsters, paper rolls can become a variety of other delightful Halloween icons.
7. Grinning Pumpkin
A classic symbol of fall and Halloween!
Materials:
- Toilet paper roll
- Orange paint
- Black construction paper
- Green construction paper or pipe cleaner (for stem/vine)
- School glue or tacky glue
- Kid-safe scissors
Instructions:
- Paint Orange: Paint the entire toilet paper roll orange and let it dry completely.
- Cut Face: From black construction paper, cut out two triangles for eyes, a smaller triangle for the nose, and a zig-zag mouth.
- Glue Face: Glue the eyes, nose, and mouth onto the painted orange roll to create a pumpkin face.
- Add Stem & Vine: Cut a small rectangle from green construction paper for the stem and glue it to the top center of the roll. For a vine, cut a thin strip of green construction paper, curl it around a pencil, then glue it beside the stem. Alternatively, use a green pipe cleaner, curl it, and glue it on.
8. Creepy-Crawly Spider
This spider is more cute than scary!
Materials:
- Toilet paper roll
- Black paint
- Black pipe cleaners (4)
- Googly eyes (2-8, various sizes for fun!)
- School glue or tacky glue
Instructions:
- Paint Black: Paint the toilet paper roll black and let it dry.
- Poke Holes: Once dry, use a pencil or a small skewer (adult assistance!) to carefully poke four small holes on each side of the paper roll, evenly spaced in a vertical line. These will be for the spider's legs.
- Add Legs: Take four black pipe cleaners. Bend each pipe cleaner in half to create two legs. Insert the bent middle of each pipe cleaner into a hole you poked. Secure with a dab of glue if needed. Once inserted, bend the pipe cleaner legs to give your spider some jointed knees!
- Attach Eyes: Glue on two large googly eyes, or for a truly creepy-cute effect, glue on 4 or even 8 smaller googly eyes!
9. Candy Corn Cutie
A sweet and simple homage to the iconic Halloween treat.
Materials:
- Toilet paper roll
- Yellow, orange, and white paint
- Black marker
- Googly eyes (optional)
- School glue
Instructions:
- Paint Stripes: Paint the bottom third of the toilet paper roll yellow, the middle third orange, and the top third white. Try to make the lines as neat as possible, letting each color dry before adding the next. You might need two coats for vibrancy.
- Add Face (Optional): Once dry, draw a simple smile and two dots for eyes with a black marker, or glue on googly eyes for a more animated look.
10. Monster Mash-Up
Let imaginations run wild creating unique monsters!
Materials:
- Toilet paper roll
- Various colored paints
- Assorted construction paper scraps
- Pipe cleaners, yarn, googly eyes, felt, buttons, glitter glue
- School glue or tacky glue
- Kid-safe scissors
- Markers
Instructions:
- Base Color: Paint the toilet paper roll any color your child fancies for their monster's body. Let it dry.
- Brainstorm Features: Encourage your child to think about what kind of monster they want to create. Does it have one eye or three? Spiky hair or fluffy antennae? Big teeth or a tiny mouth?
-
Construct & Attach:
- Cut out unique shapes for arms, legs, wings, or horns from construction paper and glue them on.
- Glue on googly eyes (one giant eye, or a scattered cluster!).
- Use pipe cleaners for bendable arms, legs, or antennae, poking them through small holes and securing with glue.
- Glue on yarn for wild hair, felt scraps for furry patches, or buttons for decorative "warts."
- Draw unique patterns, scales, or spots with markers.
- Add glitter glue for a monstrous shimmer.
- Name Your Monster: Give your unique creation a fun, spooky name!
Beyond Figures: Decorative & Functional Toilet Paper Roll Crafts
Toilet paper rolls aren’t just for making characters; they can also be used to create festive decorations!
11. Haunted House Luminaries
Create a spooky glow with these charming haunted houses.
Materials:
- Toilet paper roll
- Black paint
- Yellow or orange tissue paper
- Black marker or white gel pen
- Kid-safe scissors (or craft knife, ADULT USE ONLY)
- School glue or tacky glue
- Battery-operated tea light candle
Instructions:
- Paint Black: Paint the toilet paper roll black and let it dry completely.
- Cut Windows/Doors (ADULT ASSISTANCE): This step requires precision. On the painted black roll, draw simple window and door shapes. Carefully cut these out using kid-safe scissors (younger kids will need adult help for this, or an adult can use a craft knife for cleaner cuts).
- Add "Glass": Cut small pieces of yellow or orange tissue paper slightly larger than your window/door openings. From the inside of the roll, glue the tissue paper over each opening. This will give a glowing effect.
- Draw Details: Use a white gel pen or thin black marker to draw brick patterns, cobwebs, or spooky silhouettes (like a tiny ghost) on the outside of the house.
- Light It Up: Place a battery-operated tea light candle inside the finished haunted house to make the windows glow. Never use a real flame with paper crafts!
12. Spider Web Lanterns
A simple, effective way to decorate for a party.
Materials:
- Toilet paper roll
- Black or orange paint
- White paint or white marker
- Punch (single hole punch) or pencil (ADULT USE ONLY)
- Yarn or string
- Battery-operated tea light candle
Instructions:
- Paint Base: Paint the toilet paper roll black or orange and let it dry.
- Draw Web: Use white paint or a white marker to draw spider web patterns all around the outside of the roll. Start with radiating lines from the top and bottom, then connect them with curved lines.
- Punch Holes: Use a single hole punch to create several holes near the top rim of the roll.
- Hang: Thread a piece of yarn or string through two opposing holes to create a hanger.
- Light Up: Place a battery-operated tea light inside the lantern. Hang these in a doorway or from a mantelpiece for a subtle spooky glow.
This extensive list of crafts offers something for every child's interest and skill level. Whether they're crafting a whole village of monsters or just a single friendly ghost, the process is rich with learning opportunities and the chance to create something truly unique. Remember, the goal isn't perfection, but participation, creativity, and the sheer joy of making. These kinds of activities lay the groundwork for a lifelong love of learning, mirroring our belief at I'm the Chef Too! that hands-on engagement is the best way to ignite curiosity. Ready for more hands-on fun delivered right to your door? Join The Chef's Club and enjoy free shipping on every box with a new adventure every month!
Weaving in the Learning: STEM and Art Connections
At I'm the Chef Too!, we believe that every activity, especially crafting and cooking, is an opportunity for "edutainment." These toilet paper roll Halloween crafts are more than just cute decorations; they're fertile ground for nurturing skills in science, technology, engineering, art, and math (STEAM).
Science in Spooky Shapes
- Observation: When creating a bat, kids observe real bat shapes (or simplified versions) to inform their craft. What makes a bat a bat? Large wings, small body, usually dark colors.
- Material Properties: Children learn about how different materials behave. How does paint stick to cardboard? How does paper curl? Which glue works best for which material? This is a tactile exploration of basic physics and chemistry.
- Simple Reactions: While not a chemical reaction like the amazing fizz in our Erupting Volcano Cakes Kit, the act of mixing colors, or watching glue dry, are simple observations of change.
Technology Through Tools
- Tool Use: Safely using scissors, markers, and brushes introduces children to basic tools. They learn how different tools achieve different results, developing a foundational understanding of practical skills.
- Design & Iteration: In a simple way, deciding where to cut a window or how to attach a ghost’s arms involves design thinking. If it doesn’t work the first time, they learn to adjust and try again—a core concept in technological innovation.
Engineering & the Art of Construction
- Structural Integrity: How do you make a hat stay on a witch’s head? How do you ensure the spider’s legs don’t fall off? These questions introduce basic engineering principles like balance, attachment methods, and stability.
- Spatial Reasoning: Visualizing how a flat piece of paper will wrap around a cylinder to become a character’s body, or how to cut a cape that drapes correctly, enhances spatial awareness and understanding of three-dimensional forms.
- Problem-Solving: If a piece doesn't fit or falls off, kids learn to troubleshoot and find solutions, such as adding more glue or adjusting a cut.
Artistry in Every Monster
- Color Theory: Choosing colors for their monsters, like green for Frankenstein or black for a bat, introduces basic color association and emotional connection to colors. Mixing paints to create new shades is a fundamental art skill.
- Texture: From the smooth paint to the crinkled toilet paper of a mummy, children explore different textures and how they contribute to the overall look and feel of their creation.
- Design Elements: Understanding shapes (triangles for fangs, zig-zags for hair), lines (stitches), and forms (the cylindrical body) are all foundational art concepts.
- Self-Expression: Art is a powerful outlet for self-expression. Every child's monster will be unique, reflecting their personality and imagination. This builds confidence and validates their individual creativity.
Mathematics in Miniature
- Counting: Counting out googly eyes, pipe cleaners, or strips of paper for a mummy.
- Measurement: Approximating lengths for a witch's cape or judging proportions for a pumpkin's face.
- Geometry: Identifying and creating basic shapes like circles, triangles, rectangles, and cones for hats and features. Understanding how a 2D shape becomes a 3D object.
- Patterns: Drawing stitches, scales, or repeating elements on a monster.
By engaging in these simple crafts, children are not just making something pretty; they are actively developing a broad range of skills that are critical for academic success and life in general. We've seen firsthand how blending these disciplines makes learning more impactful and enjoyable. From designing your own unique monster to creating an edible solar system with our Galaxy Donut Kit, hands-on learning fosters a love for exploration and discovery that lasts a lifetime.
Making it a Family Affair: Crafting Together for Lasting Memories
Halloween crafting with toilet paper rolls isn't just a child's activity; it's a golden opportunity for the whole family to connect, create, and make lasting memories. In our increasingly digital world, these screen-free, hands-on moments are more precious than ever.
The Power of Shared Creation
When parents and children craft together, a beautiful dynamic unfolds. Children feel valued when their ideas are heard and incorporated. Parents have the chance to model patience, problem-solving, and the joy of creation. It's a non-pressured environment where everyone can learn from each other.
- Collaborative Storytelling: As you make a mummy, tell a silly story about how it got wrapped up. While painting a pumpkin, talk about what kind of treats it would like. Crafting can be a springboard for imaginative narratives.
- Skill Sharing: Older children can help younger siblings with cutting or painting, developing leadership and nurturing skills. Parents can guide without taking over, offering tips on technique or encouraging unique choices.
- Displaying Pride: Deciding where to display your collective creations—on a mantel, a windowsill, or hanging from a mobile—is a shared experience that reinforces the value of everyone's contribution. Imagine a row of goofy monsters, each a unique expression of a family member's creativity, bringing smiles to everyone who sees them.
Setting the Scene for Family Fun
To truly make it a family affair, consider these tips:
- Designated Craft Time: Set aside a specific afternoon or evening. Put on some fun Halloween music, prepare a snack, and make it an event.
- Embrace Imperfection: The goal is connection and creativity, not Pinterest-perfect results. A wonky eye or an asymmetrical wing has character and tells a story of a child's unique touch. Encourage this!
- Talk It Out: Use crafting time as an opportunity for conversation. "What color should we paint this ghost?" "What kind of expression should our Frankenstein have?" "What's the silliest monster you can imagine?" These open-ended questions spark imagination and language development.
- Extend the Play: Once the crafts are dry, don't let the fun stop! Use your toilet paper roll characters for a puppet show, create a "haunted village" with the houses, or hide them around the house for a spooky scavenger hunt.
At I'm the Chef Too!, we recognize that our kits do more than just teach; they provide a foundation for these invaluable family moments. We hear countless stories from parents about the laughter, the learning, and the love that blossoms around their kitchen table as they embark on our STEM cooking adventures together. These toilet paper roll crafts offer a similar opportunity: a screen-free space for joyful interaction, confidence-building, and the creation of cherished memories that truly embody the spirit of the season. Ready to make more memories? Give the gift of learning that lasts all year with a 12-month subscription to our STEM cooking adventures!
The I'm the Chef Too! Philosophy: Edutainment Beyond the Kitchen
You might be wondering how toilet paper roll crafts connect with a company specializing in cooking STEM kits. The link is stronger than you think! At I'm the Chef Too!, our mission extends far beyond just delicious recipes. We are committed to a philosophy of "edutainment"—making learning so fun and engaging that children don't even realize how much they're absorbing. Whether it's through the chemistry of baking or the engineering of a craft project, the core principles remain the same:
Sparking Curiosity and Creativity
Every child is born with an innate sense of wonder. Our goal is to nurture that curiosity and provide avenues for creative expression. A blank toilet paper roll is just as much an invitation to imagine as a bowl of ingredients waiting to be transformed into an edible masterpiece. Both scenarios challenge children to think, experiment, and bring their unique visions to life. We empower children to ask "what if?" and explore possibilities.
Facilitating Family Bonding
In a world filled with distractions, we champion activities that bring families together. Our cooking kits are designed for hands-on collaboration in the kitchen, turning meal prep into a shared adventure. Similarly, crafting with toilet paper rolls offers a valuable opportunity for parents and children to work side-by-side, sharing ideas, helping each other, and laughing together. These shared experiences build strong bonds and create a reservoir of happy memories that families will cherish for years to come.
Providing a Screen-Free Educational Alternative
We understand the challenges of limiting screen time while still providing enriching activities. Both our STEM cooking kits and these creative craft ideas offer a vibrant alternative. They engage multiple senses, require active participation, and provide tangible results, offering a deeply satisfying and educational experience that can’t be replicated by a digital screen. It’s about engaging brains and bodies in a constructive, imaginative way.
Teaching Complex Subjects Through Tangible Adventures
Whether it's the biology of yeast in bread-making, the geometry of a pie crust, or the physics of building a paper roll structure, we believe in making abstract concepts concrete. Our kits, developed by mothers and educators, break down complex subjects into accessible, hands-on steps. Toilet paper roll crafts do the same, making engineering, art, and fine motor skills understandable and enjoyable through tangible creation. For example, understanding the concept of a "chemical reaction" can be exciting when you're making our Erupting Volcano Cakes Kit bubble over with deliciousness. The principles are transferable: active learning leads to deeper understanding and greater retention.
Building Confidence and Skill Development
The act of successfully completing a project, whether it's baking a cake from scratch or crafting a charming monster, is an incredible confidence booster for children. They learn that they are capable, their ideas have merit, and their efforts can lead to wonderful results. These activities also hone essential skills—from reading instructions to measuring, mixing, cutting, and gluing—that are invaluable for all aspects of life. We focus on fostering a love for learning and building confidence, not guaranteeing specific academic outcomes, but rather cultivating the joyful process of discovery and creation.
By encouraging these toilet paper roll Halloween crafts, we’re extending our philosophy beyond the culinary arts, embracing all forms of hands-on "edutainment." It’s all about inspiring the next generation of creative thinkers, problem-solvers, and joyful learners, one project at a time. Not ready to subscribe? Explore our full library of adventure kits available for a single purchase in our shop. Find the perfect theme for your little learner by browsing our complete collection of one-time kits.
Conclusion
As the autumn air grows cooler and the excitement of Halloween builds, finding engaging, creative activities for children becomes a delightful pursuit. We’ve explored the boundless potential of the humble toilet paper roll, transforming it from an everyday item into a canvas for imaginative Halloween crafts. From grinning pumpkins and ghostly ghouls to friendly Frankenstein’s monsters and adorable bats, these projects offer more than just decorations; they provide rich opportunities for children to develop crucial fine motor skills, engage in problem-solving, express their creativity, and connect with family in a meaningful, screen-free way.
At I'm the Chef Too!, our commitment to "edutainment"—blending food, STEM, and the arts—is woven into every activity we champion. Just as our unique cooking adventures teach complex subjects through tangible, delicious experiences, these paper roll crafts serve as a perfect example of how simple materials can spark immense curiosity and build lasting confidence. Developed by mothers and educators, our approach focuses on fostering a love for learning, encouraging exploration, and creating joyful memories that transcend the final product.
We hope this comprehensive guide has inspired you to gather your empty paper rolls and embark on a crafting journey filled with laughter, learning, and spooky-cute creations. The magic of Halloween truly comes alive when we create together. Ready to make every month an adventure in learning and fun? Join The Chef's Club today and receive a new, exciting STEM cooking kit delivered right to your door with free shipping in the US. Spark curiosity, foster creativity, and build incredible family memories with I'm the Chef Too!
FAQ Section
Q1: What age group are these toilet paper roll Halloween crafts suitable for? A1: These crafts are wonderfully versatile and can be adapted for a wide range of ages! Toddlers (with significant adult assistance for cutting and gluing) can enjoy painting and sticking on pre-cut shapes. Preschoolers and early elementary children (ages 3-8) can actively participate in most steps, developing their fine motor skills. Older children (9+) can take on more complex designs, add intricate details, and even come up with their own unique monster creations. Adult supervision is always recommended, especially when using scissors or glue guns.
Q2: Are there any specific safety precautions I should take when crafting with toilet paper rolls? A2: Absolutely! Always ensure you're using non-toxic paints and glues, especially with younger children. Supervise the use of scissors, teaching children to cut away from themselves and others. If using a hot glue gun, it should be strictly for adult use. Be mindful of small embellishments like googly eyes, which can be choking hazards for very young children. A designated craft area with newspaper or a washable mat is also a good idea to protect surfaces from spills.
Q3: How many toilet paper rolls do I need to collect for a good crafting session? A3: The more, the merrier! For a few characters, 4-6 rolls are sufficient. If you want to create a whole "monster parade" or a haunted village, you'll want at least 10-12. Don't forget that paper towel rolls can also be cut down to size, offering varying heights for your characters. It's a great habit to start saving them throughout the month!
Q4: What if my child isn't very artistic? Will they still enjoy these crafts? A4: Absolutely! The beauty of these crafts is that perfection is never the goal. Encourage your child to express themselves freely. A wonky eye or an asymmetrical wing often adds character and charm. The focus is on the process—the joy of creating, exploring textures and colors, and spending quality time together. These activities are fantastic for building confidence, regardless of artistic skill. We believe every child is an artist in their own unique way!
Q5: How can I make these crafts more educational? A5: You're already doing it just by encouraging participation! To enhance the learning:
- Science: Talk about why paint covers the roll, or how glue sticks things together.
- Math: Count objects (googly eyes, pipe cleaners), discuss shapes (circles, triangles, rectangles), and measure lengths of paper.
- Engineering: Discuss how to make something stand up, or how to attach parts securely.
- Art: Talk about color choices, textures, and how different shapes create different characters.
- Language Arts: Encourage storytelling about the monsters they create, or describe the steps as you go. These hands-on moments are where true "edutainment" happens, just like in our STEM cooking kits!
Q6: Can these crafts be stored and reused for next year? A6: Yes, many of these crafts can be stored and brought out year after year, becoming cherished parts of your family's Halloween traditions! Ensure they are completely dry before storing them in a sturdy box in a cool, dry place. Delicate elements like tissue paper might get squished, but most painted cardboard creations hold up surprisingly well.
Q7: Where can I find more engaging, screen-free activities for my kids that blend learning and fun? A7: We're so glad you asked! At I'm the Chef Too!, our entire mission is built around creating unique "edutainment" experiences. Our monthly Chef's Club subscription delivers a new STEM cooking adventure right to your door with pre-measured ingredients and specialty supplies. It's a fantastic way to continue sparking curiosity and creativity in your children while enjoying quality family time. We also offer a wide variety of one-time kits if you want to explore different themes.