Creative DIY Christmas Ornaments for Kids

Table of Contents
- Why DIY Ornaments Are More Than Just Decorations: The "Edutainment" Factor
- Getting Started: Your DIY Ornament Crafting Toolkit
- A Gallery of Ideas: Engaging DIY Christmas Ornaments for Every Age
- Crafting with a Purpose: Incorporating STEM & Arts Beyond the Obvious
- Tips for a Smooth & Joyful Crafting Experience
- Extending the Learning & Fun (Beyond Ornaments)
- Conclusion
- FAQ Section
The air crackles with a special kind of magic as the holiday season approaches. It's a time for warmth, wonder, and creating traditions that shimmer with joy. But amidst the festive rush, have you ever noticed how the most cherished decorations often aren't the store-bought, perfect ones, but rather those lopsided, glitter-dusted creations your child proudly hung on the tree? These aren't just ornaments; they are tangible memories, little monuments to creativity, and powerful learning opportunities.
At I'm the Chef Too!, we wholeheartedly believe in the power of hands-on "edutainment" – where learning feels like play, and every activity sparks curiosity. In this spirit, we’re diving deep into the wonderful world of DIY Christmas ornaments for kids crafts. This isn't just about making something pretty for the tree; it's about igniting imaginations, sharpening skills, and forging unforgettable family moments. Join us as we explore how these simple crafts can become rich educational adventures, perfectly blending art, science, and the joy of creating together.
Why DIY Ornaments Are More Than Just Decorations: The "Edutainment" Factor
When you gather around a table with glue, glitter, and a pile of craft supplies, you’re doing more than just making a holiday decoration. You’re setting the stage for a rich, multifaceted learning experience that cleverly disguises education as pure fun. This is the very essence of what we champion at I'm the Chef Too!: blending food, STEM, and the arts into one-of-a-kind "edutainment" experiences.
Think about the journey your child takes to create a single ornament. It begins with an idea, maybe a whimsical snowman or a shimmering star. Then comes the planning: "What materials will I use? How will I make it stick? What colors will look best?" This is where critical thinking and problem-solving skills quietly blossom. If the glitter doesn't stick perfectly, they learn to adapt, to try a different type of glue, or to embrace the charming imperfection. This process isn't about achieving a flawless outcome; it's about the growth that happens along the way.
Unpacking the Educational Goldmine in Every Craft:
- Fine Motor Skills & Dexterity: From holding a paintbrush and carefully applying glue to threading beads onto a pipe cleaner or cutting intricate shapes from felt, every movement refines those crucial small muscle skills. These are fundamental for writing, dressing themselves, and countless daily tasks.
- Creativity & Imagination: DIY ornaments are a blank canvas. Children get to choose colors, textures, and designs, allowing their unique personalities to shine. They might invent a story for their snowman, imagine the mini landscape inside a Mason jar lid, or dream up fantastical creatures for their tree. This freedom to explore and express fosters imaginative thinking, a cornerstone of innovation.
- Patience & Persistence: Not every craft goes perfectly on the first try. There might be sticky fingers, glue mishaps, or designs that don't quite match the picture in their head. Learning to stick with a project, even when challenges arise, teaches invaluable lessons in patience and persistence. The reward of seeing their finished ornament hanging proudly makes every effort worthwhile.
- Sensory Exploration: The tactile experience of crafting is incredibly beneficial. The soft fuzz of pom-poms, the crisp sound of paper being cut, the cool slipperiness of clay, the scent of cinnamon from baked ornaments – these sensory inputs contribute to cognitive development and help children understand the world around them.
-
STEM Connections in Disguise: This is where the magic truly aligns with our mission at I'm the Chef Too!. Many ornament crafts are stealthy STEM lessons:
- Science: Children observe chemical reactions as paint dries, glue adheres, or applesauce dough bakes. They learn about material properties – why some materials bend and others break, why glitter catches the light.
- Technology: Even simple tools like scissors, hole punches, or cookie cutters teach basic tool usage and manipulation.
- Engineering: Designing a stable snowflake from popsicle sticks or balancing elements in a geometric diorama involves fundamental engineering principles like structure, balance, and load-bearing. They learn to think, "How can I make this strong enough to hang?"
- Math: Counting beads, sorting by color or size, recognizing geometric shapes (circles, triangles, squares in felt, or snowflake patterns), and understanding symmetry are all embedded math lessons.
Cultivating Family Bonding and Screen-Free Joys:
Beyond the academic benefits, perhaps the most precious outcome of diy christmas ornaments for kids crafts is the opportunity for family bonding. In a world saturated with screens, these hands-on activities provide a much-needed screen-free educational alternative. Sharing laughter over a wonky gnome, helping a younger sibling glue a pom-pom, or simply chatting about favorite holiday memories while crafting – these moments are invaluable. They build connection, create shared experiences, and weave the fabric of family tradition, one glitter-covered ornament at a time. Each year, as you unpack the box of decorations, these handmade treasures will spark conversations and transport you back to those joyful crafting sessions.
Ready to embark on a journey of monthly discovery, where every box brings a new blend of food, STEM, and art directly to your door? Our kits are developed by mothers and educators, ensuring meaningful learning in every delicious adventure. Join The Chef's Club today and enjoy free shipping on every box, making it easy to spark curiosity and creativity all year long!
Getting Started: Your DIY Ornament Crafting Toolkit
Diving into the world of diy christmas ornaments for kids crafts doesn't require a specialized art studio or a huge investment. In fact, many of the best materials are likely already in your home, or can be found affordably at any craft store. The key is to gather your supplies, prepare your space, and approach the activity with an open mind, ready to embrace creativity and a little bit of mess!
The Essential Crafting Arsenal – Basic Supplies:
Start with the staples you'll use for almost any project:
-
Adhesives:
- School Glue: Perfect for most paper, felt, and lightweight materials. It’s safe for all ages and cleans up easily.
- Hot Glue Gun (Adult Use Only): For quicker bonds or heavier elements like pinecones and wood slices. Always use with strict adult supervision, or have an adult handle the gun while children arrange pieces.
-
Cutting Tools:
- Kid-Friendly Scissors: For little hands learning to cut.
- Adult Scissors: For more precise cuts on thicker materials.
-
Coloring & Decorating:
- Washable Paints: Acrylics or tempera paints are versatile.
- Markers & Crayons: For drawing on paper, wood, or clay.
- Glitter & Glitter Glue: A classic for adding sparkle (pro tip: do glitter over a tray or newspaper for easier cleanup!).
- Pom-Poms, Beads, Sequins: For adding texture and pizzazz.
-
Construction Bases:
- Construction Paper & Cardstock: Comes in every color imaginable, great for cutting, folding, and layering.
- Felt Sheets: Easy to cut, soft, and doesn't fray, perfect for figures and layered designs.
- Pipe Cleaners: Flexible, colorful, and great for bending into shapes or threading beads.
- Cotton Balls: For snow, beards, or soft textures.
-
Hanging Elements:
- Ribbon, Twine, Yarn: Essential for loops to hang your finished ornaments.
Unleashing Creativity with Upcycled & Natural Materials:
This is where the magic of "making something from nothing" truly shines, and it’s a wonderful way to teach children about repurposing and resourcefulness.
-
From Nature:
- Pinecones: The perfect base for painting, glittering, or turning into little gnomes. (Think back to the "Painted Pinecones" or "Adorable Pine Cone Ornament" ideas from other crafters).
- Small Twigs & Leaves: Can be incorporated into natural scenes or used for stamping in clay.
-
From the Home & Craft Bin:
- Popsicle Sticks: Fantastic for building geometric shapes like snowflakes. (Remember "Popsicle Stick Snowflakes"?)
- Clothespins: Can be glued together to form beautiful snowflakes. ("Clothespin Snowflakes" is a great example!).
- Old Cookie Cutters: Excellent for tracing shapes onto felt or dough, or even wrapping with ribbon to create mini wreaths. ("Mini Wreath Ornaments" and "Wrapped Cookie Cutter Ornaments" leverage these.)
- Mason Jar Lids: The rim can become a frame for miniature landscape ornaments. ("Mini Landscape Ornaments" are so charming!)
- Wood Slices: A rustic canvas for painting, drawing, or stamping. ("Animal Wood Slice Ornaments" and "Drawing Wood Slice Ornament" are lovely personalized touches).
- Air-Dry Clay: Easy to work with, shape, and stamp, then dries without baking. ("Stamped Clay Ornaments" offer endless possibilities for texture).
- Tissue Paper: Great for making festive fans or surprise ball ornaments.
- Clear Plastic Ornaments: These can be filled with small treasures like greenery, faux snow, or even tiny toys. ("Filled Ornaments" allow for miniature dioramas).
Safety First: A Parent's Guide to Happy Crafting:
While diy christmas ornaments for kids crafts are incredibly fun, safety should always be your top priority.
- Adult Supervision is Key: For activities involving scissors, hot glue, or small beads (choking hazard for younger children), direct adult supervision is non-negotiable.
- Age-Appropriate Tools: Ensure children are using scissors designed for their age group.
- Non-Toxic Materials: Always opt for non-toxic paints, glues, and markers, especially if children are likely to put things in their mouths (though we always encourage not eating craft supplies!).
- Ventilation: If using spray paints or strong glues, ensure the area is well-ventilated.
- Small Parts Warning: Be mindful of beads, buttons, and other tiny embellishments, especially if younger siblings are present.
Setting Up for Success: The Crafting Environment:
- Protect Your Surfaces: Lay down newspaper, an old tablecloth, or a craft mat to protect your table from glue, paint, and glitter.
- Organize Your Supplies: Group similar items together so everything is easily accessible. Small containers or muffin tins can be great for organizing beads and small embellishments.
- Wear Play Clothes: Accidents happen, and a little paint on clothes is less stressful if they're already designated for messy play.
- Have Cleanup Ready: Keep wet wipes, paper towels, and a damp cloth nearby for quick cleanups.
By gathering your simple toolkit and prioritizing safety, you're all set to create a joyful and educational crafting experience that perfectly embodies the spirit of discovery we celebrate at I'm the Chef Too!
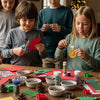
A Gallery of Ideas: Engaging DIY Christmas Ornaments for Every Age
The beauty of diy christmas ornaments for kids crafts lies in their adaptability. With a little creativity, you can find projects suitable for every age group, ensuring everyone from your toddler to your pre-teen feels engaged and proud of their handmade contribution to the family tree. Here, we’ll explore a range of ideas, building on popular themes and introducing our unique "edutainment" spin.
For Toddlers & Preschoolers (Ages 2-5): Sensory Fun and Simple Assembly
For our youngest crafters, the focus is on sensory exploration, developing fine motor skills through simple actions, and experiencing the joy of creation without the pressure of perfection. Adult assistance will be key, but letting them lead the choices is crucial!
-
Painted Pinecones: Gather pinecones from your backyard (a nature walk in itself!). Provide chunky paintbrushes and washable paints. Let them explore color and texture. Once dry, an adult can hot-glue a loop of twine for hanging.
- Learning Focus: Sensory exploration, color recognition, fine motor development (holding brush).
-
Beaded Candy Canes: Take a red or white pipe cleaner and bend it into a candy cane shape. Offer large, colorful wooden beads. Children can thread the beads onto the pipe cleaner. This is fantastic for hand-eye coordination and simple patterning.
- Learning Focus: Fine motor skills, patterning, color sorting.
-
Wrapped Cookie Cutter Ornaments: Use sturdy metal cookie cutters (stars, trees, gingerbread shapes). Provide wide ribbons or strips of colorful fabric. Kids can wrap the ribbon around the cookie cutter, securing it with a dot of school glue (adult supervision for knotting ends).
- Learning Focus: Fine motor wrapping, texture exploration, perseverance.
-
Pom-Pom Snowmen: Start with three white pom-poms (large, medium, small) and some craft glue. Children can stack and glue them together. Provide tiny googly eyes, felt cutouts for noses/hats, and mini buttons for details.
- Learning Focus: Stacking, gluing, shape recognition, imaginative play.
-
Marbled Ornaments (Shaving Cream Method): This is pure sensory magic! Spread a layer of shaving cream on a baking tray. Drip various food colorings onto the cream. Use a toothpick or craft stick for kids to swirl the colors. Press a plain wooden cutout (star, circle) onto the marbled surface, lift, and scrape off excess shaving cream to reveal a unique pattern. Adult supervision required for food coloring.
- Learning Focus: Color mixing, cause and effect, sensory exploration, pattern creation.
For Early Elementary (Ages 6-8): Building Skills and Expressing Ideas
Children in this age group are ready for slightly more intricate tasks, with an increased ability to follow instructions and develop their own design ideas. They'll gain confidence from seeing their projects take shape. This is a great age to encourage them to take more ownership of the process, from choosing materials to planning the steps.
-
Popsicle Stick Snowflakes: Provide plain or pre-painted popsicle sticks. Kids can arrange them into snowflake patterns (think geometric designs radiating from a center) and glue them together. After they dry, they can add glitter, small pom-poms, or painted details.
- Learning Focus: Geometry, symmetry, spatial reasoning, pattern recognition.
-
Clothespin Snowflakes: Take wooden spring-style clothespins. Remove the metal springs. Kids can glue the flat sides of the wooden halves together, creating a beautiful radial snowflake design. Painting them white or glittery silver enhances the effect.
- Learning Focus: Fine motor control (gluing small pieces), symmetry, structural design.
-
Mini Landscape Ornaments (Mason Jar Lids): This craft encourages storytelling! Kids can paint the inside of a Mason jar lid. Once dry, they can glue in miniature trees, cotton ball snow, small pom-pom animals, or even tiny handmade paper figures to create a winter wonderland scene. An adult can attach a ribbon loop to the back.
- Learning Focus: Storytelling, spatial arrangement, fine motor detail work, imaginative play.
-
Felt Mountain Ornaments: Provide various shades of felt (green for mountains, white for snowcaps). Kids can cut out mountain shapes and layer smaller white felt pieces for snow. They can glue on tiny green felt trees or even use decorative stitching (with supervision) for added detail.
- Learning Focus: Cutting skills, layering, understanding landscapes, simple design.
-
Stamped Clay Ornaments (Air-Dry): Roll out air-dry clay. Kids can use cookie cutters or simply cut out shapes. Then, they can press textured objects into the clay – leaves, lace, cookie stamps, even plastic toys – to create unique designs. Remember to make a hole at the top for hanging before it dries!
- Learning Focus: Texture exploration, design, sculpting, fine motor manipulation.
-
Personalized Chalkboard or Drawing Wood Slice Ornaments: Offer plain wood slices. Kids can draw directly onto them with paint pens or markers, creating portraits, holiday scenes, or their name and the year. For a chalkboard effect, an adult can spray paint the slices with chalkboard paint, and kids can write with chalk markers.
- Learning Focus: Self-expression, drawing, writing practice, personalization.
Looking for even more hands-on activities that spark joy and learning? If your child loves hands-on projects, explore our full library of adventure kits available for a single purchase in our shop. Each kit is a complete experience, ready for discovery!
For Upper Elementary & Pre-Teens (Ages 9-12): Intricate Details and Independent Creation
Older children can handle more complex instructions and multi-step projects, often working with greater independence. This is a great time to introduce more refined techniques and deeper conceptual connections.
-
DIY Christmas Gnome Ornaments: This project combines several materials. Start with a small wooden egg (flat bottom). Kids can glue a felt hat, a cotton beard, and a small wooden bead for a nose to create an adorable gnome face. They can personalize hats with details.
- Learning Focus: Multi-component assembly, character design, fine detail work.
-
Felt Cookie Ornaments: Using cookie cutters to trace shapes onto tan or brown felt, kids can cut out "cookies." Then, they can use smaller pieces of white felt for "frosting" and colorful beads for "sprinkles," attaching them with fabric glue or simple stitching (with adult supervision).
- Learning Focus: Precision cutting, design planning, basic sewing skills, mimicking real-world objects.
-
Geometric Diorama Ornaments: This involves thinking in 3D. Using small cardboard boxes (like matchboxes or small gift boxes), kids can create miniature winter scenes. They can paint the inside, glue in tiny paper cutouts (trees, houses), cotton snow, or small figurines. An adult can help cut a window in the front for viewing.
- Learning Focus: 3D construction, spatial awareness, scene composition, perspective.
-
Baked Applesauce Ornaments: A classic for a reason! Combine applesauce, cinnamon, and glue to form a dough. Kids can roll it out and use cookie cutters to make shapes. Punch a hole for hanging. These bake at a low temperature to dry and harden, filling your home with a wonderful cinnamon scent. This is a fantastic introduction to kitchen chemistry!
- Learning Focus: Measurement, mixing, chemical reactions (baking/drying), scent exploration, tradition. Just as our Erupting Volcano Cakes Kit teaches chemistry through a delicious reaction, these baked ornaments offer similar scientific discoveries!
-
Filled Ornaments (Clear Plastic Spheres): Clear plastic ornaments that split in half offer endless possibilities. Kids can fill them with faux snow, glitter, tiny pinecones, miniature bottle brush trees, small toys, or even dried flowers. They learn about composition and creating a cohesive "mini world."
- Learning Focus: Composition, small-world building, aesthetic design, material properties.
For families eager to continue this blend of hands-on learning and delicious fun, our monthly subscription boxes are the perfect solution. Each "Chef's Club" delivery brings a fresh adventure, complete with pre-measured dry ingredients and specialty supplies, right to your door with free shipping in the US. It's the ultimate screen-free educational experience! Join The Chef's Club and make every month a celebration of creativity and learning.
Crafting with a Purpose: Incorporating STEM & Arts Beyond the Obvious
At I'm the Chef Too!, our philosophy is built on the belief that learning should be an adventure, a delicious and tangible exploration of the world. DIY Christmas ornaments for kids crafts beautifully align with this mission, offering a playground for both creative expression and foundational STEM skills. It's about teaching complex subjects through tangible, hands-on activities, often without children even realizing they're learning!
Let's break down how these seemingly simple crafts are rich "edutainment" experiences, echoing the core values of I'm the Chef Too!:
Science in the Sparkle:
- Material Properties: As children choose between felt and paper, clay and wood, they’re implicitly learning about material science. Why does paint spread differently on a pinecone versus a smooth wooden disc? Why does air-dry clay harden, and how does baking change applesauce dough? These are observations of physical and chemical properties in action.
- Chemical Reactions: When paint dries, glue adheres, or cinnamon applesauce dough transforms in the oven, children are witnessing everyday chemical reactions. The marbled ornament project, whether with water-marbling paints or shaving cream and food coloring, is a vibrant demonstration of immiscible liquids and pigment dispersion.
- Natural World Exploration: Collecting pinecones, leaves for stamping, or small twigs connects children to botany and the environment. They observe textures, shapes, and the diverse beauty of nature.
Technology in the Tools:
- Tool Usage & Innovation: Using scissors, hole punches, cookie cutters, or even a low-temp hot glue gun (with strict adult supervision) teaches children about basic tools and how they extend our capabilities. It's an early introduction to applied technology – using instruments to achieve a desired outcome.
- Templates & Design: Even simple printed templates for cutting shapes introduce the concept of design aids and reproducibility, foundational to modern manufacturing and technology.
Engineering the Elf Workshop:
- Structural Design: When assembling a popsicle stick snowflake or a clothespin star, children engage in basic engineering. They think about how to create a stable structure, how to balance weight, and how to ensure their ornament can withstand gravity while hanging. "How will this piece connect to that piece to make it strong?"
- Problem-Solving: If an ornament isn't balancing correctly, or if a piece keeps falling off, children are challenged to problem-solve. They experiment with different adhesives, adjust the design, or try a new approach – all core engineering habits of mind.
- 3D Construction: Projects like geometric dioramas or gnome ornaments require children to visualize and build in three dimensions, developing spatial reasoning skills crucial for architects, designers, and engineers.
Art in Every Adornment:
- Color Theory: Choosing colors, mixing paints, and understanding how different hues interact is a practical lesson in color theory. Children learn about complementary colors, warm and cool tones, and how to create mood through color.
- Texture & Form: From the softness of felt to the rough texture of a pinecone, the smooth finish of paint, or the bumpy surface of beads, ornaments are a tactile feast. Children learn to appreciate and utilize different textures to add interest and depth to their creations.
- Composition & Design Principles: Arranging elements within an ornament – whether it’s placing "snowcaps" on a felt mountain or organizing items inside a clear plastic sphere – teaches basic principles of composition, balance, and visual appeal.
- Self-Expression: The ultimate goal of art is expression. Each child’s ornament is a unique reflection of their personality, interests, and creative vision. It fosters confidence and a sense of accomplishment.
Math in the Merry-Making:
- Counting & Sorting: Children naturally count beads, sort pom-poms by color, or categorize materials, reinforcing basic numeracy skills.
- Geometric Shapes & Patterns: Snowflakes, stars, circles, and squares are all geometric shapes. Creating patterns with beads or cutouts introduces concepts of repetition, sequence, and symmetry.
- Measurement (Informal): Estimating how much ribbon is needed, comparing sizes of materials, or judging proportions are informal yet important lessons in measurement.
This deep integration of STEM and the arts is precisely what sets our approach at I'm the Chef Too! apart. We don't just provide recipes; we craft experiences that ignite minds. Imagine the joy of making our Galaxy Donut Kit, where exploring astronomy becomes a delicious adventure, or how our Peppa Pig Muddy Puddle Cookie Pies turn a beloved character into a delightful lesson in culinary creativity. These experiences build confidence, develop key skills, and create joyful family memories, nurturing a lifelong love for learning.
Curious to experience this unique blend of education and fun firsthand? Our Chef's Club subscription delivers fresh, exciting kits right to your door every month. It’s flexible, convenient, and designed by mothers and educators to be a truly enriching, screen-free alternative. Give the gift of learning that lasts all year with a 12-month subscription to our STEM cooking adventures, or explore our other flexible plans!
Tips for a Smooth & Joyful Crafting Experience
Creating diy christmas ornaments for kids crafts is meant to be a joyful, memorable experience, not a source of stress. A little preparation and a shift in perspective can make all the difference, ensuring the process is as rewarding as the final product.
-
Preparation is Your Best Friend:
- Gather Everything Before You Start: Before inviting your children to the crafting table, lay out all your materials. Pre-cut any intricate shapes that might be too challenging for little hands. Having everything within reach prevents frustration and keeps the creative flow going.
- Set Up a Dedicated (and Protected) Space: Cover your table with newspaper, an old tablecloth, or a plastic mat. Have a container ready for scraps and a damp cloth for sticky fingers. This minimizes cleanup stress and allows everyone to relax and get messy.
-
Embrace the Process, Not Just the Product:
- Focus on the Journey: The true value of these crafts isn't in creating a perfect, Pinterest-worthy ornament. It's in the laughter, the concentration, the problem-solving, and the conversations that happen while creating. Celebrate the effort and the unique expression of your child's work, even if it's a little wobbly or asymmetrical.
- Manage Expectations: For both yourself and your child. We don't promise your child will become a top scientist or a professional artist overnight. Instead, we focus on fostering a love for learning, building confidence, developing key skills, and creating joyful family memories. Remind children that handmade items are special because they are unique and full of love.
-
Involve Kids in Every Step:
- Choice & Planning: Let children help choose which ornaments to make, what colors to use, and even which materials to gather. Giving them agency boosts their engagement and sense of ownership.
- Cleanup Crew: Teach responsibility by involving them in the cleanup process. Even little ones can help put caps on markers or throw away paper scraps.
-
Tell a Story with Each Ornament:
- Encourage Narrative: Ask your child about their ornament. "What did you name your snowman?" "What story is happening in your mini landscape?" These questions encourage imaginative thinking and communication.
- Date and Sign: A simple practice that turns an ornament into a tangible time capsule. Write the child's name and the year on the back of each creation.
-
Display Their Masterpieces Proudly:
- Prominent Placement: Hang their handmade ornaments in a place of honor on the tree, or create a special display. Seeing their work valued and admired builds self-esteem and encourages future creativity.
- A Tradition of Sharing: Talk about the handmade ornaments from years past when decorating. Each one has a story, a memory attached to it, making the process of decorating a walk down memory lane.
-
Remember Adult Supervision:
- While we encourage independence, activities involving sharp tools, hot glue, or baking always require vigilant adult supervision to ensure everyone’s safety.
By following these tips, you're not just organizing a craft session; you're cultivating an atmosphere of joyful exploration, learning, and family togetherness, perfectly in line with the values we cherish at I'm the Chef Too!.
Extending the Learning & Fun (Beyond Ornaments)
The joy of diy christmas ornaments for kids crafts doesn't have to end once the glue dries and the glitter settles. These projects can be a springboard for even more learning, creativity, and connection, extending the "edutainment" well beyond the holiday season.
Homemade Ornaments as Heartfelt Gifts: What could be more special than a handmade gift from a child? Encourage your kids to make extra ornaments to give to grandparents, teachers, neighbors, or friends. This teaches generosity, thoughtfulness, and the value of a personal touch over material cost. The act of creating for others adds another layer of purpose to their crafting efforts.
Decorating Beyond the Tree: Don't limit these beautiful creations to just the Christmas tree! Hang them from windows, adorn doorknobs, create a festive garland for the mantelpiece, or use them as unique gift toppers. This encourages children to think about how art and design can enhance different spaces, fostering an appreciation for aesthetics and home decor.
Connecting to Our Kits: A Seamless Blend of Learning: The skills developed through ornament making – fine motor control, creativity, problem-solving, and basic STEM understanding – are directly transferable to the exciting adventures found in our I'm the Chef Too! kits.
- Just like making DIY ornaments fosters creativity, our Galaxy Donut Kit lets children explore astronomy while creating edible art, turning scientific concepts into a delightful, hands-on experience.
- Similarly, our Peppa Pig Muddy Puddle Cookie Pies transform beloved characters into engaging learning adventures, where kids can practice measurement, mixing, and decorating, all while having fun with their favorite friends.
We believe that learning should be a continuous, joyful journey. That’s why we design our kits to be comprehensive, convenient, and truly educational. Each box is packed with pre-measured dry ingredients, specialty supplies, and a unique theme that sparks imagination and teaches core STEM principles.
Not quite ready for a subscription, but eager for more hands-on fun? Browse our complete collection of one-time kits to find the perfect theme for your little learner. From prehistoric baking adventures to magical culinary quests, there’s a world of discovery waiting!
Learning in Groups: Schools and Beyond:
The communal aspect of diy christmas ornaments for kids crafts makes them ideal for group settings. Imagine a classroom, a scout troop, or a homeschool co-op all working together, sharing ideas and helping each other. This fosters teamwork, communication, and a shared sense of accomplishment.
For educators and group leaders looking to extend this hands-on learning throughout the year, explore our versatile programs for schools and groups. We offer flexible options, available with or without food components, designed to bring our unique blend of STEM, food, and art to your students in an engaging and memorable way. Whether it’s a one-time workshop or an ongoing enrichment program, we make learning delicious and exciting for everyone.
The lessons learned and the joy created through these simple holiday crafts are truly boundless. They are an investment in your child's development, creativity, and the cherished memories you build together, perfectly embodying the spirit of curiosity and discovery that I'm the Chef Too! is so passionate about.
Conclusion
As we wrap up our journey through the magical world of diy christmas ornaments for kids crafts, it's clear that these activities offer far more than just festive decorations. They are vibrant opportunities for "edutainment"—a powerful blend of learning and fun that we proudly champion at I'm the Chef Too!. From the simplest painted pinecone to the most intricate felt gnome, each ornament is a testament to a child's imagination, a brushstroke of their developing fine motor skills, and a lesson in patience and persistence.
We've explored how these crafts subtly introduce fundamental STEM concepts, from the chemistry of baking applesauce ornaments to the engineering of a stable snowflake. We've seen how they cultivate artistic expression, spatial reasoning, and critical thinking. Most importantly, we've highlighted their incredible power to facilitate family bonding, pulling us away from screens and into shared moments of creativity, laughter, and lasting memories. At I'm the Chef Too!, our mission is precisely this: to spark curiosity and creativity in children, facilitate family bonding, and provide a screen-free educational alternative through hands-on, tangible, and delicious adventures.
Every lopsided star, every glitter-covered ball, and every uniquely textured creation holds a story—a story of discovery, effort, and love. These aren't just ornaments; they are cherished fragments of childhood, hung proudly on the tree year after year, reminding us of the joy found in creating together.
Are you ready to bring this kind of engaging, educational fun into your home every single month? Imagine a new adventure delivered to your door, meticulously crafted by mothers and educators, blending food, STEM, and art into an unforgettable experience. Our Chef's Club subscription offers ultimate convenience and continuous enrichment, with flexible 3, 6, and 12-month pre-paid plans perfect for gifting or long-term engagement. Each box is a complete journey, brimming with pre-measured dry ingredients and specialty supplies, all with free shipping in the US.
Don't let the magic stop with the holidays. Join The Chef's Club today and cultivate a love for learning that truly lasts all year long!
FAQ Section
Q1: What are the best DIY Christmas ornament crafts for toddlers (ages 2-3)? A1: For toddlers, focus on simple, sensory-rich activities with minimal small parts. Great options include painting pinecones with chunky brushes and washable paints, simple gluing of large pom-poms onto paper shapes, threading large wooden beads onto pipe cleaners (with adult supervision), or creating marbled paper ornaments using shaving cream and food coloring for a delightful sensory experience. Adult involvement in preparation and execution is key.
Q2: How can I make DIY ornament crafting less messy? A2: While some mess is inevitable and part of the fun, you can minimize it with preparation! Lay down newspaper, an old tablecloth, or a plastic craft mat to protect your surfaces. Use trays or cookie sheets to contain glitter, beads, and paint. Have wet wipes and paper towels readily available for quick cleanups. Designate "craft clothes" for your children, and consider doing glitter activities outdoors if possible.
Q3: What are some good non-food-based ornament ideas for kids with allergies? A3: Many of the crafts mentioned are naturally food-free! Good options include popsicle stick snowflakes, clothespin snowflakes, felt mountain ornaments, pinecone painting, beaded candy canes (using pipe cleaners and wooden beads), stamped air-dry clay ornaments, personalized wood slice ornaments, and filled clear plastic ornaments. These projects offer plenty of creative avenues without involving any food ingredients.
Q4: How long do these DIY ornament crafts typically take? A4: The time commitment varies greatly depending on the complexity of the project and your child's age and attention span. Simple crafts like painted pinecones or beaded candy canes might take 15-30 minutes. More involved projects like felt gnomes, clay ornaments (which require drying time), or mini dioramas could take 1-2 hours, potentially spread over multiple sessions (e.g., crafting one day, decorating the next after drying). Focus on the process, not rushing to a finish line.
Q5: Can these DIY ornaments be stored and reused year after year?
A5: Absolutely! Most diy christmas ornaments for kids crafts, especially those made with durable materials like wood, felt, air-dry clay, or sturdy paper, can be carefully stored and enjoyed for many years. Ensure they are fully dry before packing. Store them gently in tissue paper or individual compartments within a sturdy box to prevent breakage and preserve their handmade charm. Don't forget to write the year and your child's name on them!
Q6: What if my child gets frustrated during the crafting process? A6: Frustration is a natural part of learning! Encourage them to take a break, offer assistance without taking over, or simplify the step that's causing difficulty. Remind them that perfection isn't the goal, and handmade items are unique and special because they're made with love. Emphasize the fun of the process and the effort they're putting in. Sometimes, just a reassuring hug and a gentle nudge are all that's needed.