Conquer the STEM Egg Car Challenge: Build, Crash, and Learn!

Table of Contents
- Introduction
- What is the STEM Egg Car Challenge?
- Why the STEM Egg Car Challenge is a Powerful Learning Experience
- The Science Behind the Crash: Unpacking Physics Principles
- Engineering Principles in Action: Designing for Success
- Designing Your Egg Car: A Step-by-Step Guide
- Key Elements for Egg Protection: Engineering for Safety
- Setting Up Your Crash Test Track: The Science of Controlled Experiments
- Beyond the Crash: Learning & Discussion
- Making it a Family Affair: Bonding Through STEM
- Troubleshooting Common Challenges: When Things Don't Go as Planned
- Adaptations for Different Age Groups: Tailoring the Challenge
- Frequently Asked Questions (FAQ) About the STEM Egg Car Challenge
- Conclusion
Imagine the roar of engines, the gleam of metal, and then… a dramatic crash! While real-world automotive engineers spend countless hours designing vehicles to withstand incredible impacts, ensuring passenger safety is paramount, what if your child could step into their shoes? What if they could design, build, and test their very own crash-worthy vehicle, all from the comfort of your kitchen or classroom, using everyday materials?
That’s precisely the magic of the STEM egg car challenge! This isn't just a fun weekend activity; it's a powerful "edutainment" experience that immerses children in the thrilling world of science, technology, engineering, and mathematics. At I'm the Chef Too!, our mission is to blend food, STEM, and the arts into one-of-a-kind adventures, and challenges like the egg car build upon that same philosophy of tangible, hands-on learning. It’s about more than just keeping an egg safe; it’s about sparking curiosity, fostering problem-solving skills, and creating unforgettable family memories, all without a screen in sight.
In this comprehensive guide, we'll journey through the exciting process of the STEM egg car challenge. We’ll explore the core scientific principles at play, delve into the engineering design process, discuss practical building tips, and offer strategies for testing and refining your child’s creation. By the end, you'll be equipped with everything you need to transform your home into a dynamic STEM lab, where learning is an adventure and creativity knows no bounds. Get ready to rev those engines and discover how a simple egg can unlock a universe of scientific understanding!
Introduction
The whirring sound of a toy car speeding across the floor, only to collide with a wall, is a common sound in many homes. But what if that seemingly simple collision became a springboard for deep learning? The STEM egg car challenge takes this everyday scenario and elevates it into a rich educational experience. This activity challenges children to design and construct a vehicle capable of protecting a precious "passenger" – a raw egg – during a simulated car crash. It’s a brilliant fusion of creativity and scientific inquiry, inviting young minds to think like engineers and scientists.
At its heart, the STEM egg car challenge is about understanding fundamental physics principles, embracing the iterative engineering design process, and developing critical thinking skills. It's an opportunity for children to experiment, fail, learn, and ultimately succeed, building confidence along the way. We believe that learning is most impactful when it's engaging and relevant to real-world applications. Just as our unique STEM cooking kits, like creating an Erupting Volcano Cakes kit to learn about chemical reactions, transform abstract concepts into delicious, tangible experiences, the egg car challenge brings complex physics to life through a thrilling, hands-on project.
Throughout this post, we'll break down the challenge into manageable steps, offering insights and practical advice for parents and educators. We’ll cover everything from brainstorming initial designs and selecting materials to understanding the science of impact and analyzing test results. Our goal is to empower you to facilitate an enriching and enjoyable learning experience, fostering a love for discovery in your child that extends far beyond the finish line. So, let’s buckle up and get ready to design the ultimate egg protection system!
What is the STEM Egg Car Challenge?
At its core, the STEM egg car challenge is an engineering design project where participants construct a miniature vehicle designed to transport and protect a raw egg. The ultimate test involves the car, with its fragile cargo, being subjected to a controlled "crash," usually by rolling it down a ramp into an immovable object. The objective? For the egg to emerge from the collision completely unscathed.
This seemingly simple task opens up a world of complex thinking. Children aren't just building a toy; they're acting as engineers tasked with a crucial safety problem. They must consider the forces at play during a collision, the properties of different materials, and how to design a structure that can absorb or deflect impact energy. It's a real-world problem-solving scenario, scaled down to a manageable and incredibly fun project for kids.
The beauty of this challenge lies in its open-ended nature. There’s no single "right" way to build the car, which encourages immense creativity and innovative thinking. Some might focus on creating a robust external shell, while others might prioritize intricate internal cushioning or sophisticated restraint systems. Each design decision becomes a hypothesis to be tested, leading to valuable insights and often, delightful surprises. It's a fantastic way to introduce the concepts of structural integrity, shock absorption, and passenger safety in a memorable, hands-on context.
Ready for a new adventure every month that sparks this same kind of innovative thinking? Join The Chef's Club and enjoy free shipping on every box, bringing a fresh blend of food, STEM, and arts right to your door.
Why the STEM Egg Car Challenge is a Powerful Learning Experience
The STEM egg car challenge is far more than just a creative craft project; it's a profound educational journey that aligns perfectly with our philosophy at I'm the Chef Too! of making complex subjects accessible and exciting. Here’s why this activity is such a powerful tool for learning and development:
1. Embracing the Engineering Design Process
This challenge provides a perfect framework for children to understand and apply the engineering design process, which is fundamental to innovation in countless fields. They will:
- Ask: Define the problem – how to protect the egg from breaking during a crash.
- Imagine: Brainstorm various solutions, sketch designs, and consider different materials.
- Plan: Choose a design, detail the materials needed, and outline the construction steps.
- Create: Build the car according to their plan.
- Improve: Test the car, analyze the results (did the egg break? why?), and then refine their design based on what they learned. This iterative process of testing and modification is crucial for true engineering.
2. Deepening Understanding of Physics Concepts
Without even realizing it, children will be exploring core principles of physics:
- Force and Motion: They’ll directly observe how force causes acceleration and how motion leads to impact.
- Newton’s Laws: The challenge offers tangible examples of Newton's Laws of Motion. The car (and egg) in motion stays in motion until an external force (the wall) acts upon it (Inertia – 1st Law). The force of the impact is related to the car’s mass and acceleration (2nd Law). And when the car hits the wall, the wall hits back (3rd Law).
- Energy Transfer: Children will grapple with how kinetic energy (energy of motion) is transferred or absorbed during a crash, and how their designs can mitigate this transfer to the egg.
- Momentum: They'll see how a car's mass and speed contribute to its momentum, and thus the force of impact.
3. Fostering Critical Thinking and Problem-Solving
Every decision, from material choice to structural design, involves critical thinking. If the egg breaks, the child must analyze why it broke and brainstorm solutions for the next iteration. This cultivates resilience and analytical skills, teaching them to learn from "failures" and view them as opportunities for improvement. Just like when a recipe doesn't turn out perfectly in one of our kits, it's a chance to experiment and try again!
4. Igniting Creativity and Innovation
With open-ended material choices and design possibilities, children are encouraged to think outside the box. They might experiment with a suspension system using rubber bands, a crumple zone made of accordion-folded paper, or an "airbag" using a balloon. This freedom to innovate is key to sparking a lifelong love for creation.
5. Developing Fine Motor Skills and Spatial Reasoning
The act of cutting, gluing, assembling, and measuring materials helps refine fine motor skills. Planning the car's structure and the egg's placement also enhances spatial reasoning, teaching children about dimensions, balance, and structural stability.
6. Encouraging Collaboration and Communication
If done in groups, the challenge promotes teamwork, negotiation, and effective communication as children share ideas, divide tasks, and work together towards a common goal. Even as a solo activity, discussing designs and outcomes with a parent or educator builds communication skills.
7. Providing a Screen-Free Educational Alternative
In an increasingly digital world, hands-on activities like the egg car challenge offer a vital screen-free learning experience. It engages children physically and mentally, promoting deep engagement with the task at hand rather than passive consumption. This focus on tangible interaction is at the heart of what we do at I'm the Chef Too!, ensuring rich, meaningful engagement.
By engaging in the STEM egg car challenge, children don't just protect an egg; they build a foundation for scientific literacy, engineering prowess, and a confident approach to problem-solving. These are the invaluable skills we strive to cultivate in every child, inspiring them to be the innovators of tomorrow.
The Science Behind the Crash: Unpacking Physics Principles
To successfully protect an egg, it's essential to understand what happens during a collision. This isn't just about smashing things; it's a practical lesson in fundamental physics. Let’s break down the key scientific concepts at play in the STEM egg car challenge.
Newton's Laws of Motion: The Guiding Principles
Sir Isaac Newton's three laws of motion are the bedrock of understanding how objects move and interact.
-
Newton's First Law (Inertia): An object at rest stays at rest, and an object in motion stays in motion with the same speed and in the same direction unless acted upon by an unbalanced force.
- In your egg car: When your car speeds down the ramp, it wants to keep moving at that speed and in that direction. When it hits the wall, the car suddenly stops, but the egg inside still wants to keep moving forward. Without proper restraint, the egg will smash into the front of the car or even fly out! This is why a "seatbelt" or secure enclosure for the egg is crucial.
-
Newton's Second Law (Force, Mass, and Acceleration): The acceleration of an object as produced by a net force is directly proportional to the magnitude of the net force, in the same direction as the net force, and inversely proportional to the mass of the object. Or, more simply, Force = Mass × Acceleration (F=ma).
- In your egg car: This law helps us understand the impact force. A heavier car (more mass) or a faster car (more acceleration/deceleration) will experience a greater force upon impact. The key to protecting the egg isn't just stopping the car, but extending the time over which the deceleration occurs. A sudden stop (high acceleration/deceleration over a very short time) creates a huge force. A gentler, longer stop (lower acceleration/deceleration over a longer time) spreads out that force, reducing the peak impact on the egg. This is where crumple zones and cushioning come into play!
-
Newton's Third Law (Action-Reaction): For every action, there is an equal and opposite reaction.
- In your egg car: When your car crashes into the wall (action), the wall exerts an equal and opposite force back on the car (reaction). This is the force that stops the car and, by extension, affects the egg. Your car’s design must manage this reactionary force to protect its passenger.
Energy Transfer: Where Does the Impact Go?
When your egg car rolls down the ramp, it gains kinetic energy – the energy of motion. The faster and heavier the car, the more kinetic energy it possesses. When the car hits the wall, this kinetic energy doesn't just disappear. It transforms into other forms of energy:
- Deformation Energy: The car itself might bend, crumple, or break. This bending absorbs energy.
- Sound Energy: You hear the crash!
- Heat Energy: Materials might get slightly warmer due to friction.
- Energy Transferred to the Egg: This is the energy we want to minimize. A well-designed car will absorb most of the kinetic energy before it reaches the egg, extending the deceleration time and reducing the force on the egg.
Momentum: A Measure of Motion
Momentum is a measure of an object's mass in motion (mass × velocity). The more momentum an object has, the harder it is to stop. During a collision, the car's momentum changes rapidly as it comes to a halt. To protect the egg, the car needs features that help manage this rapid change in momentum, distributing the forces over a longer time and larger area.
Think about catching a baseball. You don't just hold your glove still; you move your hand backward slightly as the ball hits. This increases the time over which the ball's momentum changes, reducing the force on your hand. Your egg car needs to do something similar for the egg!
Understanding these principles allows children to move beyond trial and error to truly informed design. They begin to grasp why certain materials or structures are more effective, laying a crucial foundation for future scientific inquiry. This deep dive into physics makes the STEM egg car challenge a truly illuminating experience.
Engineering Principles in Action: Designing for Success
The STEM egg car challenge is a masterclass in practical engineering, bringing theoretical concepts to life through tangible construction and rigorous testing. It’s all about applying smart design choices to solve a very specific problem: protecting a fragile passenger.
1. Defining Criteria and Constraints
Every engineering project begins with clear criteria (what makes a successful solution) and constraints (limitations on resources or methods).
- Criteria: The primary criterion is that the egg must remain unbroken and unharmed after impact. Secondary criteria might include the car's ability to roll freely, maintain a straight path, or even be aesthetically pleasing.
-
Constraints: These are crucial for fostering creativity. Typical constraints might include:
- Material Limits: Only specific materials (e.g., craft sticks, cardboard, limited rubber bands, plastic cups, straws, wheels) or a limited quantity of each. This pushes children to be resourceful.
- Size Limits: The car must fit within certain dimensions.
- Budget: For older students, assigning a "cost" to each material can introduce economic considerations and the concept of cost-benefit analysis in engineering.
These constraints aren't meant to restrict fun; they’re designed to encourage innovative thinking and problem-solving, much like real-world engineers operate within budgets and material availability.
2. The Power of Materials Science
Choosing the right materials is paramount. Children will instinctively learn about material properties:
- Rigid Materials: Cardboard, wood, hard plastic provide structural integrity and a framework. They can direct forces.
- Flexible/Absorbent Materials: Cotton balls, bubble wrap, sponges, foam, soft fabric absorb impact energy by deforming. These are ideal for cushioning.
- Elastic Materials: Rubber bands can create suspension systems or secure restraints, converting kinetic energy into elastic potential energy upon impact.
Through experimentation, kids discover that a strong, rigid outer shell might protect the car, but the egg still needs internal cushioning. This leads to a nuanced understanding that different parts of the car need different material properties.
3. Structural Integrity and Protection Zones
Good engineering involves creating specific zones for specific functions:
- The Passenger Compartment: This is the core, where the egg sits. It needs to be secure, preventing the egg from shifting or being directly hit.
- Crumple Zones: Inspired by real car design, these are areas of the car designed to deform and collapse upon impact, absorbing kinetic energy before it reaches the passenger compartment. Soft, easily compressible materials at the front of the car are perfect for this.
- Roll Cage/Protective Frame: A strong, rigid frame around the egg compartment can prevent crushing or penetration, especially during rollovers or severe impacts.
- Restraint System: Just like seatbelts, a system (e.g., rubber bands, tape, snugly fitted cushioning) is needed to hold the egg firmly in place within its compartment. This prevents the egg from continuing forward due to inertia and slamming into the car’s interior upon impact.
4. Aerodynamics and Wheels (Optional but valuable)
While not always the primary focus for egg protection, considering how the car moves adds another layer of engineering:
- Aerodynamics: A smoother, more streamlined shape can help the car roll faster and more predictably, though its impact on egg protection in a short ramp crash is minimal.
- Wheels: The number, size, and material of wheels affect how smoothly the car rolls and maintains direction. Stable wheels are crucial for a consistent test.
5. Iteration and Optimization
Perhaps the most important engineering principle showcased here is iteration. The first design rarely works perfectly. Children learn that engineers don't just build once and stop; they test, analyze, identify flaws, and optimize their designs. Each broken egg is not a failure, but valuable data that informs the next, improved prototype. This process of continuous improvement is how real innovations are made.
The STEM egg car challenge encourages children to think critically about how forces act on objects, how materials behave, and how thoughtful design can overcome significant challenges. It's a joyful exploration of cause and effect, where every adjustment leads to a deeper understanding of the world around them.
Not ready to subscribe for monthly deliveries? You can still spark that engineering curiosity! Explore our full library of adventure kits available for a single purchase in our shop and find the perfect theme for your little learner.
Designing Your Egg Car: A Step-by-Step Guide
Embarking on the STEM egg car challenge is an exciting journey of discovery. Follow these steps to guide your young engineer through the process, from initial concept to the big crash test!
Phase 1: Brainstorm & Plan – The Blueprint for Success
This is where creativity takes flight! Encourage your child to think broadly and capture all their initial ideas.
- Understand the Mission: Remind them of the goal: protect the egg during a crash. Discuss what a "safe" egg looks like (no cracks, no goo!).
- Define Your Materials: Lay out the available materials. If you've set constraints (e.g., limited craft sticks, only one plastic cup), ensure these are clear.
-
Sketch It Out: Provide paper and pencils. Encourage drawing multiple design ideas.
- Where will the egg sit? (Center, front, back?)
- How will it be held in place? (Tight fit, seatbelts?)
- What will cushion it? (Bubble wrap, cotton, sponge?)
- What will protect the outside? (Cardboard shell, craft stick cage?)
- How will the wheels attach?
- Encourage labeling parts and explaining their function.
- Predict the Crash: Ask, "What do you think will happen when it hits the wall?" "Where is the egg most vulnerable?" This helps them anticipate problems.
- Choose the Best Idea (for now): After brainstorming, help them select one design to start with. It doesn’t have to be perfect; remember, iteration is key!
Phase 2: Material Selection & Sourcing – Gathering Your Engineering Toolkit
Based on their chosen design, it's time to gather the "ingredients."
-
Core Materials:
- The Egg: Use a raw egg for the final test! For initial testing or practice, a hard-boiled egg can reduce mess, or a plastic Easter egg can simulate size without risk.
- Base/Frame: Cardboard, craft sticks, small wooden blocks, plastic containers (e.g., yogurt cups).
- Wheels: Bottle caps, CDs, small toy wheels, or even cardboard cut-outs. Axles can be straws, wooden dowels, or skewers.
- Cushioning: Cotton balls, bubble wrap, sponges, foam pieces, crumpled paper, fabric scraps.
- Restraints: Rubber bands, masking tape, string.
- Adhesives: Hot glue gun (with adult supervision!), strong craft glue, masking tape.
- Tools: Scissors, ruler, pencil, perhaps a craft knife (adult use only).
- Emphasis on Resourcefulness: If you've limited materials, this phase becomes a lesson in making do with what you have, just like real engineers often do! This teaches adaptability and creative problem-solving.
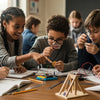
Phase 3: Build & Assemble – Bringing the Design to Life
This is the hands-on construction phase. Encourage careful work and problem-solving as they build.
- Start with the Base: Build a sturdy platform for the car.
- Attach Wheels: Ensure wheels are securely attached and can spin freely. Proper alignment prevents the car from veering off course. A common setup involves using straws as bushings for axles (dowels or skewers) to reduce friction.
-
Construct the Egg Compartment: Create a secure space for the egg.
- Example: A small plastic cup nested within a cardboard frame, lined with cotton balls.
-
Add Cushioning and Restraints: Carefully place cushioning materials around the egg. Then, add the restraint system to keep the egg from moving inside the compartment.
- Hypothetical Case Study: A 9-year-old designing their car might decide to use a plastic portion cup as the egg’s compartment. They could then line the cup with cotton balls, use a piece of bubble wrap over the top, and secure the egg with two rubber bands crisscrossing over the bubble wrap, attaching to the sides of the cup. This provides both cushioning and restraint.
- Build the Protective Outer Structure: Add crumple zones to the front and a robust frame around the entire egg compartment to absorb impact and prevent crushing.
- Adult Supervision: Especially with hot glue guns or sharp tools, ensure proper supervision and safety.
This stage reinforces the importance of following a plan, but also allows for on-the-fly modifications as challenges arise during construction.
Phase 4: Test & Analyze – The Moment of Truth
The crash test! This is exciting but also the most critical phase for learning.
-
Set Up Your Track: Find a smooth, clear surface.
- The Ramp: A sturdy piece of cardboard, a wooden plank, or even a collapsed folding table works well. Start with a moderate slope and increase it for more challenging tests.
- The Wall/Immovable Object: A brick, a stack of books, or a sturdy box. Ensure it won't move on impact.
- Measure: Mark a starting line on the ramp and the distance the car travels before impact. For advanced learners, you can measure the ramp height, car’s mass, and time taken to calculate speed and kinetic energy.
- The Crash! Place the raw egg carefully in the car. Release the car from the starting line. Observe everything!
-
Collect Data:
- Did the egg survive? (Yes/No)
- Where did the car sustain damage?
- Where did the egg sustain damage (if any)?
- What worked well? What didn't?
- Take photos or videos for later analysis.
Phase 5: Refine & Rebuild – The Iterative Process
The learning doesn't stop if the egg breaks; it only just begins!
- Analyze the "Failure": Discuss why the egg broke. Was it direct impact? Did it shift too much? Was the cushioning insufficient? Did the car flip?
-
Brainstorm Improvements: Based on the analysis, what changes can be made?
- Example: If the egg cracked from the front, perhaps add more crumple zone material or reposition the egg further back. If it cracked from shifting, strengthen the restraints. If the car flipped, improve its stability (wider base, lower center of gravity).
- Modify and Rebuild: Make the adjustments.
- Retest: Repeat the test with the modified car. The goal is to achieve an optimal design that consistently protects the egg.
This iterative process—design, build, test, analyze, refine—is the heart of engineering and scientific inquiry. It teaches perseverance, adaptability, and the value of learning from every experience. It’s exactly the kind of hands-on, problem-solving fun we champion at I'm the Chef Too! through all our creative kits. If you're looking for more ways to keep these engaging, screen-free learning experiences coming, remember that a new adventure is delivered to your door every month with free shipping in the US when you join The Chef's Club.
Key Elements for Egg Protection: Engineering for Safety
Protecting the egg is the ultimate goal, and it requires strategic application of the engineering principles we've discussed. Here are the crucial elements your child should consider incorporating into their design:
1. Impact Absorption: The Crumple Zone and Cushioning
This is perhaps the most vital component. The goal is to extend the time over which the impact force is applied to the egg.
- Crumple Zones: Design the front of the car (the part that hits the wall first) to deform easily. Materials like accordion-folded paper, layers of cardboard, sponges, or even strategically placed plastic cups can act as crumple zones, sacrificing themselves to absorb kinetic energy before it reaches the egg. Think of how a car's bumper and hood are designed to collapse in a crash.
- Internal Cushioning: The immediate surroundings of the egg need soft, compressible materials. Cotton balls, bubble wrap, foam peanuts, crumpled tissue paper, or even mini marshmallows can gently cradle the egg and absorb shocks that bypass the crumple zone. The key is to provide enough material to allow for significant compression during impact.
2. Restraint Systems: Keeping the Egg Secure
Inertia is the egg's enemy. When the car stops, the egg wants to keep moving. A restraint system prevents it from slamming into the car's interior.
- Seatbelts: Rubber bands, masking tape, or string can be used to gently yet firmly hold the egg in place within its compartment. Ensure they are snug but don't apply so much pressure that they crack the egg themselves!
- Snug Fit: A compartment that perfectly cradles the egg (lined with soft material) can also act as a passive restraint, limiting its movement. The egg should ideally have minimal wiggle room.
3. Structural Integrity: The Protective Shell and Roll Cage
Beyond cushioning, the car needs a strong "skeleton" to protect against crushing or piercing.
- Rigid Outer Shell: A robust exterior made of cardboard, craft sticks, or even a small plastic container can prevent the egg from being exposed to direct external forces.
- Roll Cage/Internal Frame: If the car is prone to tipping or rolling over, a cage-like structure built around the egg compartment (using craft sticks or cardboard strips) can provide multi-directional protection, preventing the egg from being crushed from above or the sides.
- Rigid Passenger Compartment: While the interior of the egg compartment should be soft, the walls of the compartment itself should be strong enough not to collapse inward easily.
4. Stability: Staying Upright
A car that tips over exposes the egg to different, potentially more damaging, angles of impact.
- Wide Wheelbase: A wider distance between the wheels makes the car more stable and less likely to tip.
- Low Center of Gravity: Keeping the heaviest parts of the car (including the egg) as low to the ground as possible increases stability.
5. Aerodynamics and Rolling Efficiency (Secondary Importance for Egg Protection)
While not directly protecting the egg, these factors can affect the consistency of your tests.
- Smooth Rolling: Well-aligned wheels and axles reduce friction, ensuring the car travels straight and at a consistent speed. This makes test results more reliable.
- Streamlined Shape: A less blocky shape can reduce air resistance, allowing for smoother and faster travel, though this is a more advanced consideration for younger builders.
By strategically combining these elements, children can design an egg car that offers multi-faceted protection, learning valuable lessons about mechanical design and safety engineering in the process.
Setting Up Your Crash Test Track: The Science of Controlled Experiments
A reliable test environment is just as important as a well-designed car. A well-constructed crash test track allows for repeatable experiments and accurate observation, which are cornerstones of scientific inquiry.
1. Choose Your Location Wisely
- Smooth, Flat Surface: A hardwood floor, a large table, or a smooth garage floor are ideal. Avoid carpet, which creates too much friction and inconsistent results.
- Clear Area: Ensure there's ample space for the car to roll down the ramp, collide, and for any debris (or egg contents!) to be contained. Lay down a plastic sheet or old newspaper for easy cleanup, especially if using a raw egg.
2. Constructing the Ramp
The ramp provides the acceleration needed for the crash.
- Material: A sturdy, flat material like a wooden plank, a large piece of rigid cardboard, or even a collapsed folding table.
- Length: A longer ramp allows the car to build up more speed and momentum, creating a more challenging crash. Aim for at least 3-4 feet.
-
Slope/Angle:
- Start with a gentle slope (e.g., propping one end of a plank on a stack of books or a low chair). This allows for initial, less destructive tests.
- For more challenging scenarios, gradually increase the ramp's height to create a steeper slope and thus higher impact speeds.
- Consistency is Key: Ensure the ramp's angle remains the same for all tests of a particular design. If you change the angle, you're introducing a new variable, which is great for further experimentation but complicates direct comparison.
- Starting Line: Mark a clear starting point on the ramp where the car will be released. Releasing the car from the exact same spot every time ensures consistency.
3. The Immovable Object (The "Wall")
This is what your car will crash into!
- Material: It needs to be truly immovable. A brick, a stack of heavy books, a sturdy wooden block, or even a wall in your house (protected by cardboard or a blanket if you're worried about marks) will work.
- Positioning: Place it directly at the end of the ramp, ensuring the car will hit it head-on.
- Securing: If possible, tape or brace the "wall" to prevent it from sliding upon impact. If the wall moves, it absorbs some of the energy, making the crash less impactful and your results less reliable.
4. Measurement Tools
These tools help quantify the experiment and make it more scientific.
- Ruler or Tape Measure: To measure the length of the ramp, the height of the ramp, and the distance the car travels before impact. For advanced students, you might even measure how much the crumple zone deforms.
- Stopwatch (Optional): If you want to calculate speed, you'll need a stopwatch to time how long it takes the car to travel a certain distance down the ramp.
- Camera/Video Recorder (Optional): Recording the crash can be incredibly helpful for analyzing what happened in slow motion, especially if the egg breaks. It allows for detailed observation of structural failure, egg movement, and material deformation.
By meticulously setting up your crash test track, you’re not just providing a stage for the challenge; you’re teaching your child the importance of experimental control, data collection, and systematic observation – all vital skills for any budding scientist or engineer.
For children fascinated by the forces of nature and the physics of impact, imagine exploring astronomy by creating your own edible solar system with our Galaxy Donut Kit! This hands-on kit provides another delicious way to learn about the universe, just as the egg car challenge explores the forces within it.
Beyond the Crash: Learning & Discussion
The true educational value of the STEM egg car challenge comes not just from building and crashing, but from the reflection and discussion that follows. This is where hypotheses are confirmed or refuted, new questions arise, and deeper understanding takes root.
1. Analyzing the Results
After each crash, take time to carefully examine what happened.
- The Egg: Did it survive? If not, precisely where did it crack or break? This is crucial diagnostic information. Was it a direct hit? Did it hit the side of the compartment? Did it fly out?
- The Car: Where did the car sustain damage? Did the crumple zone work as intended? Did any structural parts break or bend unexpectedly? Did the wheels stay on?
- Observations: Replay the crash in your mind (or with a video). Was there anything surprising? Did the car bounce, spin, or slide?
2. Fair Testing: The Scientific Method in Action
Discuss the concept of a "fair test."
- Controlled Variables: Emphasize that to compare different designs accurately, you need to keep everything else the same. The ramp height, the release point, and the "wall" should remain constant.
- One Variable at a Time: If you're testing whether more cushioning helps, change only the cushioning, keeping the rest of the car the same. This allows you to isolate the effect of that one change.
3. Data Collection and Simple Calculations
Even without complex formulas, children can engage in basic data collection and analysis.
-
Record Keeping: Use a simple chart to record:
- Design version number
- Materials used for key protection elements
- Egg outcome (intact/cracked/smashed)
- Observations (what worked, what didn't)
-
Quantitative Data (Optional for Older Kids):
- Distance and Time: Measure the ramp length and the time it takes the car to go down (using a stopwatch). From this, calculate average speed (Speed = Distance / Time). How does speed affect the impact?
- Ramp Height: Relate different ramp heights to increased speed and impact force.
- Cost-Benefit Ratio: If you assigned material costs, discuss which design protected the egg most effectively for the lowest "cost." This introduces real-world engineering trade-offs.
4. Reflection Questions: Guiding Deeper Thought
Use open-ended questions to encourage critical thinking:
- "What was the most challenging part of designing your car?"
- "If your egg broke, what do you think was the main reason?"
- "What changes would you make for your next design?"
- "Which materials seemed to work best for cushioning? For structure?"
- "How is this challenge similar to how real car engineers design safe cars?"
- "What did you learn about force, motion, or energy today?"
5. Connecting to Real-World Engineering
This is a fantastic opportunity to relate the activity to real-world applications:
- Automotive Safety: Discuss how engineers use crash test dummies and high-speed cameras to analyze impacts and design safer cars with crumple zones, airbags, and seatbelts.
- Packaging Design: Think about how companies design packaging to protect fragile items during shipping. It's the same principles!
- Sports Equipment: Helmets and protective gear use similar principles of impact absorption.
By guiding children through this process of analysis and reflection, you transform a fun activity into a profound learning experience, reinforcing scientific concepts and the practical application of engineering principles. This kind of hands-on exploration is exactly what we champion at I'm the Chef Too!, providing enriching, screen-free alternatives that spark genuine understanding and joy. Give the gift of learning that lasts all year with a 12-month subscription to our STEM cooking adventures – a new discovery delivered every month! Join The Chef's Club today!
Making it a Family Affair: Bonding Through STEM
The STEM egg car challenge isn't just for kids; it's a fantastic opportunity for family bonding and shared learning. At I'm the Chef Too!, we deeply value activities that bring families together, creating joyful memories and fostering a love for learning in a supportive environment.
1. Collaborate, Don't Dominate
It's tempting for adults to take over, especially when problem-solving. Instead, aim to be a facilitator.
- Ask Guiding Questions: "What do you think will happen if...?" "How could we make this stronger?" "What materials might absorb the most impact?"
- Offer Suggestions, Not Solutions: "Have you thought about using a rubber band here?" instead of "You should use a rubber band here."
- Model Patience: Show them that it's okay for ideas not to work the first time. Celebrate the learning process.
2. Divide and Conquer (and Learn!)
For multiple children or a parent-child team, assign different roles or tasks. One child might focus on the wheels, another on the egg compartment, and a parent can oversee the overall structure and safety. This fosters teamwork and shared responsibility.
3. Celebrate Every Step
Acknowledge effort, creativity, and perseverance, not just the final outcome.
- "Wow, that's a really clever way you attached those wheels!"
- "I love how you brainstormed so many different ideas."
- "It's amazing how you figured out why the egg broke and how to fix it." These affirmations build confidence and encourage continued engagement, even if the egg doesn't survive the first (or fifth) crash.
4. Screen-Free Quality Time
In our digital age, dedicated screen-free time is invaluable. The egg car challenge provides a tangible, engaging activity that encourages conversation, laughter, and genuine interaction. It's an opportunity to put down devices and fully immerse yourselves in a shared creative endeavor. This aligns perfectly with our commitment at I'm the Chef Too! to providing alternatives that prioritize hands-on, interactive learning.
5. Document the Journey
Take photos or videos throughout the process:
- The initial brainstorming sketches.
- Different stages of construction.
- The exhilarating crash tests (especially in slow-motion!).
- The expressions of triumph (or thoughtful consideration) after the results. These memories become precious family keepsakes, chronicling not just a project, but a shared adventure in learning.
By approaching the STEM egg car challenge as a collaborative family adventure, you’re not just teaching science and engineering; you’re building stronger bonds, nurturing creativity, and instilling a lifelong love for discovery. It's these kinds of enriching experiences that truly shape young minds and create lasting joy.
Troubleshooting Common Challenges: When Things Don't Go as Planned
In any hands-on STEM project, especially one involving a delicate "passenger," challenges are inevitable. This is where some of the most profound learning happens! Here’s how to troubleshoot common issues during your STEM egg car challenge.
Challenge 1: The Egg Breaks!
This is the most common "failure" and the biggest learning opportunity.
-
Diagnosis:
- Direct Impact: Did the egg hit the front of the car or the wall directly? This means the crumple zone was insufficient or the egg was too far forward.
- Internal Impact: Did the egg break by hitting the inside of its compartment? The restraints might be too loose, or the internal cushioning inadequate.
- Crushing: Did the car structure collapse onto the egg? The outer frame needs strengthening.
- Shifting/Flying Out: Did the egg move too much or even exit the car? The restraint system is the primary culprit here.
-
Solutions:
- More Crumple Zone: Add more layers of impact-absorbing material to the front.
- Better Cushioning: Increase the amount or effectiveness of soft materials around the egg.
- Tighter Restraints: Ensure the egg is snug and secure, using rubber bands or tape to prevent movement.
- Stronger Structure: Reinforce the car's frame, especially the egg compartment walls.
- Reposition the Egg: Move the egg compartment further back in the car, away from the direct impact point.
Challenge 2: The Car Doesn't Roll (or Rolls Poorly)
A non-moving car means no crash, and no data!
-
Diagnosis:
- Friction: Are the axles rubbing against the car body? Are the wheels dragging?
- Alignment: Are the wheels straight? Is the car skewed?
- Weight Distribution: Is the car unbalanced?
-
Solutions:
- Reduce Friction: Ensure axles (e.g., wooden dowels or skewers) are smooth and can spin freely within their bushings (e.g., straws). Use a touch of petroleum jelly if desired.
- Align Wheels: Carefully ensure all wheels are pointing forward and are parallel. Adjust axle length if needed.
- Balance Weight: Try to distribute the weight evenly, or intentionally lower the center of gravity for stability.
- Clear Obstructions: Make sure no part of the car is scraping the ground or other parts of the car.
Challenge 3: The Car Veers Off Track
An unpredictable car can lead to inconsistent tests.
-
Diagnosis:
- Wheel Alignment: The most common cause. Wheels are not straight.
- Uneven Weight: One side of the car is heavier.
- Ramp Imperfections: The ramp itself might not be perfectly straight or smooth.
-
Solutions:
- Realign Wheels: Double-check and adjust wheel and axle alignment.
- Redistribute Weight: Add small weights (like coins) to balance the car.
- Check Ramp: Ensure the ramp is straight and the car is released consistently.
Challenge 4: Lack of Ideas or Frustration
Sometimes, the biggest challenge is the emotional one!
- Diagnosis: Child feels overwhelmed, discouraged, or uninspired.
-
Solutions:
- Take a Break: Step away from the project for a bit. Fresh eyes often bring new ideas.
- Look for Inspiration: Gently suggest looking at pictures of different car designs (real or toy) for ideas, focusing on how different parts serve different functions.
- Simplify: If the current design is too complex, suggest a simpler approach.
- Revisit the "Why": Remind them of the fun and learning, not just the outcome. Focus on the process.
- Connect to Other Fun: If they love our kits, remind them how sometimes the first cookie doesn't come out perfect, but with a little adjustment, it gets even better!
Remember, every "failure" is a valuable piece of data in the engineering design process. By guiding your child through troubleshooting with patience and encouragement, you’re teaching them resilience, critical thinking, and the true spirit of innovation. These are the skills that empower them to tackle future challenges with confidence.
Want to keep the scientific discoveries coming even after the egg car challenge? Browse our complete collection of one-time kits to find a perfect new adventure for hands-on learning!
Adaptations for Different Age Groups: Tailoring the Challenge
The beauty of the STEM egg car challenge is its adaptability. It can be simplified for younger children or made more complex for older, more experienced budding engineers. Our philosophy at I'm the Chef Too! is about making STEM accessible and engaging for all ages, and this project fits right in.
For Younger Engineers (Ages 4-7): Focus on Creativity and Basic Concepts
For preschoolers and early elementary students, the emphasis should be on hands-on building, creativity, and simple cause-and-effect.
- Simplified Goal: "Make a car that can keep the egg safe when it rolls off a table" (a gentler drop rather than a high-speed crash).
- Pre-made Components: Provide a basic car base (e.g., a cardboard box with pre-attached wheels) or larger construction toys like LEGO Duplo/Mega Bloks.
- Abundant Materials: Offer a wide variety of soft, easy-to-manipulate materials (large cotton balls, soft fabric scraps, toilet paper rolls, foam blocks) without strict limits.
- Guided Questions: Focus on direct observations. "What makes the egg feel squishy?" "What happens when the car hits?" "How can we make it softer for the egg?"
- Focus on Fun: Prioritize the joy of building and experimenting. The egg breaking is simply an outcome to learn from, not a failure. Use hard-boiled eggs for less mess.
- Parent-Led Discussion: Keep physics explanations very simple, e.g., "The car pushes the wall, and the wall pushes the car back!"
For Middle-Grade Engineers (Ages 8-12): Deepening Scientific Inquiry
This age group is ready for more complex problem-solving and a deeper dive into scientific principles.
- Full Engineering Design Process: Guide them through all five phases: Ask, Imagine, Plan, Create, Improve.
- Specific Constraints: Introduce material limits (e.g., "only 5 rubber bands," "no more than 3 plastic cups") and size requirements.
- Core Physics Concepts: Introduce Newton's Laws, energy transfer, and momentum in age-appropriate terms. Discuss how crumple zones and restraints work.
- Testing and Data Collection: Encourage systematic testing, recording results, and making informed design modifications. Use a simple data chart.
- Measurement: Introduce measuring ramp height, distance, and time to calculate speed.
- Peer Collaboration: If in a group setting, encourage teamwork, sharing ideas, and constructive critique.
- Hypothetical Case Study: An 8-year-old might be tasked with designing a car using only cardboard, straws, and rubber bands, aiming for their egg to survive a 2-foot ramp drop. They would sketch designs, build, test, and then analyze if more cardboard layers at the front (crumple zone) or tighter rubber band "seatbelts" would be more effective.
For Advanced Engineers (Ages 13+): Advanced Concepts and Optimization
Older students can handle more abstract concepts, quantitative analysis, and complex design challenges.
- Advanced Physics: Explore concepts like impulse, force over time, and center of gravity in detail.
- Calculations: Require calculations for speed, kinetic energy, and possibly even estimate impact force.
- Material Properties Research: Task them with researching different materials and justifying their choices based on properties like elasticity, tensile strength, and compressibility.
- Optimization Challenge: Introduce criteria for efficiency, such as the lightest car that protects the egg, or the most cost-effective design (if using a budget).
- Documentation: Require a design brief, engineering notebook, or presentation detailing their process, results, and conclusions.
- Multiple Variables: Encourage them to test how different variables (ramp angle, car weight, specific material types) affect the outcome systematically.
- Advanced Constraints: Introduce challenges like designing for a rollover scenario in addition to a head-on collision.
By tailoring the complexity of the STEM egg car challenge to your child's developmental stage, you ensure that the activity remains engaging, appropriately challenging, and profoundly educational, reinforcing the joy of discovery and the power of scientific thinking.
Frequently Asked Questions (FAQ) About the STEM Egg Car Challenge
Embarking on a new STEM adventure can bring up a few questions. Here are some common queries about the STEM egg car challenge to help you get started:
Q1: What kind of egg should I use for the challenge? A: For the final, real test, use a raw egg to fully appreciate the fragility and the impact. However, for initial testing and design iteration, you can use a hard-boiled egg (less messy if it breaks!) or even a plastic Easter egg filled with something to give it weight, to simulate the size and shape without the immediate risk of a raw egg mess.
Q2: What are the essential materials I'll need? A: The beauty of this challenge is that it uses common household items! You'll need: a raw egg, materials for the car's frame (cardboard, craft sticks, plastic containers), wheels (bottle caps, old CDs, toy wheels), axles (straws, wooden dowels, skewers), cushioning materials (cotton balls, bubble wrap, sponges, foam), restraints (rubber bands, masking tape), and adhesives (hot glue, craft glue, tape).
Q3: How much supervision is required for younger children? A: Close adult supervision is highly recommended, especially when using tools like scissors, craft knives (for adults only!), or hot glue guns. For younger children, adults should handle all cutting and hot gluing, allowing the child to focus on design, assembly, and material placement. For all ages, ensure safety during the crash test.
Q4: My child's egg keeps breaking! What should we do? A: Don't get discouraged! This is part of the learning process. Carefully analyze where and how the egg broke. Is it a direct front impact (needs more crumple zone)? Is it rattling around inside (needs better cushioning/restraints)? Is the whole structure collapsing (needs reinforcement)? Use these observations to modify the design and try again. Each "failure" provides valuable data for improvement.
Q5: How can I make sure the car rolls straight down the ramp? A: The most common reasons for veering are misaligned wheels or axles, or an uneven distribution of weight. Ensure the wheels are parallel and spinning freely. Check that the axles are straight and securely attached. You can add small weights (like coins) to balance the car if one side is heavier.
Q6: What if my child gets frustrated or loses interest? A: It's important to keep the experience fun and low-pressure. Take a break if frustration sets in. You can simplify the challenge, provide more guidance, or just focus on the building aspect without the pressure of a perfect outcome. Remind them that engineers often face challenges and learn from every attempt. Celebrate their effort and creativity, not just the "win." Maybe shift to a different kind of STEM fun, like baking delicious cookies with a science twist from our one-time kits!
Q7: Can this activity be done in a classroom or group setting? A: Absolutely! The STEM egg car challenge is fantastic for groups. It encourages teamwork, communication, and friendly competition. You can divide students into teams, assign roles, and have them present their designs and findings. It's an excellent way to apply the engineering design process collaboratively.
Q8: How long does the activity usually take? A: The time can vary significantly. Simple designs for younger children might take an hour or two. More complex designs involving multiple iterations and detailed analysis for older children could span several hours, or even a few sessions over a couple of days, allowing for drying time for glues and deeper reflection.
Q9: What are some advanced concepts for older kids? A: For older students, you can introduce quantitative analysis (calculating speed, kinetic energy), explore different types of energy transfer, discuss material science properties in more detail, introduce specific constraints like a budget, or challenge them to design for multiple crash scenarios (e.g., side impact, rollover).
We hope these FAQs help you launch your STEM egg car challenge with confidence and excitement!
Conclusion
The STEM egg car challenge is a true testament to the power of hands-on, experiential learning. It transforms abstract concepts of physics and engineering into a thrilling, tangible adventure that captivates young minds and inspires a lifelong love for discovery. From the initial spark of an idea to the excitement of the crash test and the critical analysis of the results, children develop invaluable skills in problem-solving, critical thinking, creativity, and perseverance. They learn that "failure" isn't an endpoint, but a crucial stepping stone on the path to innovation.
At I'm the Chef Too!, we wholeheartedly believe in the magic of blending food, STEM, and the arts to create unique "edutainment" experiences. Just as crafting an edible Erupting Volcano Cakes kit teaches about chemical reactions, or a Galaxy Donut Kit explores astronomy, the egg car challenge demonstrates how complex scientific principles underpin our everyday world. These activities provide screen-free alternatives that spark curiosity, build confidence, and foster incredible family bonding moments.
So, gather your materials, embrace the challenge, and watch as your child transforms into a budding engineer, ready to build, crash, and learn. The skills they gain and the memories you create will last far longer than any perfectly protected egg.
Ready to continue the adventure with engaging, educational activities delivered right to your door? Don't miss out on the fun! Join The Chef's Club today and unlock a world of monthly STEM cooking adventures, complete with free shipping on every box. Your next delicious discovery awaits!