Colorful Painting Easter Crafts for Kids

Table of Contents
- Why Painting Easter Crafts? More Than Just Fun!
- Essential Supplies for Your Easter Painting Adventure
- Egg-cellent Ideas: Painting Easter Eggs (and Egg-Shapes!)
- Beyond Eggs: Adorable Easter Animal Crafts to Paint
- Unique Techniques & Creative Twists for Easter Painting
- Setting Up for Success: Tips for a Smooth Crafting Session
- Turning Easter Crafts into Learning Moments (STEM & Arts Integration)
- Displaying Your Easter Masterpieces
- Making Every Month an Adventure: The I'm the Chef Too! Way
- Conclusion
- FAQ
Ever notice how a quiet hum can settle over a busy home the moment a child dips a brush into vibrant paint? It's almost magical, isn't it? In our fast-paced world, where screens often dominate playtime, finding engaging, hands-on activities that capture a child's imagination can feel like a quest. But what if we told you that the simple act of painting Easter crafts offers more than just a momentary distraction? It's a gateway to creativity, a booster for development, and a wonderful opportunity for family connection.
At I'm the Chef Too!, we wholeheartedly believe in the power of "edutainment" – blending education with pure fun. Our unique approach focuses on tangible, hands-on, and delicious cooking adventures that spark curiosity, build confidence, and create joyful memories. While our kits often involve delectable culinary creations, the underlying principles of discovery, skill-building, and imaginative play are universal. This Easter, we're bringing that same spirit of adventure into your craft corner, showing you how painting Easter crafts for kids can be a fantastic way to engage young minds, explore artistic expression, and even sneak in some STEM learning.
This comprehensive guide will walk you through a delightful array of painting Easter crafts, from classic egg designs to adorable spring creatures, offering creative techniques suitable for various age groups. We’ll delve into the developmental benefits, essential supplies, and practical tips for setting up a successful, joy-filled crafting session. Our aim is to equip you with fun, screen-free alternatives that encourage children to explore their artistic talents, foster critical thinking, and build a love for learning that extends far beyond the canvas – or in this case, the egg! So, grab your aprons and get ready to transform simple supplies into colorful masterpieces, making this Easter a truly memorable celebration of creativity and togetherness.
Why Painting Easter Crafts? More Than Just Fun!
When we think of kids painting, we often picture a joyful, slightly messy activity. And while the joy and mess are certainly part of the experience, the benefits of engaging in painting Easter crafts run much deeper, aligning perfectly with our mission at I'm the Chef Too! We're not just about making pretty things; we're about cultivating a fertile ground for growth, learning, and connection.
Fostering Creativity & Imagination
Painting is an unparalleled avenue for imaginative play. Children aren't just following instructions; they're making choices about colors, patterns, and themes. This freedom of expression helps them develop their unique artistic voice. When painting an Easter egg, a child might imagine it as a dinosaur egg hatching, a spaceship rocketing to the moon, or a jewel from an enchanted garden. This mental storytelling is crucial for developing narrative skills and expanding their imaginative horizons. By providing a canvas, whether it's paper, cardboard, or a real egg, we're giving them permission to dream vividly and bring those dreams to life. This process of ideation and execution, of turning an abstract thought into a concrete object, is a fundamental creative skill that transcends art and benefits problem-solving in all areas of life. It’s about building confidence in their own ideas, a core value we champion in every I'm the Chef Too! kit we develop.
Boosting Fine Motor Skills & Hand-Eye Coordination
The act of holding a paintbrush, carefully applying paint, and directing strokes requires immense precision. These actions are powerful exercises for developing fine motor skills – the coordination of small muscles in the hands and fingers. From grasping a chunky brush to delicately dabbing with a Q-tip, each movement refines dexterity. Simultaneously, children are honing their hand-eye coordination as they watch where their brush is going and adjust their movements to achieve the desired effect. This developmental groundwork is essential for tasks like writing, buttoning clothes, and even the intricate steps involved in following a recipe from one of our kits. These seemingly simple crafts are actually building blocks for more complex skills down the road, making every stroke a step forward in their physical and cognitive development.
Introducing STEM Concepts (Color Mixing, Absorption, Reactions)
You might think painting is purely art, but it's a fantastic, low-stakes way to introduce foundational STEM concepts. Color theory, for instance, is essentially a lesson in chemistry and physics. What happens when blue and yellow combine? How does white lighten a color, or black darken it? Children conduct miniature experiments every time they mix paints, observing cause and effect. Salt painting, as we'll discuss, demonstrates principles of water absorption and capillary action. Even observing how different paints behave on various surfaces involves rudimentary physics. At I'm the Chef Too!, we love to blend subjects, making science palatable and exciting. Just as we explore amazing chemical reactions that make our Erupting Volcano Cakes bubble over with deliciousness, understanding how colors interact and how materials absorb liquid is a form of scientific discovery. These hands-on observations lay the groundwork for a deeper appreciation of scientific principles in later life, showing kids that learning is an adventure waiting to be explored.
Encouraging Emotional Expression & Calm
For many children, painting is a wonderfully therapeutic activity. It provides a safe, non-verbal outlet for expressing feelings, whether they're joy, frustration, or curiosity. The focus required for painting can also be incredibly calming, helping children to regulate their emotions and find a sense of peace. In a world that often demands constant attention and quick responses, the deliberate pace of painting offers a welcome respite. It's a screen-free space where they can simply be, without external pressures, fostering mindfulness and self-awareness. This emotional regulation is a vital life skill, helping them navigate challenges with greater resilience and a stronger sense of self.
Facilitating Family Bonding
Perhaps one of the most heartwarming benefits of painting Easter crafts is the opportunity for genuine family bonding. Sitting side-by-side, sharing materials, offering encouragement, and admiring each other's creations strengthens connections. These shared experiences become cherished memories, far more lasting than any toy. It's a chance for parents and children to collaborate, learn from each other, and simply enjoy being together in a relaxed, creative environment. This shared journey of discovery and creation is a cornerstone of the I'm the Chef Too! philosophy, where we aim to facilitate family bonding through every kit, transforming everyday moments into extraordinary adventures. Ready to bring more of these enriching, screen-free experiences into your home every month? Join The Chef's Club and enjoy free shipping on every box, making ongoing educational fun incredibly convenient!
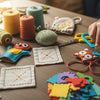
Essential Supplies for Your Easter Painting Adventure
Before the colorful fun begins, a little preparation goes a long way. Having the right tools and knowing how to set up your workspace can make the difference between a joyful creative session and a stressful cleanup. Think of it as preparing your kitchen before baking: mis en place for artists!
Paints: A Spectrum of Possibilities
The world of paint for kids is wonderfully diverse, offering different textures, drying times, and effects.
- Washable Tempera Paints: These are often the go-to for young children, and for good reason. They're vibrant, opaque, and, most importantly, easy to wash off hands, clothes, and surfaces. They dry relatively quickly and are perfect for cardboard, paper, and even some recycled materials. We highly recommend starting with a basic set of primary and secondary colors.
- Watercolors: For a lighter, more translucent effect, watercolors are fantastic. They teach children about dilution and how to build up color in layers. Pan watercolors are less messy than liquid watercolors, making them great for smaller spaces or less-experienced painters. Liquid watercolors, however, offer intense, brilliant colors perfect for techniques like watercolor resist.
- Acrylic Paints: For older children or projects requiring more permanence and bolder colors, acrylics are a good choice. They dry quickly and are water-resistant once dry, making them ideal for painting on rocks, wood, or other non-paper surfaces. Be aware that acrylics are much harder to wash out of clothing, so smocks are a must!
- Non-Toxic Finger Paints: For toddlers and very young children, finger paints offer a truly sensory experience. They are designed to be safe for skin contact and often have a thicker consistency, making them easy for little hands to manipulate.
Brushes, Sponges, Q-tips, and Unconventional Tools
Don't limit yourselves to just traditional paintbrushes! Varying your tools introduces different textures and challenges, further enhancing fine motor development and creative thinking.
- Paint Brushes: A variety of sizes is useful – chunky brushes for broad strokes and smaller ones for details. Look for brushes with sturdy handles that are easy for little hands to grip.
- Sponges: Cut kitchen sponges into fun shapes (like eggs or bunnies!) for stamping. They create interesting textured effects and are great for covering larger areas quickly.
- Q-tips (Cotton Swabs): Perfect for pointillism, adding small dots, or fine details. They also offer a different grip and pressure experience for little fingers.
- Recycled Materials: Think outside the box! Crumpled aluminum foil, bubble wrap, old toothbrushes, corks, or even natural elements like leaves can be used as painting tools to create unique patterns and textures. This also teaches resourcefulness, a practical skill we love to highlight.
Surfaces: From Paper to Repurposed Treasures
What you paint on is just as important as what you paint with.
- Paper & Cardstock: Standard printer paper works for quick sketches, but cardstock is thicker and holds up better to more paint and water, preventing warping. Look for construction paper in various colors to experiment with how paint looks on different backgrounds.
- Recycled Cardboard: This is a goldmine for crafting! Cereal boxes, shipping boxes, and paperboard can be cut into any shape – eggs, bunnies, carrots – and provide a sturdy, free canvas. It's also an excellent way to teach children about repurposing and environmental responsibility.
- Natural Elements: Smooth rocks, small pieces of wood, or even dried leaves can become unique canvases, transforming nature's bounty into artistic treasures.
- Aluminum Foil: Provides a unique, shiny surface that reacts differently to paint. It's also incredibly satisfying for kids to draw and paint on.
Protective Gear & Setup: Managing the Mess
Let's be real: painting with kids can get messy. But with a little foresight, you can contain the chaos and fully embrace the creative process.
- Tablecloth/Drop Cloth: Lay down an old shower curtain, newspapers, a plastic tablecloth, or even a large piece of cardboard to protect your workspace.
- Smocks/Old Clothes: Essential for protecting clothing. An old adult t-shirt works wonders as a makeshift smock.
- Wipes/Damp Cloths: Keep these handy for quick cleanups of hands and spills.
- Activity Trays/Baking Sheets: These are excellent for containing individual projects, especially for techniques like salt painting, preventing materials from scattering.
- Water Cups: Use unbreakable cups for rinsing brushes. Having multiple cups (one for dirty water, one for cleaner water) can help extend paint vibrancy.
Our Commitment to Convenience
At I'm the Chef Too!, we understand that busy families need convenience without sacrificing quality or educational value. That's why we create comprehensive kits with pre-measured dry ingredients and specialty supplies, delivering an entire experience right to your door. While our focus is on culinary STEM adventures, the principle of making engaging activities accessible and easy to set up extends to all forms of family enrichment. We take the guesswork out of gathering supplies, just as you can streamline your crafting by stocking up on basic art supplies. Want to experience this convenience every month with new, exciting themes? Join The Chef's Club and discover a world of hassle-free, educational fun!
Egg-cellent Ideas: Painting Easter Eggs (and Egg-Shapes!)
Easter eggs are the quintessential symbol of spring and new beginnings, making them a perfect canvas for little artists. Forget the traditional dye kits for a moment and let's explore how paint can bring these festive shapes to life, combining artistic expression with a touch of scientific discovery.
Classic Paper Eggs: Freehand, Templates, Cut-outs
One of the simplest and most accessible ways to paint Easter eggs is on paper. This allows for endless experimentation without the fragility of real eggs.
- Freehand Fun: Encourage children to draw their own egg shapes with a pencil or black marker before painting. This boosts their drawing skills and gives them ownership of their design.
- Templates for Precision: For younger children or those who prefer a guide, print out egg templates or trace around an actual egg on paper or cardboard. Cut these shapes out beforehand to focus purely on the painting aspect.
-
The "Blank Canvas" Approach: Provide pre-cut egg shapes from cardstock or recycled cardboard. This removes the drawing step and lets kids dive straight into color.
- How-To: Offer various paints and brushes. Encourage simple patterns like stripes, polka dots, zigzags, or free-form abstract art. Experiment with different colors side-by-side to see how they blend on the paper.
- Variations: Try painting only half an egg and then folding it to create a symmetrical print, or use masking tape to create crisp lines and geometric patterns.
- Educational Twist: Discuss symmetry, patterns, and color gradients. "What happens if we put two colors next to each other? Do they make a new color in the middle?"
Watercolor Resist (Oil Pastels/Crayons)
This is a magical technique that never fails to impress children (and adults!). It beautifully demonstrates the concept of 'resist' in art – how oil and water don't mix.
-
How-To:
- On a piece of paper (or pre-cut egg shape) use oil pastels or crayons to draw designs. Press firmly for best results. White oil pastels offer a "magical reveal" as the lines only appear once painted over.
- Once the designs are drawn, paint over the entire paper with liquid watercolors.
- Watch as the paint washes over the pastel, but the pastel designs "resist" the watercolor, shining through vividly.
- Why It's Great: It's visually stunning, relatively mess-free (compared to some other techniques), and teaches a basic scientific principle in an artistic context. It's a wonderful way to blend the arts with a touch of STEM, a core philosophy at I'm the Chef Too!
- Variations: Use different colored pastels to create layered effects or draw secret messages that only appear with the paint.
Salt-Painted Eggs (Science Connection!)
This craft is not only beautiful but also a fascinating mini-science experiment, perfect for illustrating absorption.
-
How-To:
- Draw an egg shape on heavy cardstock or cardboard with a permanent marker.
- Trace over the marker lines with liquid school glue (not a glue stick!). You can also draw additional designs with the glue.
- While the glue is still wet, generously sprinkle table salt over all the glue lines.
- Gently tap off the excess salt back into a container (this can be reused!).
- Let the glue dry completely. This might take a few hours or overnight.
- Once dry, use watercolor paints (liquid watercolors work best) and a paintbrush. Dip the brush into the paint, and then gently touch the wet, painted brush to the salted glue lines.
- Watch the paint magically spread and wick along the salt crystals, creating vibrant, crystallized designs.
- The Science: The salt absorbs the water from the watercolor, leaving behind concentrated pigment, which makes the colors incredibly vivid. This demonstrates capillary action and absorption in a tangible, exciting way. "See how the salt drinks up the color, making it so bright!"
- Tips: An activity tray or baking sheet helps contain the salt mess. Encourage gentle dabbing rather than brushing to keep the salt crystals intact.
Bubble Wrap/Sponge Stamped Eggs
Adding texture to your Easter eggs can make them truly stand out. Stamping is an easy way to achieve this, especially for younger artists.
-
How-To:
- Cut out large egg shapes from paper or cardboard.
- Squirt different colors of paint onto a flat plate or tray.
- Bubble Wrap: Place a piece of bubble wrap (bubbles up) onto the paint, then gently press it onto your paper egg. The bubbles will leave an interesting dot pattern.
- Sponges: Cut kitchen sponges into small egg shapes, bunny shapes, or just use them as-is. Dip them into paint and press onto the paper eggs.
- Why It's Great: It’s super tactile, creates cool patterns, and is great for developing hand strength and coordination as kids press and lift.
Recycled Cardboard Eggs (Eco-Friendly Fun)
Using recycled materials not only teaches resourcefulness but also provides a sturdy, textural canvas that can be more forgiving than paper.
-
How-To:
- Collect clean cardboard from cereal boxes, shipping boxes, or paperboard.
- Cut out various egg shapes. Encourage children to draw and cut their own if age-appropriate.
- Paint directly onto the cardboard using tempera or acrylic paints. The cardboard's natural texture can add depth to the painting.
- Variations: Once painted and dry, embellish with glitter, yarn, fabric scraps, or even collage elements to add another layer of artistic exploration. This also teaches children about different art mediums.
- Our Philosophy: This aligns perfectly with our values at I'm the Chef Too! – transforming everyday materials into something extraordinary. Just as we turn simple ingredients into culinary masterpieces, you can turn a humble cardboard box into a work of art, sparking creativity and fostering an appreciation for sustainability.
Alternative "Eggs": Rocks, Wood Slices
Expand your egg canvas beyond paper! Painting on natural objects adds a delightful, tactile dimension to the craft.
-
How-To:
- Find smooth, relatively flat rocks or untreated wood slices. Wash and dry them thoroughly.
- Use acrylic paints for best adherence and durability.
- Paint egg-like patterns, spring designs, or abstract art.
- Once dry, seal with a clear varnish or Mod Podge if they will be displayed outdoors.
- Why It's Great: These make wonderful decorative items for the garden, unique paperweights, or thoughtful gifts. It connects children with nature and encourages them to see beauty and potential in everyday objects.
Beyond Eggs: Adorable Easter Animal Crafts to Paint
While Easter eggs are iconic, the holiday also brings forth a charming menagerie of spring animals that are just begging to be painted! These crafts allow children to explore different forms, textures, and characters, moving beyond the simple oval shape and delving into more narrative-driven art.
Fluffy Chicks (Popsicle Sticks, Cotton Balls, Bubble Wrap)
Chicks symbolize new life and are universally adorable, making them a perfect subject for Easter crafts.
-
Popsicle Stick Chicks:
- Arrange 3-4 popsicle sticks side-by-side and glue a horizontal stick across them at the top and bottom to secure.
- Paint the assembled sticks bright yellow.
- Once dry, add googly eyes, an orange paper triangle beak, and maybe some little orange paper feet.
- Variation: Create a chick 'in a nest' by painting a paper plate brown and gluing the chick onto it, adding some shredded paper for nest texture.
-
Cotton Ball Chicks:
- Draw or print a simple chick outline on paper.
- Paint the chick's body yellow (or any color!).
- While the paint is wet (or after it dries, apply glue), press cotton balls onto the body to create a fluffy, 3D effect.
- Add painted details for eyes, beak, and feet. This combines painting with a textural collage element.
-
Bubble Wrap Chicks:
- Paint a piece of bubble wrap yellow (or use a yellow bubble wrap stamp).
- Press the painted bubble wrap onto a chick outline on paper.
- The bubble texture creates a wonderful "fluffy" look for the chick's feathers.
- Complete with painted or glued details.
- Educational Connection: Discuss the life cycle of a chicken, the characteristics of baby birds, and the importance of spring as a time of new beginnings.
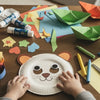
Cute Bunnies (Handprint Art, Paper Plate Masks, Jar Crafts)
Bunnies are another beloved Easter icon, offering soft shapes and sweet expressions that are fun to recreate.
-
Handprint Bunny Art:
- Paint the palm of your child's hand white or pink.
- Press it onto paper, fingers pointing upwards. The thumb and fingers form the ears, and the palm forms the head/body.
- Once dry, paint on facial features, adding whiskers, eyes, and a nose. A cotton ball can be added for a fluffy tail.
- Why It's Great: This is a fantastic keepsake, capturing the size of your child's hand at a particular age, and also very engaging for younger children who love sensory activities.
-
Paper Plate Bunny Masks:
- Take a paper plate and cut out eyeholes.
- Paint the plate white, pink, or any desired bunny color.
- Cut out two long bunny ear shapes from cardstock, paint the inner ear pink, and glue them to the top of the plate.
- Add a painted nose, whiskers, and a sweet smile. You can attach elastic string to wear it as a mask.
- Role Play: These masks encourage imaginative play and storytelling.
-
Easter Candy Jars (I'm the Chef Too! Twist):
- Collect small, clean glass jars (like baby food jars or spice jars).
- Paint the jars with white, pink, or pastel colors using acrylic paint. You might need a few coats.
- Once dry, decorate them to look like bunnies by adding googly eyes, small pom-pom noses, and pipe cleaner whiskers. Cut out and glue on paper bunny ears.
- These jars can then be filled with Easter treats or used to hold small craft supplies.
- Connection to our mission: This activity involves careful painting, assembly, and transforming an everyday item into something special, much like our kits transform ingredients into delightful creations. Even beloved characters can make learning fun, like when kids make Peppa Pig Muddy Puddle Cookie Pies – blending favorite stories with delicious, hands-on activity, showing how versatile and engaging themed projects can be.
Sweet Lambs (Q-tip Texture, Cotton Ball Masks)
Lambs represent innocence and spring, and their woolly texture offers a unique opportunity for sensory art.
-
Q-tip Lamb:
- Draw a simple lamb outline on a piece of paper.
- Dip Q-tips into white paint and dot them all over the lamb's body to create a textured, woolly effect.
- Paint the head and legs black or brown.
- Add googly eyes and a small pink painted nose.
- Why It's Great: This is excellent for fine motor skill development and introduces the concept of pointillism (creating an image from many small dots) in a child-friendly way.
-
Doily Sheep Craft:
- Use a white paper doily as the lamb's woolly body.
- Glue the doily onto a piece of blue or green paper (for the sky/grass).
- Paint a head and four legs onto the paper, extending from the doily.
- Add facial features with paint or markers.
- Variation: Use bubble wrap painted white or off-white to stamp the lamb's wool, creating a wonderfully bumpy texture.
- Learning Moment: Discuss the characteristics of sheep, the products we get from them (wool, milk), and their role in farm life. This ties into biology and even economics in a very basic way.
Other Spring Creatures (Butterflies, Flowers)
Easter isn't just about eggs and bunnies; it's about the full bloom of spring!
- Painted Butterflies: Cut out butterfly shapes from paper or cardboard. Encourage symmetrical painting by folding the paper in half after painting one side, or simply let creativity flow with vibrant colors and patterns.
- Fingerprint Flower Gardens: Use fingerprints dipped in various colors to create flower petals on a piece of paper, then add painted stems and leaves.
- Plastic Spoon Flowers: Paint plastic spoons in bright colors for petals. Once dry, glue them around a painted yellow center (e.g., a bottle cap or paper circle) to create 3D flowers.
- Seasonal Themes: These crafts connect children to the natural world, helping them observe and appreciate the changes that spring brings.
Remember, the goal with all these crafts is the process, not just the perfect product. Each stroke, each color choice, and each textured addition is a step in your child's creative and developmental journey. To continue fostering this love for learning and discovery, explore our full library of adventure kits available for a single purchase in our Main Shop Collection. You'll find a wide variety of engaging activities designed to spark curiosity!
Unique Techniques & Creative Twists for Easter Painting
Moving beyond the basics, there are countless ways to make your Easter painting crafts truly unique. These techniques introduce different sensory experiences, problem-solving opportunities, and artistic outcomes, ensuring that no two projects are ever quite the same. It's all about exploring how various materials and methods can transform a simple idea into a vibrant creation, much like we explore different scientific principles in our I'm the Chef Too! kits.
Pointillism with Q-tips
Inspired by the artistic movement of Pointillism, this technique involves creating images using tiny dots of color. It's fantastic for developing fine motor control and patience.
- How-To: Instead of brushes, provide Q-tips (cotton swabs). Squirt small amounts of various paint colors onto a palette. Children dip the Q-tip into paint and create their designs using only dots. They can make speckled Easter eggs, create fluffy textures for chicks, or build up an image dot by dot.
- Benefits: This method requires precision and focus, enhancing fine motor skills. It also teaches about color mixing through optical blending – how dots of different colors placed close together can appear as a new color from a distance.
Spin Art Easter Eggs
This dynamic technique is always a hit for its unpredictable and beautiful results, and it's surprisingly easy to set up with everyday items.
-
How-To:
- Cut paper into egg shapes that fit inside a salad spinner or an old shoebox with a piece of paper taped to the bottom.
- Place the paper egg shape inside the spinner/box.
- Drip small amounts of different colored liquid paints onto the paper egg.
- Close the lid of the salad spinner (or the shoebox).
- Spin! If using a salad spinner, give it a good spin. If using a shoebox, tilt and rotate it rapidly.
- Open to reveal a mesmerizing, marbled, or streaked design on your Easter egg.
- Why It's Great: The element of surprise is thrilling for kids. It's a fun way to explore physics (centrifugal force!) and color interaction without direct brush control. Plus, it's often less messy than it sounds!
Scrape Painting/Marbled Effects
Creating streaks, stripes, and marbled patterns can add sophisticated visual interest to your Easter crafts.
-
Scrape Painting:
- Apply drops or lines of several different paint colors onto a piece of paper cut into an egg shape.
- Take an old credit card, a piece of cardboard, or a plastic ruler.
- Place the scraping tool at one end of the paper and drag it firmly across the surface, pulling the paints together to create blended stripes and unique color combinations.
-
Marbled Paper Easter Eggs (Shaving Cream Method):
- Fill a shallow tray or baking dish with shaving cream.
- Drip various colors of liquid paint (or food coloring) onto the shaving cream.
- Use a stick or skewer to gently swirl the colors, creating marble patterns. Don't overmix!
- Lay a piece of cardstock (cut into an egg shape) face down onto the colored shaving cream, pressing gently.
- Lift the paper and use a straight edge (like cardboard) to scrape off the excess shaving cream. A beautiful marbled pattern will remain on the paper.
- Educational Aspect: This demonstrates how liquids interact and mix, or, in the case of shaving cream marbling, how they can be manipulated to create non-uniform patterns. It’s a wonderful example of process art where the journey of creation is as important as the final product.
Potato Stamping
Potato stamping is a classic for a reason – it's simple, fun, and creates charming, rustic prints.
-
How-To:
- Cut a potato in half.
- Carefully carve a simple design into the flat surface of one half – an egg shape, a bunny outline, a cross, or a simple flower.
- Pat the potato dry with a paper towel.
- Pour paint onto a shallow plate.
- Dip the carved potato half into the paint, ensuring the design is covered.
- Stamp onto paper, fabric, or even plain gift bags to create repeating patterns or individual images.
- Versatility: Use different sized potatoes for varied stamps. Children can create their own repeating patterns for Easter cards, wrapping paper, or even a garland.
Foil Art Eggs
The reflective surface of aluminum foil adds a unique sheen and texture to painted Easter designs.
-
How-To:
- Cut aluminum foil into large egg shapes or simply use pieces of foil.
- Provide tempera or acrylic paints and brushes. Children can paint directly onto the foil. The paint will glide differently than on paper, offering a new sensory experience.
- Before the paint dries, children can use a blunt pencil, the back of a paintbrush, or even their fingers to etch patterns into the wet paint, revealing the shiny foil underneath.
- Why It's Engaging: The interaction of paint with the reflective surface is captivating. It encourages experimentation with different tools and techniques to achieve varied effects.
Mixed Media Approaches (Adding Glitter, Yarn, Fabric)
Don't be afraid to combine painting with other art elements to create multi-dimensional Easter crafts.
- Textural Additions: While paint is still wet, sprinkle glitter, small beads, or rice for texture. Once dry, glue on yarn scraps, fabric pieces, cotton balls, or pom-poms to add tactile elements.
- Collage: Paint a background and then glue on pre-painted paper cut-outs, magazine clippings, or natural elements like leaves and twigs to create a scene.
- Layering: Paint a base layer, let it dry, then paint another design on top. This teaches about depth and composition.
- Benefits: Mixed media encourages children to think about different materials and how they interact, expanding their creative problem-solving skills and sensory exploration. It’s about building a unique piece, much like our kits guide kids through building a delicious and educational experience. We’re always looking for new ways to blend subjects and materials, making learning a vibrant, multi-sensory adventure.
Exploring these unique techniques not only diversifies your crafting sessions but also deepens your child's artistic understanding and confidence. It showcases that there are many paths to creative expression, and each one is valuable. If your child thrives on these hands-on, exploratory activities, remember that we're here to deliver exciting learning directly to your door. Browse our complete collection of one-time kits in our Main Shop Collection to find the perfect theme for your little learner!
Setting Up for Success: Tips for a Smooth Crafting Session
A fun crafting session doesn't just happen; it's carefully cultivated! From managing expectations to embracing the inevitable mess, a thoughtful approach can turn potential frustration into pure joy. At I'm the Chef Too!, we understand the importance of a well-prepared environment for optimal learning and engagement, whether it's baking or painting.
Age-Appropriate Expectations (Toddlers vs. Older Kids)
One of the biggest keys to a successful crafting session is tailoring the activity and your expectations to your child's developmental stage.
- Toddlers (1-3 years): Focus on sensory exploration. Big movements, vibrant colors, and non-toxic, washable paints (like finger paints or chunky tempera) are ideal. The "product" will likely be abstract blobs of color, and that's perfectly okay! Provide large surfaces like butcher paper or cardboard, and simple tools like sponges or even just their fingers. The goal is exploration, not a masterpiece. Keep sessions short, around 10-15 minutes.
- Preschoolers (3-5 years): They can start to understand simple instructions and themes. Introduce basic shapes (like pre-cut eggs) and tools like larger brushes or Q-tips. They might begin to make recognizable patterns or attempt specific colors. Encourage storytelling about their artwork.
- School-Aged Kids (5+ years): These children can follow multi-step directions, plan their designs, and work with a wider range of materials and techniques (like watercolor resist or salt painting). They can also take on more responsibility in the setup and cleanup. Encourage them to experiment and problem-solve.
- Remember: Every child is unique. Observe your child's interest and attention span, and adjust as needed. The idea is to foster a love for learning and creating, not to enforce strict rules that stifle enjoyment.
Preparation is Key (Layout, Materials Ready)
A little prep work before the kids even sit down can prevent meltdowns and ensure a smoother flow.
- Gather All Supplies: Before you call the artists, make sure all paints are open, brushes are ready, water cups are filled, and surfaces are protected. There's nothing worse than scrambling for a roll of paper towels with paint-covered hands!
- Protect Your Space: Lay down your tablecloth, newspaper, or old shower curtain. This signals "art time" and gives children permission to be a bit messier without worry.
- Wear Old Clothes/Smocks: Don't let stained clothes overshadow the fun. Put on those smocks or old t-shirts right from the start.
- Designated Drying Area: Have a clear space ready for finished artworks to dry, away from curious hands or accidental bumps.
- Think Like a Chef: Just as we pre-measure ingredients in our I'm the Chef Too! kits for a seamless cooking experience, pre-cutting paper, pouring paints into small containers, and having cleaning supplies at the ready will make your crafting session much more enjoyable for everyone.
Embrace the Mess (and How to Manage It)
Mess is an inherent, often joyous, part of creative exploration. Resisting it will only lead to frustration.
- Shift Your Mindset: Instead of seeing it as "mess," view it as evidence of engagement and learning. Children learn through sensory experiences, and getting their hands dirty is a big part of that.
- Containment Strategies: As mentioned, protective coverings and activity trays are your best friends. Consider doing particularly messy activities outside if weather permits.
- Washable is Your Ally: Stick to washable paints, especially for younger children. This significantly reduces stress about stains.
- Involve Kids in Cleanup: Teach children that cleanup is part of the process. Even toddlers can help wipe the table or put brushes in the sink. This fosters responsibility and ownership.
Process Over Product (Focus on the Learning Journey)
This is a cornerstone of our educational philosophy at I'm the Chef Too! It's not about creating a gallery-worthy piece of art, especially with young children.
- Praise Effort, Not Perfection: Instead of saying, "That's a beautiful egg!" try, "Wow, look at all the different colors you used!" or "Tell me about your squiggly lines!" This encourages them to value their own choices and efforts.
- The Joy is in the Doing: The true value lies in the exploration, the decision-making, the fine motor practice, and the imaginative play. If the final product is a muddy brown egg, that means your child experimented with color mixing – a fantastic learning outcome!
- Avoid Over-Interfering: Let your child lead. It can be tempting to "fix" their art or show them "how to do it right." But their "right" is their own unique expression. This builds confidence and independence.
Encouraging Independence & Self-Expression
Crafting is a powerful tool for developing self-reliance and fostering a strong sense of self.
- Offer Choices: "Do you want to use the big brush or the small one?" "Which colors do you want to start with?" Giving children choices empowers them.
- Provide Open-Ended Materials: Instead of giving step-by-step instructions for a specific outcome, provide materials and a prompt ("Let's make some colorful Easter eggs!") and let them explore.
- Respect Their Vision: Even if their creation looks nothing like what you imagined, acknowledge their effort and unique perspective. "That's an interesting way to make a bunny! What inspired you?"
- Screen-Free Exploration: These hands-on activities are a fantastic way to unplug and engage. At I'm the Chef Too!, our mission is to provide screen-free educational alternatives that spark curiosity and creativity, fostering family bonding. Painting Easter crafts is a perfect embodiment of this, offering a tactile, imaginative escape from digital distractions.
By following these tips, you're not just setting up a craft; you're creating an environment where learning flourishes, creativity is celebrated, and family bonds are strengthened. Ready for more inspiration delivered to your door? Our monthly Chef's Club subscription brings new "edutainment" experiences directly to you, making ongoing engagement effortless and exciting!
Turning Easter Crafts into Learning Moments (STEM & Arts Integration)
At I'm the Chef Too!, our core mission is to seamlessly blend food, STEM, and the arts into one-of-a-kind "edutainment" experiences. We believe that learning is most profound when it's tangible, hands-on, and genuinely fun. Painting Easter crafts provides a perfect opportunity to apply this philosophy, transforming simple art projects into rich, multi-disciplinary learning adventures. Let's explore how these colorful endeavors can be brimming with STEM and arts integration.
Color Theory & Mixing (Primary/Secondary)
Every time a child mixes paints, they're performing a mini-chemistry experiment and a fundamental lesson in color theory.
- Activity: Provide primary colors (red, yellow, blue) and challenge kids to create secondary colors (orange, green, purple). Ask questions like, "What do you think will happen if we mix blue and yellow?"
- Concepts: Introduces the concepts of primary and secondary colors, hue, saturation, and value (how light or dark a color is). Discuss warm and cool colors.
- I'm the Chef Too! Connection: Understanding how elements combine to create new outcomes is central to both art and science. Just as we learn about proportions and reactions in baking, children learn about the science of color through painting.
Geometry in Designs (Patterns, Shapes)
Art is full of mathematical principles, and Easter egg designs are a perfect canvas for exploring geometry.
- Activity: Encourage children to create patterns on their egg shapes using lines (straight, wavy, zigzag), circles, squares, or triangles. Discuss symmetry when designing both halves of an egg.
- Concepts: Introduces basic geometric shapes, lines, symmetry, repetition, and spatial awareness.
- I'm the Chef Too! Connection: Exploring shapes in art, like creating intricate designs on Easter eggs, is much like understanding the vastness of space as you explore astronomy by creating your own edible solar system with our Galaxy Donut Kit. Both activities involve recognizing patterns, understanding forms, and arranging elements in space.
Observational Skills (Painting from Nature)
Connecting art to the natural world around us enhances observational skills, a key component of scientific inquiry.
- Activity: Bring in real flowers, leaves, or even small branches. Encourage children to observe their shapes, colors, and textures, and try to replicate them in their paintings of spring scenes or on their Easter eggs.
- Concepts: Develops keen observation, attention to detail, and appreciation for the natural world (biology).
- I'm the Chef Too! Connection: This aligns with our commitment to fostering curiosity. Encouraging children to look closely at nature before painting is akin to encouraging them to observe the transformation of ingredients in a recipe – both build critical thinking and a deeper understanding of the world.
Language Development (Describing Colors, Textures)
Art provides a rich vocabulary-building opportunity.
- Activity: Engage children in conversations about their art. Ask open-ended questions: "Tell me about this color," "How does that texture feel?" "What story does your painting tell?"
- Concepts: Expands vocabulary (colors, textures, emotions, descriptive adjectives), encourages narrative skills, and strengthens communication.
- I'm the Chef Too! Connection: Whether describing a fluffy chick or the taste of a freshly baked treat, using descriptive language enriches the entire learning experience.
Storytelling through Art
Art is a powerful medium for narrative and imaginative play.
- Activity: After painting their Easter crafts, ask children to create a story about their creation. Is the bunny going on an adventure? What kind of magic does the egg hold?
- Concepts: Develops creativity, imagination, narrative structure, and confidence in expressing ideas.
- I'm the Chef Too! Connection: Every kit we create is an adventure, often inspired by a theme or a story. Encouraging storytelling with art extends this narrative play, helping children to see themselves as creators of their own worlds, full of possibilities.
By consciously integrating these STEM and arts elements, you elevate a simple craft session into a truly holistic learning experience. You're not just making decorations; you're nurturing critical thinkers, creative problem-solvers, and confident communicators. This holistic, hands-on learning is at the heart of what we do at I'm the Chef Too!, delivering educational fun that sparks curiosity.
Displaying Your Easter Masterpieces
Once your children have poured their creativity onto paper, cardboard, or rocks, the next exciting step is to showcase their beautiful Easter masterpieces! Displaying their artwork validates their efforts, boosts their confidence, and adds a personal, heartwarming touch to your holiday decorations. It's a wonderful way to celebrate their artistic journey and create lasting memories.
Buntings/Garlands
Transform a collection of painted Easter eggs or bunny cut-outs into a festive garland.
- How-To: Punch two small holes at the top of each dried paper or cardboard craft. Thread them onto a piece of string, yarn, or ribbon.
- Where to Hang: Drape across a mantel, hang in a doorway, or decorate a wall in their playroom.
- Why It's Great: This creates a unified display from individual pieces, showing how many small efforts can combine into something grand.
Window Decor (Sun Catchers)
If your crafts are made from translucent materials or have vibrant colors, windows are perfect for catching the light.
- How-To: For watercolor resist eggs or even simple painted paper eggs, attach them to a window with a small loop of tape. For true sun catchers, you can create designs on contact paper using tissue paper bits, then paint over them with diluted liquid watercolors for a stained-glass effect.
- Why It's Great: The sunlight illuminating their artwork creates a magical effect, literally bringing light to their creations.
Gift Tags
Personalized, handmade gift tags add an incredibly thoughtful touch to Easter baskets or presents.
- How-To: Cut painted paper into smaller egg or bunny shapes. On the back, write "To" and "From."
- Why It's Great: It teaches children about giving and sharing their art with others, making gifts even more special.
Cards
A painted Easter card is a cherished keepsake for grandparents, friends, or other family members.
- How-To: Fold a piece of cardstock in half. Children can paint an Easter scene, a single egg, or a bunny on the front. Add a handwritten message inside.
- Why It's Great: Encourages children to think about others and practice their writing skills.
Framing
For a particularly special piece, framing elevates it to gallery status.
- How-To: Simple, inexpensive frames can be found at craft stores. Let your child pick their favorite piece to be framed.
- Why It's Great: It shows your child that you value their artistic expression and see their work as truly beautiful art.
Memory Keepsakes
Some crafts are too precious to put away.
- How-To: Create a dedicated "art wall" or "art gallery" in a hallway or playroom where you can regularly rotate your child's masterpieces. Laminate paper crafts for durability or store them in a special portfolio. For handprint crafts, date them on the back.
- Why It's Great: This preserves memories and allows children to see their artistic progression over time, building a lasting appreciation for their own creativity.
Displaying children's artwork is a simple yet profound way to nurture their confidence and self-esteem. It tells them their efforts are seen, valued, and celebrated. Just as we celebrate every learning milestone and every delicious creation at I'm the Chef Too!, we encourage you to celebrate your child's unique artistic contributions this Easter. To continue fostering this sense of achievement and ongoing discovery, we invite you to explore our monthly Chef's Club subscription. It's the perfect way to bring new "edutainment" adventures, complete with all the necessary ingredients and supplies, right to your doorstep, making every month an opportunity for creative growth and family fun.
Making Every Month an Adventure: The I'm the Chef Too! Way
You've seen how much joy, learning, and bonding can come from a simple afternoon of painting Easter crafts. Imagine bringing that same excitement and educational enrichment into your home every single month, with a fresh, imaginative theme designed to spark curiosity and creativity. That's precisely what we offer at I'm the Chef Too! through our unique subscription service.
We understand that life as a parent or educator is busy. Finding truly engaging, screen-free activities that are both fun and educational can be a challenge. That's where we come in. At I'm the Chef Too!, our mission is to deliver these one-of-a-kind "edutainment" experiences directly to you, blending food, STEM, and the arts in a way that's as delicious as it is enriching. We believe that the best learning happens when it's hands-on, tangible, and inspires genuine wonder.
Our Chef's Club subscription is designed with your convenience and your child's development in mind:
- A New Adventure Monthly: Say goodbye to endless searching for ideas and gathering obscure ingredients. A new, exciting STEM cooking adventure is delivered right to your door every month. Each box features a unique theme, from exploring distant galaxies to digging for dinosaur fossils, ensuring constant novelty and engagement.
- Free Shipping in the US: We make it easy and affordable to keep the learning and fun flowing, with complimentary shipping on every box within the United States.
- Flexibility for Every Family: Whether you're looking for a delightful one-off gift or long-term enrichment, our subscription plans offer options to suit your needs. Choose from our 3, 6, or 12-month pre-paid plans, perfect for consistent engagement or as a thoughtful present that keeps on giving.
- Complete, Ready-to-Go Experiences: Each I'm the Chef Too! box is a complete experience. We include pre-measured dry ingredients, specialty supplies, and a beautifully illustrated recipe card that doubles as an educational story. All you need to add are a few fresh staples like eggs or milk, and you're ready to embark on your culinary STEM journey!
- Developed by Mothers and Educators: Our kits are thoughtfully crafted by a team of mothers and educators who understand what truly engages children and fosters meaningful learning. We focus on teaching complex subjects through delicious cooking adventures, making abstract concepts concrete and exciting.
Just as painting Easter crafts develops fine motor skills, encourages creativity, and subtly introduces scientific principles, our kits elevate this blend of fun and learning. Imagine your child building a delicious edible solar system and learning about astronomy, or creating a bubbly volcano cake while exploring chemical reactions – all from the comfort of your kitchen.
We don't promise guaranteed genius, but we do promise a process that fosters a love for learning, builds confidence in the kitchen and beyond, develops key skills, and creates countless joyful family memories. These screen-free alternatives encourage active participation, problem-solving, and imaginative play, providing a powerful antidote to passive entertainment.
So, if you've enjoyed the hands-on fun of painting Easter crafts and are ready to discover a consistent source of educational entertainment that sparks genuine curiosity in your child, look no further.
Ready for a new adventure every month? Don't miss out on the magic of hands-on learning. Join The Chef's Club today and enjoy free shipping on every box, bringing the joy of discovery straight to your home! Give the gift of learning that lasts all year with a 12-month subscription to our STEM cooking adventures.
Conclusion
As we wrap up our colorful journey through the world of painting Easter crafts for kids, it's clear that these seemingly simple activities are much more than just a way to pass the time. From the joyful mess of finger painting to the intricate patterns of salt-painted eggs, each stroke of the brush, dab of a Q-tip, or swirl of paint contributes to a child's holistic development. We've explored how these crafts ignite creativity, sharpen fine motor skills, subtly introduce STEM concepts, provide an outlet for emotional expression, and most importantly, create precious opportunities for family bonding.
At I'm the Chef Too!, we champion the power of hands-on learning and the magic of "edutainment." Our mission is to blend food, STEM, and the arts into unforgettable experiences that spark curiosity and creativity in children, offering screen-free alternatives that truly engage young minds. The principles we've discussed today—embracing the process over the product, setting age-appropriate expectations, and finding the learning in every activity—are at the heart of everything we create.
This Easter, we encourage you to dive into the paints and paper, gather your recycled materials, and celebrate the season with a burst of color and imagination. Let your children explore, experiment, and express themselves without limits. Watch as they transform simple supplies into vibrant masterpieces, building confidence and a love for learning with every creative decision.
And if these joyful, educational crafting sessions resonate with your family, imagine experiencing that same blend of fun and discovery every single month! Our Chef's Club subscription delivers new, exciting STEM cooking adventures directly to your door, complete with pre-measured ingredients and specialty supplies. It’s the perfect, hassle-free way to continue fostering creativity, scientific exploration, and heartwarming family memories, bringing a consistent stream of screen-free "edutainment" right to your kitchen.
Don't let the learning and fun stop here. Make every month an adventure with I'm the Chef Too!
Ready to continue the journey of discovery and delicious education? Join The Chef's Club now and get free shipping on every box. Spark curiosity, inspire creativity, and build lasting memories with us!
FAQ
What are the best paints for painting Easter crafts with kids?
For young children and easy cleanup, washable tempera paints are ideal. They are vibrant, opaque, and come off most surfaces and clothing easily. Watercolors offer a more translucent effect, great for techniques like watercolor resist. For older children or projects that need to be more permanent (like painting on rocks), acrylic paints can be used, but they are harder to clean up, so smocks are essential. Non-toxic finger paints are perfect for toddlers who want a sensory experience.
How can I make Easter egg painting less messy?
Mess management is key! Lay down a waterproof tablecloth, old shower curtain, or plenty of newspaper to protect your workspace. Have children wear old clothes or smocks. Use activity trays or baking sheets to contain individual projects and spills. Keep a roll of paper towels and a bowl of water handy for quick cleanups. Stick to washable paints, especially for younger kids. Consider doing particularly messy crafts outdoors if the weather permits.
What are some eco-friendly Easter painting craft ideas?
Repurposing materials is a wonderful way to be eco-friendly. Cut egg or bunny shapes from recycled cardboard (cereal boxes, shipping boxes, paperboard) and paint them. Collect smooth rocks or small wood slices from nature to use as canvases. You can also use items like bottle caps, plastic spoons, or natural elements like leaves and twigs as painting tools or decorative additions, giving them a new life.
How can I make Easter crafts educational?
Easily! Connect art to STEM by discussing color theory (mixing primary colors to make secondary ones), geometry (identifying shapes and patterns in designs), and even basic physics (how paint spreads, absorption in salt painting). Encourage language development by asking open-ended questions about their art. Promote observational skills by having them paint elements from nature. At I'm the Chef Too!, we believe in blending these subjects seamlessly; think of it like exploring astronomy with our Galaxy Donut Kit – art and science are always connected!
My child gets frustrated easily when crafting. How can I help them?
Focus on the process, not the perfect product. Emphasize effort and unique expression rather than comparing their work to an ideal outcome. Offer plenty of choices (colors, tools, techniques) to give them a sense of control. Keep activities age-appropriate and sessions short if attention spans are limited. Avoid over-interfering or "fixing" their art. Praise their creative choices and ask them to tell you about their work. Remember, building confidence and a love for learning is the goal.
What supplies should I always have on hand for kids' painting?
A basic art kit should include: washable tempera paints (in primary colors), a variety of paintbrushes (chunky for little hands, smaller for details), heavy paper or cardstock, old newspapers or a plastic tablecloth for protection, smocks or old clothes, and cups for water. Recycled cardboard is also a fantastic free resource. Having these basics ready allows for spontaneous creative sessions. If you're looking for more specific themed fun, remember you can always browse our fantastic Main Shop Collection for a wide variety of one-time kits that bring comprehensive experiences right to your door.
How can I display my child's finished Easter crafts?
There are many fun ways to display their masterpieces! Create a festive garland or bunting by punching holes in paper egg cut-outs and stringing them together. Attach brightly colored paper crafts to windows to create sun catcher effects. Frame a particularly special piece, or use smaller crafts as unique, handmade gift tags for Easter baskets. You can also create a rotating "art gallery" on a wall or refrigerator to celebrate their ongoing creativity and preserve memories.